
Home>Home & Furniture>Doors & Windows>How to Build a DIY Wood Valance
Doors & Windows
How to Build a DIY Wood Valance
Published: August 28, 2024
Learn how to build a DIY wood valance with our step-by-step guide. Perfect for adding a touch of elegance to any room, this project is simple and budget-friendly.
(Many of the links in this article redirect to a specific reviewed product. Your purchase of these products through affiliate links helps to generate commission for Twigandthistle.com, at no extra cost. Learn more)
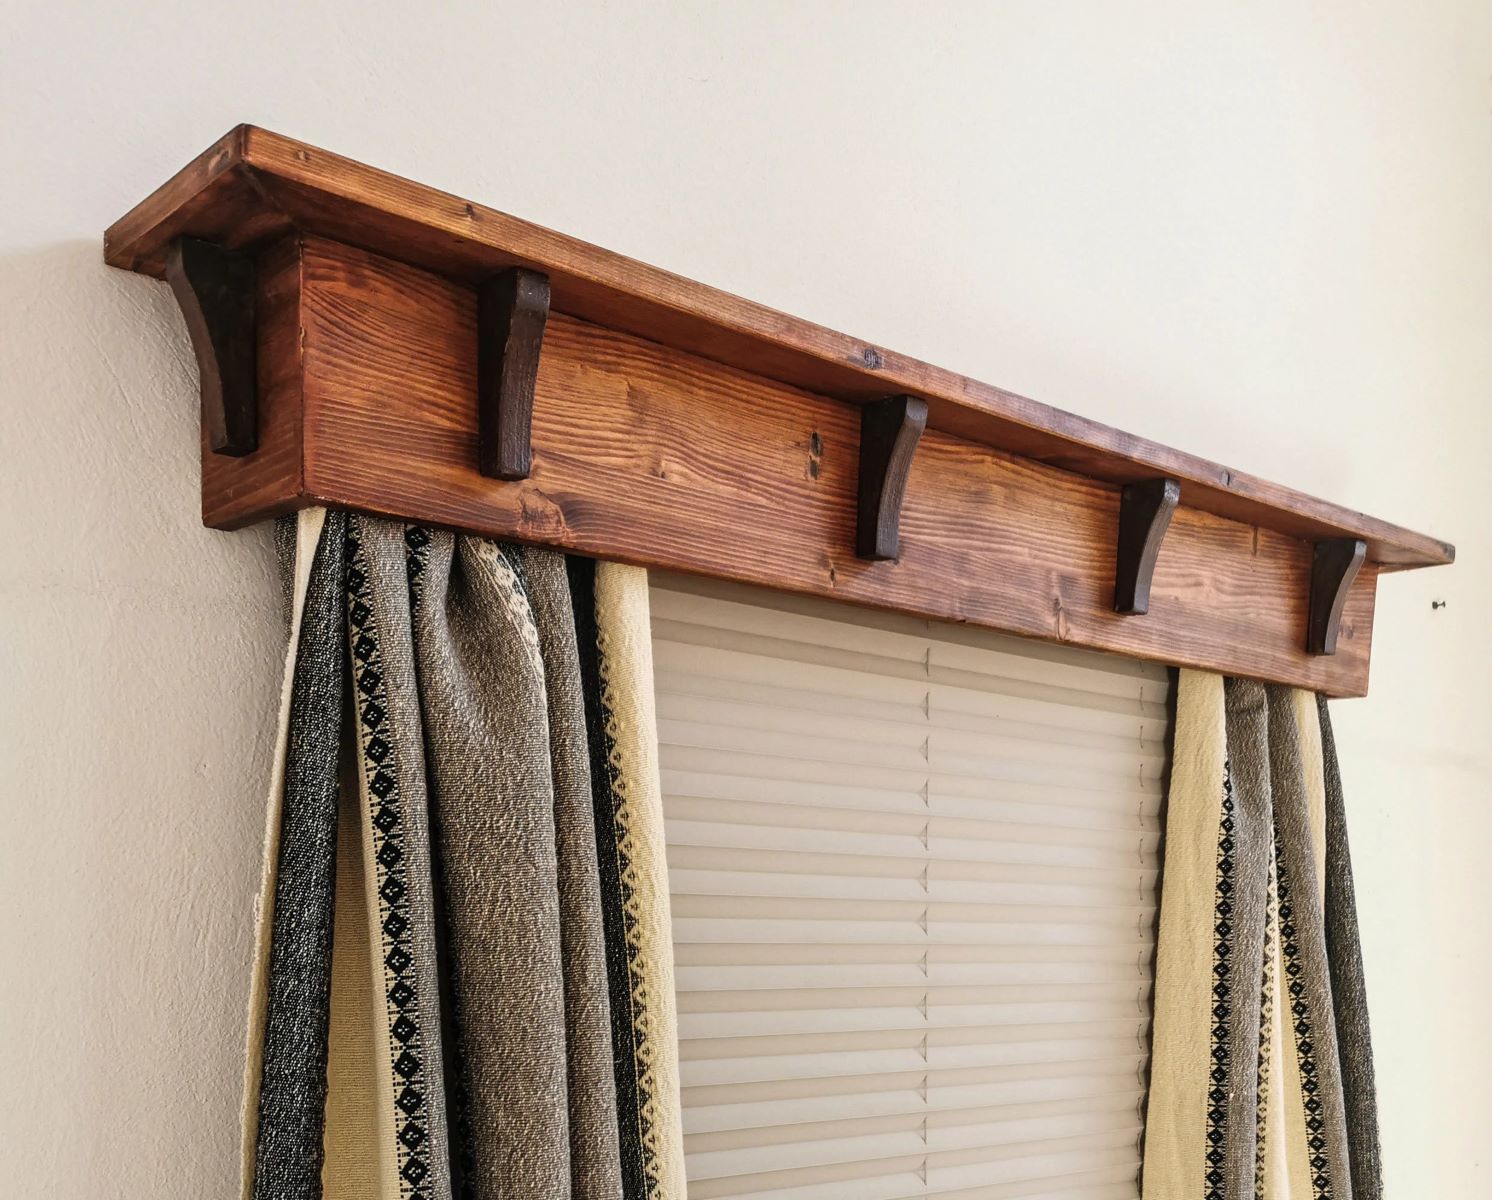
Have a window that needs a little dressing up? Building a wood valance is a simple and rewarding project. A valance can hide curtain rods while adding charm to any room. With just a few materials and some basic tools, anyone can create a custom valance that fits their style. This guide will walk through the steps needed to measure, cut, assemble, and finish a beautiful wood valance. Whether looking to add a rustic touch or a modern flair, this project will provide the perfect solution. Ready to get started? Let’s dive into the world of DIY wood valances!
Getting Ready for Your Project
Gather Materials: Collect wood, screws, wood glue, sandpaper, paint or stain, and brackets. Ensure you have all tools like a saw, drill, measuring tape, and safety gear.
Measure the Window: Measure the width of the window plus any extra length you want for the valance. Write down these measurements.
Cut the Wood: Use a saw to cut the wood to the desired length. Sand the edges to smooth out any rough spots.
Safety First: Wear safety goggles and gloves while cutting and sanding. Ensure your workspace is well-ventilated, especially when painting or staining.
Workspace Setup: Set up a clean, flat workspace. Lay down a drop cloth to protect surfaces from paint or stain.
Assemble the Valance: Use wood glue and screws to attach the pieces of wood together. Let the glue dry completely before moving on.
Paint or Stain: Apply paint or stain to the assembled valance. Allow it to dry according to the manufacturer's instructions.
Install Brackets: Attach brackets to the wall above the window using a drill. Make sure they are level and secure.
Mount the Valance: Place the valance on the brackets and secure it with screws. Double-check that everything is stable and level.
Gather Your Materials and Tools
- Wood Boards: Choose sturdy wood like pine or oak. These will form the main structure of the valance.
- Measuring Tape: Essential for accurate measurements to ensure the valance fits perfectly.
- Pencil: Used for marking measurements on the wood.
- Saw: A hand saw or circular saw will cut the wood to the desired lengths.
- Sandpaper: Smooths the edges and surfaces of the wood for a polished finish.
- Wood Glue: Bonds the wood pieces together securely.
- Clamps: Hold the wood pieces in place while the glue dries.
- Drill: Creates holes for screws and other fasteners.
- Screws: Secure the wood pieces together for added stability.
- Screwdriver: Tightens the screws into the wood.
- Wood Filler: Fills any gaps or holes in the wood for a smooth surface.
- Paint or Stain: Adds color and protects the wood. Choose based on your desired finish.
- Paintbrushes: Apply paint or stain evenly.
- Level: Ensures the valance is straight when mounted.
- Mounting Brackets: Attach the valance to the wall securely.
- Safety Gear: Includes safety glasses and gloves to protect yourself while working.
Skill Level and Time Commitment
Skill Level: Intermediate
Time Required: 4-6 hours
Steps:
- Measure and Cut Wood: 1 hour
- Assemble Frame: 1 hour
- Sand and Paint: 2 hours
- Install Valance: 1-2 hours
Follow These Steps
Gather Materials:
- Wood boards (1x6 or 1x8)
- Wood screws
- Wood glue
- Sandpaper
- Paint or stain
- Measuring tape
- Saw
- Drill
- Screwdriver
- L-brackets
Measure the Window:
- Measure the width of the window.
- Add 2-4 inches on each side for the valance width.
Cut the Wood:
- Cut one board to the width measurement for the front piece.
- Cut two shorter pieces for the sides (same depth as the valance).
Sand the Wood:
- Sand all edges and surfaces of the wood pieces until smooth.
Assemble the Valance:
- Apply wood glue to the edges of the side pieces.
- Attach the side pieces to the ends of the front piece.
- Secure with wood screws for extra strength.
Attach L-Brackets:
- Attach L-brackets to the inside corners for added support.
Paint or Stain:
- Apply paint or stain to the assembled valance.
- Let it dry completely.
Install the Valance:
- Hold the valance above the window.
- Mark the wall where the L-brackets will attach.
- Drill holes into the wall at the marked spots.
- Screw the L-brackets into the wall, securing the valance in place.
Final Touches:
- Check that the valance is level.
- Make any necessary adjustments.
Helpful Tips and Tricks
Measure twice, cut once. Always double-check measurements before cutting wood. This saves time and materials.
Use a level. Ensure the valance is straight. A crooked valance looks unprofessional.
Pre-drill holes. This prevents wood from splitting when you insert screws.
Sand edges. Smooth edges give a polished look and prevent splinters.
Paint or stain before assembly. It's easier to reach all areas and avoid drips.
Use wood glue. Adding glue to joints strengthens the structure.
Clamp pieces together. Clamps hold pieces in place while glue dries, ensuring a tight bond.
Common mistakes to avoid:
Skipping the primer. If painting, primer helps paint adhere better and last longer.
Not accounting for hardware. Measure and plan for brackets or hooks before cutting wood.
Rushing the drying process. Allow glue and paint to dry fully to avoid weak joints and smudges.
Alternatives for materials or methods:
Plywood instead of solid wood. Plywood is often cheaper and easier to work with.
L-brackets instead of wood joints. L-brackets can simplify assembly and add stability.
Fabric valance. If woodworking isn't your thing, fabric valances are easier to make and install.
Estimating the Cost
Wood: $20-$50 depending on type and size. Pine is cheaper, oak costs more.
Screws/Nails: $5-$10 for a small box.
Wood Glue: $5-$10 for a small bottle.
Sandpaper: $5 for a pack.
Paint/Stain: $10-$20 depending on brand and color.
Paintbrushes: $5-$10 for a set.
Saw: $20-$50 for a basic hand saw. A circular saw costs more.
Drill: $30-$60 for a basic model.
Measuring Tape: $5-$10.
Level: $10-$15.
Safety Gear: $10-$20 for goggles and gloves.
Total Cost: $125-$265.
Budget-Friendly Alternatives:
- Use reclaimed wood or pallet wood: Free or very cheap.
- Borrow tools from friends or family.
- Buy used tools from thrift stores or online marketplaces.
- Use leftover paint from other projects.
Different Ways to Customize
Materials: Instead of traditional wood, consider reclaimed wood for a rustic look. Plywood offers a budget-friendly option, while bamboo can give an eco-friendly touch. MDF (medium-density fiberboard) is another alternative, easy to paint and shape.
Colors: Paint the valance to match your room's decor. White or pastel shades create a soft, airy feel. Bold colors like navy blue or emerald green make a statement. Stain the wood for a natural look, using shades like walnut, cherry, or oak.
Styles: For a modern look, keep lines clean and simple. Add metal brackets or hardware for an industrial vibe. Carve or router decorative edges for a traditional style. Add fabric panels or upholstery for a softer, more elegant appearance.
Shapes: Experiment with different shapes. A straight valance is classic, while an arched or scalloped edge adds interest. Layered valances can create depth and dimension.
Decorative Elements: Attach molding or trim for added detail. Use stencils or decals to create patterns or designs. Incorporate lighting by adding LED strips behind the valance for a glowing effect.
Eco-Friendly Suggestions
Reclaimed wood makes a great choice for a DIY wood valance. Look for old pallets, barn wood, or leftover lumber from other projects. Using reclaimed wood reduces waste and gives your valance a rustic charm.
Eco-friendly stains and paints are another good option. Choose water-based or natural stains and paints that have low or no VOCs (volatile organic compounds). These are better for your health and the environment.
Natural finishes like beeswax or linseed oil can protect the wood without harmful chemicals. They provide a beautiful, natural look while being kind to the planet.
Recycled hardware can add character to your valance. Check thrift stores or salvage yards for brackets, screws, and other hardware. This not only saves money but also keeps usable items out of landfills.
Energy-efficient tools can make your project greener. Use hand tools when possible, or choose power tools with energy-saving features. This reduces your carbon footprint.
Sustainable wood sources are important if you need to buy new wood. Look for FSC-certified (Forest Stewardship Council) wood, which comes from responsibly managed forests.
Minimal waste should be a goal. Measure carefully to avoid mistakes that lead to wasted materials. Save any small scraps for future projects or donate them to someone who can use them.
Local materials reduce the carbon footprint of transportation. Buy wood and supplies from local sources to support your community and cut down on emissions.
Composting sawdust is a good way to handle waste. Sawdust can be composted or used as mulch in your garden, keeping it out of the trash.
Upcycling fabric for any added curtains or drapes can also be eco-friendly. Use old sheets, tablecloths, or fabric scraps to create a unique look without buying new materials.
Your DIY Wood Valance is Ready
You've done it! Your DIY wood valance is complete, and it looks fantastic. All that hard work, measuring, cutting, sanding, and painting has paid off. Now, your windows have a fresh, custom look that you can proudly say you made yourself.
Remember, the key to any successful DIY project is patience and attention to detail. Don't rush through steps, and always double-check measurements. If something doesn't look right, take a step back and figure out why. It's all part of the learning process.
Enjoy the satisfaction of knowing you created something unique for your home. Plus, you've probably saved a good chunk of change by doing it yourself. So, sit back, admire your handiwork, and start thinking about your next project. Who knows what you'll create next?
What materials do I need to build a wood valance?
You'll need wood boards, screws, wood glue, sandpaper, paint or stain, and a saw. A measuring tape and drill are also handy.
How long does it take to build a wood valance?
It usually takes about 3-4 hours for cutting, assembling, and finishing. Drying time for paint or stain can add a few more hours.
Can I customize the design?
Absolutely! You can adjust the size, shape, and color to match your room's decor. Add decorative trim or carvings for a unique touch.
Is it difficult to install?
Not really. If you can use a drill and level, you should be fine. Just make sure to measure and mark where you want it before drilling.
Do I need any special tools?
Basic tools like a saw, drill, and screwdriver will do. A miter saw can make angled cuts easier, but it's not essential.
How do I finish the wood?
Sand it smooth, then apply paint or stain. Use a clear coat for extra protection. Let it dry completely before installing.
Can I use reclaimed wood?
Yes, reclaimed wood adds character and is eco-friendly. Just make sure it's clean and free of pests before using it.