
Home>Home & Furniture>Doors & Windows>DIY Window Well Cover: Step-by-step Guide
Doors & Windows
DIY Window Well Cover: Step-by-step Guide
Published: August 27, 2024
Learn how to create a DIY window well cover with our step-by-step guide. Protect your basement windows from debris and weather while enhancing your home's safety and aesthetics.
(Many of the links in this article redirect to a specific reviewed product. Your purchase of these products through affiliate links helps to generate commission for Twigandthistle.com, at no extra cost. Learn more)
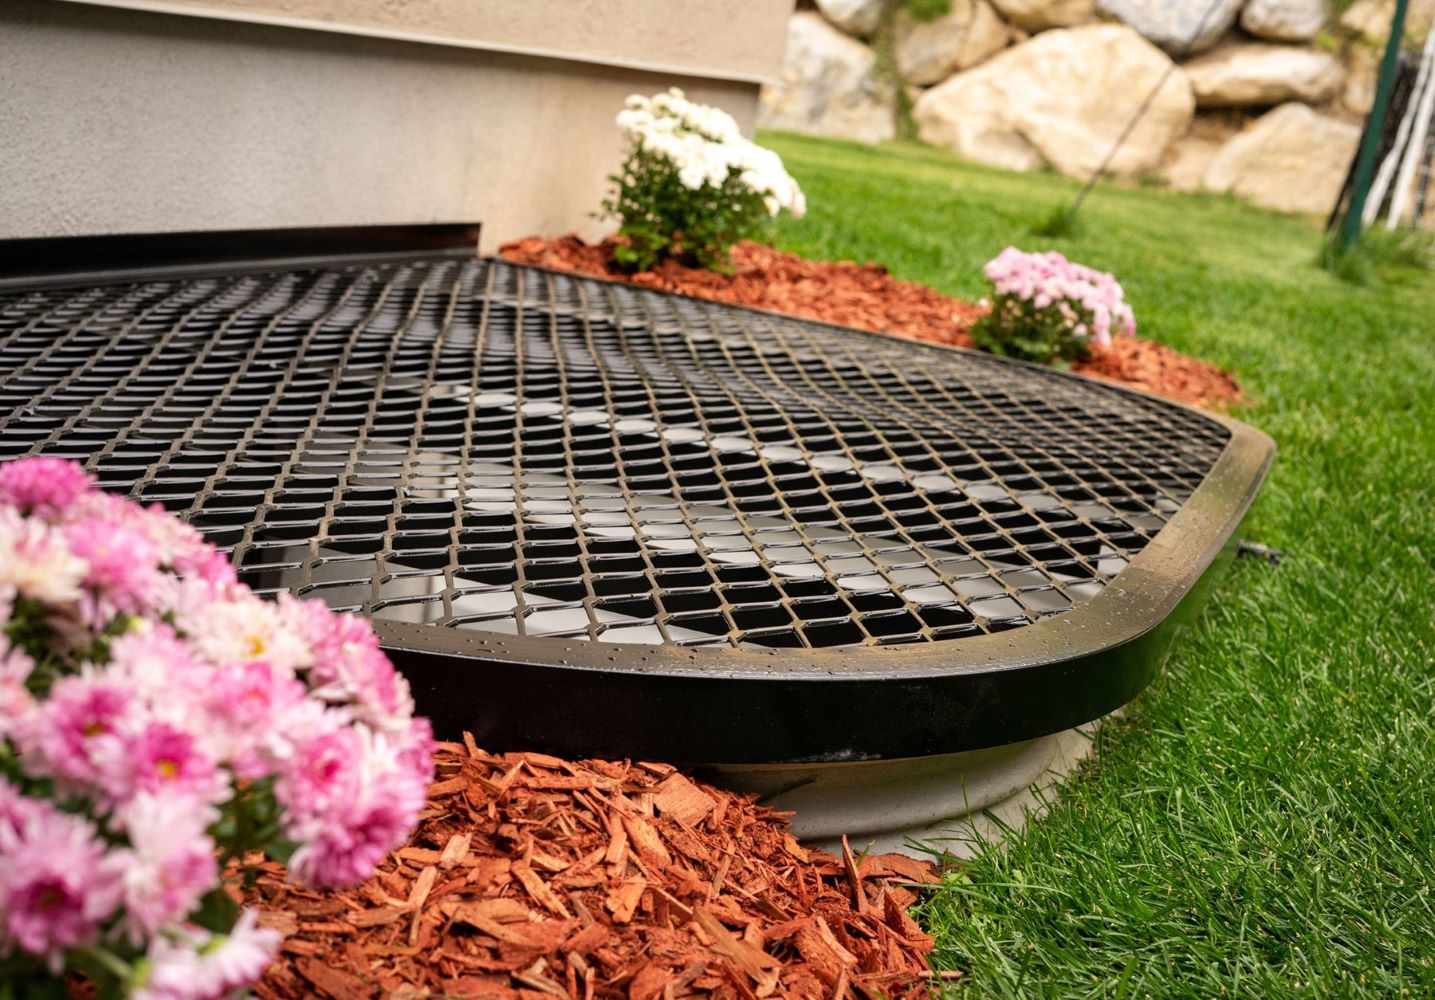
Do you want to keep your basement window wells clean and safe? Building your own window well covers can be a fun and useful project. These covers prevent debris, animals, and water from getting into your window wells. You don't need to be a professional to make them. With some basic tools and materials, you can create covers that fit perfectly over your window wells. This guide will walk you through the process step by step, ensuring you end up with sturdy, reliable covers. Ready to get started? Let's dive into this DIY project together!
Getting Ready for Your Project
Measure the Window Well: Use a tape measure to get the length, width, and depth of the window well. Write down these measurements.
Choose Materials: Decide if you want to use polycarbonate, metal, or wood for your cover. Each material has different benefits.
Gather Tools: Collect a saw, drill, screws, measuring tape, safety goggles, gloves, and a pencil.
Clear the Area: Remove any debris, leaves, or dirt from around the window well. This ensures a clean workspace.
Safety Gear: Wear safety goggles and gloves to protect your eyes and hands while cutting and drilling.
Create a Template: Use cardboard to create a template of the window well. This helps in cutting the material accurately.
Cut the Material: Place the template on the chosen material and trace it. Use the saw to cut along the traced lines.
Drill Holes: If using screws, drill holes in the material where it will attach to the window well. This makes installation easier.
Check Fit: Place the cut material over the window well to ensure it fits properly. Make adjustments if needed.
Install the Cover: Secure the cover to the window well using screws or other fasteners. Make sure it is tight and secure.
Test Stability: Gently press on the cover to ensure it is stable and can support weight if necessary.
What You Need: Materials and Tools
Materials:
- Plexiglass or Polycarbonate Sheet: Strong, clear plastic for the cover.
- Aluminum Angle Bar: Provides support and structure.
- Weatherstripping: Seals gaps to keep out water and debris.
- Screws and Bolts: Fastens materials together.
- Silicone Sealant: Waterproofs joints and edges.
Tools:
- Measuring Tape: Ensures accurate dimensions.
- Jigsaw or Circular Saw: Cuts the plastic sheet to size.
- Drill: Makes holes for screws and bolts.
- Screwdriver: Tightens screws and bolts.
- Clamps: Holds materials steady while working.
- Marker: Marks cutting lines and drill points.
- Safety Glasses: Protects eyes during cutting and drilling.
- Gloves: Shields hands from sharp edges and tools.
Skill Level and Time Commitment
Skill Level: Intermediate
Estimated Time Required: 3-4 hours
- Measure the Window Well: 15-20 minutes
- Cut the Materials: 30-45 minutes
- Assemble the Frame: 45-60 minutes
- Attach the Cover: 30-45 minutes
- Install the Cover: 30-45 minutes
Detailed Instructions for Your DIY Window Well Cover
Measure the Window Well
- Use a tape measure to find the length and width of the window well.
- Write down the measurements.
Choose the Material
- Decide if you want to use polycarbonate, acrylic, or metal.
- Purchase the material from a hardware store.
Cut the Material
- Place the material on a flat surface.
- Use a jigsaw or circular saw to cut it to the size of the window well.
Smooth the Edges
- Use sandpaper to smooth any rough edges.
- Ensure all sides are even and safe to handle.
Drill Holes for Ventilation
- Mark spots for ventilation holes.
- Use a drill to create small holes in the cover.
Attach the Handles
- Mark spots for handles on the cover.
- Drill holes and attach handles using screws.
Install the Cover
- Place the cover over the window well.
- Ensure it fits snugly and covers the entire opening.
Secure the Cover
- Use brackets or clips to secure the cover to the window well.
- Check that it is firmly in place and won't move.
Test the Cover
- Ensure the cover can be easily removed in case of emergency.
- Make any necessary adjustments for a perfect fit.
Helpful Tips and Tricks
Measure accurately before starting. Use a tape measure to get the length, width, and depth of the window well. Cut materials precisely to fit snugly.
Choose durable materials like polycarbonate or metal. These withstand weather better than plastic.
Use a jigsaw for cutting curves and corners. It provides more control than a handsaw.
Seal edges with weatherproof tape or silicone to prevent water leakage.
Install brackets securely. Use screws and anchors to ensure the cover stays in place during storms.
Check local codes. Some areas have regulations on window well covers.
Common mistakes to avoid:
- Skipping measurements: Leads to poor fit.
- Using flimsy materials: They break easily.
- Ignoring sealing: Causes leaks.
- Improper bracket installation: Cover may blow away.
Alternatives:
- Plexiglass instead of polycarbonate: Cheaper but less durable.
- Wooden frame: Adds a rustic look but requires more maintenance.
- Pre-made covers: Save time but may not fit perfectly.
Estimating the Cost
Materials:
- Plexiglass sheet (4x4 feet): $50
- Aluminum angle bar (8 feet): $20
- Weatherstripping (10 feet): $10
- Screws and bolts: $5
- Silicone sealant: $5
Tools:
- Jigsaw: $30 (or borrow)
- Drill: $40 (or borrow)
- Measuring tape: $5
- Marker: $1
- Safety goggles: $5
Total Cost: $171
Budget-friendly alternatives:
- Use polycarbonate sheet instead of plexiglass: $30
- Borrow tools from friends or a tool library: $0
- Use plastic angle bar instead of aluminum: $10
Adjusted Total Cost: $91
Different Ways to Customize
Materials: Instead of using standard polycarbonate sheets, try acrylic or tempered glass for a more durable and clear look. For a budget-friendly option, consider corrugated plastic or heavy-duty mesh.
Colors: Paint the frame in a color that matches your home's exterior. Use metallic spray paint for a modern look or rustic brown for a vintage feel. Transparent covers can be tinted with window film in shades like bronze or gray to reduce glare.
Styles: Opt for a flat cover for a sleek, minimalist appearance. For a more decorative touch, choose an arched or domed cover. Add decorative grilles or patterns to the cover for an artistic flair.
Frame Materials: Use aluminum for a lightweight, rust-resistant frame. For a more robust option, try steel or wrought iron. Wooden frames can add a natural, rustic charm but require more maintenance.
Fastening Methods: Secure the cover with hinges for easy access or clips for a more permanent solution. Magnetic strips can offer a quick-release option for emergency exits.
Additional Features: Install handles for easier lifting. Add weather stripping to seal gaps and keep out debris. Consider built-in drainage holes to prevent water accumulation.
Eco-Friendly Tips
Materials Needed:
- Recycled wood or reclaimed lumber
- Plexiglass or polycarbonate sheet
- Screws and hinges (reused if possible)
- Weatherstripping
- Sandpaper
- Wood stain or paint (eco-friendly)
Step-by-Step Guide:
Measure the window well dimensions. Ensure accuracy for a snug fit.
Cut the recycled wood to frame the cover. Use a saw to match the window well size.
Sand the wood pieces to remove splinters and rough edges.
Assemble the frame using screws. Secure corners tightly.
Cut the plexiglass or polycarbonate sheet to fit the frame. This will act as the transparent cover.
Attach the plexiglass to the wooden frame using screws. Drill holes in the plexiglass first to prevent cracking.
Install hinges on one side of the frame. This allows the cover to open for easy access.
Apply weatherstripping around the edges of the frame. This ensures a tight seal, keeping out debris and water.
Stain or paint the wooden frame with eco-friendly products. This protects the wood from weather damage.
Place the cover over the window well. Ensure it fits securely and can be easily opened.
Using recycled materials not only saves money but also helps reduce waste.
Your DIY Project is Complete!
You've done it! Your window well cover is now installed, providing safety and protection for your basement windows. This project not only saves you money but also gives you the satisfaction of creating something useful with your own hands. Remember to check the cover periodically for any wear or damage. If you notice any issues, a quick fix will keep it in top shape.
Feeling proud? You should be! Tackling DIY projects like this boosts your confidence and skills. Plus, it adds value to your home. Keep exploring other DIY ideas; there's always something new to learn and create. Whether it's a small repair or a big project, you've got the know-how to make it happen. Happy DIY-ing!
What materials do I need to make a window well cover?
You'll need polycarbonate sheets, aluminum angle bars, screws, a drill, a hacksaw, and measuring tape.
How do I measure my window well?
Measure the length and width of the window well from the inside edges. Add a couple of inches to each side for a better fit.
Can I use plexiglass instead of polycarbonate?
Yes, but polycarbonate is more durable and weather-resistant. Plexiglass can crack more easily.
How do I cut the polycarbonate sheet?
Use a hacksaw or a jigsaw with a fine-tooth blade. Make sure to wear safety goggles and gloves.
How do I attach the cover to the window well?
Drill holes in the aluminum angle bars and the polycarbonate sheet. Use screws to attach the bars to the sheet, then place the cover over the window well.
Do I need to seal the edges?
It's a good idea to use weather stripping or silicone sealant around the edges to keep out water and debris.
How long will a DIY window well cover last?
With proper materials and care, your cover should last several years. Polycarbonate is especially long-lasting.