
Home>Home & Furniture>Doors & Windows>DIY Window Bench with Storage: Step-by-Step Guide
Doors & Windows
DIY Window Bench with Storage: Step-by-Step Guide
Published: August 25, 2024
Transform your space with a DIY window bench with storage! Follow our step-by-step guide to create a stylish and functional seating area with hidden storage.
(Many of the links in this article redirect to a specific reviewed product. Your purchase of these products through affiliate links helps to generate commission for Twigandthistle.com, at no extra cost. Learn more)
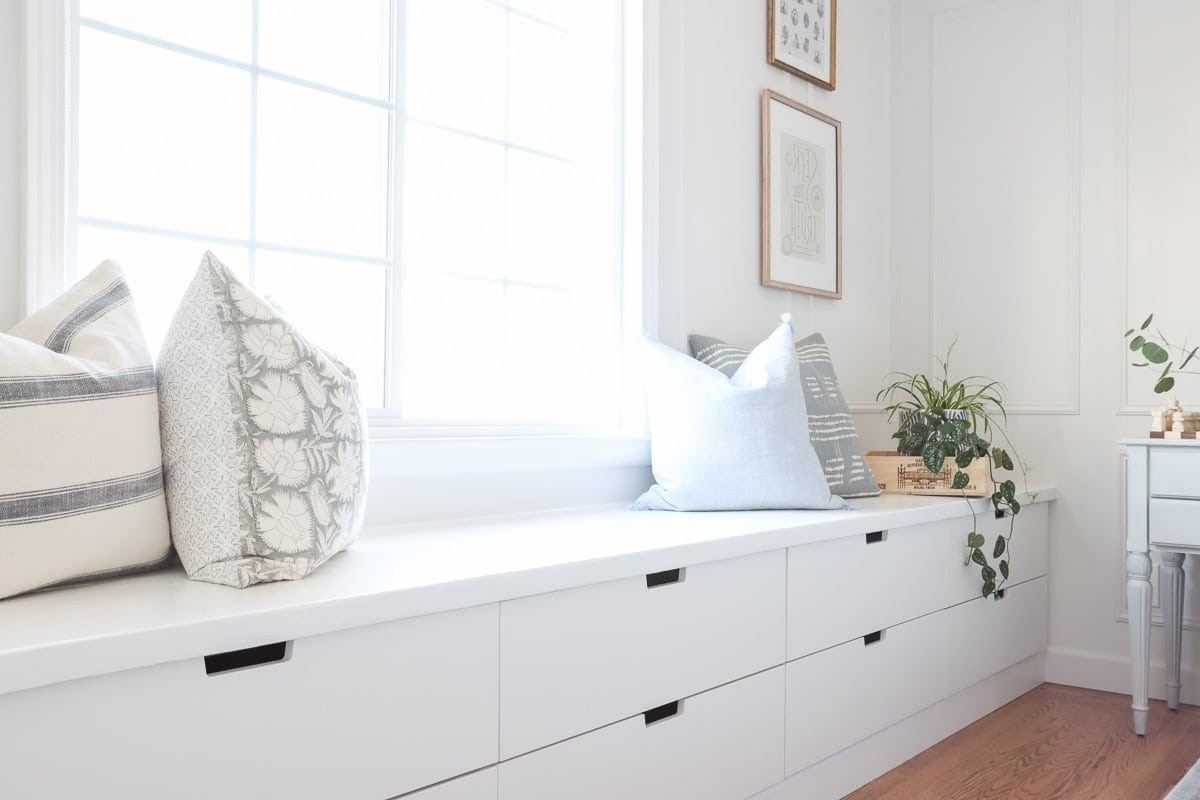
Building your own window bench with storage can be a fun and rewarding project. Not only does it provide extra seating, but it also offers a convenient place to store items. Whether you want a cozy reading nook or a practical solution for holding kids' toys, this guide will help you create a stylish and functional window bench. Even if you're new to DIY projects, this step-by-step guide will walk you through each part of the process. Gather your tools, clear some space, and get ready to add a beautiful piece to your home.
Getting Ready for Your Project
Measure the Space: Use a tape measure to get the exact dimensions of the area where the bench will go. Write down the width, height, and depth.
Gather Materials: Collect all necessary materials like wood, screws, hinges, paint, and cushions. Make sure everything is within reach.
Safety Gear: Wear safety goggles, gloves, and a dust mask to protect yourself from wood dust and splinters.
Clear the Area: Remove any furniture or items from the workspace. Ensure you have enough room to move around freely.
Prepare Tools: Have tools like a saw, drill, screwdriver, measuring tape, and level ready. Check that they are in good working condition.
Cut the Wood: Mark the wood pieces according to your measurements. Use a saw to cut them to size. Sand the edges to smooth them out.
Pre-Drill Holes: Pre-drill holes in the wood pieces where screws will go. This helps prevent the wood from splitting.
Assemble the Frame: Start by assembling the base frame. Use screws and a drill to secure the pieces together.
Install Hinges: Attach hinges to the top piece of the bench. This will allow the top to open and close for storage access.
Paint or Stain: Apply paint or stain to the wood pieces. Let them dry completely before moving on to the next step.
Add Cushions: Place cushions on top of the bench for comfort. Secure them if necessary to prevent slipping.
Final Check: Ensure all screws are tight and the bench is stable. Make any necessary adjustments.
Gather Your Materials and Tools
Materials Needed:
- Plywood: Forms the main structure of the bench. Choose a sturdy type.
- Wood Screws: Holds the plywood pieces together securely.
- Wood Glue: Adds extra strength to the joints.
- Hinges: Allows the top of the bench to open for storage.
- Paint or Stain: Finishes the bench, making it look polished.
- Foam Cushion: Adds comfort to the seating area.
- Fabric: Covers the foam cushion for a finished look.
- Sandpaper: Smooths out rough edges on the wood.
- Storage Bins: Keeps items organized inside the bench.
Tools Needed:
- Measuring Tape: Ensures accurate measurements for cutting.
- Circular Saw: Cuts the plywood to the required sizes.
- Drill: Makes holes for screws and hinges.
- Screwdriver: Tightens screws into place.
- Clamps: Holds pieces together while the glue dries.
- Paintbrush or Roller: Applies paint or stain evenly.
- Staple Gun: Attaches fabric to the foam cushion.
- Utility Knife: Cuts fabric and foam to size.
- Level: Ensures the bench is even and balanced.
Each material and tool plays a crucial role in building a sturdy, functional, and attractive window bench with storage.
Required Skills and Time Commitment
Skill Level: Intermediate
Time Required: Approximately 8-10 hours
Important Keywords:
- Skill Level: Intermediate
- Time Required: 8-10 hours
Detailed Instructions for Building
Measure the Space
- Use a tape measure to find the length, width, and height of the area where the bench will go.
- Write down these measurements.
Gather Materials
- Plywood (for the bench frame and storage compartments)
- 2x4 lumber (for support)
- Screws and nails
- Wood glue
- Hinges (for the storage lid)
- Paint or stain (optional)
- Cushions (for seating)
Cut the Wood
- Cut plywood pieces for the top, bottom, sides, back, and front of the bench.
- Cut 2x4 lumber for internal supports.
Assemble the Frame
- Attach the 2x4 supports to the bottom plywood piece using screws and wood glue.
- Attach the side, back, and front plywood pieces to the bottom piece, forming a box shape.
- Secure all pieces with screws and wood glue.
Create Storage Compartments
- Measure and cut plywood dividers for the inside of the bench.
- Attach dividers inside the frame using screws and wood glue.
Attach the Top
- Cut the top plywood piece to fit the frame.
- Attach hinges to one side of the top piece.
- Secure the other side of the hinges to the back of the bench frame, allowing the top to open and close.
Sand and Finish
- Sand all surfaces to remove rough edges.
- Paint or stain the bench if desired.
- Allow to dry completely.
Add Cushions
- Place cushions on top of the bench for comfortable seating.
Install the Bench
- Move the bench to the desired location.
- Ensure it fits snugly in the measured space.
Enjoy Your New Bench
- Use the storage compartments for extra space.
- Enjoy the new seating area by the window.
Helpful Tips and Tricks
Measure twice, cut once. Accurate measurements prevent wasted materials and frustration. Use plywood for the bench base; it's sturdy and easy to work with. Pre-drill holes before screwing pieces together to avoid splitting the wood. Sand all surfaces before assembly for a smooth finish. Paint or stain pieces before assembly to reach all areas easily.
Common mistakes to avoid: Skipping the measuring step leads to misaligned pieces. Using nails instead of screws can make the bench less sturdy. Forgetting to sand edges results in rough surfaces. Not leveling the bench can cause wobbling.
Alternatives: Instead of plywood, consider MDF for a smoother finish. Use pocket hole screws for hidden joints. For a softer seat, add a foam cushion covered with fabric.
Budgeting for Your Bench
Materials:
- Plywood (for the bench frame and storage compartments): $50-$70
- 2x4 Lumber (for support): $20-$30
- Wood Screws: $5-$10
- Wood Glue: $5-$10
- Paint or Stain: $15-$25
- Cushion Foam: $20-$40
- Fabric for Cushion Cover: $10-$20
- Hinges (if making a lift-up seat): $10-$15
Tools:
- Circular Saw: $50-$100 (or borrow)
- Drill: $30-$60 (or borrow)
- Measuring Tape: $5-$10
- Sandpaper: $5-$10
- Paintbrushes: $5-$10
Total Cost: $230-$430
Budget-Friendly Alternatives:
- Use reclaimed wood or pallets instead of buying new plywood and lumber.
- Borrow tools from friends or family.
- Look for discounted fabric at thrift stores.
- Use leftover paint from previous projects.
Creative Variations and Customizations
Materials: Instead of using plywood, try solid wood like oak or pine for a sturdier bench. For a more eco-friendly option, consider reclaimed wood.
Colors: Paint the bench in bright colors like teal or yellow to make it pop. For a more classic look, use neutral tones like white, gray, or beige.
Styles: Add cushions with different patterns or textures to match your room's decor. Use upholstered fabric for a more comfortable seating area.
Storage Options: Install drawers instead of open shelves for a cleaner look. Use baskets or bins to organize smaller items.
Hardware: Choose decorative handles or knobs for drawers to add a personal touch. Use soft-close hinges for a more luxurious feel.
Additional Features: Add a backrest for extra comfort. Incorporate built-in lighting under the bench for a cozy ambiance.
Finishes: Use a stain to highlight the natural wood grain. Apply a high-gloss finish for a modern look or a matte finish for a rustic feel.
Eco-Friendly Building Tips
Reclaimed Wood: Use old pallets or wood from demolished buildings. This reduces waste and gives your bench a rustic look.
Eco-Friendly Paint: Choose paints with low or zero VOCs (volatile organic compounds). These are better for indoor air quality.
Natural Fabrics: For the cushion, opt for organic cotton or linen. These materials are biodegradable and often produced with fewer chemicals.
Recycled Hardware: Look for second-hand hinges, screws, and handles. Thrift stores or online marketplaces often have these items.
Non-Toxic Adhesives: Use water-based glues and adhesives. They emit fewer harmful chemicals compared to traditional options.
Sustainable Insulation: If adding insulation, consider materials like wool or recycled denim. These are effective and environmentally friendly.
Solar-Powered Tools: If possible, use tools powered by solar energy. This reduces your carbon footprint during the building process.
Upcycled Storage Bins: Repurpose old crates or boxes for storage inside the bench. This adds character and reduces waste.
Local Sourcing: Buy materials from local suppliers to cut down on transportation emissions. This supports local businesses too.
Minimalist Design: Keep the design simple to use fewer materials. This approach is both stylish and sustainable.
Your Cozy Window Bench Awaits
Building a DIY window bench with storage isn't just about adding furniture; it's about creating a cozy nook that adds both functionality and charm to your space. You've learned how to measure, cut, assemble, and finish your bench. With a bit of effort, you've transformed a simple idea into a practical, stylish piece. Now, you can enjoy extra storage and a comfy spot to relax. Remember, the beauty of DIY projects lies in the personal touch you bring to them. So, take pride in your work, and don't hesitate to tackle more projects in the future. Happy building!
How much time will it take to build a window bench with storage?
Building a window bench with storage usually takes about a weekend. If you're experienced, you might finish faster. Beginners might need a bit more time.
What materials do I need for this project?
You'll need plywood, wood screws, hinges, wood glue, paint or stain, and cushions. A saw, drill, measuring tape, and sander are also essential tools.
Can I customize the size of the bench?
Absolutely! Measure your window space first. Then, adjust the dimensions of your bench to fit perfectly. Customizing ensures it looks built-in.
How do I add storage to the bench?
Create a hinged lid for the bench seat. This way, you can lift the seat to access the storage inside. You can also add dividers to organize the space better.
Is it necessary to paint or stain the bench?
While not mandatory, painting or staining protects the wood and enhances its appearance. Choose a color that matches your room's decor for a cohesive look.
What type of cushion should I use?
Use a foam cushion covered with durable fabric. Make sure it's comfortable and fits the bench dimensions. You can even sew a custom cover for a perfect match.
Can I build this bench without prior woodworking experience?
Yes, you can! Start with a simple design and follow step-by-step instructions. Take your time, measure twice, and cut once. You'll learn as you go.