
Home>Home & Furniture>Doors & Windows>DIY Crawl Space Door: Step-by-Step Guide
Doors & Windows
DIY Crawl Space Door: Step-by-Step Guide
Published: September 9, 2024
Learn how to build a DIY crawl space door with our step-by-step guide. Enhance your home's security and insulation with this easy and cost-effective project.
(Many of the links in this article redirect to a specific reviewed product. Your purchase of these products through affiliate links helps to generate commission for Twigandthistle.com, at no extra cost. Learn more)
Is your crawl space door looking worse for wear? Or maybe you need one for the first time? Crafting your own crawl space door can be a straightforward, cost-effective project. With a few tools, some basic materials, and a bit of elbow grease, you can build a durable door that keeps out pests and weather. This guide will walk you through the steps, making the task approachable even for those new to DIY projects. Roll up your sleeves, and get ready to tackle this home improvement job with confidence. Your crawl space will thank you!
Getting Ready for the Project
Measure the Opening: Use a tape measure to get the exact dimensions of your crawl space entrance. Write these measurements down.
Gather Materials: You’ll need plywood, hinges, screws, a latch, weather stripping, and paint or sealant. Make sure you have all tools like a saw, drill, screwdriver, and measuring tape.
Safety Gear: Wear safety goggles, gloves, and a dust mask. This protects your eyes, hands, and lungs from debris and dust.
Clear the Area: Remove any debris or obstacles around the crawl space entrance. This ensures you have a clean workspace.
Cut the Plywood: Using your measurements, cut the plywood to size. Double-check the dimensions before cutting to avoid mistakes.
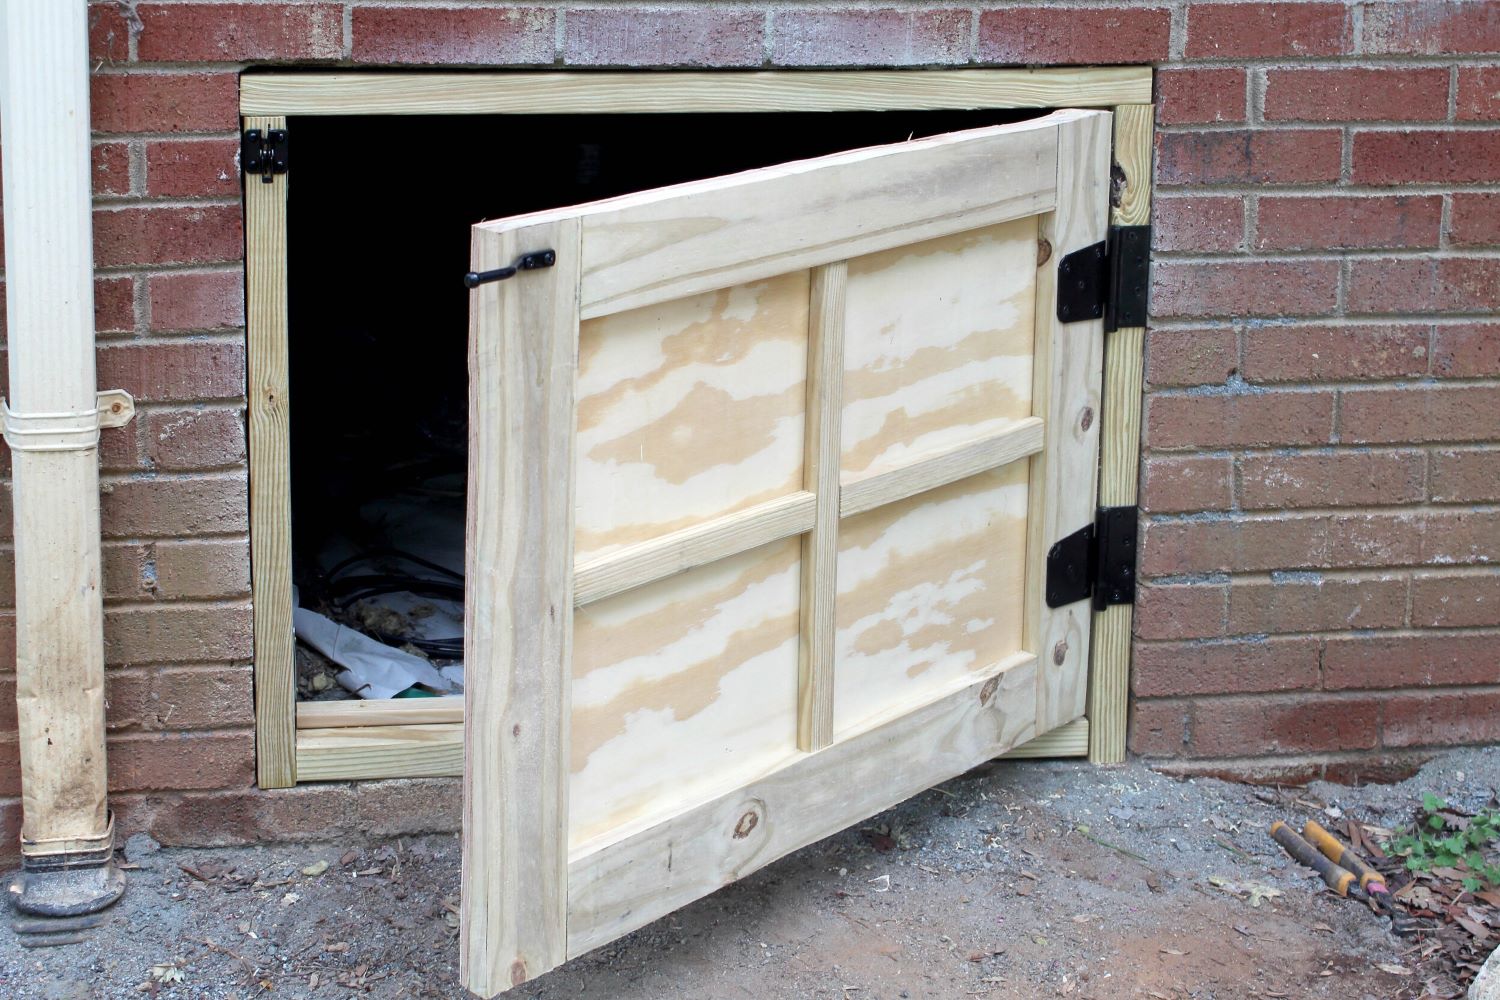
Install Hinges: Attach hinges to one side of the plywood door. Make sure they are evenly spaced and securely fastened.
Attach the Door: Secure the door to the crawl space frame using screws. Ensure it swings open and closed smoothly.
Add the Latch: Install a latch on the opposite side of the hinges. This keeps the door securely closed.
Weather Stripping: Apply weather stripping around the edges of the door. This helps keep out moisture and pests.
Paint or Seal: Paint or seal the door to protect it from the elements. Let it dry completely before use.
Test the Door: Open and close the door several times to ensure everything works correctly. Make any necessary adjustments.
Gather Your Materials and Tools
Materials:
- Plywood: Used for the door panel. Choose a sturdy, weather-resistant type.
- 2x4 Lumber: For framing the door and providing structural support.
- Hinges: Allows the door to open and close smoothly. Heavy-duty ones are best.
- Latch or Lock: Keeps the door securely closed.
- Weatherstripping: Seals gaps to prevent drafts, moisture, and pests.
- Wood Screws: Fastens the plywood and lumber together.
- Wood Glue: Adds extra strength to the joints.
- Paint or Sealant: Protects the wood from moisture and decay.
Tools:
- Tape Measure: Ensures accurate measurements for cutting materials.
- Circular Saw: Cuts the plywood and lumber to the required sizes.
- Drill: Makes holes for screws and hinges.
- Screwdriver: Tightens screws securely.
- Hammer: Useful for tapping parts into place.
- Level: Ensures the door is installed straight.
- Pencil: Marks measurements on wood.
- Safety Gear: Includes gloves, goggles, and ear protection for safe working conditions.
Required Skills and Time Commitment
Skill Level: Intermediate
Time Required: Approximately 4-6 hours
- Gather Materials and Tools: 30 minutes
- Measure and Cut Wood: 1 hour
- Assemble Frame: 1 hour
- Attach Hinges and Latch: 1 hour
- Install Door: 1 hour
- Seal and Paint: 1-2 hours
Detailed Instructions for Building
Measure the Opening
- Use a tape measure to get the height and width of the crawl space opening.
- Write down the measurements.
Cut the Plywood
- Mark the measurements on a piece of plywood.
- Use a saw to cut the plywood to size.
Attach the Frame
- Cut 2x4 lumber to fit the edges of the plywood.
- Nail or screw the 2x4 pieces around the plywood to create a frame.
Install Hinges
- Attach two or three hinges to one side of the door frame.
- Make sure the hinges are evenly spaced.
Mount the Door
- Hold the door in place against the crawl space opening.
- Screw the other side of the hinges into the wall or existing frame.
Add a Latch
- Attach a latch or lock to the opposite side of the door.
- Ensure it aligns properly with the door frame.
Seal the Edges
- Apply weatherstripping around the edges of the door.
- This helps keep out moisture and pests.
Paint or Stain
- Paint or stain the door to protect it from the elements.
- Let it dry completely before use.
Helpful Tips and Tricks
Measure Twice, Cut Once: Always double-check measurements before cutting materials. This prevents wasted materials and ensures a proper fit.
Use Treated Wood: For durability, use pressure-treated wood. It resists moisture and pests, making it ideal for crawl spaces.
Seal Gaps: Use weatherstripping or foam tape around the door frame to keep out drafts, moisture, and pests.
Hinges and Latches: Choose sturdy hinges and latches. They should be rust-resistant to withstand damp conditions.
Ventilation: Include vents in the door design to allow airflow. This helps prevent mold and mildew buildup.
Paint or Seal: Apply a waterproof sealant or exterior paint to the door. This adds an extra layer of protection against moisture.
Insulation: If the crawl space is prone to extreme temperatures, consider adding insulation to the door.
Pre-Drill Holes: When attaching hinges and latches, pre-drill holes to prevent wood from splitting.
Level the Ground: Ensure the ground where the door will sit is level. This helps the door open and close smoothly.
Common Mistakes to Avoid:
Skipping Measurements: Not measuring accurately can lead to a poorly fitting door.
Ignoring Ventilation: Lack of ventilation can cause moisture problems inside the crawl space.
Using Untreated Wood: Untreated wood can rot quickly in damp conditions.
Forgetting to Seal: Not sealing gaps around the door frame can let in pests and moisture.
Alternatives for Materials or Methods:
Composite Materials: Instead of wood, consider using composite materials. They are more resistant to moisture and pests.
Metal Doors: Metal doors can be a durable alternative. They are less likely to warp or rot.
Magnetic Latches: For a more modern touch, use magnetic latches instead of traditional ones. They provide a secure closure without visible hardware.
Foam Insulation: Use foam board insulation for added thermal protection. It’s easy to cut and fit into the door frame.
Estimating the Project Cost
Materials:
- Plywood (4x8 sheet): $30-$40
- 2x4 Lumber (for framing): $10-$15
- Hinges (2-3 pieces): $10-$15
- Latch or Lock: $5-$10
- Weatherstripping: $5-$10
- Screws and Nails: $5-$10
- Paint or Sealant: $10-$20
Tools:
- Circular Saw: $50-$100 (or borrow)
- Drill: $30-$60 (or borrow)
- Measuring Tape: $5-$10
- Level: $10-$20
- Hammer: $10-$15
- Paintbrush: $5-$10
Total Estimated Cost: $170-$335
Budget-Friendly Alternatives:
- Reclaimed Wood: Free or low cost from pallets or old furniture
- Borrow Tools: Ask friends or family to save on tool costs
- Basic Latch: Use a simple hook-and-eye latch for $2-$3
- Leftover Paint: Use any leftover paint or sealant from previous projects
Different Ways to Customize
Materials: Instead of using wood, consider metal or PVC for a more durable door. Metal offers strength and security, while PVC resists moisture and pests.
Colors: Paint the door to match your home’s exterior. Use weather-resistant paint in colors like white, gray, or earth tones. For a pop of color, try red or blue.
Styles: Add decorative trim or molding for a more polished look. Consider a barn door style with cross-bracing or a shaker style with clean lines.
Hardware: Swap out basic hinges for decorative ones in black or brushed nickel. Use a sturdy latch or lock for added security.
Insulation: Add foam insulation or weatherstripping to keep out drafts and pests. This helps maintain the temperature inside your home.
Ventilation: Install a vent or grill to allow airflow, preventing moisture buildup. Choose a style that complements the door’s design.
Handles: Opt for a decorative handle or pull to make opening the door easier. Materials like brass, iron, or stainless steel add a touch of style.
Windows: Add a small window or peephole for light and visibility. Ensure it’s made of shatterproof glass for safety.
Sealant: Use a high-quality sealant around the edges to keep out water and pests. This prolongs the door’s lifespan.
Size: Customize the door’s size to fit your crawl space perfectly. Measure carefully and adjust the dimensions as needed.
Eco-Friendly Tips for Your Project
Reusing old wood from previous projects can save money and reduce waste. Reclaimed wood from pallets or old furniture offers a rustic look while being eco-friendly. Recycled metal hinges and latches can be sourced from old doors or gates.
For insulation, consider recycled denim or sheep wool instead of traditional fiberglass. These materials are non-toxic and biodegradable. Low-VOC (Volatile Organic Compounds) paints and sealants help maintain indoor air quality.
When cutting wood, use hand tools instead of power tools to save energy. If power tools are necessary, opt for those with energy-efficient ratings.
For the door frame, bamboo is a sustainable option due to its rapid growth rate. Cork can be used for weather stripping as it is renewable and provides excellent insulation.
Finally, ensure proper ventilation in the crawl space to prevent moisture buildup, which can lead to mold. This can be achieved by installing vent covers made from recycled materials.
Your DIY Crawl Space Door is Ready!
You've done it! Building a crawl space door from scratch isn't just about saving money, it's about gaining confidence in your skills. By following these steps, you now have a sturdy, custom-made door that fits perfectly. Remember, the key to any successful DIY project is patience and attention to detail. If you ever feel stuck, don't hesitate to ask for help or look up additional resources. Your hard work has paid off, and now you can enjoy the satisfaction of a job well done. Keep this momentum going for your next project. Who knows? Maybe you'll tackle something even bigger next time. Happy building!
What materials do I need to build a crawl space door?
You'll need pressure-treated wood, hinges, screws, a latch, weatherstripping, and paint or sealant.
How do I measure for the door?
Measure the height and width of the crawl space opening. Add an extra inch to each side for a snug fit.
Should I insulate the door?
Yes, adding insulation helps keep your home energy-efficient and prevents drafts.
How do I attach the door to the frame?
Use hinges to attach the door to the frame. Make sure the hinges are evenly spaced and securely fastened.
What kind of paint should I use?
Use exterior-grade paint or sealant to protect the wood from moisture and weather damage.
How do I make the door weatherproof?
Apply weatherstripping around the edges to seal gaps and keep out moisture and pests.
Can I add a lock to the door?
Yes, you can install a latch or lock for added security and peace of mind.