
Home>Home & Furniture>Doors & Windows>DIY Barn Door Handle Installation Guide
Doors & Windows
DIY Barn Door Handle Installation Guide
Published: September 6, 2024
Learn how to install a barn door handle with our step-by-step DIY guide. Perfect for beginners, this tutorial ensures a secure and stylish finish for your barn door.
(Many of the links in this article redirect to a specific reviewed product. Your purchase of these products through affiliate links helps to generate commission for Twigandthistle.com, at no extra cost. Learn more)
Transform your space by installing a barn door handle. It's a small project, but it adds a lot of charm and functionality to your home. Whether you're new to DIY or have some experience, this guide will help you get the job done efficiently. With a few tools and a bit of patience, you'll have a stylish handle that adds character to any room. Ready to get started? Follow these simple steps, and you'll have your barn door looking great in no time. Grab your tools, and let's make this happen!
Getting Ready for the Project
Gather Tools and Materials: Collect a drill, screws, screwdriver, measuring tape, pencil, level, and the barn door handle kit.
Choose Handle Placement: Decide where the handle will go. Typically, it’s placed at a comfortable height, around 36-42 inches from the floor.
Mark Drill Holes: Use the handle as a template. Hold it against the door, ensuring it’s level. Mark the screw holes with a pencil.
Drill Pilot Holes: Use a drill bit slightly smaller than the screws. Drill pilot holes where you marked.
Safety First: Wear safety goggles to protect your eyes from wood dust. Ensure the workspace is well-lit and free of clutter.
Install Handle: Align the handle with the pilot holes. Insert screws and tighten them using a screwdriver.
Check Stability: Ensure the handle is secure. Tug gently to confirm it’s firmly attached.
Clean Up: Remove any wood dust or debris from the workspace. Store tools properly to avoid accidents.
What You Need: Materials and Tools
- Barn Door Handle: The main component you will install. Choose one that matches your door's style.
- Screws: Typically come with the handle. Ensure they are the right length for your door.
- Drill: Used to make holes for the screws. A cordless drill is convenient.
- Drill Bits: Different sizes may be needed. Usually, a 1/8-inch bit works for pilot holes.
- Screwdriver: Helps tighten screws. A power screwdriver can save time.
- Measuring Tape: Ensures the handle is centered and at the correct height.
- Pencil: Marks where to drill. Use a light mark to avoid visible lines.
- Level: Ensures the handle is straight. A small, handheld level works well.
- Safety Glasses: Protects your eyes while drilling. Always wear them for safety.
- Masking Tape: Helps mark drill spots without damaging the door. Also catches wood shavings.
Skill Level and Time Commitment
Skill Level: Beginner
Time Required: 30-45 minutes
- Gather Tools: Screwdriver, tape measure, pencil, level.
- Mark Placement: Measure and mark where the handle will go.
- Drill Holes: Drill pilot holes for screws.
- Attach Handle: Screw the handle into place.
- Check Alignment: Ensure the handle is level and secure.
How to Install: Step-by-Step Guide
Gather Materials:
- Barn door handle
- Screws (usually included with handle)
- Drill
- Screwdriver
- Measuring tape
- Pencil
- Level
Measure and Mark:
- Use the measuring tape to find the desired height for the handle.
- Mark the spots for the screws with a pencil. Ensure marks are level.
Pre-Drill Holes:
- Attach a drill bit slightly smaller than the screws.
- Drill holes where you marked for the screws. This prevents wood from splitting.
Attach Handle:
- Align the handle with the pre-drilled holes.
- Insert screws through the handle into the door.
- Tighten screws using a screwdriver.
Check Alignment:
- Use the level to ensure the handle is straight.
- Adjust if necessary by loosening screws, repositioning, then tightening again.
Test Handle:
- Open and close the door to ensure the handle is secure.
- Make any final adjustments if needed.
Clean Up:
- Remove any pencil marks.
- Put away tools and materials.
Helpful Tips and Tricks
Measure Twice, Drill Once: Ensure accurate measurements before drilling holes. This prevents misalignment.
Use a Template: Create a cardboard template of the handle's base. This helps mark exact spots for drilling.
Pre-Drill Holes: Pre-drill smaller pilot holes before using larger screws. This avoids wood splitting.
Level the Handle: Use a level to ensure the handle is straight. Crooked handles look unprofessional.
Secure Screws Tightly: Tighten screws firmly but avoid over-tightening. Over-tightening can strip the screws or damage the door.
Common Mistakes to Avoid:
- Skipping Measurements: Not measuring properly can lead to misaligned handles.
- Not Using a Level: Eyeballing the alignment often results in crooked handles.
- Over-Tightening Screws: This can strip the screws or damage the door material.
Material Alternatives:
- Wood Handles: For a rustic look, use wooden handles instead of metal.
- Leather Straps: Leather straps can serve as unique, stylish handles.
- Repurposed Items: Old tools or hardware can be repurposed into handles for a vintage feel.
Method Alternatives:
- Adhesive Mounting: Use strong adhesive strips if drilling isn't an option. Ensure the adhesive can support the handle's weight.
- Magnetic Handles: Magnetic handles can be a temporary solution, especially for metal doors.
Estimating the Cost
Barn Door Handle: $15 - $50
Drill: $30 - $100
Screws: $5 - $10
Screwdriver: $5 - $20
Measuring Tape: $5 - $15
Level: $10 - $20
Pencil: $1 - $2
Total Cost: $71 - $217
Budget-Friendly Alternatives:
Barn Door Handle: Use a simple drawer pull ($5 - $10)
Drill: Borrow from a friend or rent ($0 - $10)
Screws: Use leftover screws from other projects ($0)
Screwdriver: Use one you already have ($0)
Measuring Tape: Use a ruler or yardstick ($0)
Level: Use a free smartphone app ($0)
Pencil: Use any pencil or pen you have at home ($0)
Total Cost with Alternatives: $5 - $32
Different Styles and Customizations
Materials: Instead of standard metal handles, consider using wood, leather, or ceramic. Wood handles can be stained or painted to match the door, while leather handles add a rustic touch. Ceramic handles offer a unique, artistic flair.
Colors: Paint or stain the handle to complement or contrast with the door. For a modern look, use black or brushed nickel. For a farmhouse style, try white or distressed finishes. Bright colors like red or blue can make the handle a focal point.
Styles: Choose a handle style that matches your decor. Sleek, straight handles work well in contemporary settings. Curved or ornate handles fit traditional or vintage themes. Industrial-style handles with exposed screws or rivets add a rugged look.
Mounting Options: Instead of the usual vertical placement, try mounting the handle horizontally or at an angle for a unique appearance. Use decorative screws or bolts to add character.
Additional Features: Add a backplate behind the handle for extra detail. This can be a simple metal plate or something more decorative. Consider incorporating a lock or latch if privacy is needed.
Personal Touches: Customize the handle with engraving or etching. Add your initials, a favorite quote, or a design that reflects your personality.
Eco-Friendly Installation Tips
Reclaimed Wood: Use old wood from pallets, barns, or other sources. Sand it down and cut it to size for a rustic handle.
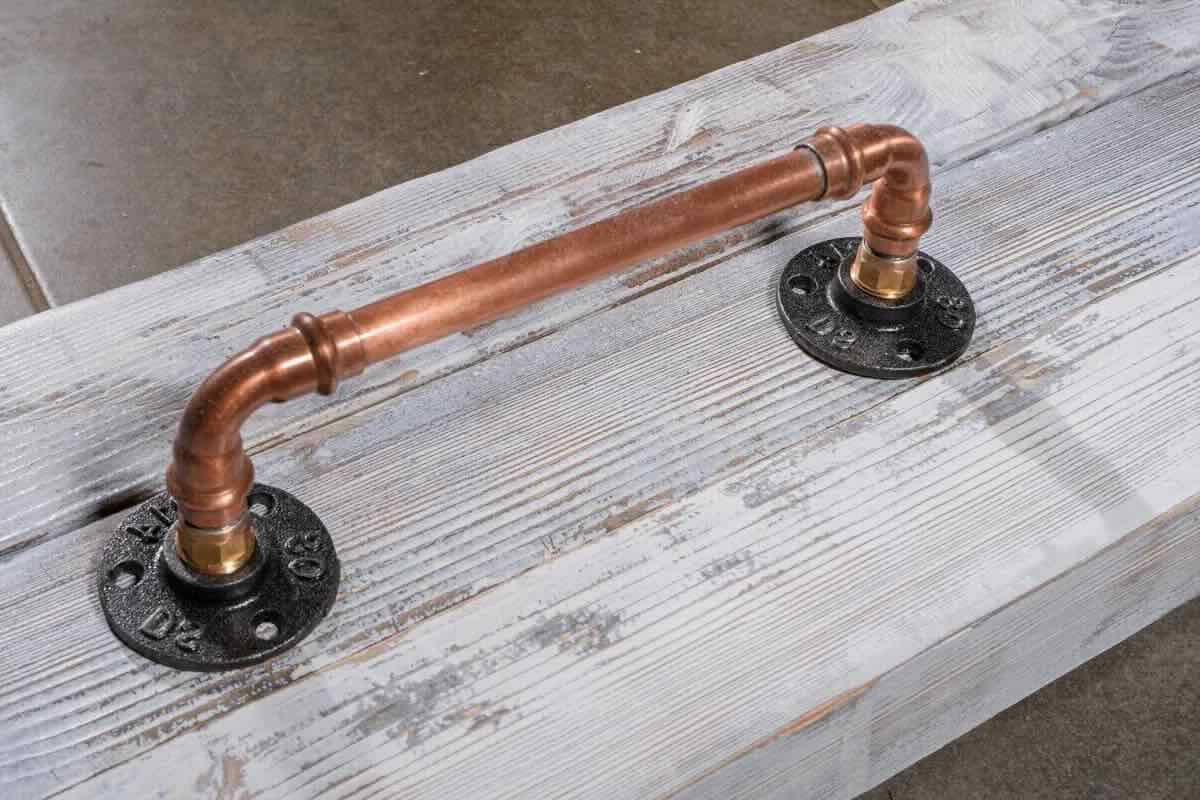
Upcycled Metal: Repurpose metal pipes or old tools like wrenches. Clean them up and attach them as handles.
Natural Finishes: Opt for non-toxic, water-based stains or paints. These are better for the environment and safer for your home.
Recycled Hardware: Look for screws, bolts, and brackets at salvage yards or reuse ones from old projects.
Handmade Rope: Use natural fibers like jute or hemp. Braid or twist them into a sturdy handle.
Local Sourcing: Buy materials from local suppliers. This reduces transportation emissions and supports your community.
Minimal Packaging: Choose products with little to no packaging. This cuts down on waste and keeps your project eco-friendly.
Energy-Efficient Tools: Use hand tools or energy-efficient power tools. This saves electricity and reduces your carbon footprint.
Reuse Old Handles: If you have old door handles, give them a new life on your barn door. Clean and repaint them for a fresh look.
Compostable Materials: Use biodegradable materials where possible. This ensures that any waste can return to the earth safely.
Your Barn Door Handle Awaits
You've got all the steps to install a barn door handle. From gathering materials to marking holes and finally securing the handle, it's a straightforward process. Just remember to double-check your measurements and ensure everything's level. A little patience goes a long way.
With your new handle, your barn door not only looks great but also functions smoothly. Plus, there's that sense of accomplishment knowing you did it yourself. If you run into any hiccups, don't hesitate to revisit the steps or seek advice from fellow DIY enthusiasts.
Now, grab your tools, and get started. Your barn door handle is just a few steps away from being perfectly installed. Happy DIY-ing!
How do I choose the right barn door handle?
Pick a handle that matches your door's style and size. If your door is heavy, go for a sturdy handle. For a rustic look, iron or wood handles work great. For modern vibes, try sleek metal ones.
What tools do I need for installation?
You'll need a drill, screws, a screwdriver, a measuring tape, and a pencil. A level helps keep things straight.
How high should I install the handle?
Typically, place the handle about 36 to 42 inches from the floor. This height is comfy for most people.
Can I install a barn door handle on any door?
Yes, but make sure the door is sturdy enough to hold the handle. Thin or hollow doors might not work well.
Do I need to pre-drill holes?
Yes, pre-drilling helps prevent the wood from splitting. Use a drill bit slightly smaller than your screws.
How do I ensure the handle is level?
Use a level tool to check before drilling. Mark the spots with a pencil, then double-check before making holes.
What if my handle comes with a backplate?
Install the backplate first, making sure it's level. Then attach the handle to the backplate using the provided screws.
Can I install a handle on a glass barn door?
Yes, but you'll need special hardware designed for glass. Regular screws won't work.