
Home>Home & Furniture>Bedroom>How to Create a DIY Graffiti Wall
Bedroom
How to Create a DIY Graffiti Wall
Published: July 21, 2024
Transform your space with a DIY graffiti wall! Learn step-by-step tips, essential tools, and creative ideas to design your own vibrant and unique mural at home.
(Many of the links in this article redirect to a specific reviewed product. Your purchase of these products through affiliate links helps to generate commission for Twigandthistle.com, at no extra cost. Learn more)
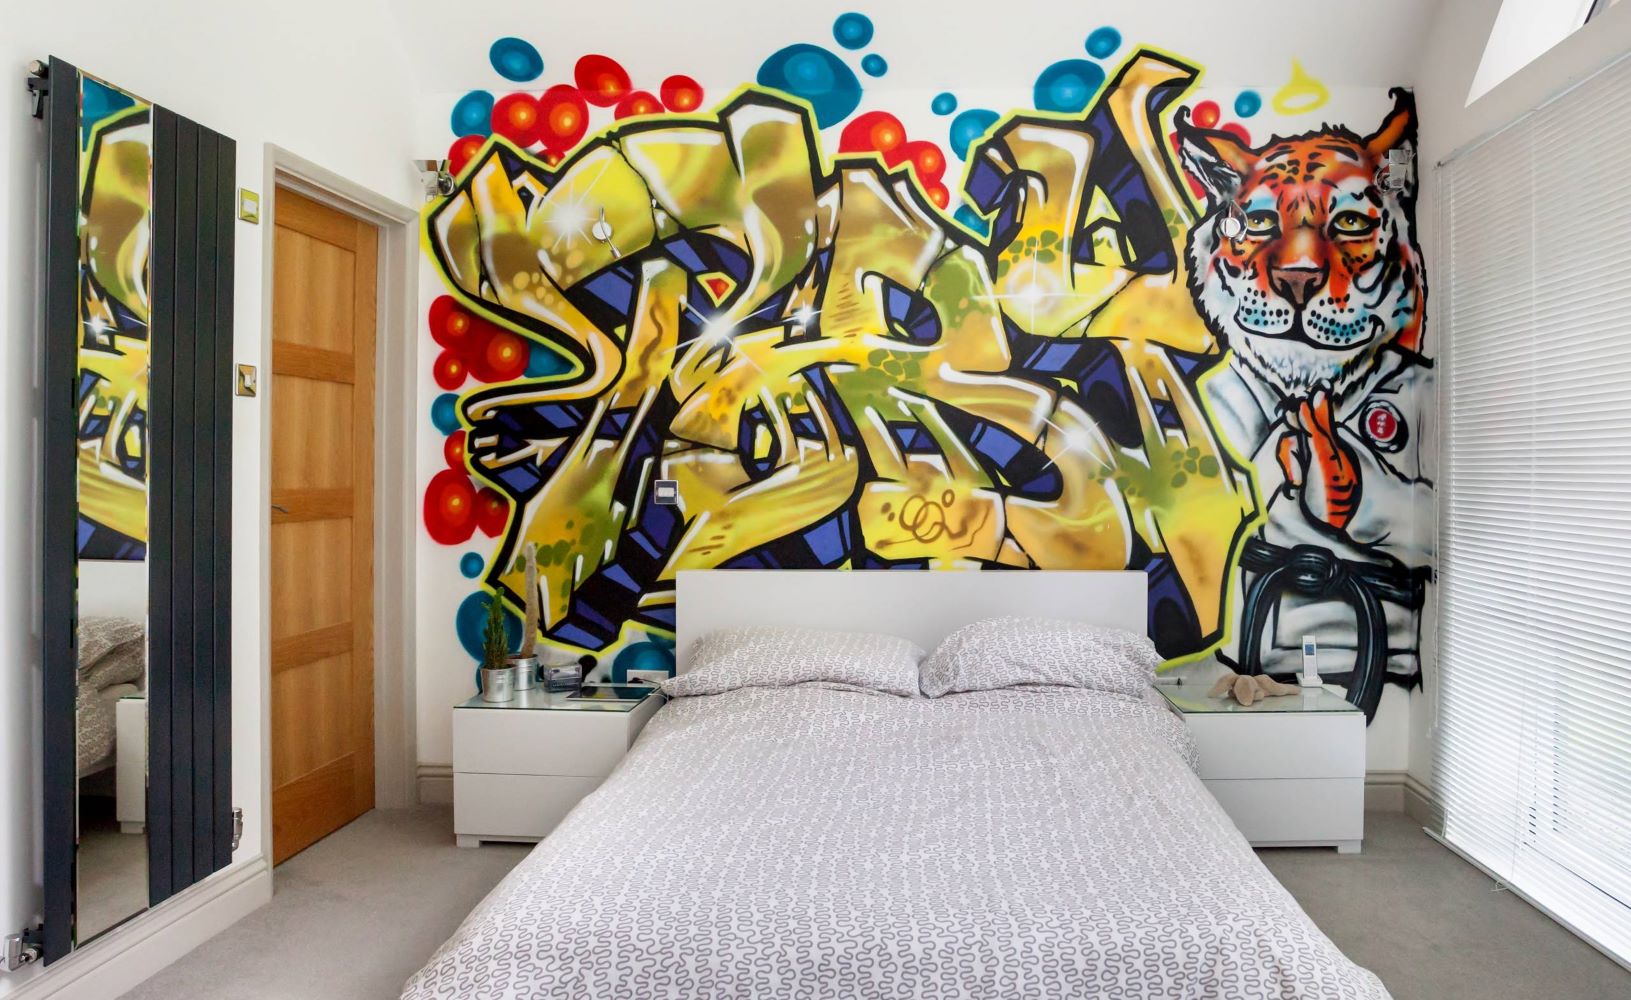
Creating a graffiti wall at home can be a fun and creative project. You don’t need to be a professional artist to make something cool and eye-catching. With the right materials, a bit of planning, and a burst of imagination, anyone can turn a plain wall into a vibrant piece of art. Whether you want to express yourself, add some color to your space, or let your friends contribute their own designs, a DIY graffiti wall can be a great way to make your home unique. Grab your spray paint, put on some old clothes, and get ready to create!
Getting Ready for Your Graffiti Wall
Choose Your Wall: Pick a wall that can handle paint. Outdoor walls or garage walls work best.
Clean the Surface: Scrub the wall to remove dirt and grime. A clean surface helps the paint stick better.
Gather Supplies: Get spray paint, stencils, painter's tape, drop cloths, and protective gear like gloves and masks.
Set Up Workspace: Lay down drop cloths to protect the floor. Tape off areas you don't want painted.
Sketch Your Design: Draw your graffiti design on paper first. This helps you plan and avoid mistakes.
Safety First: Wear gloves to protect your hands and a mask to avoid inhaling fumes. Work in a well-ventilated area.
Prime the Wall: Apply a primer if the wall is porous. This creates a smooth base for your graffiti.
Test Spray Paint: Practice on a piece of cardboard to get a feel for the spray paint.
Outline Your Design: Use light, quick sprays to outline your design on the wall.
Fill in Colors: Start with the background colors, then add details. Use stencils for intricate designs.
Seal Your Work: Once dry, apply a clear sealant to protect your graffiti from weather and fading.
Essential Materials and Tools
- Spray Paint: Essential for creating vibrant graffiti art. Comes in various colors and finishes.
- Drop Cloths: Protects floors and surrounding areas from paint splatters.
- Painter's Tape: Helps create clean lines and protect areas you don't want painted.
- Face Mask: Protects from inhaling paint fumes.
- Gloves: Keeps hands clean and protected from paint.
- Ladder: Useful for reaching higher areas of the wall.
- Stencils: Helps create consistent shapes and designs.
- Chalk: Used for sketching designs before painting.
- Clear Coat Spray: Seals and protects the finished artwork.
- Cleaning Supplies: Includes rags, soap, and water for any necessary cleanup.
- Light Source: Ensures good visibility, especially if working in a dim area.
- Sketchbook: For planning and sketching out designs before transferring them to the wall.
Skill Level and Time Commitment
Skill Level: Intermediate
Time Required: 4-6 hours
Preparation: 1 hour
- Clean the wall
- Gather materials (spray paint, stencils, drop cloths)
Design Planning: 1 hour
- Sketch your design on paper
- Choose colors
Base Coat Application: 1 hour
- Apply a base coat of paint
- Let it dry
Stencil and Freehand Work: 2-3 hours
- Use stencils for detailed parts
- Freehand larger sections
Final Touches: 30 minutes
- Add any finishing details
- Clean up the area
Instructions for Creating Your Graffiti Wall
Choose Your Wall
- Pick a wall that you can paint on without any issues.
- Make sure the surface is clean and smooth.
Gather Supplies
- Spray Paint: Various colors.
- Drop Cloths: To protect the floor.
- Painter's Tape: For clean edges.
- Stencils: Optional, for specific designs.
- Protective Gear: Gloves, mask, and goggles.
Prepare the Wall
- Lay down drop cloths to cover the floor.
- Use painter's tape to outline the area you will paint.
- Clean the wall with a damp cloth to remove dust and dirt.
Plan Your Design
- Sketch your design on paper first.
- Decide on colors and any stencils you might use.
Apply a Base Coat
- Spray a base color over the entire wall.
- Let it dry completely before adding more layers.
Start with Large Shapes
- Begin with the largest shapes or background elements.
- Hold the spray can 6-12 inches from the wall.
- Use smooth, even strokes.
Add Details
- Layer smaller shapes and details on top of the base.
- Use stencils for intricate designs if needed.
- Allow each layer to dry before adding more.
Outline and Highlight
- Use darker colors to outline shapes and add depth.
- Add highlights with lighter colors for contrast.
Final Touches
- Step back and review your work.
- Make any necessary adjustments or touch-ups.
Clean Up
- Remove painter's tape carefully.
- Dispose of drop cloths and any trash.
- Clean spray nozzles for future use.
Helpful Tips and Tricks
Choose the Right Wall: Pick a smooth, clean surface. Rough or dirty walls make painting harder.
Prep the Wall: Clean the wall with soap and water. Let it dry completely. Use a primer to help the paint stick better.
Sketch Your Design: Use chalk or light pencil to outline your design. This helps avoid mistakes later.
Use Quality Paint: Spray paint works best for graffiti. Choose colors that stand out.
Practice Techniques: Try different spray paint techniques on cardboard first. Practice makes perfect.
Layer Colors: Start with the background colors. Add details and outlines last.
Protect Your Work: Use a clear sealant to protect your graffiti from weather and fading.
Common Mistakes to Avoid:
- Skipping Prep: Not cleaning or priming the wall can ruin your work.
- Overloading Paint: Too much paint causes drips. Use light, even coats.
- Ignoring Safety: Always wear a mask and work in a well-ventilated area.
Alternatives:
- Stencils: Use stencils for clean, sharp edges.
- Brushes: For more control, use brushes instead of spray paint.
- Digital Mockups: Plan your design on a computer before painting.
Estimating the Cost
Spray Paint: You'll need about 10-15 cans of spray paint in different colors. Each can costs around $5-$7. Total: $50-$105.
Primer: A gallon of primer to prepare the wall costs about $20-$30.
Drop Cloths: To protect the surrounding area, use drop cloths. These cost around $10-$15.
Painter's Tape: For clean edges, get painter's tape. A roll costs about $5.
Protective Gear: Safety first! Masks and gloves will cost around $10-$15.
Budget-Friendly Alternatives:
- Acrylic Paint: Instead of spray paint, use acrylic paint and brushes. This can reduce costs to about $30-$50.
- Old Sheets: Use old sheets instead of drop cloths to save $10.
- DIY Primer: Mix white paint with a bit of water as a makeshift primer, saving $20-$30.
Total estimated cost: $95-$170. Budget-friendly option: $55-$85.
Creative Variations and Customizations
Alternative Materials: Instead of traditional spray paint, use acrylic paint with brushes or paint markers for more control. For a different texture, try chalk or pastels on a chalkboard-painted wall.
Colors: Choose a monochromatic scheme using different shades of one color for a sleek look. Use neon colors for a vibrant, eye-catching design. Opt for metallic paints to add a shiny, reflective quality.
Styles: Go for a stencil approach to create clean, repeatable patterns. Try a freehand style for a more organic, spontaneous look. Incorporate mixed media by adding stickers, posters, or even small objects glued to the wall.
Themes: Create a nature-themed wall with flowers, trees, and animals. Design a cityscape with buildings, streets, and urban elements. Make a pop culture wall featuring favorite characters, quotes, or symbols.
Finishing Touches: Add a clear coat to protect the artwork and make it last longer. Use LED lights around the edges to highlight the graffiti. Frame sections of the wall with wooden borders for a polished look.
Eco-Friendly Tips
Reclaimed Wood Panels: Use old wooden pallets or scrap wood as your canvas. Sand them down and paint them with a base color before adding graffiti.
Eco-Friendly Paints: Choose non-toxic, water-based paints. These are better for the environment and safer to use.
Recycled Spray Paint Cans: Opt for spray paints made from recycled materials. Some brands offer cans with eco-friendly propellants.
Reusable Stencils: Create stencils from cardboard or thick paper. These can be reused multiple times, reducing waste.
Natural Brushes: Use brushes made from natural fibers instead of synthetic ones. They are biodegradable and often more durable.
Upcycled Materials: Incorporate old fabrics, metal scraps, or other materials into your graffiti wall. This adds texture and reduces waste.
Solar-Powered Lights: If you want to highlight your graffiti wall at night, use solar-powered lights. They save energy and are easy to install.
Rainwater Collection: Use collected rainwater for cleaning brushes and other tools. This conserves tap water and is an easy way to be more sustainable.
Biodegradable Cleaners: When cleaning up, use biodegradable soaps and cleaners. They are less harmful to the environment.
Community Paint Swaps: Organize a paint swap in your community. This way, unused paint gets a new life instead of going to waste.
Your Masterpiece Awaits
You've got everything you need to create a stunning DIY graffiti wall. Gather your supplies, pick a theme, and let your creativity flow. Remember, practice makes perfect. Don't be afraid to make mistakes; they're part of the process. Experiment with different techniques and styles until you find what works best for you.
Once your wall is complete, step back and admire your work. You've transformed a blank space into a vibrant expression of your artistic vision. Share your creation with friends and family, and maybe even inspire them to try their hand at graffiti art.
Keep pushing your boundaries and exploring new ideas. Your graffiti wall is just the beginning. Who knows? You might discover a hidden talent or a new passion. Happy painting!
What materials do I need for a DIY graffiti wall?
You'll need spray paint, stencils, drop cloths, masking tape, protective gear (like gloves and a mask), and a smooth wall surface.
How do I prepare the wall before painting?
Clean the wall thoroughly to remove dirt and dust. Use sandpaper to smooth out any rough spots. Apply a primer if the wall is unpainted or has a dark color.
Can I use regular paint instead of spray paint?
Spray paint is recommended for graffiti because it provides a smooth finish and is easier to control for detailed designs. Regular paint can be used but might not give the same effect.
How do I create stencils for my design?
Draw your design on cardboard or thick paper and cut it out with a craft knife. You can also print designs and use carbon paper to transfer them onto the stencil material.
What safety precautions should I take?
Always wear protective gear like gloves and a mask to avoid inhaling fumes. Work in a well-ventilated area or outdoors. Cover surrounding areas with drop cloths to prevent overspray.
How can I fix mistakes on my graffiti wall?
If you make a mistake, let the paint dry completely. Then, use sandpaper to smooth out the area and repaint it. For small errors, you can use a paintbrush to touch up the design.
How do I seal my graffiti wall to make it last longer?
Once your design is complete and dry, apply a clear sealant or varnish to protect the paint from fading and chipping. This will help your graffiti wall stay vibrant for years.