
Home>Home & Furniture>Bedroom>DIY Pallet Wall Shelf for Bedroom
Bedroom
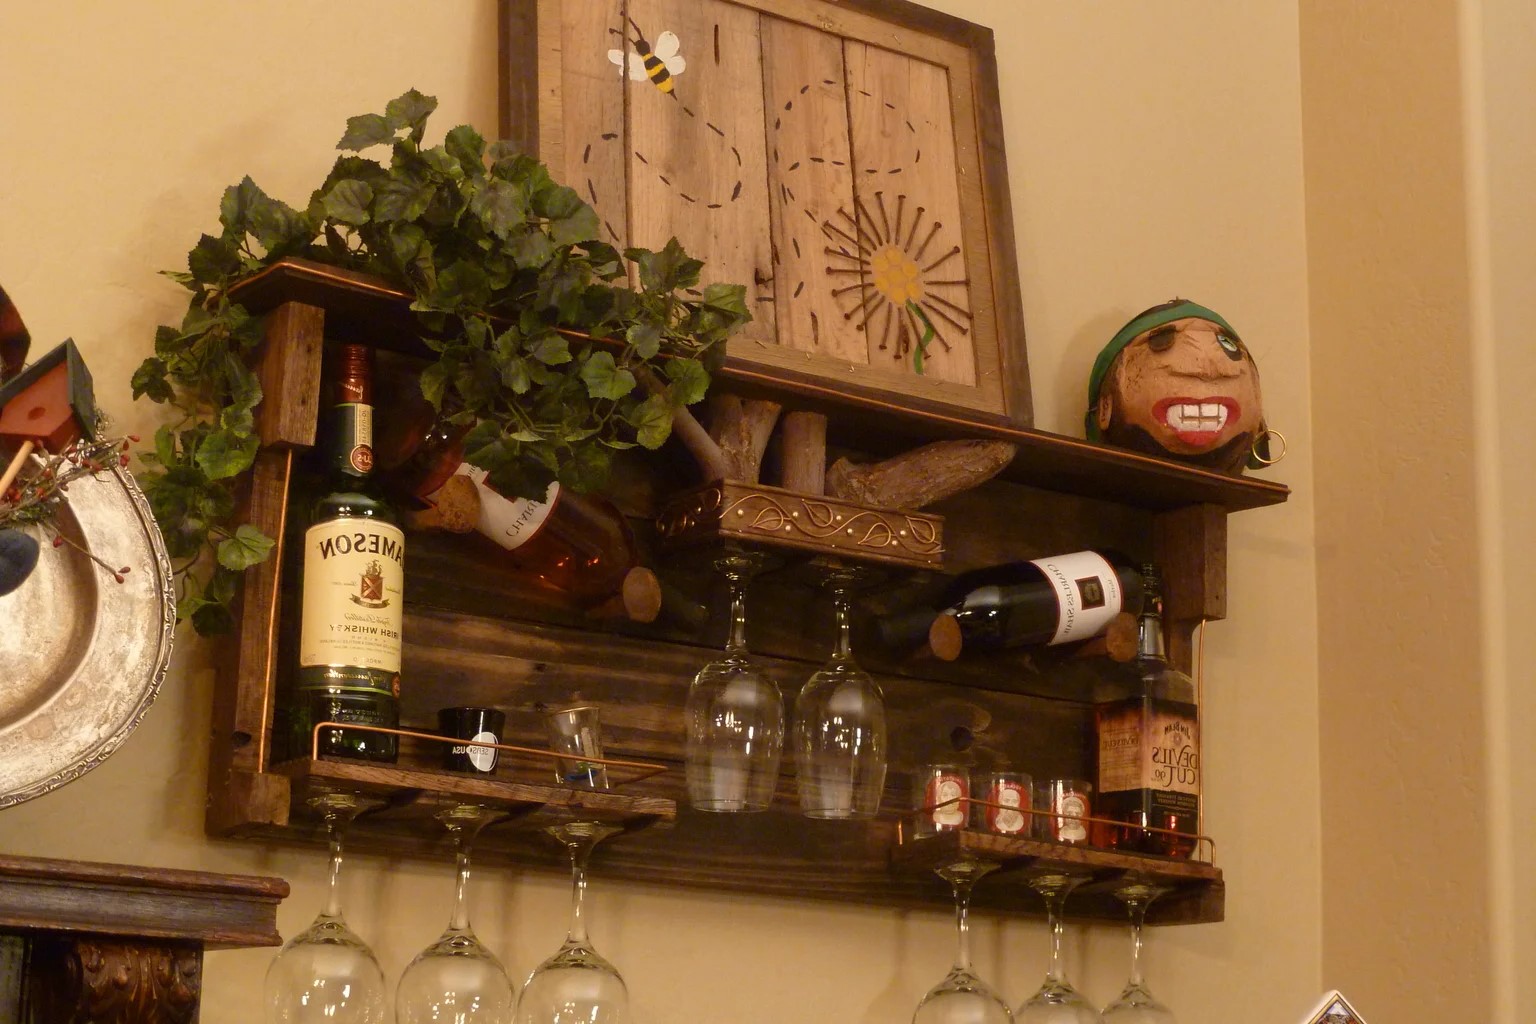
DIY Pallet Wall Shelf for Bedroom
Published: July 9, 2024
Learn how to create a stylish DIY pallet wall shelf for your bedroom with our step-by-step guide. Perfect for adding rustic charm and extra storage space!
(Many of the links in this article redirect to a specific reviewed product. Your purchase of these products through affiliate links helps to generate commission for Twigandthistle.com, at no extra cost. Learn more)
Ever thought about adding a touch of rustic charm to your bedroom? A DIY pallet wall shelf could be just what you need! This project is perfect for anyone who loves crafting and wants to create something functional yet stylish. Pallets are affordable, often free, and can be turned into beautiful shelves with minimal effort. Plus, making your own shelf allows you to customize its size, color, and design to fit your room perfectly. Gather a few basic tools, some sandpaper, and a bit of creativity, and you'll have a unique piece that adds character and storage to your space.
Getting Ready for Your Project
Gather Materials: Collect pallets, screws, a drill, sandpaper, a saw, a measuring tape, a level, and wall anchors.
Inspect Pallets: Check for any nails or staples. Remove them using pliers or a hammer.
Safety Gear: Wear safety goggles, gloves, and a dust mask to protect yourself from splinters and dust.
Workspace Setup: Choose a well-ventilated area. Lay down a tarp or old sheets to catch sawdust and debris.
Measure and Mark: Use a measuring tape to mark the dimensions of the shelf on the pallet. Ensure the measurements are accurate.
Cut Pallets: Use a saw to cut the pallet according to your marked dimensions. Sand the edges to smooth out rough spots.
Pre-Drill Holes: Pre-drill holes in the pallet and the wall where the shelf will be mounted. This prevents wood from splitting.
Install Wall Anchors: Insert wall anchors into the pre-drilled holes in the wall for added support.
Mount Shelf: Align the pallet with the wall anchors. Use a drill to secure the shelf with screws.
Check Level: Use a level to ensure the shelf is straight. Adjust if necessary.
Clean Up: Dispose of any debris and store tools safely.
What You Need: Materials and Tools
Materials:
- Wood Pallets: Reclaimed wood pallets form the main structure of the shelf.
- Sandpaper: Smooths out rough edges on the wood.
- Wood Screws: Secures the pallets together.
- Wood Stain or Paint: Adds color and protects the wood.
- Brackets: Supports the shelf when mounted on the wall.
- Wall Anchors: Ensures the shelf stays securely attached to the wall.
Tools:
- Saw: Cuts the pallets to the desired size.
- Drill: Makes holes for screws and wall anchors.
- Screwdriver: Tightens screws.
- Paintbrush: Applies stain or paint.
- Measuring Tape: Ensures accurate measurements.
- Level: Ensures the shelf is straight when mounted.
- Hammer: Helps with any necessary adjustments or nail placements.
How Much Time and Skill You Need
Skill Level: Intermediate
Time Required: 3-4 hours
Steps:
- Gather Materials: Pallet wood, screws, wall anchors, sandpaper, wood stain, and a drill.
- Prepare Pallet: Sand the wood to remove splinters and rough edges.
- Cut Wood: Measure and cut the pallet wood to desired shelf size.
- Assemble Shelf: Attach pieces using screws to form the shelf.
- Stain Wood: Apply wood stain for a polished look.
- Mount Shelf: Use wall anchors and screws to secure the shelf to the wall.
Tips:
- Safety Gear: Wear gloves and safety goggles.
- Measure Twice: Ensure accurate measurements before cutting.
- Dry Fit: Assemble pieces without screws first to check alignment.
Follow These Steps
Gather Materials:
- Wooden pallet
- Sandpaper
- Saw
- Measuring tape
- Pencil
- Screws
- Drill
- Wall anchors
- Level
- Paint or stain (optional)
- Paintbrush (optional)
Prepare the Pallet:
- Inspect the pallet for any nails or splinters. Remove nails with a hammer.
- Sand the pallet thoroughly to smooth rough edges.
Measure and Cut:
- Decide the size of the shelf. Use a measuring tape and pencil to mark the desired length.
- Cut the pallet to size using a saw.
Sand Again:
- Sand the cut edges to ensure they are smooth.
Paint or Stain (Optional):
- Apply paint or stain to the pallet if desired. Let it dry completely.
Mark Wall Placement:
- Hold the pallet against the wall where you want the shelf. Use a level to ensure it’s straight.
- Mark the screw holes on the wall with a pencil.
Drill Holes:
- Drill holes at the marked spots on the wall. Insert wall anchors for extra support.
Attach the Shelf:
- Hold the pallet in place and use a drill to screw it into the wall anchors.
Check Stability:
- Ensure the shelf is securely attached and level.
Decorate:
- Place books, plants, or other items on your new shelf.
Helpful Tips and Tricks
Measure twice, cut once. Always double-check your measurements before cutting the pallet wood. This saves time and materials.
Sand the wood thoroughly. Pallets can have rough edges and splinters. Sanding ensures a smooth finish and prevents injuries.
Use a stud finder to locate wall studs. Mounting your shelf on studs provides better support and stability.
Pre-drill holes before screwing. This prevents the wood from splitting and makes the assembly easier.
Seal the wood with a clear coat or paint. This protects the wood and gives it a polished look.
Common mistakes to avoid:
Skipping sanding. Rough wood can cause splinters and looks unfinished.
Ignoring wall studs. Shelves mounted on drywall alone can fall, damaging your wall and items.
Not pre-drilling holes. This can split the wood, ruining your project.
Alternatives for materials or methods:
Use reclaimed wood if pallets are unavailable. Reclaimed wood offers a similar rustic look.
Metal brackets can replace wooden supports. Metal adds a modern touch and can be easier to install.
Floating shelf hardware can be used for a cleaner look. This hides the mounting hardware, making the shelf appear to float.
How Much Will It Cost?
Materials:
- Pallet wood: Free (often available from local businesses or online marketplaces)
- Sandpaper: $5 for a pack
- Wood stain or paint: $10-$15
- Brushes: $5
- Screws: $3
- Wall anchors: $5
Tools:
- Saw: $20 (or borrow one)
- Drill: $30 (or borrow one)
- Measuring tape: $5
- Level: $10
Total Cost: Around $93
Budget-friendly alternatives:
- Use leftover paint from other projects
- Borrow tools from friends or family
- Find free pallets from local stores or online groups
Different Ways to Customize
Materials: Instead of traditional wooden pallets, try reclaimed wood for a rustic look or plywood for a smoother finish. For a modern touch, use metal brackets or pipes as supports.
Colors: Paint the shelf in bright colors like teal or yellow for a pop of color. Use stains to enhance the natural wood grain, or go for a whitewash effect for a shabby chic style.
Styles: Add hooks underneath for hanging items like keys or jewelry. Attach small baskets or bins to the shelf for extra storage. Create a floating shelf by hiding the brackets inside the wood.
Finishes: Use a matte finish for a natural look or a glossy finish for a sleek, modern appearance. Apply a distressed finish by sanding the edges and corners for a vintage feel.
Sizes: Customize the size to fit your space. Make a longer shelf for more storage or a shorter one for a minimalist look. Stack multiple shelves vertically for a tiered effect.
Decorations: Personalize with stencils or decals. Add LED strip lights underneath for a cozy glow. Decorate with plants, picture frames, or books to make it uniquely yours.
Eco-Friendly Tips
Reclaimed wood from old pallets makes a great base. Sand it down to remove splinters. Use non-toxic paint or natural wood stain to finish. Eco-friendly screws or nails, made from recycled metal, hold everything together. For brackets, consider using recycled metal or upcycled materials like old pipes. Seal the wood with natural oils like linseed or beeswax. Attach the shelf to the wall with recycled anchors. Decorate with second-hand items or thrift store finds.
Your DIY Masterpiece Awaits
Building a pallet wall shelf for your bedroom is a rewarding project. You’ve learned how to select pallets, prepare materials, and assemble your shelf. With a bit of creativity and effort, you can transform a simple pallet into a functional and stylish piece. This project not only adds storage but also a unique touch to your room. Remember, the key is in the details—sanding, painting, and securing everything properly. Now, grab your tools, get started, and enjoy the satisfaction of creating something with your own hands. Happy building!
What materials do I need to build a pallet wall shelf?
You'll need wood pallets, sandpaper, wood screws, a drill, measuring tape, a level, and brackets. Optional: paint or stain for finishing.
How do I prepare the pallets for use?
First, disassemble the pallet using a pry bar or saw. Then, sand the wood to remove splinters and rough edges. Finally, clean the wood to get rid of any dirt or debris.
How do I measure and cut the wood?
Measure the desired length for your shelf. Mark the wood with a pencil and use a saw to cut it. Double-check measurements to ensure accuracy.
How do I attach the brackets to the wall?
Use a level to ensure the brackets are straight. Mark the spots for the screws, then drill pilot holes. Secure the brackets to the wall with wood screws.
How do I attach the shelf to the brackets?
Place the cut wood on the brackets. Use a drill to secure the wood to the brackets with screws. Make sure everything is tight and level.
Can I paint or stain the shelf?
Absolutely! Paint or stain the wood to match your room's decor. Let it dry completely before attaching it to the brackets.
How much weight can the shelf hold?
It depends on the brackets and wood used. Generally, a well-secured pallet shelf can hold around 20-30 pounds. Always test with lighter items first.