
Home>Home & Furniture>Bathroom>DIY Bathroom Tile Installation Guide
Bathroom
DIY Bathroom Tile Installation Guide
Published: July 12, 2024
Learn how to install bathroom tiles like a pro with our comprehensive DIY guide. Step-by-step instructions, expert tips, and essential tools for a flawless finish.
(Many of the links in this article redirect to a specific reviewed product. Your purchase of these products through affiliate links helps to generate commission for Twigandthistle.com, at no extra cost. Learn more)
Tiling your bathroom yourself can be a fun and rewarding project. Whether sprucing up an old space or creating a new look, you don't need to be a pro to get great results. With some planning, the right tools, and a bit of patience, you can transform your bathroom into a stylish and functional area. This guide covers everything from choosing materials to installing tiles, ensuring you get the job done right. Get ready to roll up your sleeves and dive into the world of DIY bathroom tiling!
Getting Ready for Your Project
Gather Materials: Collect all necessary tools and materials. This includes tiles, adhesive, grout, spacers, a tile cutter, a notched trowel, a level, and safety gear.
Safety First: Wear safety goggles and gloves to protect your eyes and hands. Ensure proper ventilation if using strong adhesives.
Clear the Area: Remove any existing tiles, fixtures, or debris from the bathroom. Clean the surface thoroughly to ensure the new tiles adhere properly.
Measure and Plan: Measure the area to determine how many tiles you'll need. Plan the layout to avoid awkward cuts and ensure a balanced look.
Prepare the Surface: Make sure the surface is smooth and dry. Use a level to check for any uneven spots and sand them down if necessary.
Mix Adhesive: Follow the instructions on the adhesive package. Mix only what you can use within the working time to avoid waste.
Set Up Workspace: Arrange your tools and materials within easy reach. Lay down a drop cloth to catch any spills or debris.
Test Fit: Lay out a few tiles without adhesive to see how they fit. Make any necessary adjustments before you start applying adhesive.
Mark Guidelines: Use a chalk line or pencil to mark straight lines on the surface. This will help keep your tiles aligned as you work.
Check for Obstacles: Identify any pipes, outlets, or other obstacles. Plan how you'll cut tiles to fit around these areas.
Mix Grout: Prepare the grout according to the package instructions. Like adhesive, mix only what you can use within the working time.
Final Inspection: Double-check all measurements and plans. Make sure you have everything you need before starting the installation.
What You Need to Get Started
Tiles: Choose tiles that fit your bathroom's style and size. Ceramic, porcelain, and natural stone are popular options.
Tile Adhesive: This sticky substance holds tiles in place on the wall or floor. Make sure it's suitable for your chosen tile type.
Grout: Fills the gaps between tiles, providing a finished look and preventing water from seeping through.
Tile Spacers: Small plastic pieces that ensure even spacing between tiles during installation.
Tile Cutter: A tool for cutting tiles to fit around edges and corners. Manual or electric options are available.
Notched Trowel: Used to spread tile adhesive evenly on the surface. The notches help create grooves for better adhesion.
Grout Float: A flat tool for spreading grout into the spaces between tiles.
Sponge: Essential for cleaning excess grout off tile surfaces before it dries.
Level: Ensures tiles are laid evenly and straight.
Tape Measure: Measures the area to be tiled and helps with cutting tiles to the correct size.
Pencil: Marks cutting lines on tiles.
Bucket: Holds water for cleaning tools and mixing grout.
Rubber Mallet: Gently taps tiles into place without breaking them.
Safety Gear: Includes gloves, goggles, and a dust mask to protect yourself during cutting and mixing.
Tile Sealer: Applied after grout dries to protect tiles and grout from moisture and stains.
How Much Time and Skill You Need
Skill Level: Intermediate
Time Required: 2-3 days
Preparation: 4-6 hours
- Gather materials
- Clean and prep the surface
Layout and Planning: 2-3 hours
- Measure and mark guidelines
- Plan tile placement
Tile Installation: 8-10 hours
- Apply adhesive
- Place tiles
- Use spacers for even gaps
Drying Time: 24 hours
- Allow adhesive to set
Grouting: 3-4 hours
- Apply grout
- Clean excess grout
Final Touches: 2-3 hours
- Seal grout
- Clean tiles
Total Time: 2-3 days
Follow These Steps
Gather Materials and Tools
- Tiles
- Tile adhesive
- Grout
- Tile spacers
- Notched trowel
- Tile cutter
- Level
- Sponge
- Bucket
- Tape measure
- Pencil
Prepare the Surface
- Clean the wall or floor thoroughly.
- Ensure the surface is dry and smooth.
- Repair any cracks or holes.
Plan the Layout
- Measure the area to determine the tile layout.
- Mark the center point of the wall or floor.
- Lay out a row of tiles with spacers to see how they fit.
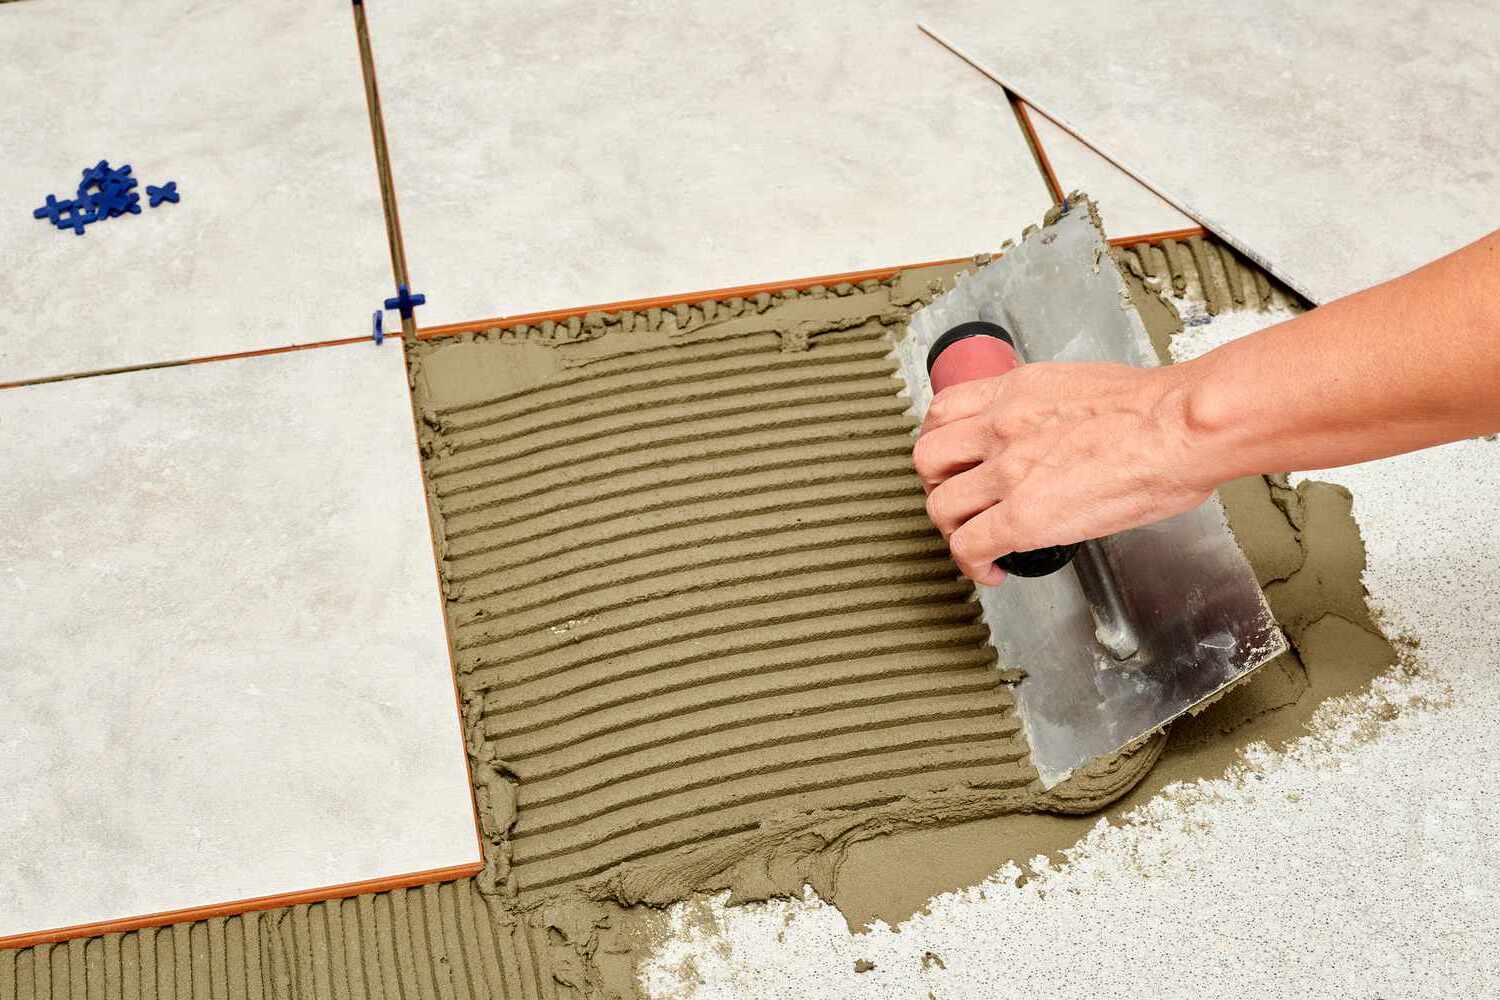
Apply Tile Adhesive
- Mix the adhesive according to the instructions.
- Spread adhesive on a small section using a notched trowel.
- Hold the trowel at a 45-degree angle for even application.
Place the Tiles
- Press the first tile into the adhesive at the center point.
- Place spacers between tiles for even gaps.
- Continue placing tiles, working outward from the center.
Cut Tiles to Fit
- Measure and mark tiles needing cuts.
- Use a tile cutter to cut tiles to size.
- Smooth any rough edges with a file.
Allow Adhesive to Set
- Let the adhesive dry for 24 hours.
- Avoid walking on or disturbing the tiles during this time.
Apply Grout
- Mix grout according to the instructions.
- Spread grout over the tiles using a rubber float.
- Press grout into the gaps between tiles.
Clean Excess Grout
- Wipe off excess grout with a damp sponge.
- Rinse the sponge frequently to keep it clean.
- Allow grout to dry for 24 hours.
Seal the Grout
- Apply grout sealer to protect against moisture and stains.
- Follow the sealer instructions for application and drying time.
Final Touches
- Remove tile spacers.
- Clean the tiles with a damp cloth.
- Inspect the installation for any missed spots or imperfections.
Helpful Hints for Success
Plan your layout before starting. Measure your space and mark the center point on the wall or floor. This helps ensure tiles are evenly placed.
Use a level to keep tiles straight. Uneven tiles can cause problems later.
Apply thin-set mortar in small sections. It dries quickly, so work in areas you can finish within 15 minutes.
Use spacers between tiles for even gaps. This makes grouting easier and looks professional.
Cut tiles with a wet saw for clean edges. Measure twice, cut once to avoid mistakes.
Seal tiles after installation. This protects against water damage and stains.
Common mistakes to avoid:
- Skipping the layout step. This can lead to uneven tiles.
- Not using a level. Crooked tiles look bad and can cause issues.
- Applying too much mortar at once. It can dry before you place tiles.
- Forgetting spacers. Uneven gaps make grouting difficult.
- Not sealing tiles. Water can seep in and cause damage.
Alternatives:
- Instead of traditional ceramic, consider vinyl tiles. Easier to cut and install.
- Use peel-and-stick tiles for a quick update. No mortar or grout needed.
- For a unique look, try reclaimed wood tiles. Adds warmth and character.
How Much Will It Cost?
Tiles: $2 to $10 per square foot. For a 100-square-foot bathroom, expect to spend $200 to $1,000.
Tile Adhesive: $20 to $50 for a 50-pound bag, enough for 100 square feet.
Grout: $10 to $30 for a 25-pound bag, enough for 100 square feet.
Tile Spacers: $5 to $10 for a pack of 200.
Tile Cutter: $30 to $100. A manual tile cutter is cheaper, while an electric one costs more.
Trowel: $10 to $20.
Grout Float: $10 to $15.
Sponge: $2 to $5.
Level: $10 to $30.
Measuring Tape: $5 to $15.
Bucket: $5 to $10.
Safety Gear: $10 to $20 for gloves, goggles, and a mask.
Total Estimated Cost: $317 to $1,305.
Budget-Friendly Alternatives:
- Tiles: Consider peel-and-stick tiles, which cost $1 to $3 per square foot.
- Tile Cutter: Rent one from a hardware store for about $15 per day.
- Safety Gear: Use items you already have at home.
Ways to Personalize Your Tiles
Materials: Instead of traditional ceramic tiles, consider porcelain for a more durable option. Glass tiles can add a modern, sleek look. For a natural feel, use stone tiles like marble or slate.
Colors: Choose neutral tones like beige or gray for a timeless look. For a bold statement, go with bright colors like teal or red. Pastel shades can create a calming atmosphere.
Styles: Create a mosaic pattern using small, colorful tiles. For a classic look, use subway tiles in a brick pattern. Hexagon tiles can add a unique, geometric touch.
Grout: Use colored grout to make the tiles pop. Epoxy grout is more durable and stain-resistant than traditional grout. For a seamless look, choose matching grout that blends with the tile color.
Borders and Accents: Add a border tile in a contrasting color for visual interest. Use accent tiles with patterns or textures to break up large areas of plain tiles. Metallic tiles can add a touch of luxury.
Finishes: Choose a matte finish for a modern, understated look. Glossy finishes can make the bathroom feel brighter and more spacious. Textured tiles can add depth and interest to the walls or floor.
Layout: Experiment with different layouts like herringbone or diagonal patterns. Vertical stacking can make the room appear taller. Random placement of different-sized tiles can create a unique, artistic effect.
Eco-Friendly Ideas for Your Project
Eco-friendly materials can make your bathroom tile installation both beautiful and sustainable. Recycled glass tiles are a great option. They come in various colors and patterns, adding a unique touch to your bathroom. Cork tiles are another eco-friendly choice. Cork is renewable and provides a soft, warm feel underfoot.
For grout, consider using low-VOC (volatile organic compounds) options. These are better for indoor air quality. Natural stone tiles like slate or marble can also be eco-friendly if sourced responsibly. Look for certifications indicating sustainable quarrying practices.
Adhesives should be chosen carefully. Opt for water-based adhesives with low VOCs. These are less harmful to the environment and your health.
Reusing old tiles can save money and reduce waste. If you have leftover tiles from a previous project, consider incorporating them into your new design. This adds a unique, personalized touch while being eco-friendly.
Tools can also be sustainable. Use manual tile cutters instead of electric ones to save energy. Borrow or rent tools you don’t use often instead of buying new ones.
Sealants should be eco-friendly too. Look for water-based sealants that are less toxic and better for the environment.
By choosing sustainable materials and methods, you can create a beautiful, eco-friendly bathroom that you can feel good about.
Your DIY Bathroom Awaits
You've got all the tools, materials, and know-how to tackle your bathroom tile project. Remember, preparation is key. Double-check your measurements, ensure surfaces are clean, and take your time with each tile. Mistakes happen, but they can be fixed. Don't rush the grouting process; it seals your hard work. Once everything's set, step back and admire your handiwork. You've transformed your bathroom with your own two hands. Not only did you save money, but you also gained valuable skills. Now, every time you step into your bathroom, you'll feel a sense of pride. Keep this momentum going for future projects. Your home is your canvas, and you've just added a beautiful stroke. Happy tiling!
How do I choose the right tiles for my bathroom?
Pick tiles that are water-resistant and durable. Ceramic or porcelain tiles work best. Consider the size and color to match your bathroom's style.
What tools will I need for tile installation?
You'll need a tile cutter, trowel, spacers, level, grout, adhesive, and a sponge. Don't forget safety gear like gloves and goggles.
How do I prepare the bathroom wall or floor before tiling?
Clean the surface thoroughly. Make sure it's dry and smooth. If there are any cracks or holes, fill them in. Use a primer if needed.
What's the best way to apply tile adhesive?
Spread the adhesive evenly with a notched trowel. Work in small sections to prevent it from drying out. Press each tile firmly into the adhesive.
How do I ensure the tiles are level?
Use tile spacers to keep tiles evenly spaced. Check with a level frequently. Adjust as needed before the adhesive sets.
When should I apply grout?
Wait at least 24 hours after setting the tiles. Mix the grout and spread it with a rubber float. Wipe off excess with a damp sponge.
How do I maintain my newly tiled bathroom?
Clean tiles regularly with a mild cleaner. Avoid harsh chemicals that can damage the grout. Seal the grout every six months to keep it waterproof.