
Home>Create & Decorate>DIY & Crafts>Wood Kiln DIY: How To Build Your Own
DIY & Crafts
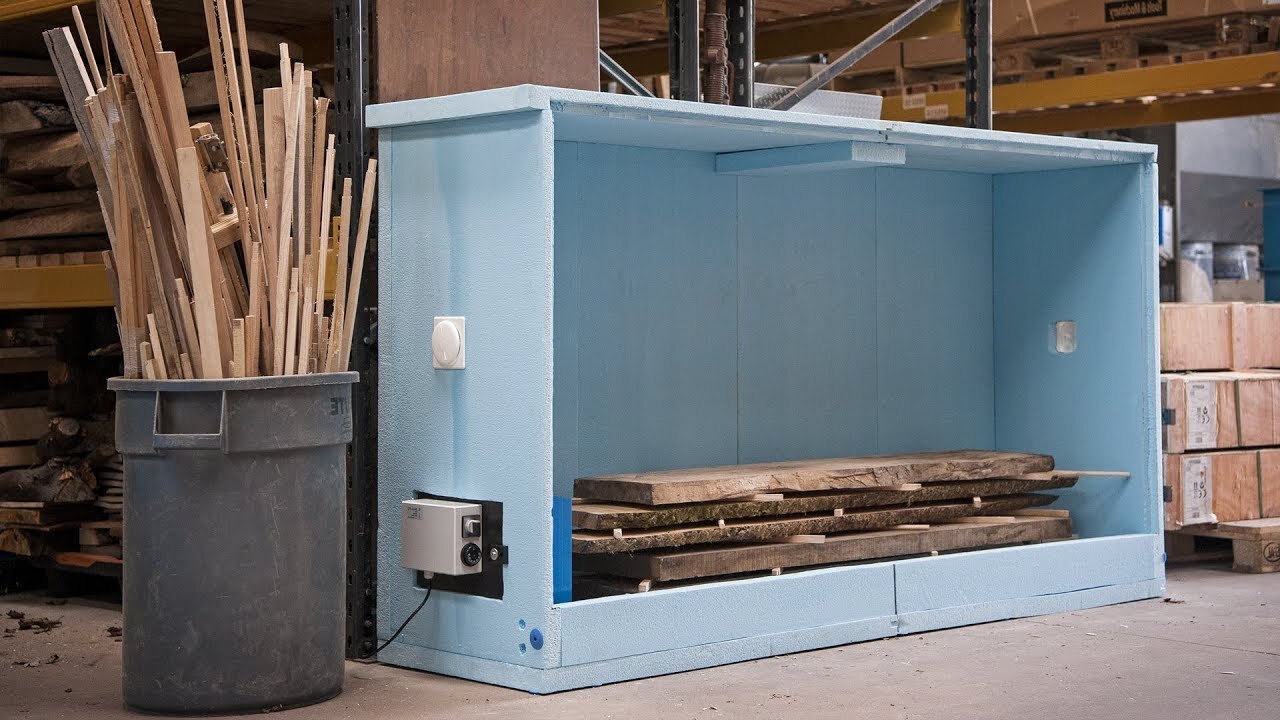
Wood Kiln DIY: How To Build Your Own
Published: June 10, 2024

Senior Editor in Create & Decorate, Kathryn combines traditional craftsmanship with contemporary trends. Her background in textile design and commitment to sustainable crafts inspire both content and community.
Learn how to build your own wood kiln with our DIY guide. Perfect for DIY & Crafts enthusiasts looking to take their projects to the next level.
(Many of the links in this article redirect to a specific reviewed product. Your purchase of these products through affiliate links helps to generate commission for Twigandthistle.com, at no extra cost. Learn more)
Introduction
So, you're a woodworking enthusiast, and you're looking for a way to dry your own lumber at home? Building your own wood kiln might just be the perfect solution for you. Not only does it give you the ability to control the drying process, but it also allows you to save money by not having to rely on commercial kilns. In this article, we'll guide you through the process of building your very own wood kiln, from planning and gathering materials to the final testing and usage. Let's dive in and get started on this exciting DIY project!
Materials Needed
To get started on building your DIY wood kiln, you'll need to gather the following materials:
- Pressure-treated lumber: This will be used to construct the frame of the kiln, so make sure to get enough to fit the size of the kiln you want to build.
- Insulation: Look for high-quality insulation to line the inside of the kiln. Fiberglass insulation is a popular choice for this purpose.
- Plywood: You'll need this to cover the frame and insulation, so make sure to get enough to cover the entire structure.
- Moisture meter: This tool will be essential for monitoring the moisture content of the wood during the drying process.
- Heating element: Depending on your preference, you can choose between electric, solar, or even a wood-fired heating element for your kiln.
- Thermometer and hygrometer: These instruments will help you monitor the temperature and humidity levels inside the kiln.
- Sealant: To ensure that the kiln is airtight, you'll need a high-quality sealant to prevent any air leaks.
- Fasteners: Nails, screws, and other fasteners will be necessary for assembling the frame and securing the plywood.
Gathering these materials is the first step in embarking on your wood kiln DIY project. Once you have everything on hand, you'll be ready to move on to the planning stage.
Planning Your Wood Kiln
Before diving into the construction of your wood kiln, it's crucial to plan out the design and layout. Here are the key steps to consider during the planning phase:
-
Determine the Size: Decide on the capacity of your wood kiln based on the amount of lumber you typically work with. Consider the space available for the kiln and ensure it can accommodate the desired capacity.
-
Location: Choose a suitable location for the wood kiln. It should be a well-ventilated area with access to a power source if you're using an electric heating element. Additionally, consider the proximity to your woodworking area for convenience.
-
Ventilation: Plan for adequate ventilation to allow for proper airflow within the kiln. This is essential for controlling temperature and humidity levels during the drying process.
-
Insulation: Research and select the appropriate insulation material for your wood kiln. Ensure that it provides efficient heat retention and is suitable for the local climate conditions.
-
Heating Element: Determine the type of heating element you'll use based on your available resources and preferences. Electric heating elements are convenient, while solar or wood-fired options offer sustainability.
-
Budget and Timeline: Set a budget for the project, including all materials and tools required. Additionally, establish a timeline for the construction process, considering any potential challenges or setbacks.
By carefully planning these aspects, you'll lay a solid foundation for the successful construction and operation of your DIY wood kiln. Once the planning phase is complete, you can proceed to the next steps of building the frame and insulation.
Building the Frame
Building the frame is a critical step in constructing your DIY wood kiln. Follow these steps to create a sturdy and reliable frame for your kiln:
-
Cutting the Lumber: Begin by cutting the pressure-treated lumber to the required lengths for the frame components. Use a sawhorse and a circular saw to make precise cuts, ensuring that the pieces fit together seamlessly.
-
Assembling the Base: Lay out the cut lumber to form the base of the frame, ensuring that the corners are square. Use galvanized screws or nails to secure the pieces together, creating a solid foundation for the kiln.
-
Building the Walls: Once the base is assembled, erect the walls of the frame by attaching the vertical pieces to the base. Ensure that the walls are plumb and securely fastened to the base to maintain structural integrity.
-
Adding Support Beams: Install support beams across the top of the frame to provide additional stability and to support the roof structure. Use joist hangers or appropriate fasteners to secure the beams in place.
-
Creating the Roof Structure: Construct the roof frame using additional lumber, ensuring that it fits securely onto the walls of the frame. This will form the top enclosure of the wood kiln.
-
Checking for Stability: Once the frame is fully assembled, check for any wobbling or instability. Reinforce any weak points and ensure that the frame is solid and level on the ground.
By following these steps, you'll have a well-constructed frame that forms the basis of your DIY wood kiln. With the frame in place, you can proceed to the next phase of installing the insulation to create an efficient drying environment for your lumber.
Installing the Insulation
Installing the insulation is a crucial step in creating an efficient and effective wood kiln. Proper insulation helps to retain heat and regulate the internal temperature, creating an optimal environment for drying lumber. Here's a detailed guide on how to install insulation in your DIY wood kiln:
-
Measuring and Cutting: Begin by measuring the dimensions of the interior walls and roof of the kiln. Use these measurements to cut the insulation material to the appropriate sizes. Ensure that the insulation fits snugly within the frame, covering all interior surfaces.
-
Attaching the Insulation: With the cut insulation pieces ready, use adhesive or appropriate fasteners to secure them to the interior walls and roof of the kiln. Pay close attention to sealing any gaps or seams to prevent heat loss.
-
Layering the Insulation: Depending on the insulation material used, consider adding multiple layers to enhance heat retention. This is especially important for regions with colder climates, as it helps maintain a consistent internal temperature.
-
Sealing Joints and Edges: To create an airtight seal, use high-temperature silicone caulk or sealant to seal the joints and edges of the insulation. This prevents air leakage and ensures that the kiln retains heat effectively.
-
Protecting the Insulation: To safeguard the insulation from potential damage, consider covering it with a layer of plywood or another protective material. This adds an extra layer of durability and shields the insulation from any potential impact.
-
Inspecting for Uniform Coverage: Once the insulation is installed, inspect the interior of the kiln to ensure that all surfaces are uniformly covered. Address any areas where the insulation may be lacking or not properly secured.
By following these steps, you'll effectively insulate your wood kiln, creating an environment that promotes efficient and controlled drying of your lumber. With the insulation in place, you can move on to the next phase of adding the heating element to complete your DIY wood kiln.
Adding the Heating Element
The heating element is a vital component of your DIY wood kiln, as it provides the necessary heat to facilitate the drying process of the lumber. Here's a comprehensive guide on how to add the heating element to your wood kiln:
-
Selecting the Heating Source: Depending on your preferences and available resources, choose the most suitable heating source for your wood kiln. Electric heating elements are convenient and easy to control, while solar-powered options offer sustainability and cost-efficiency. Alternatively, a wood-fired heating element provides a traditional approach and can be a great option if you have access to wood fuel.
-
Positioning the Heating Element: Determine the optimal placement for the heating element within the wood kiln. It should be strategically positioned to ensure even distribution of heat throughout the kiln. Consider factors such as airflow and proximity to the lumber to achieve uniform drying.
-
Installing the Heating Element: If you opt for an electric heating element, follow the manufacturer's instructions for installation. Ensure that it is securely mounted and wired according to safety standards. For solar or wood-fired heating, set up the necessary infrastructure to harness and distribute the heat effectively.
-
Temperature Control Mechanism: Implement a temperature control mechanism to regulate the heat output of the heating element. This can be achieved through the use of thermostats, timers, or manual controls, depending on the complexity of your setup.
-
Monitoring Equipment: Install a thermometer and hygrometer within the wood kiln to monitor the temperature and humidity levels accurately. This allows you to make real-time adjustments to the heating element and maintain optimal drying conditions for the lumber.
-
Safety Precautions: Prioritize safety when installing the heating element. Ensure that all electrical connections are secure and insulated to prevent any hazards. If using a wood-fired heating element, follow proper fire safety protocols and consider the installation of a smoke vent for ventilation.
By following these steps, you'll successfully integrate the heating element into your DIY wood kiln, creating a controlled and efficient drying environment for your lumber. Once the heating element is in place, you can proceed to the final phase of testing and using your wood kiln to dry your own lumber.
Testing and Using Your DIY Wood Kiln
After completing the construction of your DIY wood kiln, it's essential to conduct thorough testing before utilizing it for drying your lumber. Here's a detailed guide on testing and using your wood kiln:
-
Initial Heat Test: Before introducing any lumber into the kiln, conduct an initial heat test to ensure that the heating element functions as intended. Monitor the temperature inside the kiln using the installed thermometer and verify that it reaches the desired drying temperature. This test allows you to identify and address any heating issues before proceeding with the drying process.
-
Moisture Content Check: Use a moisture meter to measure the initial moisture content of the lumber you intend to dry. This baseline measurement provides a reference point for monitoring the drying progress and determining when the lumber has reached the desired moisture level.
-
Load Placement: When loading the lumber into the kiln, arrange it in a manner that allows for proper airflow and even exposure to the heat. Avoid overcrowding the kiln, as this can impede the drying process and lead to uneven results.
-
Monitoring and Adjustments: Throughout the drying process, consistently monitor the temperature and humidity levels inside the kiln using the installed instruments. Make any necessary adjustments to the heating element or ventilation to maintain optimal drying conditions. Regular checks ensure that the lumber dries uniformly and without any issues.
-
Drying Progress Evaluation: Periodically check the moisture content of the lumber as it undergoes the drying process. Compare the ongoing measurements to the initial moisture content to gauge the progress. Once the lumber reaches the desired moisture level, it is ready for use in your woodworking projects.
-
Quality Assurance: Inspect the dried lumber for any signs of warping, cracking, or other defects that may have occurred during the drying process. Properly dried lumber should exhibit minimal distortion and be suitable for various woodworking applications.
-
Usage and Benefits: With your DIY wood kiln successfully tested and proven effective, you can confidently utilize it for drying lumber for your woodworking projects. Enjoy the benefits of having control over the drying process, ensuring that your lumber is of high quality and ready for use in your creations.
By following these testing and usage guidelines, you'll be able to maximize the efficiency and effectiveness of your DIY wood kiln, ultimately enhancing the quality of the lumber for your woodworking endeavors.
Conclusion
Congratulations on successfully completing the construction of your DIY wood kiln! By following the detailed steps outlined in this guide, you've gained the knowledge and skills to build and operate a functional wood kiln for drying your own lumber. With careful planning, precise construction, and thorough testing, you've created a valuable asset for your woodworking endeavors.
As you embark on using your wood kiln, remember to prioritize safety and consistently monitor the drying process to achieve optimal results. The ability to control the drying environment and produce high-quality, properly seasoned lumber is a significant advantage that will enhance the quality of your woodworking projects.
With your DIY wood kiln in operation, you have the freedom to efficiently dry lumber according to your specific needs and preferences. Whether it's for furniture making, crafting, or construction projects, the dried lumber from your wood kiln will be a valuable resource for your creative pursuits.
As you continue to explore the world of woodworking, your DIY wood kiln stands as a testament to your dedication and passion for the craft. Embrace the opportunities it presents and enjoy the satisfaction of working with impeccably dried lumber, knowing that you've achieved this through your own ingenuity and effort. Happy woodworking!