
Home>Create & Decorate>DIY & Crafts>Slope-Savvy DIY: Crafting Hillside Steps
DIY & Crafts
Slope-Savvy DIY: Crafting Hillside Steps
Published: June 13, 2024

Content Creator specializing in woodworking and interior transformations. Caegan's guides motivate readers to undertake their own projects, while his custom furniture adds a personal touch.
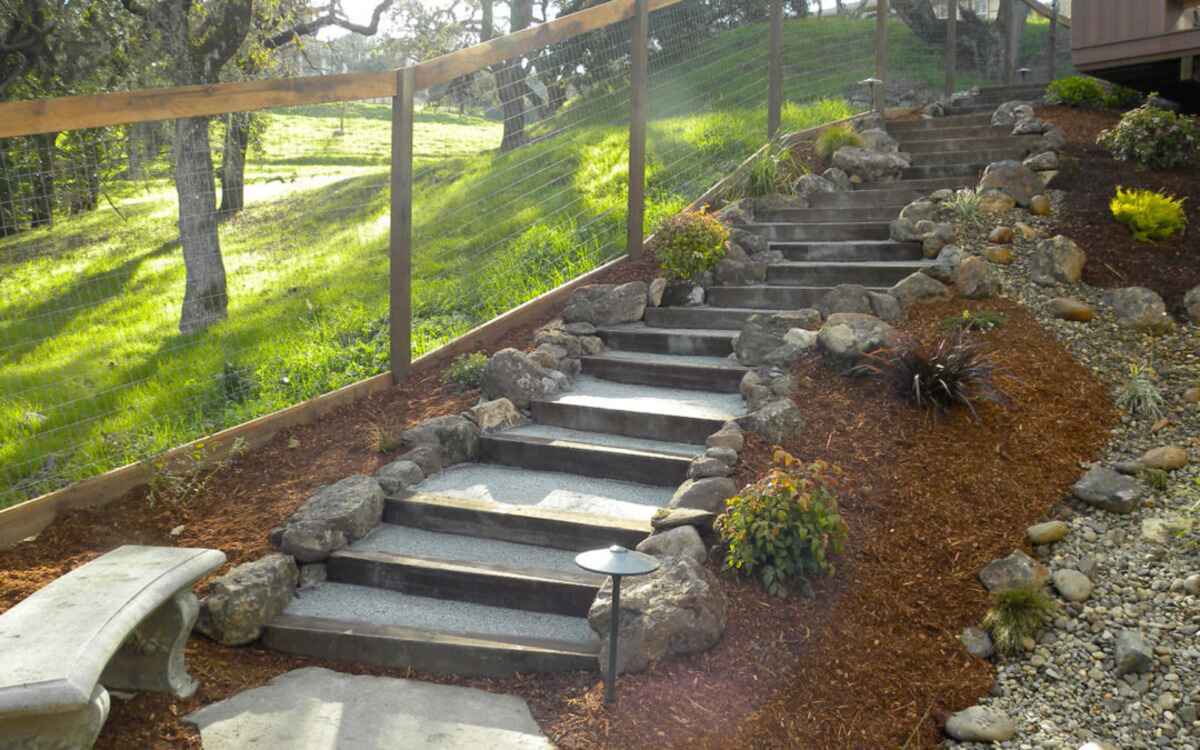
Discover expert tips and tricks for crafting hillside steps with our DIY and crafts guide. Create a functional and stylish solution for your sloped landscape.
(Many of the links in this article redirect to a specific reviewed product. Your purchase of these products through affiliate links helps to generate commission for Twigandthistle.com, at no extra cost. Learn more)
Understanding Hillside Landscaping
Hillside landscaping can add a touch of natural beauty to your outdoor space, but it also comes with its own set of challenges. When it comes to crafting hillside steps, it's crucial to understand the unique characteristics of the landscape. The slope of the hill, the type of soil, and the presence of any existing vegetation all play a crucial role in determining the approach you should take. By understanding the specific features of your hillside, you can effectively plan and execute the construction of steps that not only enhance the aesthetic appeal of your property but also ensure safety and functionality.
Assessing the Slope for Steps
Assessing the slope of your hillside is the first crucial step in crafting hillside steps. The angle of the slope will determine the design and construction of the steps. A gentle slope may only require a few steps, while a steeper incline may necessitate a more intricate tiered design. To assess the slope, you can use a simple method involving a string level or a water level. This will help you determine the degree of the slope and plan the placement and size of each step accordingly. Additionally, consider the natural water flow on the slope during rain. Observing how water moves down the hillside will guide you in creating steps that effectively manage water runoff and prevent erosion.
When assessing the slope, it's also essential to take into account any existing vegetation or obstacles. Trees, shrubs, or large rocks may need to be worked around or integrated into the design of the steps. By carefully evaluating the slope and its surroundings, you can ensure that the steps blend harmoniously with the natural features of the hillside, creating a seamless and visually appealing transition.
Choosing the Right Materials
When it comes to crafting hillside steps, selecting the right materials is essential for ensuring durability, safety, and aesthetic appeal. Here are some key considerations for choosing the right materials:
-
Natural Stone: Natural stone, such as flagstone or fieldstone, is a popular choice for hillside steps due to its durability and natural appearance. It provides a timeless and rustic look that complements the surrounding landscape. Additionally, the irregular shapes and textures of natural stone can create a visually interesting and organic feel to the steps.
-
Concrete Pavers: Concrete pavers offer a versatile and cost-effective option for hillside steps. They come in a variety of shapes, sizes, and colors, allowing for customization to suit your specific design preferences. Concrete pavers are also relatively easy to install and maintain, making them a practical choice for DIY enthusiasts.
-
Pressure-Treated Wood: For a more traditional and warm aesthetic, pressure-treated wood can be used for constructing hillside steps. It provides a natural and inviting look that blends well with the surrounding environment. However, it's important to choose high-quality, rot-resistant wood and ensure proper maintenance to prevent deterioration over time.
-
Composite Materials: Composite materials, such as recycled plastic or wood fibers, offer a durable and low-maintenance alternative for hillside steps. They are resistant to rot, insects, and warping, making them an ideal choice for long-term use in outdoor settings. Additionally, composite materials are available in a range of colors and textures, allowing for customization to match your landscape design.
-
Gravel and Pea Gravel: Gravel can be used as a filling material for the steps, providing excellent drainage and preventing erosion. Pea gravel, in particular, offers a smooth and comfortable surface for walking. When combined with other materials, such as timber or stone, gravel can create a visually appealing and functional step design.
By carefully considering the characteristics of each material and how they align with your specific needs and preferences, you can choose the right materials that will enhance the beauty and functionality of your hillside steps.
Designing and Planning the Steps
Designing and planning the steps for your hillside landscape is a crucial phase that sets the foundation for a successful construction process. Here are the key steps to consider when designing and planning your hillside steps:
-
Step Layout: Begin by determining the layout of the steps. Consider the natural flow of the landscape and how the steps can seamlessly integrate with the surroundings. The layout should take into account the natural contours of the hillside, ensuring that the steps blend harmoniously with the existing terrain.
-
Step Size and Rise: The size and rise of each step are essential factors to consider. The height and depth of the steps should be carefully calculated to provide a comfortable and safe walking experience. Additionally, maintaining consistent step dimensions throughout the design will contribute to a visually appealing and uniform appearance.
-
Safety and Accessibility: Prioritize safety and accessibility in the design of the steps. Ensure that the steps are evenly spaced and have a suitable tread depth to prevent tripping hazards. If the steps will be frequently used by individuals with mobility challenges, consider incorporating handrails or additional support features to enhance accessibility.
-
Erosion Control: Integrate erosion control measures into the design to prevent soil erosion and maintain the stability of the hillside. This may include incorporating retaining walls, drainage channels, or planting vegetation strategically to anchor the soil.
-
Aesthetics and Landscaping: Consider the aesthetic aspects of the steps and how they contribute to the overall landscaping. Incorporate landscaping elements such as native plants, ground cover, or decorative gravel to soften the appearance of the steps and create a visually appealing transition between different levels of the hillside.
-
Material Integration: Determine how the chosen materials will be integrated into the design. Whether using natural stone, concrete pavers, or wood, ensure that the materials align with the overall design vision and complement the surrounding environment.
-
Water Management: Plan for effective water management within the step design. Consider how water will flow down the hillside and incorporate features such as drainage channels or permeable materials to manage water runoff and prevent erosion.
By carefully considering these aspects during the design and planning phase, you can create a well-thought-out blueprint for constructing hillside steps that not only enhance the functionality of your landscape but also contribute to its visual appeal and long-term sustainability.
Building the Hillside Steps
Once the design and planning phase is complete, it's time to roll up your sleeves and start building the hillside steps. This phase requires careful execution and attention to detail to ensure the structural integrity and longevity of the steps. Here's a detailed guide on how to build hillside steps effectively:
1. Excavation and Preparation
Begin by marking the layout of the steps using stakes and string, following the planned design. Excavate the soil to create a level base for the steps, ensuring that the depth and width of each step are consistent. Remove any rocks, roots, or debris from the excavation area to create a clean and stable foundation.
2. Base and Foundation
Lay a base material, such as crushed gravel or compactible fill, to create a stable foundation for the steps. Tamp down the base material to ensure proper compaction and stability. This foundation will provide support for the steps and help prevent settling or shifting over time.
3. Step Construction
Depending on the chosen materials, begin constructing the steps from the bottom up. For natural stone or concrete pavers, lay each piece in the desired pattern, ensuring a snug fit and level placement. If using pressure-treated wood, secure the steps in place using appropriate fasteners and ensure that each step is level and securely anchored to the hillside.
4. Backfill and Compaction
Backfill behind each step with additional base material, compacting it thoroughly to provide support and stability. This step is crucial for preventing soil erosion and maintaining the integrity of the steps. Proper compaction will also minimize settling and shifting of the steps over time.
5. Integration with the Landscape
As you build the steps, consider how they integrate with the surrounding landscape. Incorporate native plants, ground cover, or decorative gravel around the steps to soften their appearance and create a seamless transition between the steps and the hillside. This integration enhances the overall aesthetic appeal of the steps and contributes to the natural beauty of the landscape.
6. Finishing Touches
Once the steps are in place, take the time to inspect and make any necessary adjustments. Ensure that each step is level, stable, and free from any tripping hazards. Consider adding handrails or lighting for additional safety and accessibility, especially if the steps will be used frequently, or if the slope is steep.
By following these detailed steps, you can effectively build hillside steps that not only enhance the functionality of your landscape but also stand the test of time, providing safe and visually appealing access to different levels of your hillside.
Adding Finishing Touches and Maintenance Tips
After completing the construction of hillside steps, adding finishing touches and implementing maintenance practices are essential for ensuring the longevity and visual appeal of the steps. Here's a comprehensive guide on how to add those final touches and maintain the steps for years to come:
1. Landscaping Integration
Integrate landscaping elements around the steps to soften their appearance and blend them seamlessly with the surrounding environment. Plant native shrubs, flowers, or ground cover along the edges of the steps to create a natural transition. Consider using decorative gravel or mulch to fill in the spaces between the steps, adding a polished and cohesive look to the overall design.
2. Handrails and Lighting
If the hillside steps are located in an area where additional safety measures are necessary, consider installing handrails for support and stability. Handrails provide added security, especially on steeper slopes or in areas frequented by individuals with mobility challenges. Additionally, incorporating low-voltage lighting along the steps enhances visibility and safety, particularly during the evening or nighttime.
3. Sealing and Maintenance
Depending on the materials used for the steps, consider applying a sealant to protect and preserve their appearance. Natural stone, concrete pavers, and wood can benefit from sealants that provide resistance to moisture, UV exposure, and general wear and tear. Regularly inspect the steps for any signs of damage, such as loose stones, cracked pavers, or rotting wood, and address these issues promptly to prevent further deterioration.
4. Drainage and Erosion Control
Maintain proper drainage around the steps to prevent water accumulation and erosion. Clear any debris or sediment that may collect on the steps or in the surrounding area. If necessary, install additional drainage features, such as French drains or channel drains, to redirect water away from the steps and minimize the risk of erosion.
5. Seasonal Care
Throughout the changing seasons, monitor the steps for any seasonal maintenance needs. In colder climates, ensure that the steps are properly cleared of snow and ice to prevent slippery conditions. In warmer climates, keep an eye on vegetation growth around the steps and trim any overhanging branches or foliage that may obstruct the pathway.
6. Regular Inspections
Perform regular inspections of the steps to identify any potential issues early on. Check for signs of settlement, shifting, or damage to the materials. Addressing minor maintenance needs promptly can prevent more significant problems down the line and extend the lifespan of the steps.
By incorporating these finishing touches and implementing a proactive maintenance routine, you can ensure that your hillside steps not only maintain their structural integrity but also continue to enhance the beauty and functionality of your outdoor space for years to come.