
Home>Create & Decorate>DIY & Crafts>Ship In A Bottle: A DIY Guide To Crafting A Nautical Masterpiece
DIY & Crafts
Ship In A Bottle: A DIY Guide To Crafting A Nautical Masterpiece
Published: May 27, 2024

Senior Editor in Create & Decorate, Kathryn combines traditional craftsmanship with contemporary trends. Her background in textile design and commitment to sustainable crafts inspire both content and community.
Discover how to create a stunning nautical masterpiece with our step-by-step DIY guide. Perfect for craft enthusiasts and nautical lovers. Unlock your creativity today!
(Many of the links in this article redirect to a specific reviewed product. Your purchase of these products through affiliate links helps to generate commission for Twigandthistle.com, at no extra cost. Learn more)
Introduction
So, you've always been fascinated by those intricate ship-in-a-bottle creations, and now you're ready to take on the challenge of crafting your very own nautical masterpiece. Building a ship in a bottle is a timeless art that requires patience, precision, and a steady hand. In this DIY guide, we'll walk you through the step-by-step process of creating your own ship in a bottle, from selecting the perfect materials to sealing it all up. Get ready to embark on a journey of creativity and craftsmanship as we delve into the world of ship in a bottle construction. Let's set sail!
Materials Needed
To embark on this nautical DIY adventure, you'll need a few essential materials to bring your ship in a bottle to life. Here's what you'll need to get started:
-
Bottle: Select a clear glass bottle with a wide enough opening to fit your ship through. Look for a bottle with smooth sides to make the process easier.
-
Wood or Plastic Ship Model Kit: Choose a ship model kit that fits the size of your bottle. These kits typically include all the necessary parts for constructing the ship, such as the hull, masts, and rigging.
-
Tools: Gather a set of small tools for assembling the ship, such as tweezers, small scissors, and glue suitable for model making.
-
Paints and Brushes: If your ship model kit is unpainted, you'll need acrylic paints and fine brushes to add realistic details to the ship.
-
Cork or Putty: You'll need a material to create the illusion of ocean waves inside the bottle. Cork or putty can be shaped and painted to resemble the sea.
-
Long-handled Tweezers or Forceps: These tools will help you carefully place the ship and other components inside the bottle without damaging them.
-
Small Funnel: A small funnel will make it easier to pour the sea-like material into the bottle without making a mess.
-
Sealing Wax or Glue: Once your ship is in place, you'll need a way to securely seal the bottle to prevent any components from shifting.
Gather these materials, and you'll be well-equipped to begin your ship in a bottle project. Now that you have everything you need, let's move on to the first step: choosing the right bottle.
Step 1: Choosing the Right Bottle
When it comes to crafting a ship in a bottle, selecting the perfect bottle is crucial. Here's how to choose the right one:
-
Size and Shape: Opt for a clear glass bottle with a wide enough opening to comfortably fit your ship through. The bottle should be proportional to the size of the ship model kit you've selected. A wider base can provide stability for your ship and make the construction process easier.
-
Smooth Sides: Look for a bottle with smooth, flat sides. This will make it easier to maneuver and position the ship and other components inside the bottle.
-
Clear Glass: Transparency is key. A clear glass bottle will showcase your ship and the simulated sea inside, allowing for a stunning visual display.
-
Personal Preference: Consider the overall aesthetic you want to achieve. Some crafters prefer vintage-style bottles for a classic look, while others may opt for modern or unconventional shapes to add a unique twist to their creation.
By carefully selecting the right bottle, you'll set the stage for a visually captivating ship in a bottle masterpiece. Now that you've chosen the perfect bottle, it's time to move on to the next step: building the ship.
Step 2: Building the Ship
Now that you have the ideal bottle selected, it's time to focus on constructing the ship that will sail within it. Follow these steps to bring your miniature vessel to life:
-
Assemble the Ship Model Kit: Carefully unpack the ship model kit and follow the instructions provided. This typically involves piecing together the hull, attaching the masts, and adding the rigging. Take your time to ensure each component is securely fastened.
-
Painting and Detailing: If your ship model kit is unpainted, use acrylic paints and fine brushes to add intricate details. Pay attention to the color scheme and historical accuracy if you're replicating a specific ship. Add small touches like tiny flags, ropes, and lifeboats to enhance the realism.
-
Miniature Rigging: Creating the rigging for your ship requires precision and patience. Use thin thread or specialized rigging line to carefully thread and secure the intricate network of ropes, pulleys, and sails. This step may require steady hands and a keen eye for detail.
-
Final Touches: Once the ship is fully assembled and detailed, inspect it for any loose parts or imperfections. Make any necessary adjustments to ensure that the ship is sturdy and visually appealing.
By following these steps, you'll have a beautifully crafted ship ready to be placed inside the bottle. With the ship completed, it's time to move on to the next phase: adding the details that will bring your nautical scene to life.
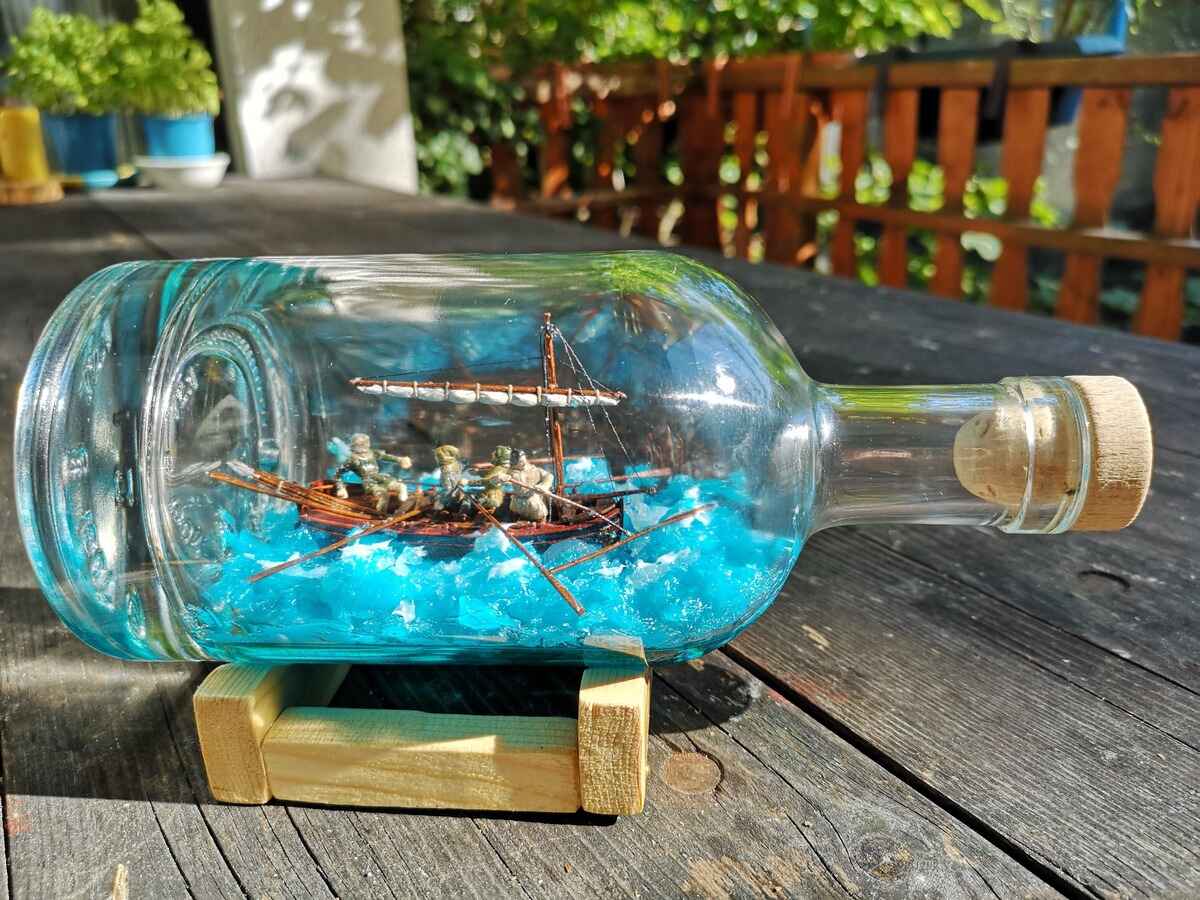
Step 3: Adding the Details
With the ship constructed, it's time to focus on adding the intricate details that will transform your ship in a bottle into a captivating maritime scene. Here's how to bring your nautical masterpiece to life:
-
Creating the Sea: Before placing the ship inside the bottle, you'll need to simulate the ocean within. Use cork or putty to sculpt the waves at the bottom of the bottle. Paint the material in varying shades of blue and white to achieve a realistic water effect. Ensure that the sea complements the scale and style of your ship, creating a visually harmonious scene.
-
Positioning the Ship: Carefully lower the ship into the bottle using long-handled tweezers or forceps. Take your time to position the ship at the desired angle, ensuring that it appears as though it's navigating the simulated waves. Patience and precision are key during this delicate process.
-
Adding Finishing Touches: Enhance the visual appeal of your ship in a bottle by incorporating additional elements such as seagulls, tiny buoys, or a lighthouse on the bottle's cork stopper. These details can add depth and character to your maritime creation, making it even more captivating.
-
Fine-Tuning: Once all the components are in place, take a moment to assess the overall composition. Make any necessary adjustments to the ship's positioning or the sea's appearance to achieve the desired aesthetic. Attention to detail during this stage will elevate the realism of your ship in a bottle.
By meticulously attending to these details, you'll transform your ship in a bottle from a mere model into a captivating maritime vignette. With the details added, the final step is to seal the bottle, preserving your masterpiece for years to come.
Step 4: Sealing the Bottle
Sealing the bottle is the crucial final step in completing your ship in a bottle masterpiece. The goal is to secure all the components inside while maintaining the visual appeal of the scene. Here's how to expertly seal the bottle:
-
Applying Sealing Wax or Glue: Once you're satisfied with the arrangement of the ship, sea, and any additional details inside the bottle, it's time to seal it shut. If you're using sealing wax, carefully melt the wax and pour it over the bottle's opening. Quickly insert the cork stopper and allow the wax to cool and harden, creating a secure seal. Alternatively, you can use a strong adhesive glue to seal the bottle shut. Apply a thin, even layer of glue around the rim of the bottle before firmly pressing the cork stopper into place.
-
Ensuring a Secure Seal: After applying the sealing wax or glue, inspect the bottle to ensure that it's tightly sealed. Gently shake the bottle to check for any movement or rattling of the components inside. If everything remains in place, you've successfully sealed the bottle. This step is crucial for preserving your creation and preventing any shifting or damage over time.
-
Final Inspection: Once the bottle is sealed, take a moment to admire your handiwork. Ensure that the ship, sea, and additional details are prominently displayed and that the seal is neat and secure. Your ship in a bottle is now ready to be proudly showcased, whether as a personal keepsake or a thoughtful gift for a fellow maritime enthusiast.
By expertly sealing the bottle, you've completed the intricate process of crafting a ship in a bottle. Your attention to detail and craftsmanship have resulted in a stunning nautical masterpiece that will undoubtedly be admired for years to come. Now, sit back and revel in the satisfaction of having successfully navigated the art of creating a ship in a bottle.
Conclusion
Crafting a ship in a bottle is a labor of love that combines artistry, precision, and creativity. From selecting the perfect bottle to meticulously positioning the ship and adding lifelike details, each step in the process contributes to the creation of a captivating maritime scene. By following this DIY guide, you've embarked on a journey that has allowed you to channel your passion for nautical history and craftsmanship into a tangible work of art. Whether displayed as a cherished keepsake or shared as a thoughtful gift, your ship in a bottle stands as a testament to your dedication and skill. As you admire your completed masterpiece, take pride in knowing that you've successfully navigated the intricate art of crafting a ship in a bottle, leaving behind a legacy of maritime artistry for generations to appreciate.