
Home>Create & Decorate>DIY & Crafts>Model Ship Building: A DIY Guide To Crafting Your Own Miniature Vessel
DIY & Crafts
Model Ship Building: A DIY Guide To Crafting Your Own Miniature Vessel
Published: May 26, 2024

Senior Editor in Create & Decorate, Kathryn combines traditional craftsmanship with contemporary trends. Her background in textile design and commitment to sustainable crafts inspire both content and community.
Discover the art of model ship building with our comprehensive DIY guide. Craft your own miniature vessel with expert tips and techniques. Perfect for DIY & Crafts enthusiasts!
(Many of the links in this article redirect to a specific reviewed product. Your purchase of these products through affiliate links helps to generate commission for Twigandthistle.com, at no extra cost. Learn more)
Introduction
Are you a fan of maritime history and the art of shipbuilding? Have you ever dreamed of crafting your own miniature vessel that captures the essence of the high seas? If so, then model ship building might just be the perfect DIY project for you. In this comprehensive guide, we will take you through the step-by-step process of creating your very own model ship, from choosing the right materials to adding intricate details and finally displaying your masterpiece. So, grab your tools and let's set sail on this exciting journey of crafting a miniature vessel that will surely make a stunning addition to your home decor.
Choosing the Right Materials
When it comes to model ship building, selecting the right materials is crucial to the success of your project. Here are the essential materials you will need to get started:
1. Wood
The primary material for constructing the hull and other structural components of your model ship is wood. Basswood, balsa wood, and plywood are popular choices due to their workability and durability. Each type of wood offers unique characteristics, so consider the scale and design of your model when choosing the appropriate wood.
2. Glue
A high-quality wood glue is essential for securely bonding the wooden components of your model ship. Look for a strong adhesive that dries clear and is suitable for bonding wood to wood.
3. Tools
Invest in a set of precision tools such as a hobby knife, sandpaper, and a mini saw. These tools will enable you to cut, shape, and refine the wooden pieces with accuracy and precision.
4. Paints and Finishes
To add the finishing touches to your model ship, you will need a variety of paints and finishes. Acrylic paints are ideal for creating intricate details and adding color to different parts of the vessel. Additionally, a clear varnish or lacquer will protect the wood and give your model ship a polished appearance.
5. Rigging Materials
If your model ship includes rigging and sails, you will need thread or fine string to accurately replicate the intricate ropes and lines of a real vessel.
By carefully selecting high-quality materials, you can ensure that your model ship not only looks visually stunning but also stands the test of time. Now that you have the right materials in hand, it's time to move on to the next step in the model ship building process.
Tools and Equipment Needed
When embarking on the journey of model ship building, having the right tools and equipment at your disposal is essential for bringing your miniature vessel to life. Here's a detailed list of the tools and equipment you'll need to ensure a smooth and precise construction process:
-
Hobby Knife: A sharp and precise hobby knife is indispensable for cutting and shaping wooden components with accuracy. Look for a knife with interchangeable blades to cater to various cutting needs.
-
Sandpaper: Smooth out rough edges and refine the surfaces of your wooden pieces with different grits of sandpaper. This will ensure a seamless finish and precise fitting of components.
-
Mini Saw: A small, fine-toothed saw is essential for cutting thicker wooden pieces and creating intricate details. Choose a saw that allows for controlled and precise cuts.
-
Clamps: Securely hold wooden parts together during the gluing process with a set of small clamps. This will ensure that the components bond firmly and accurately.
-
Ruler and Calipers: Accurate measurements are crucial in model ship building. A sturdy ruler and calipers will help you maintain precision and consistency throughout the construction process.
-
Workbench: A dedicated workbench or a flat, stable surface is essential for assembling and working on your model ship. This provides a stable and organized workspace for intricate tasks.
-
Paintbrushes: Invest in a variety of fine paintbrushes for applying detailed paints and finishes to your model ship. Different brush sizes will allow for precision in adding color and intricate details.
-
Modeling Vice: A modeling vice can be incredibly useful for holding small components securely while you work on them. It provides stability and allows for intricate detailing without the risk of slippage.
-
Protective Gear: Safety should always be a priority. Wear protective gear such as safety goggles and a dust mask to safeguard your eyes and respiratory system from wood dust and debris.
-
Magnifying Glass: For working on intricate details, a magnifying glass can be incredibly helpful, especially for modelers who require assistance in focusing on tiny components and delicate features.
Having these essential tools and equipment at your disposal will not only streamline the model ship building process but also ensure that you can execute intricate details with precision and finesse. Now that you're equipped with the necessary tools, it's time to delve into the next phase of crafting your miniature vessel.
Understanding Scale and Measurements
When it comes to model ship building, understanding scale and measurements is paramount to achieving a realistic and visually appealing miniature vessel. Here's a detailed overview of the key aspects to consider when it comes to scale and measurements:
1. Scale Ratio
The scale ratio determines the proportional relationship between the model ship and its real-life counterpart. Common scale ratios for model ships include 1:72, 1:96, and 1:128, among others. Choosing the appropriate scale ratio is essential as it dictates the size of the model and the level of detail that can be achieved.
2. Reference Materials
Gathering accurate reference materials such as blueprints, historical documents, and photographs of the actual ship you are modeling is crucial for ensuring precise measurements and details. These references will guide you in replicating the intricate features and proportions of the real vessel.
3. Measuring Tools
Utilize precise measuring tools such as calipers, rulers, and protractors to ensure accurate dimensions and angles during the construction process. Consistent and accurate measurements are essential for maintaining the scale and proportion of the model ship.
4. Transferring Measurements
Transferring measurements from reference materials to the model components requires precision and attention to detail. Use fine-tipped pencils and marking tools to accurately transfer measurements onto the wood, ensuring that each component aligns with the scale and design of the model.
5. Test Fitting
Regularly test fit components during the assembly process to ensure that they align with the intended scale and proportions. This step is crucial for identifying any discrepancies in measurements and making necessary adjustments to maintain the accuracy of the model ship.
By understanding the significance of scale and measurements in model ship building, you can ensure that your miniature vessel accurately captures the essence of its real-life counterpart. Now that you have a solid grasp of scale and measurements, it's time to apply this knowledge to the construction of the hull and structural components of your model ship.
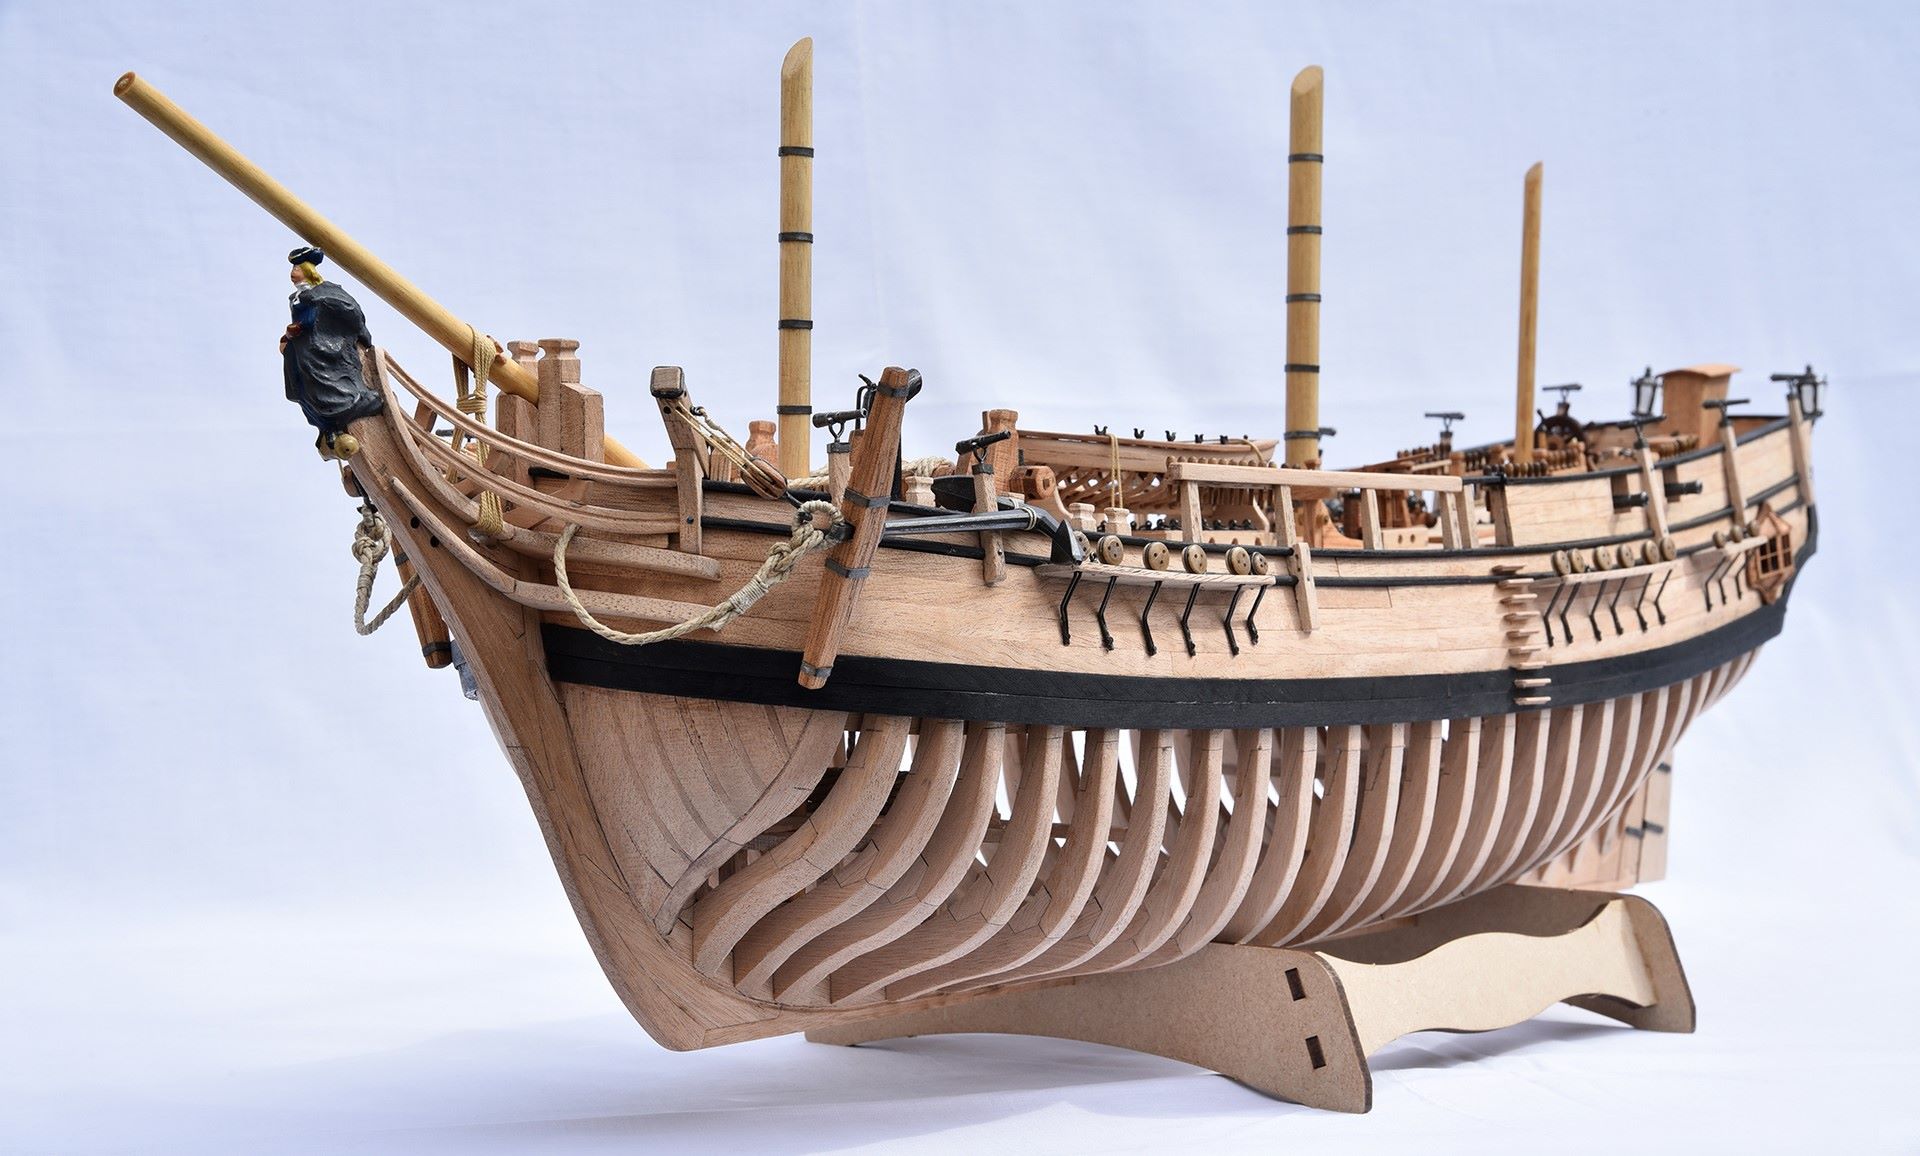
Building the Hull
The hull serves as the foundation of your model ship, providing the structure on which the rest of the vessel will be built. Here's a detailed breakdown of the steps involved in constructing the hull of your miniature masterpiece:
-
Preparing the Hull Components: Begin by carefully cutting the wooden hull components according to the precise measurements and scale ratio. Use a sharp hobby knife and sandpaper to ensure smooth edges and a precise fit.
-
Assembling the Bulkheads: The bulkheads form the skeleton of the hull and determine its shape. Securely glue the bulkheads in place on a flat surface, ensuring that they align with the designated measurements and angles.
-
Planking the Hull: Once the bulkheads are in place, begin planking the hull by attaching thin wooden strips along the length of the structure. Use a flexible plank bender to achieve the curvature of the hull, ensuring a seamless and realistic appearance.
-
Sanding and Shaping: After the planks are in place, carefully sand and shape the hull to achieve a smooth and uniform surface. This step is crucial for refining the contours of the hull and preparing it for the next stages of construction.
-
Adding the Keel and Sternpost: Attach the keel and sternpost to the bottom and rear of the hull, respectively. These components provide structural reinforcement and contribute to the overall stability and authenticity of the model ship.
-
Filling and Sealing Gaps: Inspect the hull for any gaps or irregularities and use wood filler to fill in any imperfections. Once filled, sand the hull again to ensure a seamless and polished surface.
-
Reinforcing the Hull: Strengthen the hull by adding internal bracing and reinforcement where necessary. This step is essential for ensuring the structural integrity of the hull, especially if your model ship will be displayed with rigging and sails.
By meticulously following these steps, you can construct a sturdy and visually striking hull that forms the basis of your model ship. With the hull completed, you're ready to move on to the next phase of adding intricate details and features to your miniature vessel.
Adding Details and Features
Once the hull of your model ship is constructed, it's time to focus on adding intricate details and features that will bring your miniature vessel to life. Here's a comprehensive guide to enhancing your model ship with captivating details and features:
-
Deck Structures: Begin by adding deck structures such as cabins, hatches, and companionways to the hull. These elements contribute to the realism and historical accuracy of your model ship.
-
Cannons and Armaments: If your model ship replicates a historical warship, consider adding miniature cannons and armaments to the deck. Pay attention to the positioning and alignment of these features to accurately represent the firepower of the vessel.
-
Anchors and Windlasses: Attach finely crafted anchors and windlasses to the bow of the ship. These details not only add visual interest but also showcase the functionality of essential maritime equipment.
-
Rigging and Sails: If your model ship includes rigging and sails, meticulously thread fine string or thread through the masts and yards to replicate the intricate network of ropes and lines. Pay attention to the tension and arrangement of the rigging to convey a sense of dynamic movement.
-
Figureheads and Ornamentation: Consider adding a detailed figurehead to the bow of the ship, showcasing the artistic and symbolic elements of maritime tradition. Additionally, embellish the vessel with ornamental carvings and decorative elements to enhance its visual appeal.
-
Navigation Instruments: Incorporate miniature navigation instruments such as compasses, astrolabes, and sextants on the deck to showcase the navigational prowess of the vessel's crew.
-
Lanterns and Lighting: For added realism, include miniature lanterns and lighting fixtures on the deck and within the ship's interior. This detail adds a captivating visual element, especially when the model ship is displayed in low-light settings.
-
Crew Figures: If desired, add miniature crew figures to the deck to depict the bustling activity aboard the ship. Position the figures in various roles such as sailors, officers, and helmsmen to convey a sense of life and movement.
By meticulously incorporating these details and features, you can elevate your model ship from a simple miniature vessel to a captivating and historically accurate representation of maritime craftsmanship. With the addition of these intricate elements, your model ship is poised to become a stunning centerpiece in any nautical enthusiast's collection.
Painting and Finishing Touches
Once the structural components and intricate details of your model ship are in place, it's time to breathe life into your creation through the art of painting and adding finishing touches. Here's a detailed breakdown of the steps involved in bringing your miniature vessel to its full visual splendor:
-
Priming the Surface: Before applying any paint, it's essential to prime the surface of the model ship to ensure that the paint adheres smoothly and evenly. Use a high-quality primer designed for use on wood to create a suitable base for the subsequent layers of paint.
-
Color Selection: Choose a color scheme that aligns with the historical period or the intended aesthetic of your model ship. Research the traditional color palettes used in the era of the ship you are replicating, and select paints that accurately represent the hues of the original vessel.
-
Layering and Detailing: Apply thin, even layers of paint to the various components of the model ship, starting with the hull and progressing to the deck structures, rigging, and other details. Use fine paintbrushes to add intricate details such as wood grain, weathering effects, and decorative elements.
-
Weathering and Aging: To convey a sense of realism and historical authenticity, consider incorporating weathering and aging effects into the paintwork. Use techniques such as dry brushing, washes, and subtle discoloration to simulate the wear and tear that would naturally occur on a seafaring vessel.
-
Gilding and Gilding: If your model ship features ornate elements such as figureheads, decorative carvings, or gilded accents, consider incorporating gilding techniques to add a touch of opulence and grandeur. Gold leaf or metallic paints can be used to achieve stunning visual effects.
-
Applying Finishes: Once the paintwork is complete, apply a clear varnish or lacquer to protect the painted surfaces and provide a glossy, polished finish. The varnish will not only enhance the visual appeal of the model ship but also safeguard the paint from wear and environmental factors.
-
Detailing the Deck: Pay special attention to the deck of the model ship, adding realistic wood grain effects, subtle weathering, and strategic placement of accessories such as barrels, crates, and deck fittings. These details contribute to the overall authenticity and visual interest of the miniature vessel.
-
Final Touches: After the paint and finishes have been applied, take the time to inspect the model ship for any areas that may require touch-ups or additional detailing. Fine-tune the paintwork and ensure that every aspect of the vessel reflects the craftsmanship and dedication invested in its creation.
By meticulously executing the painting and finishing touches, you can transform your model ship into a captivating work of art that pays homage to the rich tradition of maritime craftsmanship. With the completion of this phase, your miniature vessel is ready to be proudly displayed as a testament to your skill and passion for model ship building.
Displaying Your Model Ship
Once you have invested your time, effort, and creativity into crafting a stunning model ship, it's essential to consider the best way to display your miniature masterpiece. The presentation of your model ship can significantly enhance its visual impact and allow you to showcase the intricate details and craftsmanship you've poured into its creation. Here are some key considerations for effectively displaying your model ship:
-
Choice of Display Case: Investing in a high-quality display case offers protection from dust, moisture, and accidental damage while allowing your model ship to take center stage. Look for a display case with clear, non-reflective glass or acrylic panels to provide unobstructed views of the vessel from all angles.
-
Lighting and Ambiance: Consider the lighting conditions in the area where you plan to display your model ship. Soft, ambient lighting can accentuate the details and contours of the vessel, creating an inviting and captivating display. Avoid direct sunlight, as it can cause fading and damage to the paintwork and materials.
-
Positioning and Focal Point: Select a prominent and visually appealing location to showcase your model ship. Whether it's a mantelpiece, a dedicated display shelf, or a custom-built stand, ensure that the vessel is positioned at a height and angle that allows viewers to appreciate its details without straining.
-
Thematic Background: Enhance the visual impact of your model ship by creating a thematic background or setting within the display case. Consider adding elements such as a nautical map, miniature seafaring accessories, or a backdrop that complements the historical period or style of the vessel.
-
Interactive Elements: If appropriate, incorporate interactive elements into the display, such as a rotating base or a mechanism that allows the model ship to simulate gentle rocking or movement. These features can add a dynamic and engaging dimension to the presentation.
-
Informational Plaques: Provide viewers with context and historical information about the model ship by including an informational plaque or display card. Share details about the vessel's origins, historical significance, and the craftsmanship involved in its creation.
-
Rotation and Variation: To prevent prolonged exposure to environmental factors and to maintain the vessel's condition, consider periodically rotating the display of your model ship. Additionally, if you have multiple model ships, varying the display over time can keep the presentation fresh and engaging.
By carefully considering these aspects of displaying your model ship, you can create a captivating and immersive showcase that not only highlights the beauty of your miniature vessel but also invites admiration and appreciation from all who behold it.
Conclusion
In conclusion, model ship building is a rewarding and captivating endeavor that allows enthusiasts to immerse themselves in the artistry and history of maritime craftsmanship. From meticulously selecting the right materials to adding intricate details and finally presenting the finished masterpiece, the process of crafting a model ship is a testament to patience, precision, and passion. Whether you are drawn to the elegance of sailing vessels, the power of warships, or the nostalgia of historical maritime icons, the world of model ship building offers a rich tapestry of possibilities for creative expression and historical exploration. By embarking on this DIY journey, you not only create a stunning work of art but also pay homage to the timeless allure of seafaring vessels and the artisans who brought them to life. So, set sail on your model ship building adventure and let your imagination navigate the seas of creativity and craftsmanship.