
Home>Create & Decorate>DIY & Crafts>Indoor Fort Ideas: Get Creative With DIY Crafts For Cozy Hideaways
DIY & Crafts
Indoor Fort Ideas: Get Creative With DIY Crafts For Cozy Hideaways
Published: May 24, 2024

Senior Editor in Create & Decorate, Kathryn combines traditional craftsmanship with contemporary trends. Her background in textile design and commitment to sustainable crafts inspire both content and community.
Discover fun and imaginative indoor fort ideas with our DIY crafts for creating cozy hideaways. Get creative and build your own DIY fort for endless entertainment. Perfect for kids and adults alike!
(Many of the links in this article redirect to a specific reviewed product. Your purchase of these products through affiliate links helps to generate commission for Twigandthistle.com, at no extra cost. Learn more)
Introduction
Are you looking for a fun and cozy way to spend time indoors? Creating your own indoor fort can be a fantastic way to unleash your creativity and enjoy a snug hideaway right in the comfort of your home. Whether you're a kid or a kid at heart, indoor fort ideas are a great way to add a touch of magic and adventure to your living space. In this article, we'll explore a variety of DIY crafts that will help you build the perfect indoor fort for hours of entertainment and relaxation. So, grab your blankets, pillows, and imagination, and let's get started on creating the ultimate indoor hideaway!
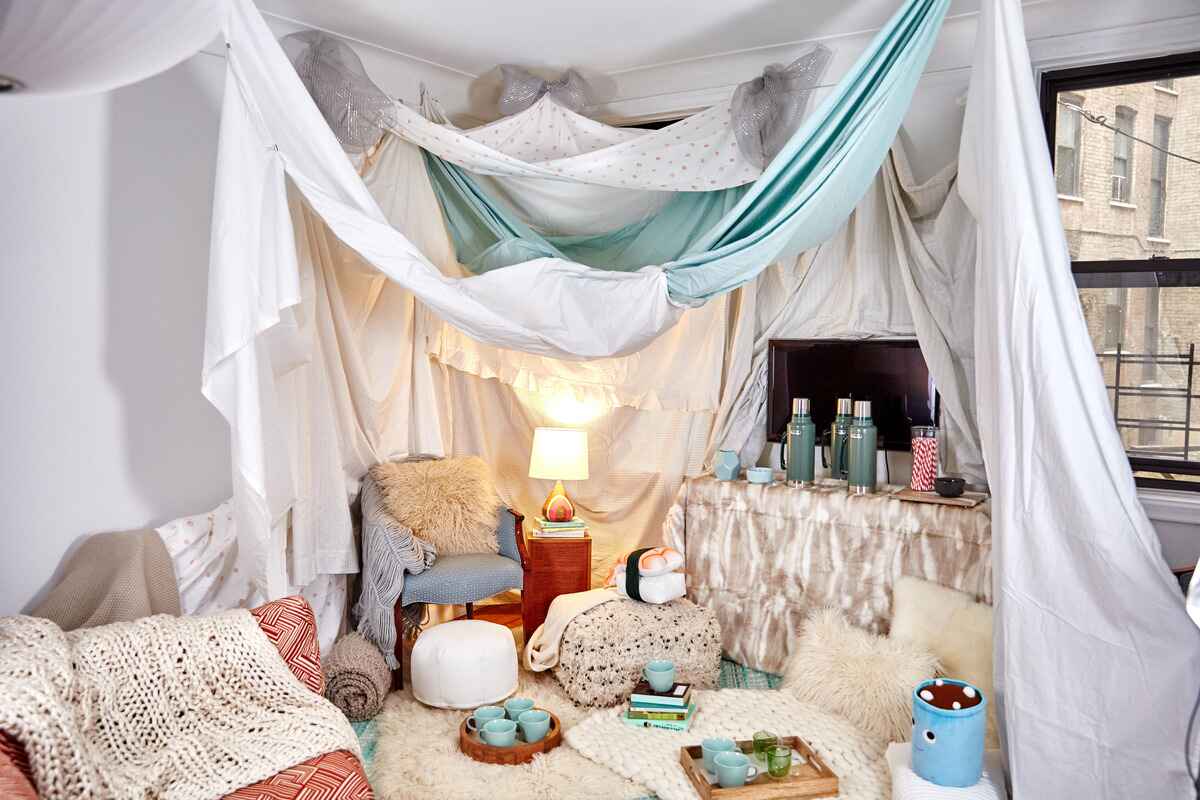
Blanket Forts: Cozy and Creative Hideaways
Blanket forts are a classic and timeless way to create a cozy and imaginative hideaway. To start, gather your materials – blankets, sheets, and some sturdy furniture to serve as the framework for your fort. Begin by draping the blankets over the furniture, creating walls and a roof for your fort. Use heavy books or clips to secure the blankets in place, ensuring that they don't slip or fall. Once the structure is in place, add some soft cushions, pillows, and maybe even a sleeping bag to create a comfortable and inviting interior. You can also add some fairy lights or battery-powered candles to create a warm and magical ambiance inside your fort. Whether you're reading a book, watching a movie, or simply relaxing, a blanket fort provides the perfect space to unwind and let your imagination run wild.
- Choose a spacious area in your home to build your blanket fort.
- Use a combination of blankets and sheets to create a multi-layered and sturdy structure.
- Include soft and plushy materials inside the fort for maximum comfort.
- Personalize your fort with decorative items such as fairy lights, stuffed animals, or posters.
- Consider adding a small table or tray inside the fort to hold snacks and drinks.
Cardboard Box Castles: Building with Recyclables
Cardboard box castles offer a fantastic way to repurpose materials and unleash your creativity. Start by collecting various sizes of cardboard boxes, ensuring they are clean and sturdy. Once you have your boxes, it's time to plan the layout of your castle. Begin by arranging the boxes in a strategic manner to create the foundation and walls of your castle. You can use scissors or a craft knife to cut out windows, doors, and turrets to add a touch of authenticity to your castle design.
To secure the boxes together, use strong tape or non-toxic glue, ensuring that the structure is stable and safe. Once the basic structure is in place, it's time to get creative with decorating your cardboard box castle. You can use paint, markers, or colored paper to add details such as bricks, flags, and ivy to give your castle a majestic and medieval look. Consider adding a drawbridge made from cardboard and string, or even a moat using blue fabric or paper to complete the castle experience.
For an added touch of grandeur, create a royal throne or a treasure chest using smaller boxes, and place them inside the castle for imaginative play. Whether you're hosting a royal banquet, defending your fortress from dragons, or simply enjoying some quiet time, a cardboard box castle provides endless opportunities for fun and creativity.
- Start by collecting clean and sturdy cardboard boxes of various sizes.
- Plan the layout of your castle and arrange the boxes to create the foundation and walls.
- Use scissors or a craft knife to cut out windows, doors, and other decorative details.
- Secure the boxes together using strong tape or non-toxic glue to ensure stability.
- Decorate your castle with paint, markers, or colored paper to add intricate details and designs.
- Consider adding smaller boxes to create furniture or props for imaginative play inside the castle.
Pillow Forts: Soft and Snug DIY Structures
Pillow forts offer a soft and snug sanctuary for relaxation and play. To begin creating your pillow fort, gather a variety of pillows, cushions, and maybe even some stuffed animals to add to the cozy atmosphere. Choose a location with enough space to accommodate your fort, whether it's in the living room, bedroom, or any other suitable area.
Start by arranging the pillows to form the walls and base of your fort. You can stack the pillows vertically to create walls, or lay them horizontally to form a comfortable base. Once the foundation is set, use larger cushions or pillows to create a roof, ensuring that it's secure and won't collapse.
To add a touch of whimsy and personalization to your pillow fort, consider using bedsheets or blankets to drape over the structure, creating a sense of privacy and seclusion. You can also use clothespins or clips to secure the fabric in place, allowing for easy entry and exit from your cozy hideaway.
For added comfort, consider bringing in a soft throw blanket or a favorite quilt to snuggle up with inside the fort. You can also include some battery-operated fairy lights or lanterns to create a warm and inviting ambiance.
Once your pillow fort is complete, it's time to enjoy the comfort and relaxation it provides. Whether you're reading a book, having a movie night, or simply taking a nap, a pillow fort offers a peaceful retreat within your own home.
- Choose a spacious area to build your pillow fort, ensuring there's enough room for relaxation and play.
- Use a variety of pillows, cushions, and stuffed animals to create a cozy and inviting atmosphere.
- Arrange the pillows to form walls and a base, and use larger cushions to create a secure roof.
- Personalize your fort by draping bedsheets or blankets over the structure, and add fairy lights for a magical touch.
- Bring in additional comfort with soft throw blankets or quilts for snuggling up inside the fort.
Tent Forts: Recreating the Camping Experience Indoors
Tent forts offer a delightful way to bring the outdoor camping experience inside your home. To begin, gather a large, lightweight blanket or a dedicated tent if you have one. Choose a spacious area where you can set up your tent fort, such as a living room or a playroom. If you're using a blanket, drape it over a sturdy clothesline, chairs, or any other suitable supports to create the tent structure. Ensure that the blanket is secure and won't easily collapse.
Once the tent structure is in place, it's time to add some camping essentials to complete the experience. Bring in some cozy sleeping bags, blankets, and a few cushions to create a comfortable and inviting interior. You can also include some camping-themed decorations such as artificial plants, camping lanterns, and even a faux campfire made from LED lights to add to the ambiance.
For a touch of authenticity, consider incorporating camping activities into your tent fort experience. Set up a pretend campfire with cushions arranged in a circle, and gather around for some storytelling or toasting marshmallows. If you have a projector, you can even create a starry night sky inside your tent fort by projecting images of stars and constellations onto the ceiling.
Whether you're hosting a camping-themed movie night, enjoying a sleepover with friends, or simply seeking a cozy retreat, a tent fort provides the perfect setting to recreate the magic of camping within the comfort of your home.
- Choose a spacious area to set up your tent fort, ensuring there's enough room for the tent structure and activities.
- Use a large, lightweight blanket or a dedicated tent to create the tent structure, securing it over suitable supports.
- Bring in cozy sleeping bags, blankets, and cushions to create a comfortable and inviting interior.
- Incorporate camping-themed decorations and activities to enhance the camping experience inside the tent fort.
- Consider using a projector to create a starry night sky inside the tent fort for added ambiance.
Fairy Light Hideaways: Adding a Magical Touch to Your Fort
Creating a fairy light hideaway is a wonderful way to infuse your indoor fort with a touch of enchantment and magic. Fairy lights, also known as string lights or twinkle lights, can transform a simple fort into a captivating and whimsical space. To begin, gather a string of fairy lights in your preferred color or style. These lights are often available in various lengths and can be battery-operated for convenience.
Once you have your fairy lights, it's time to add them to your fort to create a magical ambiance. Start by draping the fairy lights along the interior of your fort, weaving them around the walls, roof, or any other structural elements. The soft, twinkling glow of the lights will instantly add a sense of warmth and wonder to your hideaway.
Consider using transparent adhesive hooks or clips to secure the fairy lights in place, ensuring they are safely and evenly distributed throughout the fort. You can also incorporate the lights into the fort's design by creating patterns or shapes with the strings, such as spirals, zigzags, or even a starry night sky effect on the ceiling.
For an added touch of magic, consider mixing different types of fairy lights, such as those with varying sizes or colors, to create a captivating and multi-dimensional lighting display. Additionally, you can pair the fairy lights with sheer or gauzy fabrics to diffuse the light and create a dreamy, ethereal atmosphere inside the fort.
Once your fairy light hideaway is complete, dim the surrounding lights and bask in the enchanting glow of your creation. Whether you're hosting a cozy gathering, enjoying a quiet evening alone, or simply seeking a magical retreat, the addition of fairy lights will elevate your indoor fort to a whole new level of charm and allure.
Secret Passageways: Creating Intriguing Entryways to Your Hideaway
Creating secret passageways can add an element of mystery and excitement to your indoor fort, making the entrance an adventure in itself. One creative way to achieve this is by using curtains or hanging fabrics to conceal the entrance to your hideaway. Choose a lightweight and semi-sheer fabric that complements the theme of your fort. Secure the fabric above the entrance using a tension rod or hooks, allowing it to drape down and create a sense of intrigue.
Another approach to crafting a secret passageway is by using decorative room dividers or screens. These can be positioned to partially obscure the entrance, creating a sense of anticipation as one approaches the hidden doorway. Room dividers come in various styles and designs, allowing you to customize the look of your secret passageway to suit your fort's theme and ambiance.
For a more whimsical and imaginative touch, consider creating a "magic portal" using a large picture frame. Position the frame at the entrance of your fort and drape sheer fabric or string lights around it to give the illusion of stepping through a mystical gateway. This approach not only adds an element of fantasy to your hideaway but also serves as a captivating focal point for the entrance.
Incorporating a secret password or a special knock to gain entry to the fort can further enhance the sense of adventure and intrigue. This can be a fun and interactive way to engage with the fort, adding an element of playfulness and creativity to the overall experience.
By creating an intriguing entryway to your hideaway, you set the stage for a memorable and immersive journey into your indoor fort. Whether it's a simple curtain, a decorative room divider, or a whimsical "magic portal," the secret passageway adds an extra layer of excitement and enchantment to the act of entering your cozy retreat.
Conclusion: Enjoying the Cozy Comfort of Your DIY Indoor Fort
After all the creativity and effort you've put into building your DIY indoor fort, it's time to reap the rewards of your cozy hideaway. Whether you've constructed a blanket fort, a cardboard box castle, a pillow fort, a tent fort, or a fairy light hideaway, the ultimate goal is to enjoy the comfort and relaxation it provides. Your indoor fort is a space where you can unwind, let your imagination roam free, and create lasting memories. It's a place for quiet solitude, fun gatherings with friends and family, or simply a retreat for some well-deserved "me time." So, grab your favorite book, snuggle up with a warm blanket, and bask in the magical ambiance of your DIY indoor fort. Whether you're seeking a moment of tranquility or a playful adventure, your cozy hideaway is ready to provide the perfect setting for your indoor escapades.