
Home>Create & Decorate>DIY & Crafts>How To Build Kitchen Counter Frame
DIY & Crafts
How To Build Kitchen Counter Frame
Published: June 13, 2024

Content Creator specializing in woodworking and interior transformations. Caegan's guides motivate readers to undertake their own projects, while his custom furniture adds a personal touch.
Learn how to create a sturdy kitchen counter frame with our step-by-step DIY guide. Perfect for DIY & Crafts enthusiasts looking to upgrade their kitchen.
(Many of the links in this article redirect to a specific reviewed product. Your purchase of these products through affiliate links helps to generate commission for Twigandthistle.com, at no extra cost. Learn more)
Introduction
So, you've decided to take on the challenge of building your own kitchen counter frame. Congratulations! Building a kitchen counter frame can be a rewarding and cost-effective project that allows you to customize your kitchen to your exact specifications. Whether you're a seasoned DIY enthusiast or a novice looking to take on a new project, building a kitchen counter frame is a great way to add a personal touch to your home. In this article, we'll guide you through the process of building a kitchen counter frame from start to finish, providing you with the knowledge and confidence to tackle this project head-on. Let's get started!
Materials Needed
To get started on building your kitchen counter frame, you'll need to gather the following materials:
- Wood: Select high-quality, sturdy wood for the frame. Consider using 2×4 or 2×6 boards for the frame's structure.
- Countertop: Choose a durable and visually appealing countertop material, such as granite, quartz, or butcher block.
- Screws and Nails: Ensure you have an ample supply of screws and nails to secure the frame and countertop.
- Measuring Tape and Square: Accurate measurements are crucial, so make sure you have these tools on hand.
- Circular Saw or Miter Saw: You'll need a reliable saw for cutting the wood to the correct dimensions.
- Drill and Drill Bits: A drill is essential for creating pilot holes and securing the frame together.
- Wood Glue: Using wood glue in conjunction with screws and nails will provide added strength to the frame.
- Sandpaper: Smooth out any rough edges and surfaces before assembling the frame.
- Level: Ensure that your frame is perfectly level during the assembly process.
By gathering these materials beforehand, you'll be well-prepared to embark on the construction of your kitchen counter frame.
Measuring and Cutting the Wood
Before diving into the assembly process, it's crucial to accurately measure and cut the wood for your kitchen counter frame. Here's a step-by-step guide to help you through this essential stage:
-
Measure Twice, Cut Once: Begin by measuring the dimensions of your kitchen space where the counter will be installed. Take precise measurements for the length and width, accounting for any appliances or fixtures that the counter will accommodate.
-
Mark the Wood: Using a measuring tape and square, mark the measurements on the wood boards. Double-check your measurements to ensure accuracy before making any cuts.
-
Cutting the Wood: With a circular saw or miter saw, carefully cut the wood boards according to the marked measurements. Take your time and use a steady hand to achieve clean and precise cuts.
-
Account for Joints and Corners: If your counter frame includes joints or corners, be sure to measure and cut the wood accordingly to accommodate these features. Use a miter saw to create angled cuts for seamless joints.
-
Sand the Edges: After cutting the wood, use sandpaper to smooth out any rough edges or surfaces. This will not only enhance the appearance of the frame but also prevent any splinters.
By meticulously measuring and cutting the wood, you'll lay a solid foundation for the assembly of your kitchen counter frame. Accuracy and attention to detail at this stage will contribute to a seamless and professional-looking finished product.
Assembling the Frame
Now that you have the wood cut to the correct dimensions, it's time to assemble the frame for your kitchen counter. Follow these steps to ensure a sturdy and well-constructed frame:
-
Lay Out the Pieces: Begin by laying out the cut wood pieces in the configuration they will be assembled. This will give you a visual guide and ensure that everything fits together as intended.
-
Create Pilot Holes: Using a drill and the appropriate drill bit, create pilot holes in the wood where the screws will be inserted. This will prevent the wood from splitting when the screws are driven in.
-
Apply Wood Glue: Before securing the pieces together, apply wood glue along the joints. This will provide added strength and stability to the frame.
-
Secure the Corners: Starting with the corners, use screws to secure the wood pieces together. Ensure that the frame is square by measuring the diagonals – if the measurements are equal, the frame is square.
-
Add Support Beams: Depending on the size of your kitchen counter, you may need to add support beams across the frame to provide additional stability. Measure and cut these beams to fit snugly within the frame, then secure them in place with screws and wood glue.
-
Check for Level: Once the frame is fully assembled, use a level to ensure that it is perfectly level in all directions. Adjust as necessary by adding shims under the frame.
By following these steps, you'll be able to assemble a strong and durable frame for your kitchen counter. Taking the time to ensure that the frame is well-constructed will set the stage for a successful installation of the countertop.
Attaching the Countertop
Attaching the countertop is the pivotal moment in bringing your kitchen counter frame to life. Follow these steps to securely attach the countertop to the frame:
-
Position the Countertop: Carefully lift the countertop and position it onto the assembled frame. Ensure that it aligns evenly on all sides and overhangs as desired.
-
Secure with Brackets: Depending on the design of your countertop and frame, you may need to use brackets to secure the countertop in place. Use a drill to attach the brackets to the underside of the countertop, ensuring they are positioned to align with the frame for maximum support.
-
Apply Silicone Adhesive: To further secure the countertop, apply a bead of silicone adhesive along the top edges of the frame. This will create a strong bond between the countertop and the frame, preventing any shifting or movement over time.
-
Check for Stability: Once the countertop is in place, carefully apply pressure to various points to ensure that it is stable and securely attached to the frame. Make any necessary adjustments to the brackets or adhesive to achieve a solid and stable connection.
-
Seal the Edges: To prevent moisture from seeping into the wood and causing damage, use a waterproof sealant to seal the edges where the countertop meets the frame. This will also enhance the overall appearance of the counter and provide a professional finish.
By following these steps, you'll be able to securely attach the countertop to the frame, bringing your DIY kitchen counter project one step closer to completion.
Finishing Touches
After the countertop is securely attached to the frame, it's time to add the finishing touches that will elevate the appearance and functionality of your DIY kitchen counter. Here are the essential steps to complete the project with finesse:
-
Smooth and Polish: Use fine-grit sandpaper to smooth out any rough edges or surfaces on the wood frame and countertop. This will create a seamless and polished look while also ensuring that the surface is safe to touch and use.
-
Apply a Protective Finish: To protect the wood and enhance its natural beauty, consider applying a protective finish such as polyurethane or varnish. This will shield the wood from moisture, stains, and daily wear and tear, extending the lifespan of your kitchen counter.
-
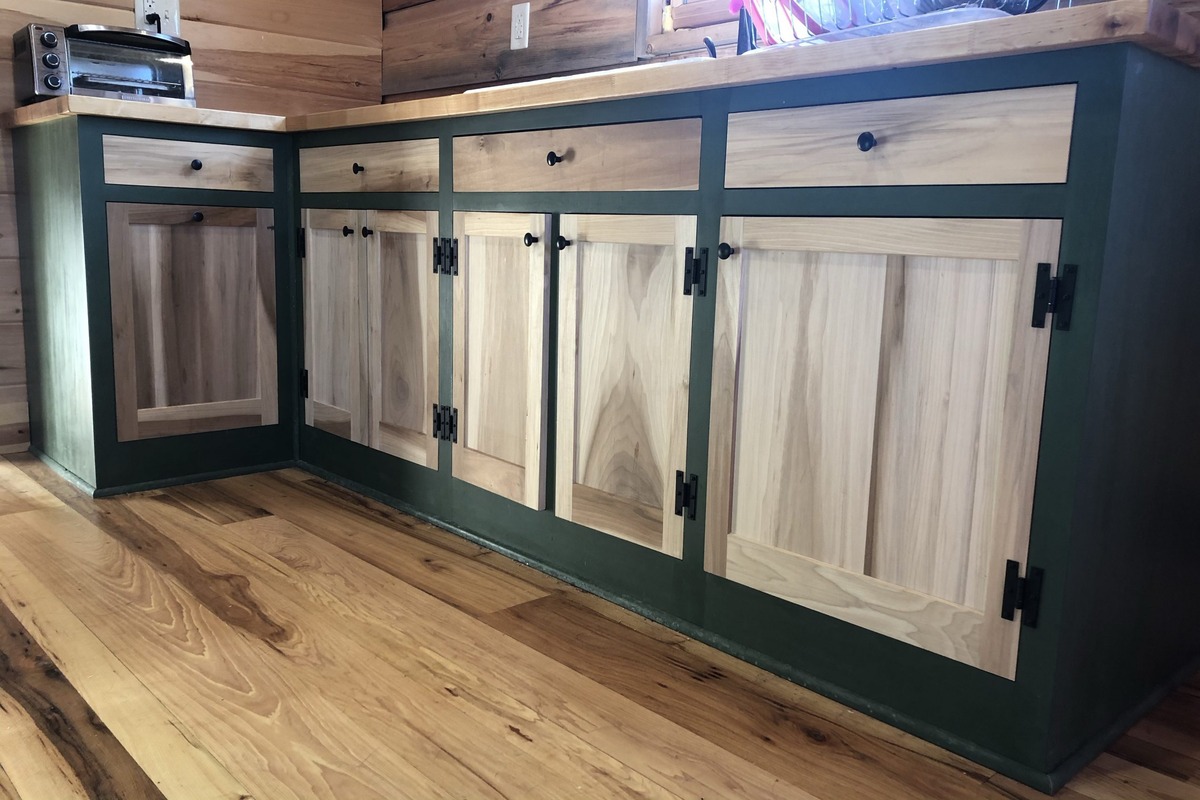
Install Hardware: If your kitchen counter includes drawers or cabinets, now is the time to install the hardware. Attach drawer pulls, knobs, or handles that complement the overall design of your kitchen, adding a functional and decorative element to the counter.
-
Seal Gaps and Joints: Inspect the joints and gaps between the countertop and the frame. Use a color-matched silicone sealant to fill any visible gaps, creating a seamless transition and preventing debris from accumulating in hard-to-reach areas.
-
Add Decorative Touches: Consider adding decorative elements such as trim molding or decorative brackets to enhance the visual appeal of your kitchen counter. These details can add character and charm to the counter while concealing any exposed edges.
-
Final Inspection: Once the finishing touches are in place, conduct a thorough inspection of the entire kitchen counter. Check for any loose hardware, uneven surfaces, or imperfections that require attention. Making any necessary adjustments at this stage will ensure a polished and professional result.
By completing these finishing touches, you'll transform your DIY kitchen counter frame into a stunning and functional centerpiece of your kitchen. These details will not only enhance the aesthetics of the counter but also contribute to its durability and longevity.