
Home>Create & Decorate>DIY & Crafts>How To Build A Spiral Staircase
DIY & Crafts
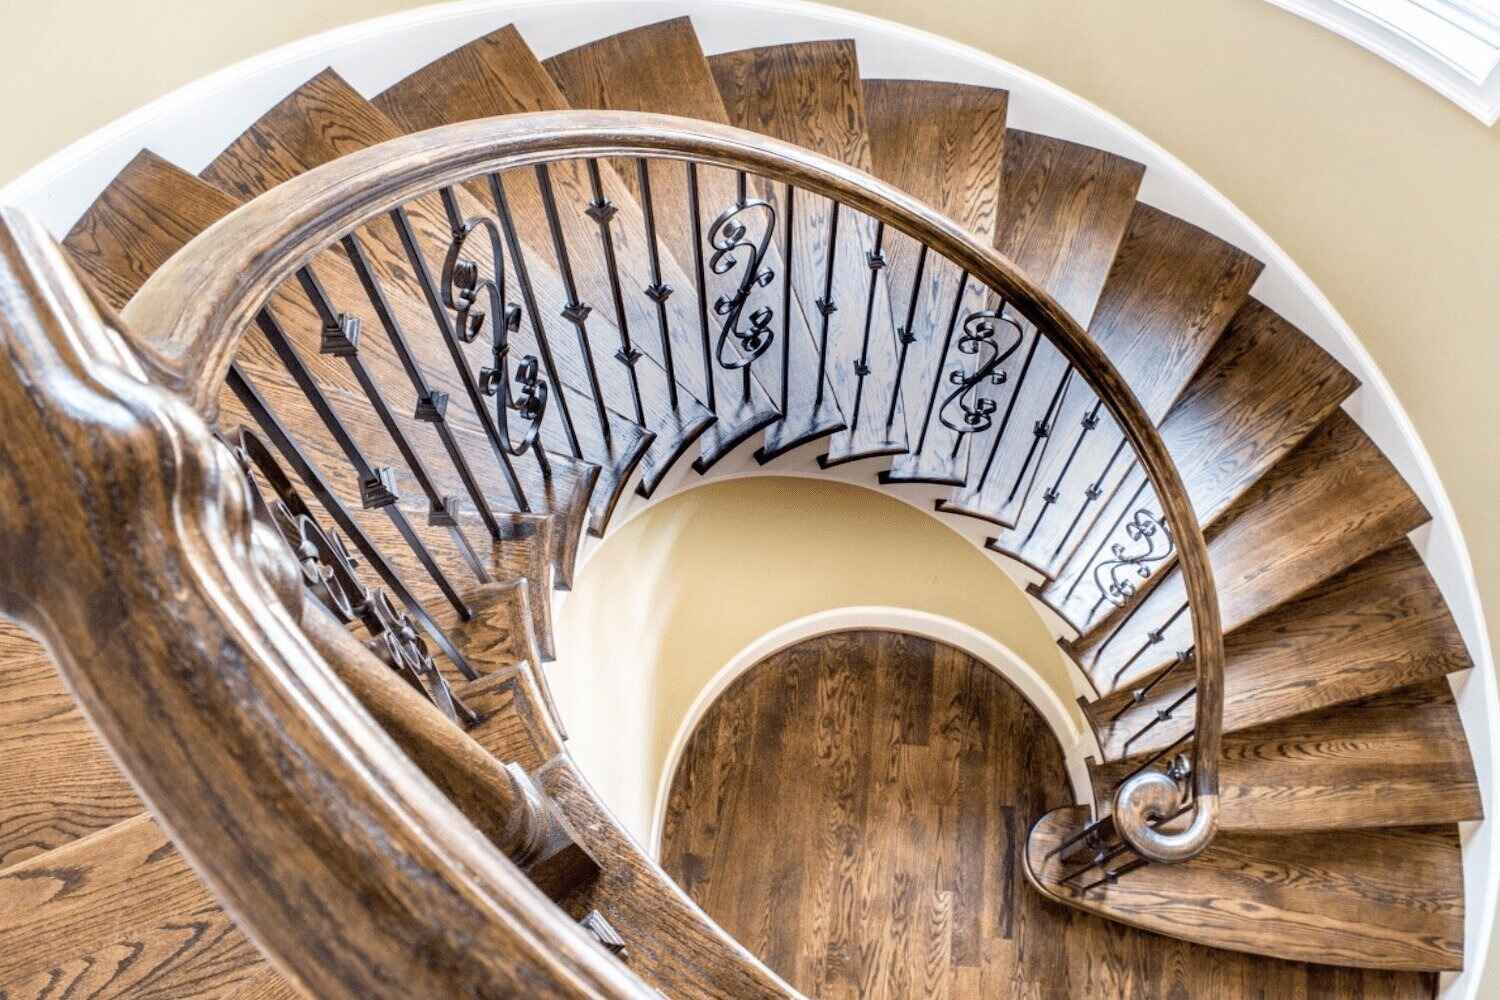
How To Build A Spiral Staircase
Published: June 15, 2024

Senior Editor in Create & Decorate, Kathryn combines traditional craftsmanship with contemporary trends. Her background in textile design and commitment to sustainable crafts inspire both content and community.
Learn how to build a stunning spiral staircase with our step-by-step DIY guide. Perfect for your next craft project. Unlock your creativity today!
(Many of the links in this article redirect to a specific reviewed product. Your purchase of these products through affiliate links helps to generate commission for Twigandthistle.com, at no extra cost. Learn more)
Introduction
So, you've decided to take on the challenge of building a spiral staircase. Congratulations! This unique and space-saving design can add a touch of elegance and functionality to any home. Whether you're looking to connect different levels of your house or add a striking feature to your outdoor space, a spiral staircase can be a fantastic addition. In this guide, we'll walk you through the step-by-step process of building your very own spiral staircase. From planning and designing to adding the finishing touches, we've got you covered. Let's dive in and get started on this exciting DIY project!
Planning and Designing Your Spiral Staircase
When it comes to building a spiral staircase, careful planning and precise designing are crucial. Here are the steps to get you started:
-
Measure the Space: Begin by measuring the height and diameter of the space where the staircase will be installed. These measurements will determine the size and shape of your staircase.
-
Check Building Codes: Before diving into the design, familiarize yourself with local building codes and regulations. Different areas may have specific requirements for staircase dimensions, railing height, and other safety considerations.
-
Choose a Design: Consider the overall aesthetic of your home and select a spiral staircase design that complements the existing architecture. Whether you prefer a sleek modern look or a more traditional style, there are various design options to explore.
-
Create Detailed Plans: Use graph paper or design software to create detailed plans for your staircase. Include precise measurements, the number of steps, and the angle of rotation. This will serve as a roadmap for the construction phase.
-
Select Materials: Decide on the materials for your staircase. From wood and metal to glass and concrete, the choice of materials will impact the overall look and feel of the staircase.
By carefully planning and designing your spiral staircase, you'll set the stage for a successful and visually stunning addition to your home.
Gathering Materials and Tools
Before diving into the construction of your spiral staircase, it's essential to gather all the necessary materials and tools. Here's a comprehensive list to ensure you have everything you need:
Materials:
- Wood or Metal Steps: Depending on your design preference, choose the appropriate material for the steps. Measure and cut the steps to fit the designated space.
- Central Column: This can be a pre-fabricated metal column or a custom-built wooden column, depending on your chosen design and materials.
- Handrail: Select a handrail that complements the overall design of the staircase. This can be made of wood, metal, or a combination of materials.
- Fasteners and Hardware: Ensure you have the necessary screws, bolts, and other fasteners to secure the components of the staircase.
- Finishing Materials: If you plan to paint or stain the staircase, gather the appropriate finishing materials based on the chosen materials.
Tools:
- Measuring Tape and Level: Accurate measurements are crucial for a well-built staircase. A level ensures that the components are installed straight and true.
- Saw: Depending on the materials chosen, you may need a circular saw, jigsaw, or miter saw for cutting the steps and handrail.
- Drill and Bits: A drill is essential for creating pilot holes and securing fasteners. Ensure you have the appropriate drill bits for wood or metal.
- Welding Equipment (if using metal): If your staircase incorporates metal components, welding equipment may be necessary for fabrication and assembly.
- Safety Gear: Safety should always be a priority. Ensure you have protective eyewear, gloves, and any other necessary safety equipment.
By gathering all the required materials and tools, you'll be well-prepared to tackle the construction of your spiral staircase with confidence and efficiency.
Building the Central Column
The central column is a crucial component of a spiral staircase, providing structural support and serving as the axis around which the steps are positioned. Here's a detailed guide on constructing the central column for your spiral staircase:
-
Prepare the Materials: Depending on your chosen design and materials, gather the necessary components for the central column. This may include a metal pole, wooden beams, or other structural elements.
-
Cutting and Shaping: If you're working with wood, use a saw to cut the beams to the required lengths. For metal columns, a cutting tool or saw designed for metal can be used to achieve precise cuts.
-
Assembly: Assemble the central column according to the design specifications. This may involve joining multiple sections of wood or metal to create a single, sturdy column. If welding is required for metal components, ensure that the joints are secure and the column is structurally sound.
-
Securing the Column: Once the central column is assembled, ensure that it is securely anchored to the floor and ceiling. This is essential for the stability and safety of the staircase. Use appropriate fasteners and anchors to secure the column in place.
-
Alignment and Leveling: Use a level to ensure that the central column is perfectly vertical. Any deviation from vertical alignment can affect the overall stability and appearance of the staircase. Make any necessary adjustments to achieve precise alignment.
-
Reinforcement and Bracing: Depending on the height and design of the staircase, additional reinforcement or bracing may be necessary to enhance the structural integrity of the central column. This is particularly important for taller staircases or those supporting heavy loads.
By following these steps, you can construct a robust and reliable central column for your spiral staircase. The central column not only provides structural support but also contributes to the overall aesthetic appeal of the staircase. Once the central column is in place, you'll be ready to proceed with the installation of the steps, bringing your spiral staircase one step closer to completion.
Installing the Steps
Installing the steps is a critical phase in the construction of a spiral staircase. Each step must be positioned precisely to ensure safety and structural integrity. Here's a detailed guide on how to install the steps for your spiral staircase:
-
Prepare the Steps: Before installation, ensure that each step is cut and shaped according to the design specifications. Whether you're working with wood, metal, or another material, the steps should be uniform in size and shape.
-
Positioning the First Step: Begin by positioning the first step at the base of the central column. Secure it in place using appropriate fasteners, ensuring that it is level and securely anchored.
-
Maintain Consistent Rise and Run: As you install subsequent steps, it's crucial to maintain a consistent rise (height of each step) and run (depth of each step). Use a level and measuring tape to ensure uniformity throughout the staircase.
-
Spiral Configuration: As you progress upward, position each step in a spiral configuration around the central column. The angle of rotation should align with the design specifications outlined during the planning phase.
-
Securing the Steps: Use screws, bolts, or other fasteners to secure each step to the central column and adjacent steps. This step-by-step assembly is essential for the stability and safety of the staircase.
-
Check for Stability: Periodically check the stability of the staircase as you install the steps. Ensure that each step is securely fastened and that the entire structure remains stable and level.
-
Tread and Riser Installation: If your design includes separate treads and risers, ensure that they are installed securely and aligned properly. This is particularly important for wooden staircases, where the treads and risers contribute to the overall strength of the steps.
-
Finishing Touches: Once all the steps are in place, make any necessary adjustments to ensure that they are level and aligned. This is the final opportunity to fine-tune the positioning of the steps before proceeding to the next phase of construction.
By following these steps, you can successfully install the steps for your spiral staircase, bringing you one step closer to completing this impressive DIY project.
Adding the Handrail
The handrail is a crucial safety feature and a visually significant element of a spiral staircase. Here's a detailed guide on how to add the handrail to your spiral staircase:
-
Select the Handrail Material: Choose the material for the handrail based on your design and preferences. Common options include wood, metal, or a combination of materials. Ensure that the handrail complements the overall aesthetic of the staircase.
-
Measure and Cut: Accurately measure the length of the handrail, taking into account the spiral configuration of the staircase. Use a saw or appropriate cutting tool to cut the handrail to the required length. If the handrail consists of multiple sections, ensure that the joints are precisely cut for a seamless fit.
-
Attach the Handrail Brackets: Position the handrail brackets along the central column or the wall, depending on the design of your staircase. Use a level to ensure that the brackets are aligned and then secure them in place using screws or bolts. The spacing between the brackets should comply with local building codes and safety standards.
-
Install the Handrail: With the brackets in place, carefully position the handrail and secure it to the brackets. Depending on the material, you may need to pre-drill holes for the screws to prevent splitting. Ensure that the handrail is securely fastened and level throughout its length.
-
Smooth and Finish: If the handrail is made of wood, sand the surface to remove any rough edges or imperfections. This step is essential for both safety and aesthetics. If you're using a metal handrail, ensure that the edges are smooth and free of any sharp points.
-
Add Decorative Elements: Depending on your design preferences, consider adding decorative elements to the handrail. This could include ornamental caps, finials, or other embellishments that enhance the visual appeal of the handrail.
-
Final Inspection: Once the handrail is installed, perform a thorough inspection to ensure that it is securely attached, level, and free of any sharp edges or protrusions. The handrail should provide a comfortable and secure grip along the entire length of the staircase.
By following these steps, you can add a sturdy and visually appealing handrail to your spiral staircase, enhancing both the safety and the overall aesthetic of the completed structure.
Finishing Touches and Safety Measures
As you near the completion of your spiral staircase project, it's essential to focus on the finishing touches and incorporate crucial safety measures to ensure that the final result is both visually appealing and safe for use. Here's a detailed guide on the essential steps to take during this phase:
-
Paint or Stain: If your staircase incorporates wooden components, consider applying a coat of paint or stain to enhance its appearance and protect the wood from wear and tear. Choose a finish that complements the overall design of your home and adds a touch of elegance to the staircase.
-
Anti-Slip Treatment: For added safety, especially if the staircase is located outdoors or in a potentially damp environment, consider applying an anti-slip treatment to the steps. This can help prevent slips and falls, providing an additional layer of safety for anyone using the staircase.
-
Lighting: Install appropriate lighting to ensure that the staircase is well-lit, especially if it connects different levels of your home. Consider incorporating LED step lights or overhead lighting to enhance visibility and safety, particularly during the evening or in dimly lit areas.
-
Safety Signage: If your staircase is located in a commercial or public space, consider adding safety signage to remind users to exercise caution and use the handrail. Clear and visible signage can contribute to a safer environment for everyone.
-
Inspect for Sharp Edges: Perform a thorough inspection of the entire staircase to ensure that there are no sharp edges, protruding nails, or other potential hazards. Sand down any rough areas and ensure that all components are smooth and free of any safety risks.
-
Handrail Comfort and Stability: Double-check the handrail for stability and comfort. It should provide a secure grip and be free of any wobbling or instability. The handrail is a crucial safety feature, and its reliability is paramount.
-
Final Safety Check: Before officially opening the staircase for use, conduct a comprehensive safety check. Test the stability of each step, ensure that the handrail is securely attached, and verify that all safety measures have been implemented effectively.
By focusing on these finishing touches and safety measures, you can ensure that your spiral staircase not only looks impressive but also prioritizes the safety and well-being of those who will use it. With these final steps completed, you can take pride in the successful construction of a visually striking and safe spiral staircase.