
Home>Create & Decorate>DIY & Crafts>DIY Truck Camper: How To Build Your Own Mobile Adventure
DIY & Crafts
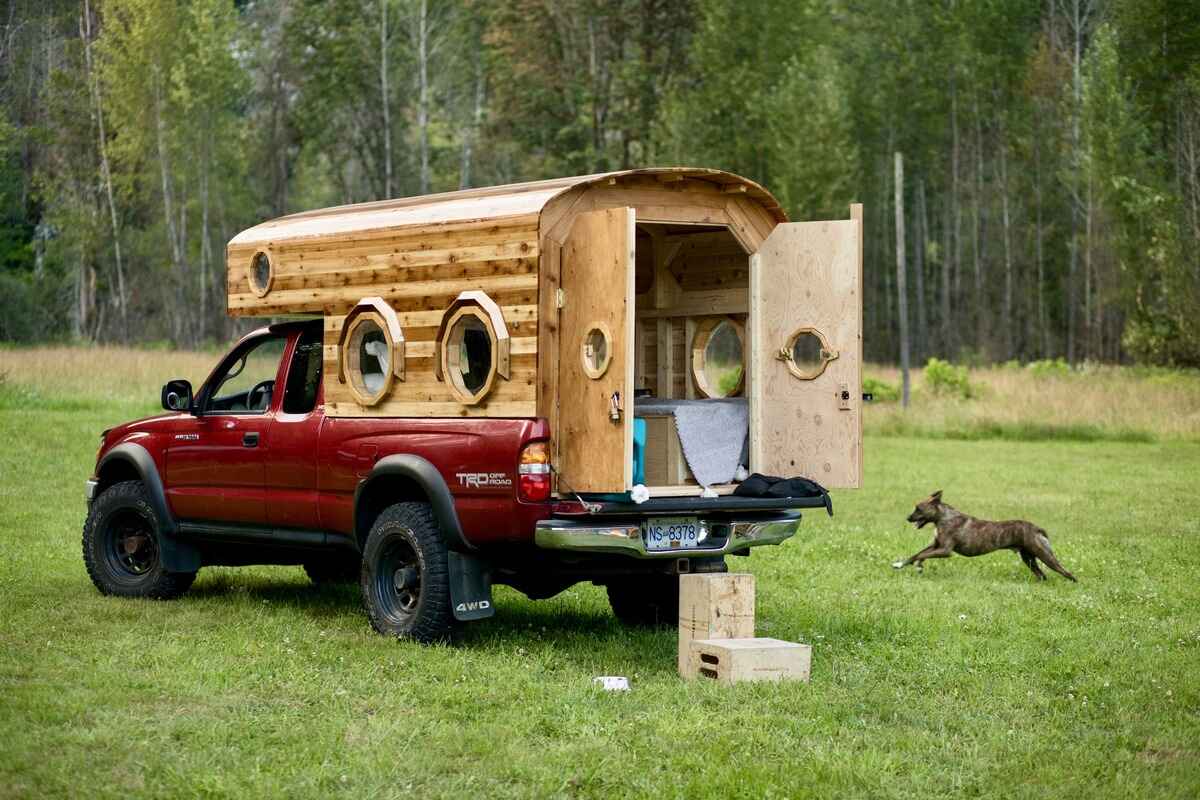
DIY Truck Camper: How To Build Your Own Mobile Adventure
Published: June 9, 2024

Content Creator specializing in woodworking and interior transformations. Caegan's guides motivate readers to undertake their own projects, while his custom furniture adds a personal touch.
Learn how to build your own DIY truck camper and embark on mobile adventures with this comprehensive guide to DIY & Crafts. Start your journey today!
(Many of the links in this article redirect to a specific reviewed product. Your purchase of these products through affiliate links helps to generate commission for Twigandthistle.com, at no extra cost. Learn more)
Introduction
So, you're ready to take your love for adventure to the next level by building your own DIY truck camper. Congratulations! With a bit of creativity, hard work, and the right guidance, you can create a mobile living space that's perfect for exploring the great outdoors. In this guide, we'll walk you through the step-by-step process of building your very own truck camper, from planning and material selection to the final touches. Let's dive in and get ready to embark on this exciting DIY adventure!
Planning Your DIY Truck Camper
Before you start building your DIY truck camper, it's crucial to have a solid plan in place. Here are the key steps to consider during the planning phase:
-
Set Your Budget: Determine how much you're willing to invest in your project. This will help you make informed decisions when it comes to material selection and customization options.
-
Design Considerations: Think about the layout and features you want in your truck camper. Consider factors such as sleeping arrangements, storage space, kitchen facilities, and any other amenities you'd like to include.
-
Vehicle Compatibility: Ensure that your truck is suitable for a camper conversion. Check the weight capacity, dimensions, and structural integrity to support the added weight of the camper.
-
Regulations and Permits: Research any local regulations or permits required for modifying a vehicle into a camper. Compliance with safety and legal standards is essential.
-
Timeframe: Set a realistic timeline for your project, considering your availability, skill level, and any external assistance you may need.
By carefully planning these aspects, you'll lay a strong foundation for a successful DIY truck camper project.
Choosing the Right Materials
Selecting the right materials is crucial for the structural integrity, durability, and overall quality of your DIY truck camper. Here's a detailed look at the essential materials you'll need for a successful build:
1. Lumber and Plywood
- Opt for high-quality, lightweight lumber and plywood to construct the frame and interior structures. Consider materials that offer a balance of strength and weight to ensure the camper is sturdy yet mobile.
2. Insulation
- Choose insulation materials that provide effective thermal and sound insulation. Closed-cell foam boards or spray foam insulation are popular choices for their insulation properties and space-saving benefits.
3. Exterior Cladding
- Select durable and weather-resistant cladding materials to protect the camper from the elements. Aluminum composite panels, fiberglass, or marine-grade plywood are excellent options for the exterior skin of the camper.
4. Windows and Doors
- Invest in high-quality, weather-sealed windows and doors designed for RVs or campers. Look for features such as double-pane glass for insulation and secure locking mechanisms for safety.
5. Electrical and Plumbing Components
- When it comes to electrical wiring, opt for marine-grade wiring and components designed for mobile applications. For plumbing, choose flexible PEX tubing and high-quality fixtures suitable for compact spaces.
6. Hardware and Fasteners
- Use corrosion-resistant hardware and fasteners to ensure the longevity of your camper. Stainless steel or galvanized hardware is ideal for outdoor applications and can withstand exposure to moisture.
7. Interior Finishes
- Select lightweight yet durable materials for the interior finishes, such as laminate or vinyl flooring, lightweight cabinetry materials, and easy-to-clean surfaces for countertops and walls.
By carefully selecting these materials, you'll ensure that your DIY truck camper is not only structurally sound but also equipped to withstand the rigors of outdoor adventures.
Building the Frame and Structure
Building the frame and structure of your DIY truck camper is a critical phase that sets the foundation for the entire project. Here's a detailed breakdown of the steps involved in constructing the frame and structure:
-
Frame Design: Begin by designing the frame layout based on your camper's dimensions and the desired floor plan. Consider the weight distribution, structural integrity, and attachment points to the truck bed.
-
Frame Material Selection: Choose high-quality, lightweight, and durable materials for the frame. Aluminum and steel are popular choices due to their strength-to-weight ratio and resistance to corrosion.
-
Cutting and Welding: If using metal materials, accurately cut and weld the frame components according to the design specifications. Precision is crucial to ensure the frame's stability and alignment.
-
Attachment to the Truck Bed: Securely anchor the frame to the truck bed using appropriate mounting hardware. Ensure a strong connection to withstand the forces encountered during travel.
-
Floor and Wall Structures: Once the frame is in place, construct the floor and wall structures using the selected plywood and lumber. Ensure proper bracing and reinforcement to support the interior components and withstand dynamic loads.
-
Roof Construction: Design and build the roof structure to provide adequate support for the chosen cladding material. Consider aerodynamics, water runoff, and the potential for roof-mounted accessories.
-
Integration of Windows and Doors: Cut openings for windows and doors in the frame and install them according to the manufacturer's guidelines. Proper sealing and weatherproofing are essential to prevent leaks and drafts.
-
Structural Integrity Checks: Thoroughly inspect the frame and structure for any signs of weakness, misalignment, or inadequate support. Address any issues before proceeding to the next phase of the build.
By meticulously executing the frame and structure construction, you'll ensure that your DIY truck camper is not only safe and reliable but also capable of withstanding the demands of life on the road.
Installing Windows and Doors
Installing windows and doors in your DIY truck camper is a crucial step that requires precision and attention to detail. Here's a detailed breakdown of the process:
-
Window Placement: Begin by carefully marking the locations for the windows based on your camper's layout and design. Consider factors such as natural light, ventilation, and exterior visibility when determining the placement of windows.
-
Cutting Openings: Using the appropriate tools, carefully cut openings in the camper's structure for the windows. Ensure that the dimensions of the openings match the specifications provided by the window manufacturer.
-
Weatherproofing: Prior to installing the windows, apply a high-quality weatherproofing sealant around the perimeter of the window openings. This step is crucial for preventing water infiltration and ensuring a secure seal.
-
Window Installation: Carefully place the windows into the prepared openings, following the manufacturer's guidelines for proper positioning and fastening. Secure the windows in place using the recommended fasteners and hardware.
-
Sealing and Insulation: Once the windows are installed, apply additional layers of weatherproofing sealant around the exterior edges to create a watertight seal. Insulate the gaps between the window frames and the camper structure to enhance thermal efficiency.
-
Door Preparation: When it comes to installing the door, ensure that the opening is accurately sized to accommodate the door unit. Check the door for proper operation and fit before proceeding with the installation.
-
Door Installation: Position the door unit in the designated opening, ensuring that it aligns correctly and operates smoothly. Secure the door in place according to the manufacturer's instructions, paying close attention to the alignment and weather sealing.
-
Hardware and Locks: Install the necessary hardware, hinges, and locks for the windows and doors. Ensure that all components are securely fastened and functioning correctly to provide both security and ease of use.
-
Final Inspections: Thoroughly inspect the installed windows and doors for any gaps, leaks, or operational issues. Test the functionality of the windows and doors to ensure smooth operation and proper sealing.
By following these detailed steps, you'll ensure that the installation of windows and doors in your DIY truck camper is executed with precision, resulting in a secure, weatherproof, and comfortable living space for your adventures.
Insulating and Waterproofing
Insulating and waterproofing your DIY truck camper is essential to create a comfortable and protected living space. Here's a detailed guide on how to effectively insulate and waterproof your camper:
-
Selecting Insulation Materials: Choose insulation materials that offer both thermal efficiency and moisture resistance. Closed-cell foam boards, spray foam insulation, or fiberglass batts are commonly used for their insulating properties and ability to repel moisture.
-
Installation of Insulation: Carefully install the selected insulation materials within the wall, floor, and ceiling cavities of the camper. Ensure a snug fit to eliminate gaps and thermal bridging, which can compromise the insulation's effectiveness.
-
Vapor Barrier Application: Install a vapor barrier on the interior side of the insulation to prevent moisture from penetrating into the insulation material. This barrier helps control condensation and protects the insulation from moisture-related damage.
-
Sealing Wall and Ceiling Cavities: Seal any gaps or joints in the wall and ceiling cavities to prevent air leakage and moisture intrusion. Use a high-quality sealant or tape to ensure airtight and watertight seals.
-
Waterproofing Exterior Surfaces: Apply a weatherproofing membrane or coating to the exterior surfaces of the camper, including the roof and walls. This protective layer acts as a barrier against rain, snow, and moisture, safeguarding the structural integrity of the camper.
-
Sealing Windows and Doors: Inspect the seals around windows and doors for any gaps or deterioration. Replace worn seals and apply fresh sealant to ensure a tight, waterproof seal around these openings.
-
Roof Waterproofing: Pay special attention to the roof, as it is particularly vulnerable to water infiltration. Apply a durable and UV-resistant roof sealant or coating to prevent leaks and protect the roof from environmental damage.
-
Floor Waterproofing: If your camper features a wooden floor, consider applying a waterproofing sealant to protect the wood from moisture and potential rot. This step is crucial, especially if your camper will be exposed to wet or humid conditions.
-
Moisture Control: Incorporate ventilation features, such as roof vents and breathable materials, to control moisture buildup inside the camper. Proper airflow helps prevent condensation and mold growth, contributing to a healthier indoor environment.
By meticulously insulating and waterproofing your DIY truck camper, you'll create a cozy and resilient living space that can withstand varying weather conditions and provide comfort during your outdoor adventures.
Adding Electrical and Plumbing Systems
When outfitting your DIY truck camper with electrical and plumbing systems, careful planning and execution are essential to ensure functionality, safety, and convenience on the road. Here's a comprehensive guide to adding electrical and plumbing systems to your camper:
Electrical System Installation
-
Design and Layout: Begin by designing the electrical layout, considering the power requirements of appliances, lighting, and electronic devices. Plan the placement of outlets, switches, and the main electrical panel to optimize functionality and accessibility.
-
Power Source: Determine the power source for your camper. Options include a dedicated deep-cycle battery or a solar power system for off-grid capabilities. Calculate the energy needs based on your usage patterns and select the appropriate battery capacity or solar panel configuration.
-
Wiring and Components: Use marine-grade wiring and electrical components designed for mobile applications. Route the wiring through protective conduits to prevent damage and ensure a tidy installation. Install circuit breakers, fuses, and a power inverter to regulate and distribute electrical power safely.
-
Lighting and Fixtures: Install energy-efficient LED lighting fixtures to minimize power consumption. Consider task lighting for specific areas such as the kitchen and reading nooks, as well as ambient lighting for overall illumination.
-
Appliance Integration: If your camper includes appliances such as a refrigerator, stove, or water heater, ensure they are compatible with the electrical system. Follow the manufacturer's guidelines for installation and power requirements.
-
Safety Measures: Incorporate ground fault circuit interrupters (GFCIs) in areas exposed to moisture, such as the kitchen and bathroom, to prevent electrical shocks. Test the electrical system thoroughly to verify proper functionality and safety.
Plumbing System Installation
-
Water Storage and Supply: Determine the water storage capacity needed for your travels and install a freshwater tank accordingly. Consider a portable or collapsible gray water tank for wastewater storage, especially for off-grid camping.
-
Piping and Fixtures: Use flexible PEX tubing for water supply lines, as it is durable, resistant to freezing, and suitable for mobile applications. Install a water pump to provide pressurized water to the faucets and shower, and incorporate shut-off valves for maintenance and emergency purposes.
-
Sink and Shower Installation: If your camper includes a kitchen sink and a shower, ensure proper drainage and venting for the plumbing fixtures. Use lightweight yet durable materials for the sink and shower components to minimize weight and maximize functionality.
-
Toilet Considerations: If your camper includes a toilet, select a compact and water-efficient model suitable for mobile use. Install a black water tank for sewage storage and consider environmentally friendly waste disposal options when traveling in remote areas.
-
Hot Water System: If hot water is a necessity, consider installing a compact water heater compatible with your power source. Tankless propane water heaters are popular for their space-saving design and on-demand hot water supply.
-
Winterization: If you plan to use your camper in cold climates, incorporate measures to prevent freezing of the plumbing system. This may include insulating exposed pipes, using heated water hoses, and adding antifreeze to the system when necessary.
By following these detailed steps, you'll successfully integrate electrical and plumbing systems into your DIY truck camper, providing essential amenities for a comfortable and self-sufficient mobile living space.
Customizing the Interior
Customizing the interior of your DIY truck camper allows you to tailor the living space to your preferences and needs. Here's a comprehensive guide to customizing the interior of your camper:
1. Layout and Functionality
- Begin by envisioning the layout that best suits your lifestyle. Consider the placement of key elements such as the sleeping area, kitchenette, storage compartments, and seating arrangements.
- Optimize space utilization by incorporating multifunctional furniture and storage solutions. Foldable tables, convertible seating, and modular storage units can maximize the functionality of the interior.
2. Cabinetry and Storage
- Design and install custom cabinetry to accommodate your storage needs. Utilize lightweight yet durable materials such as marine-grade plywood or composite panels to construct the cabinets.
- Incorporate overhead cabinets, under-seat storage, and pull-out drawers to efficiently utilize every available space. Consider utilizing vertical space for storage to minimize clutter.
3. Kitchen and Dining Area
- Customize the kitchen area to include essential appliances such as a compact stove, sink, and refrigerator. Opt for space-saving kitchen fixtures and appliances designed for RV or marine use.
- Create a dining area that can double as a workspace or entertainment zone. Fold-down tables or swivel-mounted tabletops can provide versatility in a compact space.
4. Sleeping Quarters
- Design a comfortable and space-efficient sleeping area. Consider installing a platform bed with built-in storage or a convertible seating arrangement that transforms into a bed.
- Incorporate comfortable bedding, such as a high-quality mattress or memory foam to ensure a restful night's sleep during your adventures.
5. Climate Control and Ventilation
- Install a compact heating and cooling system suitable for the size of your camper. Consider portable electric heaters, vented propane heaters, or roof-mounted air conditioning units for climate control.
- Incorporate roof vents, windows with screens, and adjustable airflow features to ensure adequate ventilation and airflow within the camper.
6. Aesthetics and Personalization
- Add personal touches to the interior by incorporating decorative elements that reflect your style and personality. Consider wall art, throw pillows, and window treatments to create a cozy and inviting atmosphere.
- Choose a color scheme and interior finishes that complement the overall design theme of your camper. Lighter colors can create a sense of spaciousness, while darker tones can add a cozy ambiance.
7. Entertainment and Connectivity
- Integrate entertainment options such as a compact audio system, LED TV, or portable projector for multimedia enjoyment during downtime.
- Ensure connectivity by installing USB charging ports, 12-volt outlets, and Wi-Fi or cellular signal boosters to stay connected while on the go.
By customizing the interior of your DIY truck camper with careful consideration of layout, functionality, and personalization, you can create a comfortable and inviting living space that enhances your outdoor adventures.
Final Touches and Safety Considerations
As you near the completion of your DIY truck camper project, it's essential to focus on the final touches and safety considerations to ensure that your mobile adventure space is not only aesthetically pleasing but also equipped with essential safety features.
1. Exterior Finishing
Give attention to the exterior aesthetics by adding finishing touches such as decals, paint, or protective coatings. These elements not only enhance the visual appeal of your camper but also provide an additional layer of protection against the elements.
2. Lighting and Visibility
Install exterior lighting to enhance visibility and safety during nighttime activities. Consider adding LED awning lights, motion-activated security lights, and reflective tape to improve visibility and security around the camper.
3. Safety Equipment
Prioritize safety by equipping your camper with essential safety equipment. Install smoke and carbon monoxide detectors to provide early warnings in the event of potential hazards. Additionally, consider carrying a fire extinguisher and a first aid kit for emergency situations.
4. Weight Distribution and Stability
Ensure that the weight distribution of your camper is optimized for stability and safe towing. Properly distribute the load within the camper to maintain a balanced center of gravity, reducing the risk of swaying or instability during travel.
5. Secure Storage Solutions
Incorporate secure storage solutions to safeguard your belongings during transit and when parked. Utilize locking compartments and tie-down systems to prevent items from shifting or becoming projectiles in the event of sudden stops or maneuvers.
6. Tire Maintenance and Safety
Regularly inspect and maintain the tires of your camper to ensure proper inflation, tread depth, and overall condition. Adequate tire maintenance is crucial for safe and reliable travel, reducing the risk of blowouts or tire-related incidents.
7. Emergency Preparedness
Prepare for unforeseen circumstances by carrying essential emergency supplies. This may include a roadside emergency kit, spare tire, jack, tire iron, and emergency signaling devices to address unexpected breakdowns or roadside assistance needs.
8. Roadworthiness Checks
Before embarking on your adventures, conduct thorough roadworthiness checks on both the camper and the towing vehicle. Ensure that all mechanical and electrical systems are in optimal condition, including brakes, suspension, lighting, and hitch connections.
9. User Manuals and Documentation
Compile user manuals and documentation for the installed systems and components within your camper. This information can be invaluable for troubleshooting, maintenance, and emergency situations, providing guidance when needed.
By attending to these final touches and safety considerations, you'll not only enhance the functionality and safety of your DIY truck camper but also gain peace of mind as you embark on your mobile adventures.
Conclusion
Congratulations on completing the construction of your DIY truck camper! By following the step-by-step process outlined in this guide, you've transformed a standard truck into a versatile and comfortable mobile adventure space. From meticulous planning and material selection to the integration of essential systems and safety considerations, your dedication and hard work have culminated in the creation of a personalized haven for your outdoor pursuits.
As you prepare to hit the road and embark on new adventures, remember that your DIY truck camper is a reflection of your creativity and resourcefulness. It's a testament to your ability to transform a vision into a tangible and functional living space. Whether you're exploring remote wilderness areas, embarking on cross-country road trips, or simply enjoying weekend getaways, your camper is poised to be a reliable companion on your journey.
As you enjoy the freedom and flexibility that your DIY truck camper offers, continue to prioritize safety, maintenance, and responsible travel practices. Regular inspections, proper weight distribution, and adherence to road safety regulations will contribute to a secure and enjoyable travel experience.
Embrace the versatility and self-sufficiency that your camper provides, and take pride in the fact that you've created a space that reflects your individuality and passion for adventure. Cherish the memories you'll create and the experiences you'll have within the walls of your custom-built camper.
Above all, savor the sense of accomplishment that comes with bringing your DIY truck camper project to fruition. Your dedication to craftsmanship and attention to detail have resulted in a mobile living space that is uniquely yours. As you venture into the great outdoors, may your DIY truck camper be a source of comfort, inspiration, and endless exploration.
Safe travels and happy adventures!