
Home>Create & Decorate>DIY & Crafts>DIY Murphy Door: How To Create Your Own Hidden Entrance
DIY & Crafts
DIY Murphy Door: How To Create Your Own Hidden Entrance
Published: June 14, 2024

Senior Editor in Create & Decorate, Kathryn combines traditional craftsmanship with contemporary trends. Her background in textile design and commitment to sustainable crafts inspire both content and community.
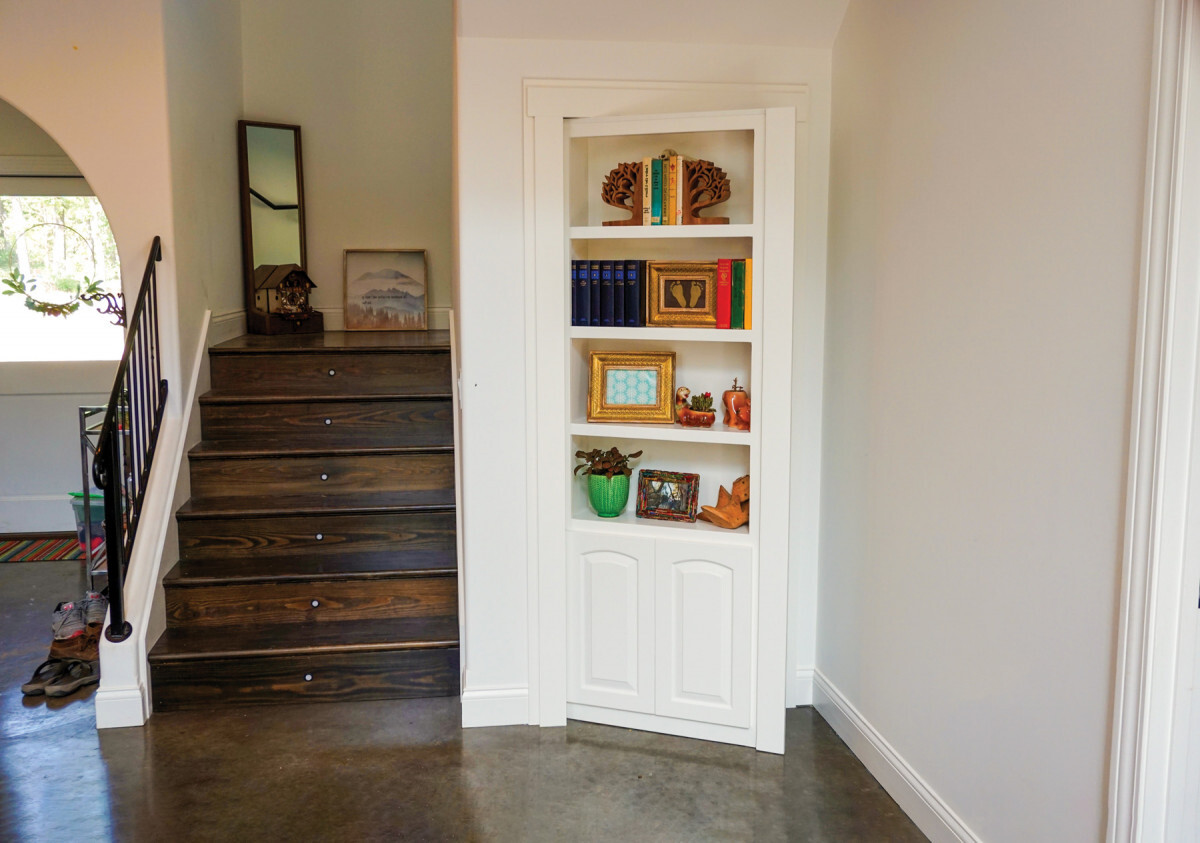
Learn how to build your own hidden entrance with our DIY Murphy Door guide. Perfect for DIY & Crafts enthusiasts looking for a fun and functional project.
(Many of the links in this article redirect to a specific reviewed product. Your purchase of these products through affiliate links helps to generate commission for Twigandthistle.com, at no extra cost. Learn more)
Introduction
So, you want to add a touch of mystery and functionality to your home? A DIY Murphy door might just be the perfect project for you. Imagine having a hidden entrance that seamlessly blends into your wall, providing both a practical solution for space-saving and a cool secret feature for your home. In this guide, we'll walk you through the steps to create your very own hidden entrance using a Murphy door. Whether you're a seasoned DIY enthusiast or just starting out, this project can be a rewarding and impressive addition to your home. Let's get started!
Materials Needed
To get started on your DIY Murphy door project, you'll need the following materials:
- Wood: Choose a sturdy and durable wood material for building the door frame. Plywood or medium-density fiberboard (MDF) are popular choices.
- Hinges: Select heavy-duty hinges that can support the weight of the door and allow it to swing smoothly.
- Door Hardware: This includes a doorknob, latch, and any other hardware you want to include on your hidden door.
- Trim and Molding: To give your door a polished look, you'll need trim and molding to frame the entrance.
- Paint or Stain: Depending on your preference, you'll need paint or stain to finish the door and match it to your existing wall.
- Tools: Essential tools for this project include a saw, drill, screws, screwdriver, measuring tape, level, and sandpaper.
- Optional: If you want to add a bookshelf or storage space to your Murphy door, you'll also need shelf brackets and additional wood for the shelving.
Gathering these materials will set you up for a successful DIY Murphy door project.
Step 1: Measuring and Planning
Before diving into the construction of your DIY Murphy door, it's crucial to start with accurate measurements and thorough planning. Here's how to approach this critical first step:
-
Measure the Space: Begin by measuring the area where you intend to install the Murphy door. Take precise measurements of the height and width of the doorway to ensure that the door will fit seamlessly into the space.
-
Consider Clearances: Take into account the clearances needed for the door to swing open and close without obstruction. This includes the space required for the door to pivot and the clearance at the top and bottom of the door frame.
-
Plan the Swing Direction: Decide on the direction in which you want the door to swing. This will impact the placement of the hinges and the overall design of the door.
-
Account for Shelving or Storage: If you plan to incorporate shelving or storage within the Murphy door, factor in the dimensions and placement of these elements during the planning phase.
-
Create a Detailed Plan: Sketch out a detailed plan for the door, including the dimensions, hinge placement, and any additional features you want to include. This plan will serve as a guide throughout the construction process.
By taking the time to measure the space accurately and plan out the specifics of your Murphy door, you'll set the foundation for a successful and seamless installation.
Step 2: Building the Door Frame
With precise measurements and a solid plan in hand, it's time to move on to constructing the door frame for your Murphy door. Follow these steps to build a sturdy and functional frame:
-
Cut the Wood: Using the measurements from your plan, carefully cut the wood to create the frame components. You'll need pieces for the vertical sides, horizontal top and bottom, and any additional support pieces based on the size of your door.
-
Assemble the Frame: Begin by assembling the vertical and horizontal pieces to form the rectangular frame. Use wood glue and screws to secure the joints, ensuring that the frame is strong and stable.
-
Reinforce the Corners: To add extra strength to the frame, consider using corner brackets or braces at each corner. This reinforcement will help the door withstand the stress of regular use.
-
Install the Center Support: For larger doors, it's essential to include a center support piece to prevent warping or sagging over time. Measure and install this support piece within the frame to maintain its structural integrity.
-
Prep for Hinges: Determine the placement of the hinges on the frame based on your swing direction plan. Mark the locations for the hinges and ensure they are aligned accurately for smooth operation.
By following these steps, you'll create a robust and well-constructed door frame that forms the backbone of your Murphy door. Once the frame is complete, you'll be ready to move on to the next phase of the project.
Step 3: Installing Hinges and Hardware
Once the door frame is constructed, the next crucial step is to install the hinges and hardware that will allow your Murphy door to function smoothly. Follow these detailed steps to ensure proper installation:
-
Attach the Hinges: Position the hinges on the door frame according to your pre-determined plan for the swing direction. Use a screwdriver and screws to securely attach the hinges to the frame. Ensure that the hinges are aligned correctly to allow the door to open and close without any issues.
-
Mount the Door: With the help of a friend or family member, carefully lift the door and align it with the hinges on the frame. Secure the door to the hinges by attaching the hinge pins, ensuring that the door swings freely and smoothly.
-
Install the Hardware: Affix the doorknob, latch, and any additional hardware to the door according to your design preferences. Make sure the hardware is installed securely and functions properly. Test the door to ensure that the hardware operates smoothly and effectively.
-
Adjust for Smooth Operation: Once the hinges and hardware are in place, test the door's functionality by opening and closing it multiple times. Make any necessary adjustments to the hinges or hardware to ensure that the door operates seamlessly without sticking or rubbing against the frame.
-
Add Optional Features: If you've chosen to incorporate shelving or storage within the Murphy door, this is the stage to install the shelf brackets and attach the additional wood for the shelving. Ensure that the shelving is securely installed and can support the intended weight.
By following these steps, you'll successfully install the hinges and hardware, bringing your DIY Murphy door one step closer to completion. With the door now fully functional, you're ready to add the finishing touches to enhance its appearance and seamlessly integrate it into your home.
Step 4: Adding the Finishing Touches
With the functional aspects of your DIY Murphy door in place, it's time to focus on adding the finishing touches that will enhance its appearance and seamlessly integrate it into your home. Follow these steps to complete the project with finesse:
-
Trim and Molding: To give your Murphy door a polished and seamless look, carefully install trim and molding around the door frame. This will not only conceal any gaps between the door and the wall but also create a cohesive and integrated appearance.
-
Paint or Stain: Apply the chosen paint or stain to the door and the surrounding wall to match the existing decor. Ensure that the finish is even and complements the overall aesthetic of the room. This step will help the Murphy door blend in discreetly when closed and stand out as a stylish feature when open.
-
Adjust and Test: Take the time to adjust the door's alignment and functionality as needed. Ensure that it opens and closes smoothly, latches securely, and aligns perfectly with the surrounding wall. Making any final adjustments at this stage will guarantee a flawless end result.
-
Optional Customization: If you want to add a personal touch, consider customizing the door with decorative elements such as a chalkboard surface, a mirror, or a unique paint design. This customization can turn your Murphy door into a standout feature that reflects your personal style and creativity.
-
Final Inspection: Once all the finishing touches are in place, conduct a thorough inspection of the door and its surroundings. Check for any imperfections, ensure that the hardware is secure, and confirm that the door operates as intended. This final inspection will give you the opportunity to address any last-minute details before unveiling your completed Murphy door.
By following these steps and paying attention to the finishing touches, you'll elevate your DIY Murphy door from a functional addition to a seamless and stylish feature in your home. With the project now complete, you can enjoy the convenience and intrigue of your hidden entrance while impressing visitors with your craftsmanship and attention to detail.
Conclusion
Congratulations! You've successfully embarked on the journey of creating your very own DIY Murphy door, transforming a simple doorway into a hidden entrance that adds both functionality and intrigue to your home. By meticulously measuring, planning, constructing, and adding the finishing touches, you've brought to life a unique feature that seamlessly integrates into your living space. Whether you've chosen to incorporate shelving, storage, or personalized customization, your Murphy door stands as a testament to your creativity and craftsmanship. Now, as you admire the seamless blend of your hidden entrance with the surrounding wall, you can take pride in the fact that you've not only optimized space but also added a touch of mystery and style to your home. Enjoy the seamless functionality and the wow factor of your DIY Murphy door, and let it serve as a constant reminder of the endless possibilities that come with DIY home improvement projects.