
Home>Create & Decorate>DIY & Crafts>DIY Ice Rink: How To Build Your Own Skating Wonderland
DIY & Crafts
DIY Ice Rink: How To Build Your Own Skating Wonderland
Published: June 13, 2024

Content Creator specializing in woodworking and interior transformations. Caegan's guides motivate readers to undertake their own projects, while his custom furniture adds a personal touch.
Learn how to create your own DIY ice rink and turn your backyard into a skating wonderland with our step-by-step guide. Perfect for DIY & Crafts enthusiasts!
(Many of the links in this article redirect to a specific reviewed product. Your purchase of these products through affiliate links helps to generate commission for Twigandthistle.com, at no extra cost. Learn more)
Introduction
So, you've always dreamed of having your own ice rink in your backyard, but you're not sure where to start? Well, you're in luck because building your own DIY ice rink is easier than you might think! Whether you're a hockey enthusiast, figure skater, or just love the idea of having a winter wonderland in your own yard, creating your own ice rink can be a fun and rewarding project. In this article, we'll guide you through the step-by-step process of building your very own DIY ice rink. Get ready to lace up your skates and enjoy the thrill of skating in your own backyard!
Choosing the Right Location
When it comes to building your DIY ice rink, choosing the right location is crucial for a successful and enjoyable skating experience. Here are some key factors to consider when selecting the perfect spot for your ice rink:
-
Flat Surface: Look for a flat area in your yard that is free from any significant slopes or bumps. A level surface will make it easier to create an even layer of ice and ensure a smooth skating surface.
-
Access to Water: Since you'll need to fill your rink with water, it's essential to have easy access to a water source. Consider the proximity of a hose or water supply to the chosen location for your ice rink.
-
Shading: While sunlight is great for enjoying the outdoors, it can also affect the quality of the ice on your rink. Choose a location that receives minimal direct sunlight to prevent the ice from melting too quickly.
-
Safety: Ensure that the location you choose is away from any potential hazards such as trees, rocks, or other obstacles that could pose a danger to skaters.
-
Space: Consider the available space in your yard. Make sure the chosen location provides enough room for the size of the rink you want to build, as well as space for skaters to move around comfortably.
By carefully considering these factors, you can select the ideal location for your DIY ice rink, setting the stage for a fantastic skating experience right in your own backyard.
Gathering Materials and Tools
Before you start building your DIY ice rink, it's essential to gather all the necessary materials and tools. Here's a comprehensive list of what you'll need to get started:
Materials
- Lumber: Purchase lumber to create the frame of your ice rink. Pressure-treated 2×6 or 2×8 boards are commonly used for this purpose.
- Brackets and Fasteners: You'll need brackets and fasteners to secure the lumber together and create a sturdy frame.
- Liner: Invest in a high-quality liner specifically designed for ice rinks. This will help contain the water and prevent leakage.
- Water: Depending on the size of your rink, you'll need a significant amount of water to fill it. Ensure you have access to a sufficient water supply.
- Leveling Material: Sand or snow can be used to level the ground before laying the liner, ensuring a smooth surface for the ice.
- Optional Accessories: Consider adding boards, netting, or decorative elements to enhance the appearance and functionality of your rink.
Tools
- Measuring Tape: Accurate measurements are crucial for building a well-proportioned rink.
- Saw: A saw will be necessary for cutting the lumber to the appropriate lengths.
- Drill and Screws: These tools are essential for securing the lumber and brackets together.
- Shovel: You'll need a shovel to clear the area and create a level surface for the rink.
- Hose or Water Source: Ensure you have a reliable hose or access to a water source for filling the rink.
- Level: A level will help you ensure that the frame and liner are installed evenly.
By gathering these materials and tools, you'll be well-prepared to begin the construction of your DIY ice rink. With everything in place, you can move on to the exciting process of bringing your skating wonderland to life right in your own backyard.
Building the Frame
Building the frame is a critical step in creating a sturdy foundation for your DIY ice rink. Follow these steps to construct a reliable and durable frame for your skating wonderland:
-
Measure and Mark: Begin by measuring the area where you plan to build the rink. Use a measuring tape to mark the dimensions for the frame, ensuring that the corners are square and the sides are equal in length.
-
Cut the Lumber: Using a saw, cut the pressure-treated lumber to the appropriate lengths based on your measurements. You'll need longer pieces for the sides and shorter pieces for the ends of the frame.
-
Assemble the Frame: Position the cut lumber to form a rectangular shape, with the longer pieces on the sides and the shorter pieces at the ends. Use brackets and screws to secure the corners and create a rigid frame structure.
-
Level the Frame: Once the frame is assembled, use a level to ensure that it is even and sits flush on the ground. Adjust the frame as needed to achieve a level surface, which is essential for the next steps in the construction process.
-
Stabilize the Frame: To reinforce the stability of the frame, consider driving stakes into the ground at the outer corners of the frame. This will help prevent shifting or movement once the rink is filled with water.
By following these steps, you can build a robust frame that will provide the necessary support for the rest of the DIY ice rink construction process. With the frame in place, you're one step closer to realizing your backyard skating dreams.
Installing the Liner
Installing the liner is a crucial step in creating a watertight barrier that will hold the water for your DIY ice rink. Follow these steps to ensure a smooth and successful installation of the liner:
-
Prepare the Area: Before laying the liner, ensure that the frame is clean and free of any debris. Use a shovel to remove any remaining snow, dirt, or rocks from the surface. It's essential to have a clean and level base for the liner.
-
Unroll the Liner: Carefully unroll the ice rink liner inside the frame, ensuring that it covers the entire area with some overlap on the edges. The excess liner will be trimmed later, so make sure it extends beyond the frame's perimeter.
-
Smooth Out Wrinkles: As you lay the liner, work to smooth out any wrinkles or folds to ensure a flat and even surface. This will help prevent any uneven freezing or potential weak spots in the ice.
-
Secure the Liner: Once the liner is positioned correctly, use boards or weights around the perimeter to hold it in place. This will prevent the liner from shifting or moving during the next steps of the construction process.
-
Trim the Excess: Using a sharp utility knife, carefully trim the excess liner, leaving a few inches of overlap around the frame. This overlap will help secure the liner in place and prevent any water leakage.
-
Secure the Edges: To further secure the liner, consider using clamps or clips to fasten the edges to the frame. This will help create a tight seal and prevent the water from seeping out once the rink is filled.
By following these steps, you can effectively install the liner, creating a watertight barrier that will contain the water and allow for the formation of a smooth and even layer of ice. With the liner in place, you're ready to move on to the next exciting phase of building your DIY ice rink.
Filling the Rink with Water
Now that the frame is built and the liner is securely in place, it's time to fill your DIY ice rink with water. This step is crucial for creating a solid and smooth skating surface. Here's how to effectively fill your rink with water:
-
Even Distribution: Begin by evenly distributing the water across the surface of the rink. Using a hose with a gentle flow or a sprinkler attachment can help ensure that the water is spread out uniformly, preventing any pooling or uneven areas.
-
Thin Layers: Rather than filling the rink with a large volume of water all at once, it's best to add thin layers of water at a time. This approach allows each layer to freeze evenly, resulting in a stronger and more consistent ice surface.
-
Patience is Key: As you add water, be patient and allow each layer to freeze before adding the next. Depending on the temperature, each layer may take several hours to freeze completely. Building the ice gradually will help prevent air bubbles and create a smoother skating surface.
-
Monitor the Thickness: Keep an eye on the thickness of the ice as you add layers of water. For a standard backyard ice rink, a thickness of 2 to 4 inches is typically sufficient for safe skating. Use a measuring tape to check the ice thickness in different areas of the rink.
-
Addressing Imperfections: If you notice any imperfections or rough patches in the ice as it freezes, you can use a snow shovel or a squeegee to smooth out the surface. This will help create a more enjoyable and safer skating experience.
-
Consider the Weather: Be mindful of the weather conditions as you fill the rink with water. Warmer temperatures may require more frequent water additions, while colder temperatures may result in faster freezing times.
By following these steps and taking a patient and methodical approach to filling your DIY ice rink with water, you can create a solid and smooth skating surface that will provide hours of enjoyment for you, your family, and friends. Once the water has frozen into a solid layer of ice, you'll be ready to lace up your skates and experience the thrill of skating in your very own backyard winter wonderland.
Maintaining the Ice
Maintaining the ice of your DIY ice rink is essential to ensure a safe and enjoyable skating experience. Once the rink is filled and the ice is solid, ongoing maintenance will help preserve the quality of the ice and extend the skating season. Here are some key tips for effectively maintaining the ice of your DIY ice rink:
-
Regular Inspections: Make it a habit to regularly inspect the ice surface for any signs of damage, such as cracks, holes, or uneven areas. Addressing these issues promptly can prevent them from worsening and ensure a smoother skating experience.
-
Remove Snow and Debris: After snowfall or windy conditions, use a snow shovel or a broom to clear off any accumulated snow or debris from the ice surface. Keeping the ice clean and free of obstructions will help maintain its quality and safety.
-
Smooth Out Imperfections: If you notice any rough patches or uneven areas on the ice, use a shovel or a specialized ice resurfacer to smooth out the surface. This will help create a more consistent and enjoyable skating surface.
-
Add Thin Layers of Water: As the ice surface experiences wear and tear from skating, adding thin layers of water can help repair minor imperfections and strengthen the ice. This process, known as "flooding," can be done using a hose or a watering can to apply a thin, even layer of water.
-
Monitor Temperature Changes: Be mindful of temperature fluctuations, as they can affect the quality of the ice. Warmer temperatures may require additional maintenance to prevent melting, while colder temperatures may necessitate adjustments in the water application process.
-
Consider Ice Maintenance Tools: Investing in specialized ice maintenance tools, such as a hand Zamboni or ice edger, can help streamline the maintenance process and ensure a consistently smooth and safe skating surface.
By implementing these maintenance practices, you can prolong the lifespan of your DIY ice rink and enjoy a high-quality skating experience throughout the winter season. With regular care and attention, your backyard ice rink will continue to provide endless hours of fun and enjoyment for skaters of all ages.
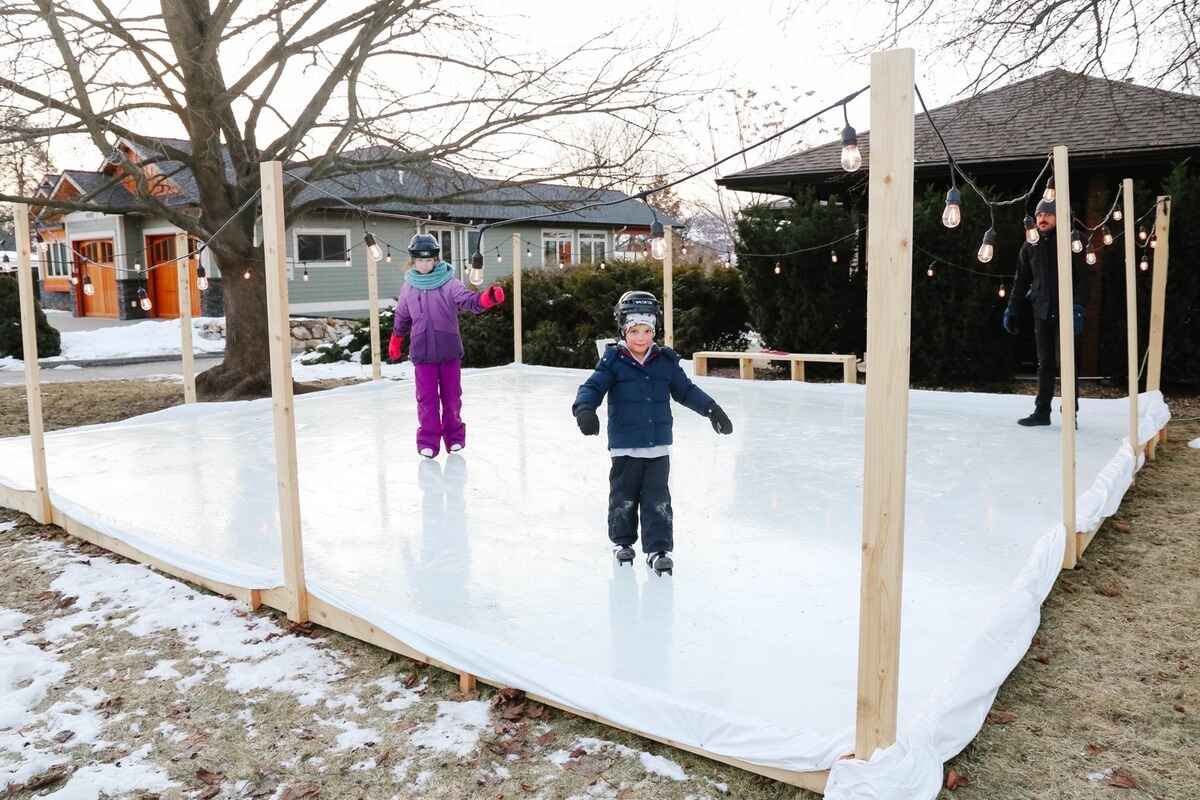
Enjoying Your DIY Ice Rink
Now that your DIY ice rink is built, filled, and well-maintained, it's time to reap the rewards of your hard work and enjoy the exhilarating experience of skating in your very own backyard winter wonderland. Here are some fantastic ways to make the most of your DIY ice rink:
-
Skating Parties: Host skating parties for family and friends to share the joy of your DIY ice rink. Whether it's a casual gathering or a themed skating event, creating memorable moments on the ice will be a highlight of the winter season.
-
Friendly Hockey Matches: Organize friendly hockey matches for some competitive fun on the ice. Gather a group of hockey enthusiasts and enjoy exhilarating games right in your backyard.
-
Figure Skating Performances: If you or your family members are figure skating enthusiasts, showcase your skills with dazzling performances on the ice. It's a great opportunity to practice routines and enjoy the beauty of figure skating.
-
Nighttime Skating: Extend the skating fun into the evening by adding some outdoor lighting around the rink. Skating under the stars and twinkling lights creates a magical ambiance for nighttime enjoyment.
-
Hot Cocoa and Snacks: Set up a cozy station near the rink with hot cocoa, snacks, and warm beverages. After a delightful skating session, everyone can gather around to share stories and laughter while savoring comforting treats.
-
Skating Lessons: Offer skating lessons to beginners or younger family members. Sharing your passion for skating and helping others improve their skills can be a rewarding experience for everyone involved.
-
Winter Celebrations: Incorporate your DIY ice rink into winter celebrations and holidays. Whether it's a festive skate on Christmas Day or a New Year's Eve skating party, your ice rink can become a focal point for seasonal merriment.
-
Create Fond Memories: Capture the joy and excitement of skating on your DIY ice rink by taking plenty of photos and videos. These memories will be cherished for years to come and can be shared with friends and family.
By embracing these enjoyable activities and making the most of your DIY ice rink, you'll create lasting memories and experiences that will make your backyard ice rink a cherished part of the winter season. So, lace up your skates, gather your loved ones, and immerse yourself in the pure delight of skating in your very own DIY winter wonderland.