
Home>Create & Decorate>DIY & Crafts>DIY Dog Crate: Build A Stylish And Functional Home For Your Furry Friend
DIY & Crafts
DIY Dog Crate: Build A Stylish And Functional Home For Your Furry Friend
Published: May 29, 2024

Senior Editor in Create & Decorate, Kathryn combines traditional craftsmanship with contemporary trends. Her background in textile design and commitment to sustainable crafts inspire both content and community.
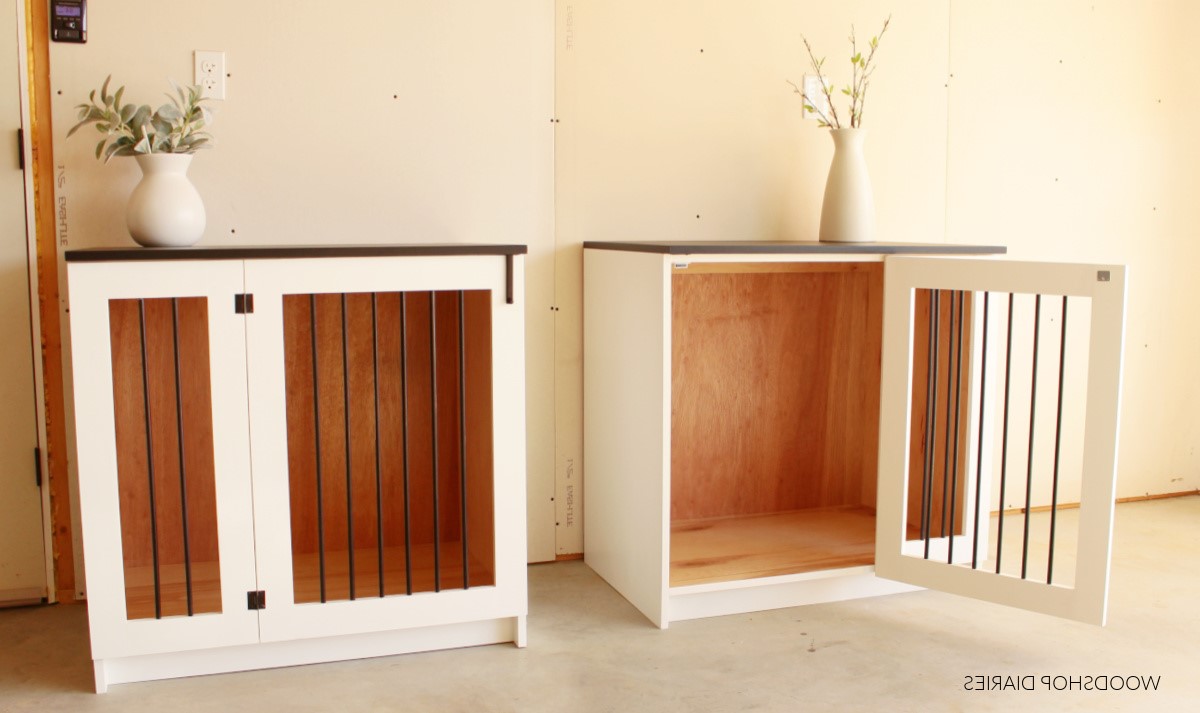
Discover how to create a stylish and functional DIY dog crate for your furry friend with our easy-to-follow DIY & Crafts guide. Keep your pet happy and your home looking great!
(Many of the links in this article redirect to a specific reviewed product. Your purchase of these products through affiliate links helps to generate commission for Twigandthistle.com, at no extra cost. Learn more)
Introduction
Are you tired of the unsightly metal or plastic dog crates that clash with your home decor? Do you want to provide your furry friend with a cozy and stylish space of their own? Building your own DIY dog crate could be the perfect solution. Not only can you customize it to match your home's aesthetic, but you can also ensure that it meets your dog's specific needs. In this article, we'll explore the benefits of building your own dog crate and provide you with step-by-step instructions for creating a stylish and functional home for your beloved pet.
Benefits of Building Your Own Dog Crate
Building your own DIY dog crate offers a multitude of benefits for both you and your furry companion. Here are some compelling reasons to consider taking on this rewarding project:
-
Customization: One of the most significant advantages of building your own dog crate is the ability to customize it to fit your home's decor and your dog's needs. You can choose the size, shape, and materials that best suit your space and your pet's comfort.
-
Cost-Effective: DIY dog crates can be more cost-effective than purchasing pre-made crates. By sourcing materials yourself and putting in the labor, you can create a high-quality crate at a fraction of the cost.
-
Quality and Durability: When you build a dog crate yourself, you have control over the quality of materials used and the construction process. This means you can ensure that the crate is sturdy, safe, and built to last.
-
Bonding Experience: Building a dog crate can be a fun and rewarding project that allows you to bond with your pet. Involving your dog in the process can also help them feel more comfortable and familiar with their new space.
-
Tailored to Your Dog's Needs: Every dog is unique, and their crate should reflect that. By building your own crate, you can tailor it to your dog's specific requirements, whether they need extra ventilation, a cozy den-like space, or easy access for an older or injured pet.
-
Eco-Friendly: By using sustainable and eco-friendly materials, you can reduce the environmental impact of your pet's crate. You can also upcycle or repurpose materials, giving them a new life as a functional and stylish dog crate.
-
Sense of Accomplishment: Completing a DIY project can provide a sense of accomplishment and pride. Knowing that you created a comfortable and safe space for your pet with your own hands can be incredibly fulfilling.
By considering these benefits, you can see why building your own DIY dog crate is a worthwhile endeavor that can enhance both your home and your pet's well-being.
Choosing the Right Materials
When it comes to building a DIY dog crate, selecting the right materials is crucial for creating a safe, durable, and stylish home for your furry friend. Here's a guide to help you choose the best materials for your project:
1. Wood
Opt for sturdy and pet-safe wood such as plywood, pine, or cedar. These materials are durable and can be easily customized to fit your desired crate dimensions. Ensure that the wood is free from any toxic treatments or chemicals that could harm your dog.
2. Hardware
Select high-quality hardware such as screws, bolts, and hinges that are strong enough to withstand your dog's activity. Look for rust-resistant options to ensure the longevity of the crate.
3. Flooring
Consider using a durable and easy-to-clean material for the crate's flooring. Linoleum or laminate can be excellent choices, as they are resistant to scratches and accidents, making maintenance a breeze.
4. Mesh or Bars
If your design includes a mesh or barred door or windows, choose materials that are pet-safe and escape-proof. Heavy-duty wire mesh or steel bars are ideal for providing ventilation and visibility while ensuring your dog's security.
5. Finishing
Opt for pet-safe finishes and paints to add a touch of style to your dog crate. Look for non-toxic, low-VOC paints and finishes to protect both your pet and the environment.
By carefully selecting the right materials, you can ensure that your DIY dog crate is not only aesthetically pleasing but also safe, comfortable, and built to last.
Step-by-Step Instructions for Building a DIY Dog Crate
Now that you've decided to embark on the journey of creating a custom dog crate for your furry friend, it's time to roll up your sleeves and get started. Follow these step-by-step instructions to bring your vision to life:
1. Design and Planning
Begin by sketching out the design and dimensions of your dog crate. Consider your dog's size, behavior, and any specific requirements. This will serve as a blueprint for your project and ensure that the final product meets your pet's needs.
2. Gather Materials and Tools
Once you have a clear plan, gather all the necessary materials and tools. This may include wood, hardware, flooring, mesh or bars, and finishing materials. Ensure that you have the right tools such as a saw, drill, screws, and measuring tape to facilitate the construction process.
3. Construct the Frame
Start by constructing the frame of the crate using the selected wood. Cut the wood to the appropriate dimensions and assemble the pieces using screws and bolts. Ensure that the frame is sturdy and secure, as it will form the foundation of the crate.
4. Add Flooring and Walls
Once the frame is in place, add the flooring material to create a comfortable and easy-to-clean surface for your dog. Then, attach the walls to the frame, leaving space for doors and windows as per your design.
5. Install Doors and Windows
If your design includes doors and windows, carefully install them using hinges and latches. Ensure that they open and close smoothly and securely, providing easy access for your dog while maintaining safety.
6. Finishing Touches
Apply the chosen finish to the crate, whether it's a coat of paint, stain, or sealant. This not only adds a personal touch but also protects the wood from wear and tear.
7. Test and Adjust
Once the crate is assembled, test it to ensure that it meets your dog's needs. Make any necessary adjustments to improve the functionality and comfort of the crate.
By following these step-by-step instructions, you can create a custom DIY dog crate that not only complements your home but also provides a safe and cozy space for your beloved pet.
Adding Stylish and Functional Features
When it comes to creating a DIY dog crate, adding stylish and functional features can elevate the overall design and make the crate more appealing to both you and your furry friend. Here are some creative and practical features you can incorporate into your custom dog crate:
-
Cushioned Bedding: To provide maximum comfort for your dog, consider adding a cushioned bedding area within the crate. This could be a removable bed or a built-in cushion that offers a cozy spot for your pet to rest.
-
Built-In Storage: Incorporating built-in storage compartments into the crate can serve a dual purpose. You can store your dog's toys, treats, and grooming supplies conveniently within the crate, keeping the surrounding area tidy and organized.
-
Integrated Feeding Station: If your dog spends extended periods in the crate, consider integrating a feeding station. This could be a fold-down bowl holder or a designated space for food and water dishes, ensuring that your pet's dining area is contained within the crate.
-
Decorative Accents: Personalize the crate by adding decorative accents such as custom nameplates, engraved designs, or painted motifs. These embellishments can add a touch of personality to the crate while blending seamlessly with your home decor.
-
Ventilation and Lighting: Ensure that the crate has adequate ventilation to keep the interior fresh and airy. You can incorporate mesh panels or adjustable vents for airflow. Additionally, consider adding subtle LED lighting to create a warm and inviting ambiance within the crate.
-
Mobility and Accessibility: If you anticipate moving the crate from one location to another, consider adding wheels or casters for easy mobility. This feature can be particularly useful for cleaning or rearranging the space.
-
Convertible Design: For added versatility, create a convertible design that allows the crate to serve multiple functions. This could involve a collapsible side panel, transforming the crate into a cozy den or an open pet gate when not in use.
By incorporating these stylish and functional features into your DIY dog crate, you can ensure that it not only complements your home decor but also provides a comfortable and practical space for your beloved pet.
Tips for Training Your Dog to Use the Crate
Introducing your dog to a new crate requires patience, positive reinforcement, and a gradual approach. Here are some essential tips for effectively training your dog to use the crate:
-
Create a Positive Association: Begin by making the crate a welcoming and positive space for your dog. Place treats, toys, and familiar bedding inside the crate to encourage your pet to explore and associate the crate with comfort and security.
-
Gradual Introduction: Start by leaving the crate door open and allowing your dog to voluntarily enter and exit the crate. Avoid forcing or locking your dog inside initially, as this can create negative associations with the crate.
-
Mealtime in the Crate: Incorporate mealtime into the crate training process. Place your dog's food bowl at the back of the crate, gradually moving it further inside as your dog becomes more comfortable. This helps your dog associate the crate with positive experiences and rewards.
-
Short Incremental Enclosures: Once your dog is comfortable entering the crate, start closing the door for short periods while you are present. Gradually increase the duration of these enclosures, always ensuring that your dog remains calm and relaxed.
-
Comfort and Familiarity: Add your dog's favorite toys and blankets to the crate to create a familiar and comforting environment. This can help alleviate any anxiety or stress associated with being in the crate.
-
Positive Reinforcement: Whenever your dog enters the crate willingly or remains calm inside, offer verbal praise, treats, or affection. Positive reinforcement helps reinforce the idea that being in the crate is a positive and rewarding experience.
-
Avoid Punishment: Never use the crate as a form of punishment. The crate should be a safe and comfortable space for your dog, and associating it with negative experiences can hinder the training process.
-
Gradual Alone Time: Once your dog is comfortable with short enclosures, gradually increase the time they spend alone in the crate. Start with brief absences and gradually extend the duration as your dog becomes more accustomed to being in the crate without your presence.
-
Consistency and Routine: Establish a consistent routine for crate time, such as using the crate during specific periods of the day or when you are away from home. Consistency helps your dog understand when to expect crate time and creates a sense of predictability.
-
Patience and Observation: Every dog responds differently to crate training, so it's essential to be patient and observant. Pay attention to your dog's behavior and comfort level, adjusting the training process to suit their individual needs.
By following these tips and being patient and consistent, you can effectively train your dog to use the crate as a safe and comfortable space, providing them with a secure retreat within your home.
Conclusion
In conclusion, building a DIY dog crate allows you to create a personalized and functional space for your furry friend while adding a stylish touch to your home. The benefits of customization, cost-effectiveness, and the ability to tailor the crate to your dog's specific needs make this DIY project a rewarding endeavor. By carefully selecting the right materials, following step-by-step instructions, and adding stylish and functional features, you can ensure that the crate meets both your and your pet's requirements. Additionally, effective crate training techniques can help your dog view the crate as a safe and comforting retreat within your home. Ultimately, the process of building and training your dog to use a DIY crate can strengthen the bond between you and your pet while enhancing the overall comfort and aesthetics of your living space.