
Home>Create & Decorate>DIY & Crafts>Crafty Home Improvement: DIY Valentine Pins For A Festive Touch
DIY & Crafts
Crafty Home Improvement: DIY Valentine Pins For A Festive Touch
Published: February 15, 2024

Content Creator specializing in woodworking and interior transformations. Caegan's guides motivate readers to undertake their own projects, while his custom furniture adds a personal touch.
Add a festive touch to your home with these DIY Valentine pins. Get crafty with our easy DIY & Crafts project for a fun home improvement idea.
(Many of the links in this article redirect to a specific reviewed product. Your purchase of these products through affiliate links helps to generate commission for Twigandthistle.com, at no extra cost. Learn more)
Introduction
Valentine's Day is just around the corner, and what better way to infuse your home with love and creativity than by crafting your own festive decorations? DIY Valentine pins are a delightful and personalized touch that can add a pop of color and charm to your home decor. Whether you're a seasoned crafter or a novice DIY enthusiast, creating these adorable pins is a fun and rewarding project that can be enjoyed by crafters of all skill levels.
By crafting your own Valentine pins, you have the opportunity to unleash your creativity and customize each piece to reflect your unique style and personality. These charming pins can be used to adorn various items, such as clothing, bags, or even displayed as decorative accents around your home. Not only do they serve as a visual reminder of the love-filled holiday, but they also make for thoughtful handmade gifts for friends and family.
In this comprehensive guide, we will walk you through the materials needed and provide step-by-step instructions to create your own DIY Valentine pins. Additionally, we'll share tips for personalizing your pins, allowing you to tailor them to suit your individual preferences and design aesthetic. So, gather your crafting supplies and let's embark on this delightful DIY journey to add a touch of love and creativity to your home this Valentine's Day.
Materials Needed
To embark on this delightful DIY project, you'll need a few essential materials to bring your charming Valentine pins to life. Here's a comprehensive list of the items you'll require:
1. Felt Sheets
Gather an assortment of colorful felt sheets in various shades of pink, red, and white. These will serve as the primary material for crafting the heart-shaped base of your Valentine pins.
2. Embroidery Floss and Needles
Ensure you have a selection of embroidery floss in coordinating colors, along with embroidery needles. These will be used to add intricate details and secure the layers of felt together.
3. Pin Backs
Acquire a set of pin backs or brooch pins, which will allow you to easily attach the finished Valentine pins to clothing, accessories, or other surfaces.
4. Fabric Glue
Invest in a reliable fabric glue to affix the pin backs securely to the felt, as well as to attach any additional embellishments, such as beads or sequins.
5. Scissors
A pair of sharp scissors is essential for cutting out the heart shapes and trimming the felt with precision.
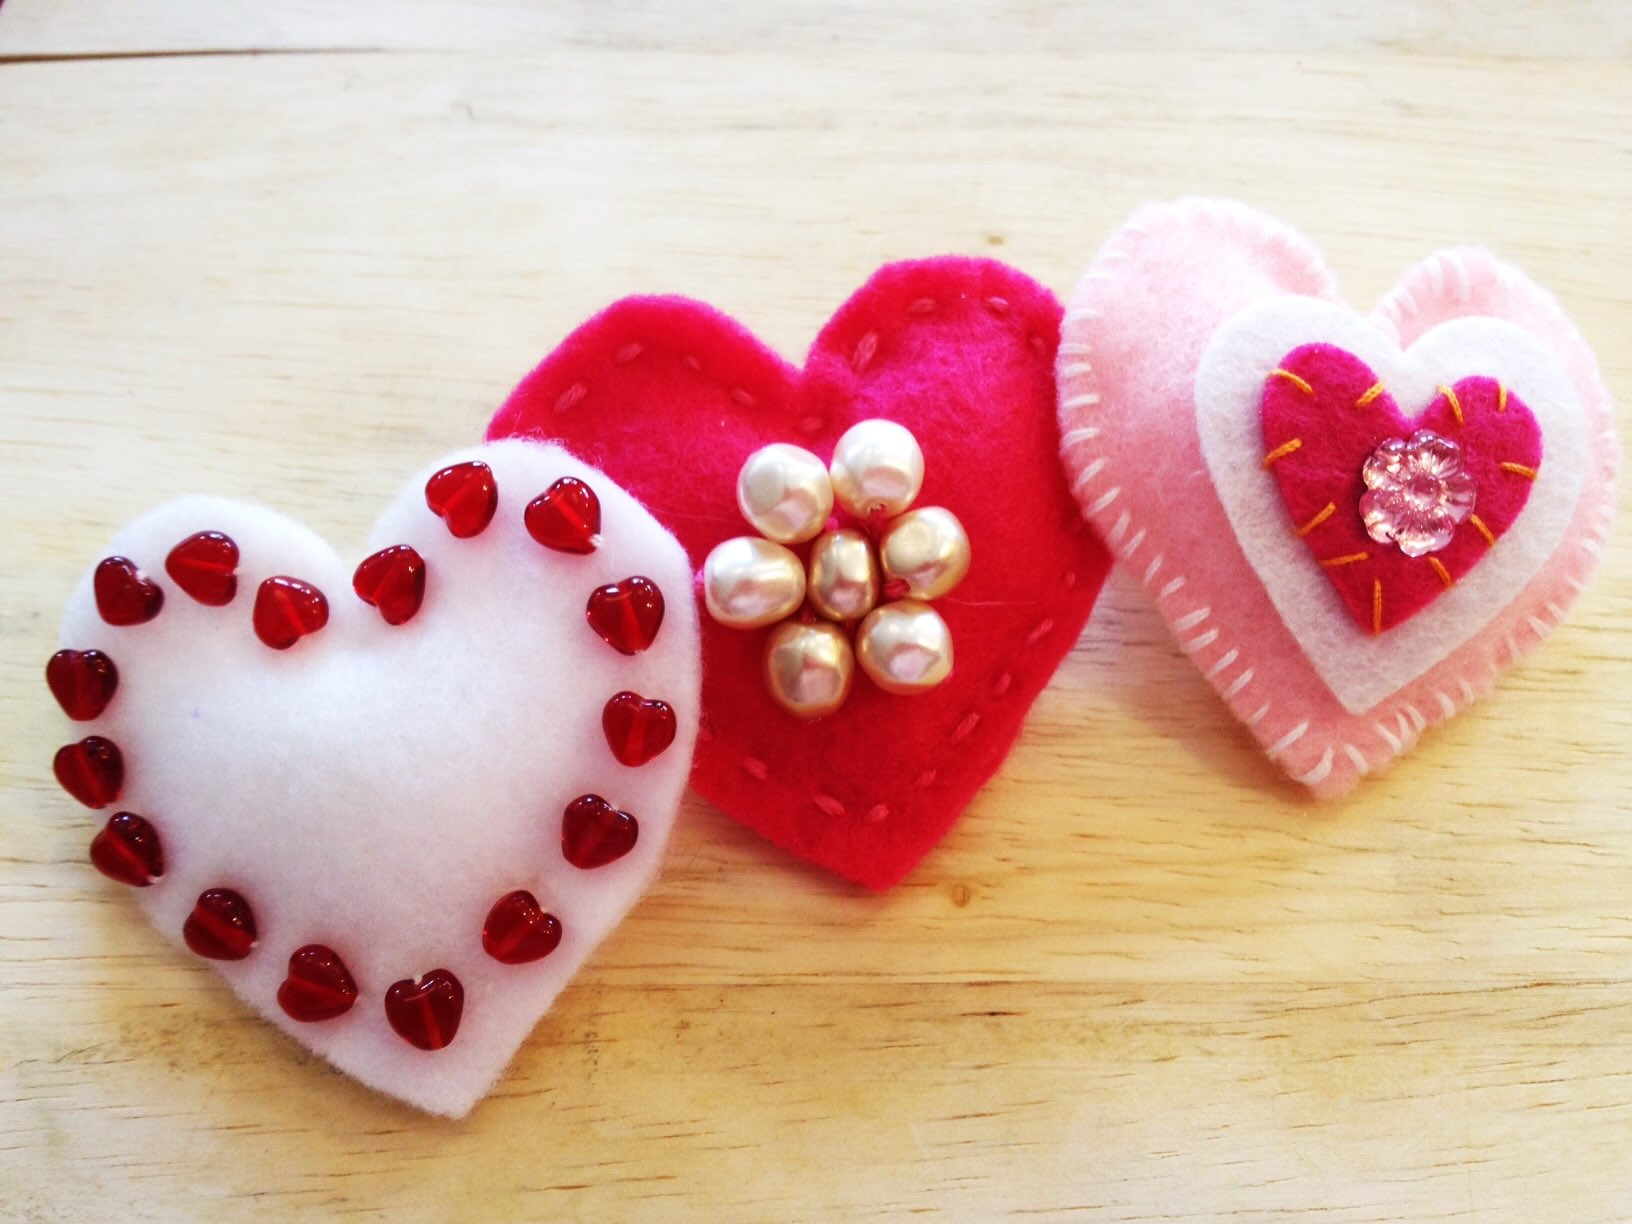
6. Embellishments (Optional)
If you wish to add extra flair to your Valentine pins, consider gathering an assortment of decorative embellishments, such as beads, sequins, or small buttons.
7. Pencil or Fabric Marker
A pencil or fabric marker will come in handy for tracing the heart shapes onto the felt before cutting them out.
8. Template or Stencil (Optional)
While not essential, having a heart-shaped template or stencil can streamline the process of creating uniform heart shapes for your pins.
9. Crafting Surface
Ensure you have a clean and spacious crafting surface to work on, providing ample room to lay out your materials and work comfortably.
By gathering these materials, you'll be well-equipped to embark on the creative journey of crafting your own personalized Valentine pins. With these essentials at your disposal, you're ready to dive into the step-by-step instructions and bring your delightful DIY project to fruition.
Step-by-Step Instructions
-
Prepare the Felt: Begin by selecting the desired colors of felt sheets for your Valentine pins. Lay the felt on your crafting surface and use a pencil or fabric marker to trace heart shapes onto the fabric. You can either freehand the hearts or use a template or stencil for uniformity. Each pin will require two identical heart shapes, so ensure you have pairs for each pin you plan to create.
-
Cut Out the Heart Shapes: With a pair of sharp scissors, carefully cut out the traced heart shapes from the felt. Take your time to ensure precise cutting, as neat edges will contribute to the overall polished look of your Valentine pins.
-
Layer the Hearts: Once you have your pairs of heart shapes, layer them on top of each other to create a double-sided heart. This will give your pins a finished look from all angles. Secure the layers together using small, discreet stitches with coordinating embroidery floss and a needle. Alternatively, fabric glue can be used to affix the layers if preferred.
-
Attach the Pin Backs: With the layered hearts in place, it's time to attach the pin backs. Apply a small amount of fabric glue to the back of the felt and carefully press the pin back onto the glue. Allow the glue to dry completely to ensure a secure bond. If you prefer a more durable attachment, consider reinforcing the bond with a few stitches using embroidery floss.
-
Add Personalized Details: This step is where your creativity can truly shine. Consider embellishing your Valentine pins with decorative elements such as beads, sequins, or small buttons. These additional touches can add a delightful sparkle and personalized charm to your pins, making them truly unique.
-
Final Touches: Once all the components are in place, take a moment to inspect your Valentine pins. Trim any stray threads and ensure that all elements are securely attached. Your charming DIY Valentine pins are now ready to adorn your favorite accessories or be shared as heartfelt gifts with loved ones.
By following these step-by-step instructions, you can create a collection of delightful Valentine pins that exude charm and creativity. Whether you choose to make a single pin or a whole set, this DIY project offers a wonderful opportunity to infuse your home with a festive touch and showcase your crafting prowess.
Tips for Personalizing Your Valentine Pins
Personalizing your DIY Valentine pins allows you to infuse them with unique touches that reflect your individual style and creativity. Here are some tips to help you tailor your pins to perfection:
-
Custom Color Combinations: Experiment with an array of color combinations to evoke different moods and aesthetics. Whether you prefer a classic red and pink palette or a more eclectic mix of hues, the choice of colors can convey a personalized sentiment through your Valentine pins.
-
Embroidered Messages: Consider adding embroidered messages or initials to your pins to imbue them with a personalized touch. Whether it's a short love-themed phrase, a significant date, or the recipient's initials, these delicate details can elevate the sentimental value of the pins.
-
Incorporate Fabric Patterns: If you have patterned felt or fabric scraps on hand, incorporate them into your designs to introduce texture and visual interest. Mixing solid colors with subtle patterns can add depth and character to your Valentine pins.
-
Mix and Match Shapes: While heart-shaped pins are quintessentially Valentine's Day, don't be afraid to incorporate other shapes into your designs. Consider adding complementary elements such as flowers, arrows, or even playful abstract forms to diversify your pin collection.
-
Personalized Embellishments: Infuse your pins with personalized embellishments that hold special meaning. Whether it's a tiny charm that symbolizes a shared interest, a birthstone bead, or a miniature trinket that resonates with the recipient, these thoughtful additions can make the pins truly one-of-a-kind.
-
Layered Dimension: Experiment with layering different materials to add dimension to your pins. Incorporating lace, tulle, or sheer fabric behind the felt hearts can create a whimsical and ethereal effect, enhancing the visual appeal of the pins.
-
Consider Recipient's Preferences: If you're creating the pins as gifts, take the recipient's preferences and style into account. Whether it's their favorite colors, motifs, or design aesthetics, tailoring the pins to resonate with the recipient's tastes can make the gesture even more meaningful.
-
Mix Textures: Introduce a mix of textures by combining different materials such as felt, fabric, and even metallic threads. The interplay of textures can add tactile interest and elevate the overall visual impact of the pins.
By incorporating these personalized touches, you can transform your DIY Valentine pins into meaningful keepsakes that celebrate love, creativity, and individuality. Embrace the opportunity to infuse each pin with a touch of your personality, making them not just decorative accents, but heartfelt expressions of affection and artistry.
Conclusion
In conclusion, crafting DIY Valentine pins is a delightful and rewarding endeavor that allows you to infuse your home with a personalized touch of love and creativity. By following the step-by-step instructions and incorporating personalized details, you can create a collection of charming pins that serve as visual reminders of the love-filled holiday. Whether adorning your favorite accessories or shared as heartfelt gifts with loved ones, these handmade pins carry a unique sentiment that resonates with the spirit of Valentine's Day.
As you embark on this creative journey, remember that the true beauty of DIY projects lies in the opportunity for self-expression and customization. Each pin you create becomes a canvas for your imagination, allowing you to experiment with colors, textures, and embellishments to craft pieces that reflect your individual style and sentiment. Whether you opt for classic red and pink hues or explore unconventional color palettes, the freedom to personalize your pins ensures that each creation is a unique reflection of your creativity.
Furthermore, the act of crafting DIY Valentine pins extends beyond the tangible results. It offers a therapeutic and fulfilling experience, allowing you to immerse yourself in a world of creativity and self-expression. The process of cutting, stitching, and embellishing the pins becomes a meditative practice, offering a welcome respite from the hustle and bustle of daily life. Additionally, the joy of gifting these handmade treasures to friends and family fosters a sense of connection and warmth, strengthening the bonds of love and friendship.
As you display your handmade Valentine pins or witness the joy they bring to their recipients, take pride in the fact that you've infused your home with a festive touch that is not only visually appealing but also deeply meaningful. Each pin becomes a symbol of your craftsmanship and thoughtfulness, adding a touch of warmth and creativity to your surroundings.
In essence, the journey of crafting DIY Valentine pins transcends the act of creating decorative pieces; it becomes a celebration of love, creativity, and the joy of handmade craftsmanship. So, embrace the opportunity to infuse your home with a touch of love this Valentine's Day, and let your creativity shine through the charming DIY pins that you bring to life.