
Home>Organize & Storage>Closet Organization>How to Build a DIY Closet Wine Cellar
Closet Organization
How to Build a DIY Closet Wine Cellar
Published: September 3, 2024
Transform your closet into a wine cellar with our DIY guide. Learn step-by-step instructions, essential tips, and materials needed for a perfect wine storage solution.
(Many of the links in this article redirect to a specific reviewed product. Your purchase of these products through affiliate links helps to generate commission for Twigandthistle.com, at no extra cost. Learn more)
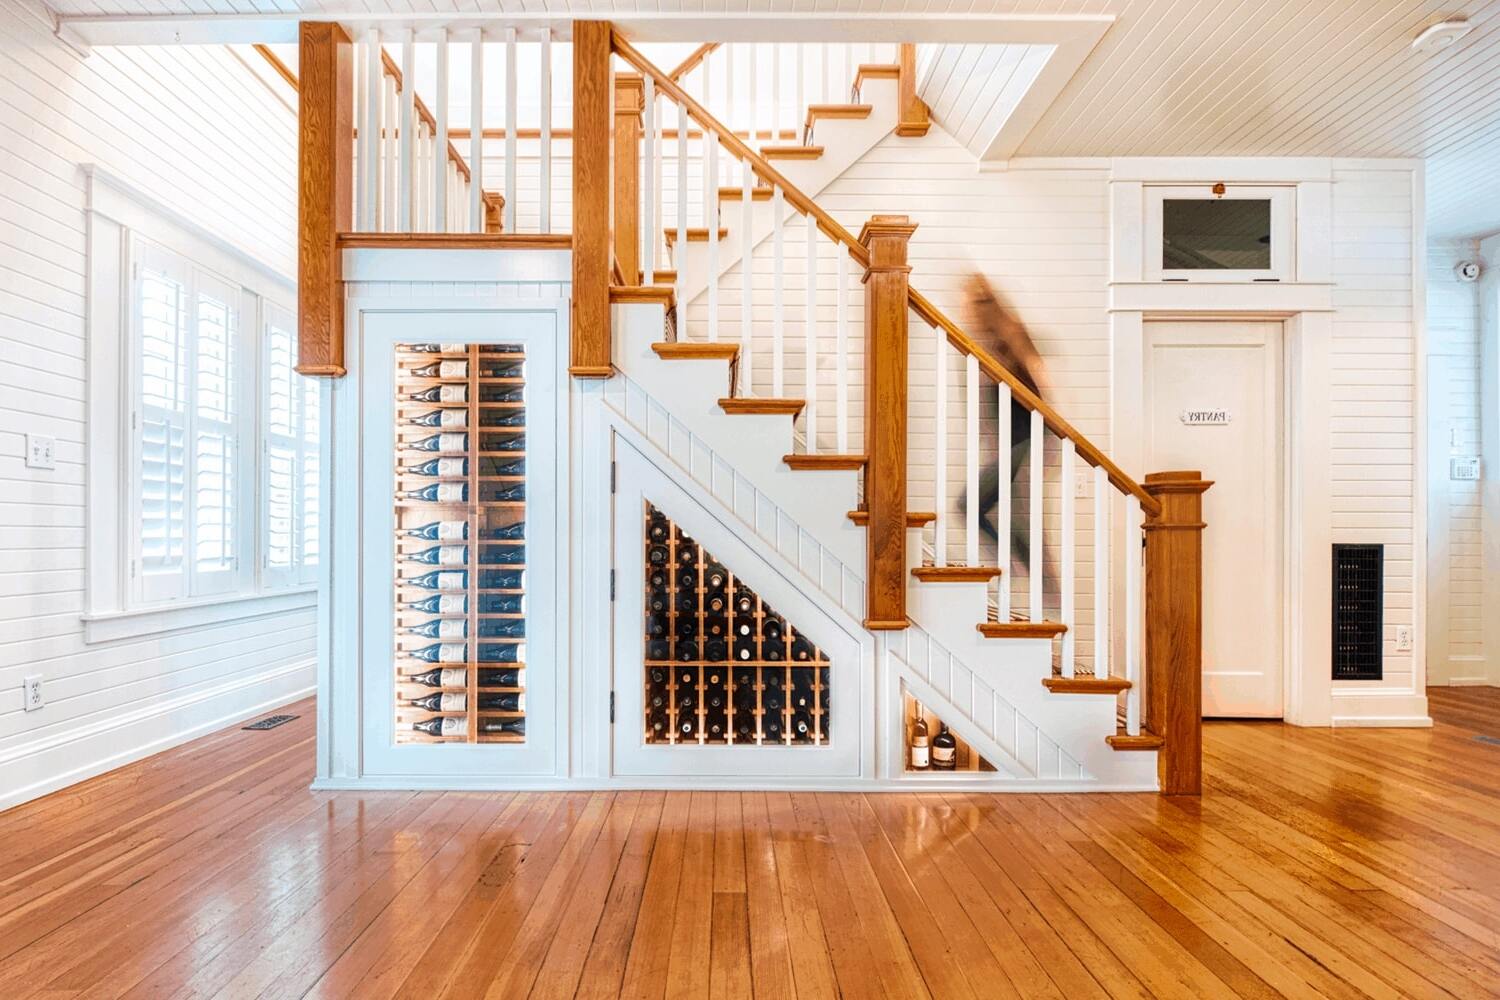
Dreaming of having your own wine cellar but short on space? Transforming a closet into a wine cellar might be the perfect solution! This DIY project lets you create a cozy, functional space to store and display your favorite bottles without needing a full basement or large area. Whether you’re a wine enthusiast or just starting, building a closet wine cellar can be both fun and rewarding. Follow along to learn the basics of planning, insulating, cooling, and racking your new wine haven right at home. Cheers to turning small spaces into something special!
Getting Ready for Your Project
Clear the Closet: Remove everything from the closet. This includes clothes, shelves, and any other items. Make sure the space is completely empty.
Measure the Space: Use a tape measure to get the dimensions of the closet. Write down the height, width, and depth. This will help you plan the layout and buy the right materials.
Check for Ventilation: Wine needs a cool, stable environment. Ensure the closet has proper ventilation. If not, consider installing a small vent or fan.
Insulate the Walls: Line the walls with insulation to maintain a consistent temperature. Use foam panels or fiberglass insulation. This step is crucial for keeping your wine at the right temperature.
Install a Cooling Unit: If you live in a warm climate, you might need a cooling unit. Choose a unit that fits your closet size. Follow the manufacturer's instructions for installation.
Set Up Shelving: Install sturdy shelves or wine racks. Make sure they can hold the weight of multiple wine bottles. Secure them to the wall to prevent tipping.
Check Humidity Levels: Wine needs a certain level of humidity to stay fresh. Use a hygrometer to check the humidity. If needed, add a small humidifier.
Lighting: Install soft, dim lighting. Avoid bright lights that can affect the wine's quality. LED lights are a good option.
Safety Gear: Wear gloves, safety goggles, and a mask while working. This protects you from dust, insulation fibers, and any other debris.
Organize Your Tools: Keep all your tools and materials in one place. This makes the project go smoother and faster.
Test Everything: Before storing wine, test the cooling unit, ventilation, and humidity levels. Make sure everything works perfectly.
Label the Shelves: Once everything is set up, label the shelves. This helps you organize your wine collection easily.
Gathering Materials and Tools
Wine Racks: These hold your wine bottles securely. Choose ones that fit your closet space.
Insulation: Keeps the temperature stable. Use foam boards or fiberglass insulation.
Vapor Barrier: Prevents moisture from entering. Plastic sheeting works well.
Drywall: Covers the insulation and vapor barrier. Use moisture-resistant drywall.
Paint: Protects the drywall and adds a finished look. Use mold-resistant paint.
Cooling Unit: Maintains the ideal temperature. Choose a unit designed for small spaces.
Thermometer/Hygrometer: Monitors temperature and humidity. Digital versions are easy to read.
Lighting: Illuminates the space without adding heat. LED lights are a good choice.
Door Seal Kit: Ensures the door is airtight. Includes weather stripping and a door sweep.
Shelving: Provides extra storage for wine accessories. Adjustable shelves are versatile.
Power Drill: For installing racks and shelves. Cordless drills are convenient.
Screwdriver: Tightens screws and bolts. A multi-bit screwdriver is handy.
Tape Measure: Ensures accurate measurements. Essential for fitting racks and insulation.
Utility Knife: Cuts insulation and vapor barrier. A retractable blade is safest.
Level: Ensures everything is straight. A small, handheld level works fine.
Stud Finder: Locates wall studs for secure mounting. Battery-operated models are easy to use.
Caulk Gun: Applies sealant around edges. Ensures a tight seal.
Hammer: For nailing drywall and other tasks. A claw hammer is versatile.
Pencil: Marks measurements and cutting lines. Keep a sharpener handy.
Safety Gear: Protects you during construction. Includes gloves, goggles, and a dust mask.
Required Skills and Time Commitment
Skill Level: Intermediate
Time Required: 2-3 weekends
- Planning and Design: 4-6 hours
- Gathering Materials: 2-4 hours
- Insulation and Vapor Barrier Installation: 6-8 hours
- Framing and Drywall: 8-10 hours
- Cooling Unit Installation: 4-6 hours
- Shelving and Racking: 6-8 hours
- Finishing Touches: 2-4 hours
Detailed Step-by-Step Guide
Choose the Closet:
- Pick a closet with enough space for wine racks.
- Ensure it's away from direct sunlight and heat sources.
Clear the Space:
- Remove everything from the closet.
- Clean thoroughly to avoid dust and pests.
Insulate the Closet:
- Install foam board insulation on walls and ceiling.
- Use a vapor barrier to prevent moisture buildup.
Install a Cooling Unit:
- Cut a hole in the wall for the cooling unit.
- Mount the unit securely, ensuring proper ventilation.
Seal the Door:
- Add weather stripping around the door frame.
- Install a door sweep to block drafts.
Add Wine Racks:
- Measure the space for racks.
- Install pre-made racks or build custom ones.
Install a Hygrometer:
- Mount a hygrometer to monitor humidity levels.
- Aim for 50-70% humidity.
Add Lighting:
- Install LED lights to avoid heat.
- Ensure lights are dimmable for better control.
Organize Your Wine:
- Place bottles on racks.
- Label sections for easy access.
Monitor Temperature and Humidity:
- Regularly check the cooling unit.
- Adjust settings to maintain 55-58°F.
Helpful Tips and Tricks
Choose the Right Closet: Pick a closet away from direct sunlight and heat sources. Basements or interior closets work best.
Insulate Properly: Use foam board insulation on walls and ceiling. This helps maintain a consistent temperature.
Install a Cooling Unit: A small wine cellar cooling unit is essential. Ensure it fits your space and has proper ventilation.
Seal the Door: Use weather stripping around the door to keep the cool air in. A solid core door works best.
Use Wine Racks: Opt for sturdy, space-efficient wine racks. Metal or wood racks are good choices.
Monitor Humidity: Aim for 50-70% humidity. Use a hygrometer to check levels. A small humidifier can help if needed.
Lighting: Use LED lights. They emit less heat and are energy-efficient.
Flooring: Avoid carpet. Tile or vinyl flooring is easier to clean and maintain.
Common Mistakes to Avoid:
- Skipping Insulation: Leads to temperature fluctuations.
- Ignoring Ventilation: Cooling units need proper airflow.
- Using Regular Light Bulbs: They generate too much heat.
- Not Sealing the Door: Causes temperature and humidity issues.
Alternatives:
- Cooling Unit: If budget is tight, consider a portable air conditioner.
- Wine Racks: DIY wooden racks can save money.
- Insulation: Reflective bubble wrap can be a cheaper option.
Estimating the Cost
Insulation: $50-$100. Use foam boards or fiberglass.
Drywall: $30-$50. Needed for walls and ceiling.
Vapor Barrier: $20-$40. Essential to control moisture.
Wine Racks: $100-$300. Pre-made or DIY with wood.
Cooling Unit: $300-$600. Keeps wine at the right temperature.
Lighting: $20-$50. LED strips or recessed lights.
Thermometer/Hygrometer: $10-$20. Monitors temperature and humidity.
Sealant: $10-$20. Ensures airtight space.
Paint: $20-$40. For walls and ceiling.
Tools: $50-$100. Basic tools like a saw, drill, and screwdriver.
Total Cost: $610-$1,320.
Budget-Friendly Alternatives:
- Use second-hand wine racks: $50-$100.
- Opt for a portable cooling unit: $150-$300.
- DIY wooden wine racks: $50-$100.
- Use recycled materials for insulation: $20-$50.
Creative Variations and Customizations
Alternative Materials: Instead of traditional wood, use metal shelving for a modern look. Reclaimed wood adds a rustic touch. For a sleek finish, consider glass shelves.
Colors: Paint the interior a deep burgundy or rich mahogany to complement the wine. For a lighter feel, use cream or soft gray. Bold colors like navy blue or forest green can make a statement.
Styles: Go for a vintage look with antique handles and aged wood. For a contemporary style, use minimalist designs with clean lines. A Mediterranean theme with terra cotta tiles and wrought iron accents can add character.
Lighting: Install LED strip lights along the shelves for a modern touch. Use warm lighting to create a cozy atmosphere. Spotlights can highlight special bottles.
Storage Options: Use wine racks for easy access. Add a wine fridge for temperature control. Pull-out shelves can maximize space.
Decor: Hang wine-themed art or vintage posters. Use decorative wine corks in a glass jar. Add a small table for tasting sessions.
Eco-Friendly Tips
Use reclaimed wood for shelves and racks. It adds character and reduces waste. Cork flooring is a great option; it's sustainable and provides good insulation. Recycled glass tiles can be used for decorative touches. LED lighting is energy-efficient and generates less heat, which is crucial for wine storage.
For insulation, consider sheep wool or recycled denim. Both are eco-friendly and effective. Use low-VOC paints to avoid harmful chemicals. If you need a cooling system, look for energy-efficient models to minimize power consumption.
Repurpose old furniture for storage. An old dresser or cabinet can be converted into a wine rack. Use glass jars or containers for storing wine accessories like corkscrews and stoppers. This reduces plastic use and adds a vintage touch.
Seal gaps with eco-friendly caulk to maintain a stable temperature. Use bamboo for any additional shelving or decorative elements. It's a fast-growing, renewable resource. Consider installing a solar-powered ventilation system to keep air circulating without increasing your carbon footprint.
Cheers to Your New Wine Cellar
Building a DIY closet wine cellar is a rewarding project. You’ve transformed a simple closet into a functional and stylish space for your wine collection. From insulation to cooling systems, each step plays a crucial role in maintaining the right environment for your wine. Remember, temperature and humidity control are key. Don’t forget to add some shelves or racks to keep your bottles organized. Now, you can enjoy your wine at its best, knowing it’s stored properly. Plus, you’ve added a unique feature to your home that’s sure to impress guests. So, grab a glass, toast to your hard work, and enjoy the fruits of your labor. Cheers!
How much space do I need for a closet wine cellar?
You don't need a ton of space. A small closet, even one that's just a few feet wide and deep, can work. Just make sure you can fit shelves or racks for the wine bottles.
What materials should I use for the shelves?
Use sturdy materials like wood or metal. Wood is classic and looks great, but metal can be more durable. Make sure the shelves can hold the weight of the bottles.
How do I control the temperature?
Install a wine cooler or a small air conditioning unit. Wine needs to be stored at a consistent temperature, usually between 45-65°F. A thermometer will help you keep track.
Do I need special lighting?
Yes, avoid direct sunlight and use LED lights. Sunlight and heat can damage wine. LED lights don't produce much heat and are energy-efficient.
How do I organize the wine bottles?
Group them by type, region, or age. Use labels or tags to keep track. This makes it easier to find what you're looking for and keeps your collection organized.
Can I add a lock to the closet?
Absolutely, adding a lock can keep your collection safe. You can use a simple padlock or install a more sophisticated locking system.
What about humidity control?
Keep humidity levels between 50-70%. Use a hygrometer to monitor it. If it's too dry, the corks can shrink; too humid, and mold can grow. A small humidifier or dehumidifier can help.