
Home>Organize & Storage>Closet Organization>DIY Glam Closet Makeover
Closet Organization
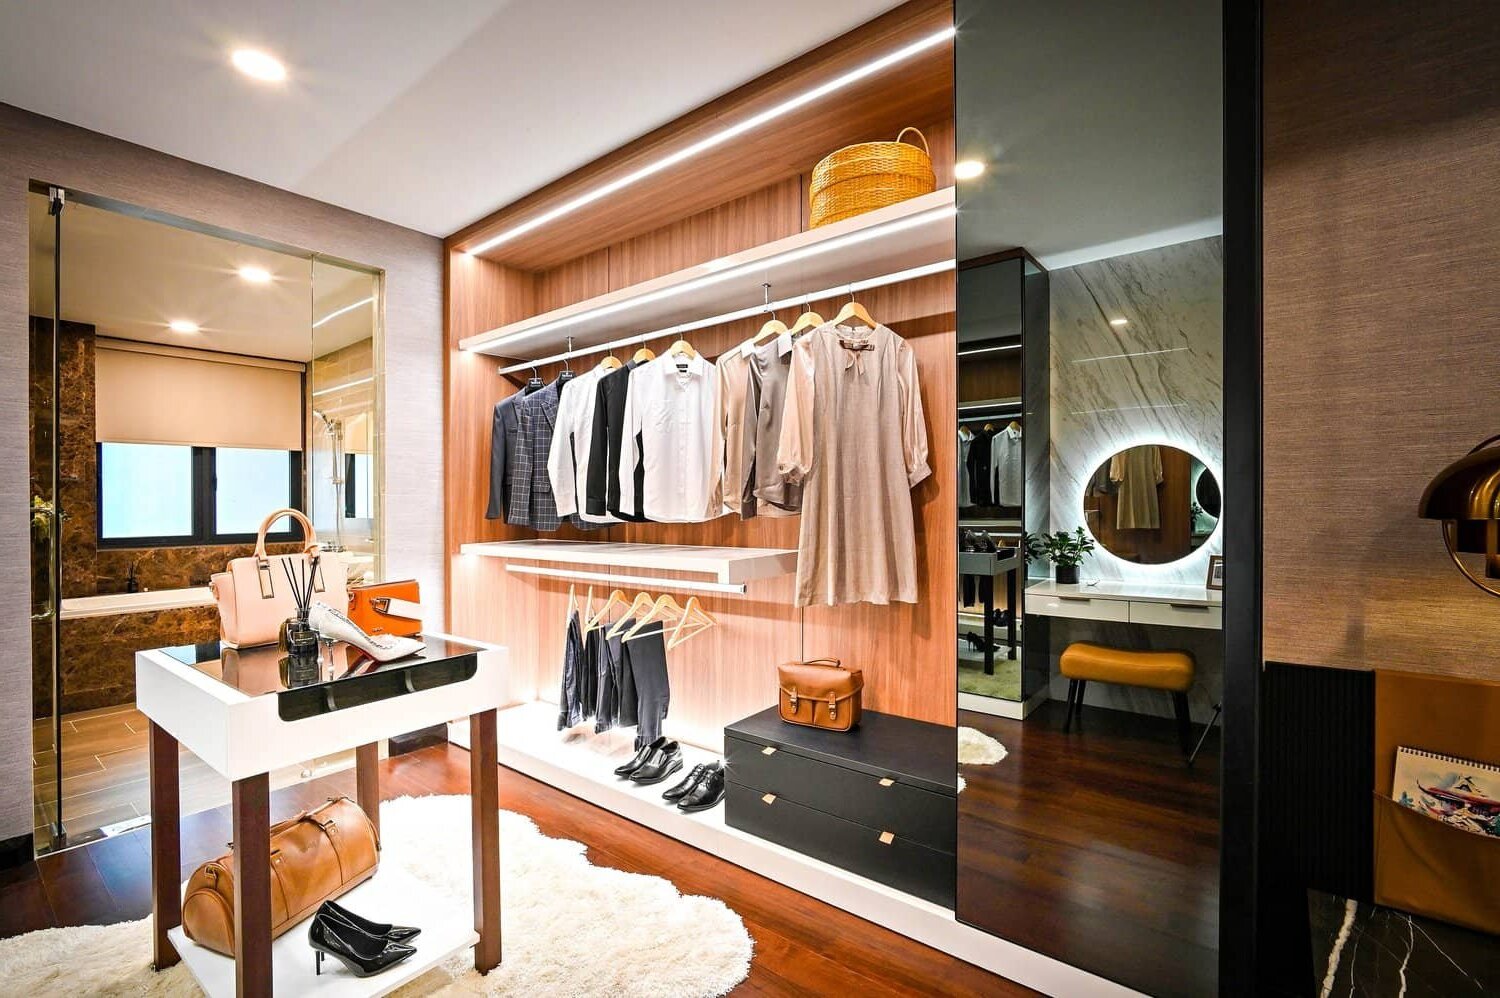
DIY Glam Closet Makeover
Published: September 4, 2024
Transform your closet into a glamorous haven with our DIY glam closet makeover guide. Discover tips, tricks, and stylish ideas to elevate your storage space effortlessly.
(Many of the links in this article redirect to a specific reviewed product. Your purchase of these products through affiliate links helps to generate commission for Twigandthistle.com, at no extra cost. Learn more)
Tired of a cluttered, boring closet? Transform it into a stylish, organized space with a DIY glam closet makeover. You don’t need to break the bank or hire professionals. Using simple tools, creative ideas, and a bit of elbow grease, you can turn your closet into a chic, functional area. Whether you need more storage, better lighting, or a pop of color, this makeover will help you achieve a closet you’ll love. Ready to get started? Let’s dive into some easy steps to make your dream closet a reality.
Getting Ready for Your Project
Measure the Space: Use a tape measure to get accurate dimensions of your closet. Note the height, width, and depth.
Clear Out the Closet: Remove all items, including clothes, shoes, and accessories. This gives a blank canvas to work with.
Clean Thoroughly: Dust shelves, vacuum the floor, and wipe down walls. A clean space ensures better results.
Plan the Layout: Sketch a design or use online tools to visualize where shelves, rods, and drawers will go.
Gather Materials: Collect all necessary tools and supplies like shelves, rods, brackets, screws, and a drill.
Safety Gear: Wear gloves, safety goggles, and a dust mask to protect yourself during the project.
Set Up Workspace: Organize tools and materials in a nearby area for easy access. Ensure good lighting and ventilation.
Check for Studs: Use a stud finder to locate wall studs. This helps secure heavy items like shelves and rods.
Mark Measurements: Use a pencil to mark where each component will go based on your layout plan.
Pre-Drill Holes: Drill pilot holes for screws to make installation easier and prevent wood from splitting.
Install Shelves and Rods: Follow your plan to install shelves, rods, and other components securely.
Organize Items: Once everything is installed, place your clothes, shoes, and accessories back in an organized manner.
What You Need to Get Started
- Paint and Primer: Freshen up walls with a new coat of paint. Primer helps the paint stick better.
- Paint Brushes and Rollers: Use brushes for edges and rollers for larger areas.
- Painter's Tape: Keeps paint off areas you don't want painted.
- Drop Cloths: Protect floors and furniture from paint splatters.
- Shelving Units: Add extra storage space for clothes, shoes, and accessories.
- Closet Rods: Hang clothes neatly. Choose sturdy ones to hold weight.
- Screws and Wall Anchors: Secure shelving units and rods to walls.
- Screwdriver and Drill: Essential for installing screws and wall anchors.
- Measuring Tape: Ensure accurate placement of shelves and rods.
- Level: Make sure shelves and rods are straight.
- Storage Bins and Baskets: Organize smaller items like scarves, belts, and jewelry.
- Full-Length Mirror: Check outfits easily. Adds a touch of glam.
- Lighting Fixtures: Brighten up the closet. Choose stylish fixtures for a glam look.
- Decorative Hooks: Hang bags, hats, and accessories. Adds functionality and style.
- Drawer Organizers: Keep drawers tidy. Perfect for socks, underwear, and small items.
- Step Stool: Reach higher shelves safely.
- Vacuum or Broom: Clean up dust and debris after the makeover.
- Decorative Wallpaper: Add a stylish backdrop to the closet walls.
- Curtains or Closet Doors: Hide clutter and add a finished look.
- Label Maker: Label bins and baskets for easy organization.
How Much Skill and Time You Need
Skill Level: Intermediate
Time Required:
- Planning and Shopping: 2-3 hours
- Painting and Drying: 4-6 hours
- Installing Shelves and Rods: 3-4 hours
- Organizing and Decorating: 2-3 hours
Total Time: 11-16 hours
Follow These Steps
Empty the Closet
- Take out all clothes, shoes, and accessories.
- Remove any existing shelves or rods.
Clean and Prep
- Wipe down walls and floor.
- Fill any holes with spackle and sand smooth.
Paint or Wallpaper
- Choose a glamorous color or pattern.
- Apply paint or wallpaper to walls. Let dry completely.
Install New Lighting
- Add a chandelier or stylish light fixture.
- Ensure proper wiring and safety.
Add Shelving and Rods
- Measure and install new shelves and rods.
- Use brackets for extra support.
Install a Full-Length Mirror
- Secure a mirror to the wall or door.
- Ensure it’s at a comfortable height.
Organize with Bins and Baskets
- Use decorative bins for smaller items.
- Label baskets for easy access.
Add a Rug or Carpet
- Choose a plush rug or carpet.
- Place it in the center of the closet.
Hang Curtains or Doors
- Install curtains or sliding doors for a finished look.
- Use a curtain rod or track system.
Accessorize
- Add hooks for bags and scarves.
- Place a small stool or chair for convenience.
Reorganize Clothes and Accessories
- Hang clothes by category and color.
- Store shoes and accessories in designated areas.
Helpful Tips and Tricks
Plan Ahead: Measure your closet space. Sketch a layout before starting. This helps avoid buying unnecessary items.
Use Mirrors: Mirrors make small spaces look bigger. Place one on the door or a wall.
Lighting: Install LED strip lights or battery-operated puck lights. Good lighting makes finding clothes easier.
Organize by Category: Group clothes by type (shirts, pants, dresses). Use matching hangers for a uniform look.
Add Shelves: Adjustable shelves maximize space. Use them for shoes, bags, or folded clothes.
Decorative Boxes: Store accessories in stylish boxes. Label them for easy access.
Velvet Hangers: These save space and prevent clothes from slipping.
Hooks and Rods: Install hooks for bags and scarves. Add extra rods for more hanging space.
Common Mistakes to Avoid:
- Overloading Shelves: Too much weight can cause shelves to sag or break.
- Ignoring Lighting: Poor lighting makes it hard to see and find items.
- Skipping Measurements: Not measuring can lead to buying items that don’t fit.
- Clutter: Avoid keeping items you don’t use. Donate or sell them.
Alternatives:
- Shelving Material: Instead of wood, use wire shelves. They’re cheaper and easier to install.
- Lighting: If LED strips are too expensive, use battery-operated tap lights.
- Storage: Instead of buying new boxes, repurpose old shoeboxes with decorative paper.
How Much Will It Cost?
Materials:
- Paint: $30 for a gallon
- Wallpaper: $40 per roll (2 rolls needed)
- Shelving: $50 for a basic set
- Closet Rods: $20 each (2 needed)
- Lighting: $60 for LED strips
- Mirror: $30 for a full-length mirror
- Decorative Bins: $25 for a set of 4
- Hooks and Hangers: $15
Tools:
- Paintbrushes/Rollers: $10
- Screwdriver Set: $15
- Measuring Tape: $5
- Level: $10
- Utility Knife: $5
Total Cost: $370
Budget-Friendly Alternatives:
- Paint: Use leftover paint or buy sample sizes ($10)
- Wallpaper: Opt for peel-and-stick decals ($20 per roll)
- Shelving: Use repurposed wood or crates ($20)
- Closet Rods: Use tension rods ($10 each)
- Lighting: Use battery-operated puck lights ($20)
- Mirror: Find one at a thrift store ($10)
- Decorative Bins: Use cardboard boxes covered in fabric ($10)
- Hooks and Hangers: Use what you already have or buy in bulk ($5)
Total Cost with Alternatives: $180
Ways to Customize Your Closet
Alternative materials can change the look and feel of your closet. Instead of traditional wood, try using acrylic shelves for a modern touch. For a more rustic vibe, consider reclaimed wood.
Colors play a huge role in customization. Paint the walls a soft pastel for a chic look or go bold with metallic gold or silver accents. If you prefer a neutral palette, white or beige can make the space feel larger and more open.
Styles can also vary. For a vintage feel, add antique knobs and ornate mirrors. If you like a contemporary style, use sleek handles and minimalist lighting. For a bohemian touch, incorporate woven baskets and colorful rugs.
Lighting can transform the space. Install LED strip lights under shelves for a soft glow. A chandelier adds a touch of glamour, while recessed lighting keeps things modern and clean.
Storage solutions can be customized too. Use velvet hangers for a luxurious feel. Add pull-out drawers for accessories or clear bins for easy visibility. Shoe racks can be built-in or standalone, depending on your space.
Decorative elements like wallpaper can add personality. Choose a floral pattern for a feminine touch or a geometric design for a modern look. Mirrors not only add style but also make the space feel larger.
Personal touches make the closet truly yours. Display favorite handbags on open shelves or hang jewelry on a decorative board. Add a plush ottoman for seating and a touch of luxury.
Budget-friendly options include using contact paper instead of paint or thrifted items for unique finds. DIY projects like making your own drawer dividers or custom labels can save money and add a personal touch.
Eco-Friendly Tips
Reclaimed wood can add a rustic touch to your closet. Use old pallets or barn wood for shelves and organizers. Recycled glass knobs or handles can give a chic look to doors or drawers. Eco-friendly paint made from natural ingredients reduces harmful fumes and is better for the environment. Bamboo is a sustainable material perfect for hangers or shelving. Repurpose old furniture by giving it a fresh coat of paint or new hardware. Fabric scraps can be used to create custom drawer liners or decorative accents. LED lighting is energy-efficient and lasts longer than traditional bulbs. Natural fiber baskets like jute or seagrass are great for storage and add a stylish touch. Vintage mirrors or frames can be upcycled to create a glamorous look without buying new items. Second-hand stores often have unique pieces that can be refurbished to fit your style.
Your Closet, Your Masterpiece
Transforming your closet into a glamorous haven isn't just about aesthetics. It's about creating a space that reflects your style and makes daily routines smoother. With some creativity, a bit of elbow grease, and the right materials, you can turn a cluttered mess into an organized, chic sanctuary. Remember, the key is to plan, prioritize, and personalize. Don't be afraid to mix textures, colors, and storage solutions that suit your needs. Whether you're adding a splash of paint, installing new shelves, or simply reorganizing, every small change contributes to the bigger picture. So, roll up your sleeves, get those tools out, and start making your dream closet a reality. Happy DIY-ing!
How can I maximize space in my closet?
Use shelves, hanging organizers, and storage bins. Double up on hanging rods to create more room for clothes.
What tools will I need for a closet makeover?
You'll need a drill, screwdriver, measuring tape, level, and stud finder. A saw might come in handy if you're cutting shelves.
How do I choose the right paint color?
Pick a light color to make the space feel bigger. Neutral tones work well, but you can add a pop of color with accessories.
What kind of lighting should I use?
LED strip lights or battery-operated puck lights are great options. They’re easy to install and provide good illumination.
How can I keep my closet organized?
Use labels on bins and baskets. Group similar items together and rotate seasonal clothes to keep everything accessible.
Are there budget-friendly ways to upgrade my closet?
Yes! DIY shelving, thrift store finds, and repurposing old furniture can save money. Paint and new handles can also make a big difference.
How do I measure for new shelves?
Measure the width, height, and depth of your closet. Make sure to account for any obstructions like doors or existing rods.