
Home>Home & Furniture>Roof>DIY Truck Bed Rack for Roof Top Tent
Roof
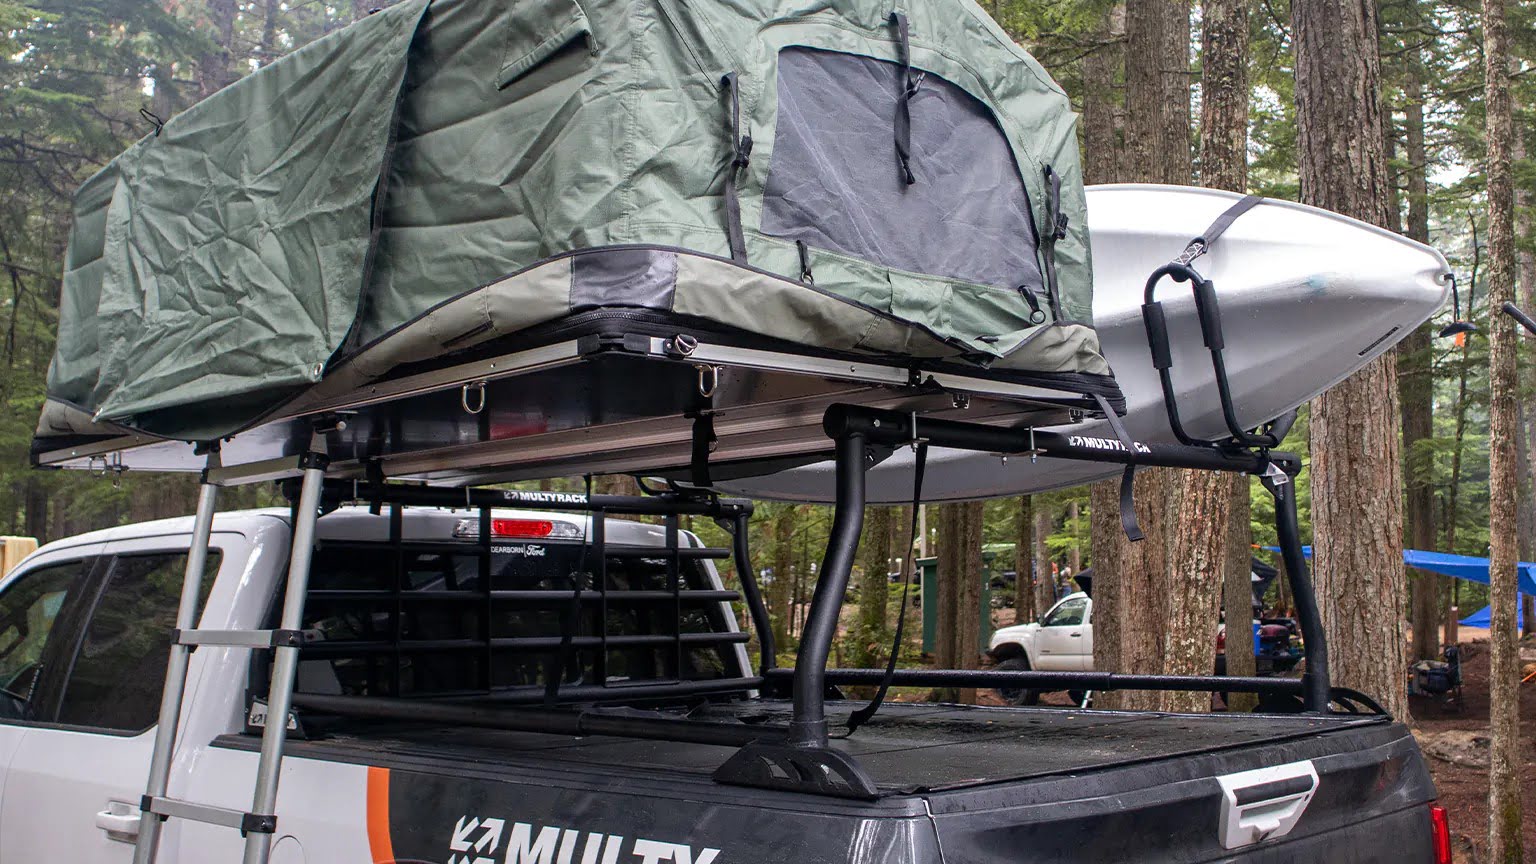
DIY Truck Bed Rack for Roof Top Tent
Published: August 20, 2024
Learn how to build a DIY truck bed rack for your roof top tent with our step-by-step guide. Perfect for camping enthusiasts looking to maximize their truck's utility.
(Many of the links in this article redirect to a specific reviewed product. Your purchase of these products through affiliate links helps to generate commission for Twigandthistle.com, at no extra cost. Learn more)
Building your own truck bed rack for a roof top tent can be both fun and rewarding. Not only will you save money, but you’ll also have a custom setup perfect for your needs. Whether you love camping, fishing, or just exploring the great outdoors, a sturdy rack makes all the difference. No need for fancy tools or expert skills. With some basic materials and a bit of time, you can create a reliable rack. This guide will walk you through the steps to get you on your way to many adventures. Let's get started!
Getting Ready for Your Project
Measure Your Truck Bed: Use a tape measure to get the length, width, and height of your truck bed. Write down these measurements.
Gather Materials: Collect all necessary materials like steel pipes, brackets, bolts, and nuts. Make sure you have a drill, saw, and wrench.
Safety Gear: Wear safety goggles, gloves, and a dust mask to protect yourself from metal shavings and dust.
Clear Workspace: Clean your workspace to avoid tripping hazards. Ensure you have enough room to move around and lay out materials.
Cutting Pipes: Use a saw to cut steel pipes to the required lengths. Double-check measurements before cutting.
Drill Holes: Mark spots on the pipes where holes need drilling. Use a drill to make holes for bolts.
Assemble Frame: Connect pipes using brackets, bolts, and nuts. Tighten everything securely with a wrench.
Test Fit: Place the assembled frame on your truck bed to ensure it fits properly. Make adjustments if needed.
Secure Rack: Bolt the rack to your truck bed. Ensure it’s stable and can support the weight of the roof top tent.
Final Check: Inspect the entire setup for any loose bolts or weak spots. Tighten and reinforce as necessary.
Gathering Materials and Tools
- Steel Tubing: Strong and durable, used for the main frame.
- Angle Grinder: Cuts and shapes the steel tubing.
- Welding Machine: Joins the steel pieces together securely.
- Measuring Tape: Ensures accurate measurements for cutting and fitting.
- Marker: Marks cutting and welding points on the steel.
- Clamps: Holds steel pieces in place during welding.
- Drill: Creates holes for bolts and screws.
- Bolts and Nuts: Fastens the rack to the truck bed.
- Primer and Paint: Protects the steel from rust and gives a finished look.
- Safety Gear: Includes gloves, goggles, and a welding mask for protection.
- Wrenches: Tightens bolts and nuts securely.
- Level: Ensures the rack is even and balanced.
- Sandpaper: Smooths rough edges on the steel tubing.
- Rubber Pads: Prevents metal-to-metal contact and reduces noise.
Skill Level and Time Commitment
Skill Level: Intermediate
Time Required: 6-8 hours
- Gather Materials: 1 hour
- Measure and Cut Metal: 2 hours
- Weld Frame: 2 hours
- Paint and Finish: 1 hour
- Install Rack: 1-2 hours
Detailed Steps to Follow
Gather Materials and Tools
- Steel tubing or aluminum bars
- Measuring tape
- Marker
- Saw (metal cutting)
- Drill with metal bits
- Bolts, nuts, and washers
- Welding machine (if using steel)
- Protective gear (gloves, goggles)
Measure Truck Bed
- Measure the width and length of the truck bed.
- Determine the height you want for the rack.
Cut Tubing/Bars
- Mark the measurements on the tubing/bars.
- Use the saw to cut the pieces to size.
Assemble Frame
- Lay out the cut pieces on the ground.
- Arrange them in the shape of the rack.
- Ensure all pieces fit together properly.
Drill Holes
- Mark spots for bolts on the tubing/bars.
- Drill holes at the marked spots.
Bolt Pieces Together
- Align the drilled holes.
- Insert bolts through the holes.
- Secure with nuts and washers.
Weld Joints (if using steel)
- Wear protective gear.
- Weld the joints for added strength.
- Allow the welds to cool.
Attach Rack to Truck Bed
- Place the assembled rack on the truck bed.
- Mark spots for mounting holes on the truck bed.
- Drill holes in the truck bed.
Secure Rack to Truck Bed
- Align the rack with the drilled holes.
- Insert bolts through the holes.
- Secure with nuts and washers.
Mount Roof Top Tent
- Follow the tent manufacturer's instructions.
- Secure the tent to the rack.
Test Stability
- Ensure all bolts are tight.
- Shake the rack to check for stability.
- Make adjustments if necessary.
Helpful Tips and Tricks
Measure Twice, Cut Once: Always double-check measurements before cutting any materials. This saves time and prevents waste.
Use Quality Materials: Opt for sturdy steel or aluminum for the frame. These metals offer durability and can handle heavy loads.
Pre-Drill Holes: Pre-drilling holes helps prevent wood or metal from splitting. It also makes assembly smoother.
Rust-Proofing: Apply a rust-resistant coating to metal parts. This extends the life of your rack, especially in wet conditions.
Secure Fasteners: Use lock washers or nylon lock nuts to keep bolts from loosening over time.
Weight Distribution: Ensure the weight of the tent is evenly distributed. This prevents strain on any single part of the rack.
Test Stability: Before hitting the road, test the rack's stability by gently shaking it. Make sure everything is secure.
Common Mistakes to Avoid:
Skipping Measurements: Eyeballing measurements often leads to errors. Always use a tape measure.
Using Weak Materials: Avoid using wood or thin metal that can't support the weight of a roof top tent.
Ignoring Rust-Proofing: Failing to rust-proof metal parts can lead to corrosion, weakening the structure.
Overloading: Don't exceed the weight limit of your materials. This can cause the rack to fail.
Alternatives:
Wooden Frame: For a budget-friendly option, use treated lumber. Ensure it's strong enough to support the tent.
Pre-Made Kits: If DIY isn't your thing, consider purchasing a pre-made truck bed rack kit. These often come with all necessary parts and instructions.
PVC Pipes: For a lightweight, temporary solution, use PVC pipes. They are easy to cut and assemble but may not be as durable.
Estimating the Cost
Materials:
- Steel Tubing: $100-$150
- Bolts, Nuts, and Washers: $20-$30
- Primer and Paint: $20-$40
- Rubber Pads: $10-$15
- Mounting Brackets: $30-$50
Tools:
- Welder: $200-$300 (or rent for $50/day)
- Angle Grinder: $40-$60
- Drill: $30-$50
- Measuring Tape: $5-$10
- Wrenches and Sockets: $20-$40
Total Cost Estimate: $475-$745
Budget-Friendly Alternatives:
- Steel Tubing: Use scrap metal from a local yard ($50-$75)
- Primer and Paint: Opt for spray paint ($10-$20)
- Welder: Borrow from a friend or rent ($0-$50)
- Angle Grinder: Hand saw ($10-$20)
- Drill: Use a manual hand drill ($10-$15)
Total Cost with Alternatives: $200-$325
Different Ways to Customize
Materials: Use aluminum for a lightweight option or steel for extra strength. Wood can give a rustic look but may need more maintenance.
Colors: Paint the rack with black for a sleek, modern look. Use camouflage for an outdoor adventure vibe. Bright colors like red or blue can make your truck stand out.
Styles: Opt for a minimalist design with clean lines for a modern feel. A rugged design with extra bars and hooks can provide more utility. Modular designs allow for easy adjustments and additions.
Accessories: Add LED lights for better visibility at night. Install extra tie-down points for securing gear. Attach a toolbox for added storage.
Height Adjustments: Make the rack adjustable to fit different tent heights. A fixed height can provide more stability.
Finish: Use a powder-coated finish for durability. A galvanized finish can prevent rust. Stained wood can offer a natural look.
Mounting Options: Use bolt-on mounts for easy removal. Welded mounts can offer more strength. Clamp mounts can avoid drilling holes in your truck.
Shape: A flat rack can be versatile for carrying other items. A curved rack can match the shape of your tent better. Angled racks can provide better aerodynamics.
Storage Solutions: Incorporate built-in storage for camping gear. Add side rails for extra security. Use foldable sections for compact storage when not in use.
Eco-Friendly Suggestions
Use reclaimed wood for the main structure. It's strong, durable, and gives a rustic look. Recycled metal pipes or bars can serve as supports. These materials often come from old furniture or construction sites.
Bamboo is another eco-friendly option. It's lightweight, strong, and grows quickly, making it a sustainable choice. For joints and connectors, consider reusing old hardware like bolts and screws from previous projects.
Natural oils or water-based sealants can protect the wood without harmful chemicals. Avoid using plastic parts; instead, opt for metal or wooden alternatives.
When cutting materials, measure twice to minimize waste. Any leftover wood or metal can be saved for future projects or donated to local makerspaces.
Lastly, consider using solar-powered lights for added functionality and sustainability.
Your DIY Adventure Awaits
Building a truck bed rack for your roof top tent is not just about saving money, it's about creating something uniquely yours. With the right tools and a bit of patience, you can craft a sturdy, reliable rack that fits your needs perfectly. Remember to measure twice, cut once, and always prioritize safety. This project can be a fun, rewarding experience that enhances your camping trips. Plus, there's nothing quite like the satisfaction of using something you built with your own hands. So gather your materials, follow the steps, and soon you'll have a custom rack ready for adventure. Happy building!
How much weight can a DIY truck bed rack hold?
A well-built DIY truck bed rack can hold around 500-800 pounds. Always use strong materials like steel or aluminum and double-check your design.
What tools will I need to build a truck bed rack?
You’ll need a drill, saw, measuring tape, wrench set, and a welder if you’re using metal. Safety gear like gloves and goggles is also important.
How long does it take to build a truck bed rack?
Depending on your experience and tools, it can take anywhere from a weekend to a full week. Planning and gathering materials ahead of time can speed things up.
Can I use wood to build my truck bed rack?
Yes, you can use treated wood, but metal like steel or aluminum is more durable and can handle more weight. Wood might be easier to work with if you’re new to DIY projects.
How do I secure the rack to my truck bed?
Use bolts and brackets to attach the rack to the truck bed. Make sure everything is tight and secure to prevent any movement while driving.
Do I need to paint or coat the rack?
Yes, painting or coating the rack helps prevent rust and weather damage. Use a rust-resistant primer and paint for metal racks, or a weatherproof sealant for wood.
Can I add accessories to my DIY truck bed rack?
Absolutely! You can add hooks, lights, or even a toolbox. Just make sure any additions don’t compromise the rack’s strength or stability.