
Home>Home & Furniture>Kitchen>How to Organize Your DIY Kitchen Pantry
Kitchen
How to Organize Your DIY Kitchen Pantry
Published: July 30, 2024
Discover expert tips on how to organize your DIY kitchen pantry for maximum efficiency and style. Transform your space with these practical and creative solutions!
(Many of the links in this article redirect to a specific reviewed product. Your purchase of these products through affiliate links helps to generate commission for Twigandthistle.com, at no extra cost. Learn more)
Tired of your messy kitchen pantry? Ready to take control and get organized? Organizing your pantry doesn't have to be a huge project. With some simple steps and a bit of creativity, you can transform that chaotic space into a tidy, efficient area. Whether it’s sorting through expired items, arranging shelves, or finding the perfect containers, a well-organized pantry makes cooking more enjoyable. Plus, it saves time and money when you know exactly what you have on hand. Grab your favorite music playlist, roll up your sleeves, and get ready to tackle your DIY pantry makeover!
Getting Ready for Your DIY Kitchen Pantry
Clear Out the Pantry: Remove everything from the shelves. This helps you see what you have and what you need to get rid of.
Clean the Shelves: Wipe down all surfaces with a damp cloth and mild cleaner. This ensures a fresh start.
Sort Items: Group similar items together. For example, put all canned goods in one pile, snacks in another.
Check Expiry Dates: Throw away expired items. This reduces clutter and keeps your pantry safe.
Plan Your Layout: Decide where each group of items will go. Keep frequently used items at eye level.
Label Containers: Use clear containers and label them. This makes it easy to find what you need.
Install Shelving or Racks: If needed, add extra shelves or racks to maximize space.
Safety Tips: Use a sturdy step stool for high shelves. Keep heavy items on lower shelves to avoid accidents.
Workspace Setup: Lay out all your tools and supplies before starting. This includes labels, containers, and cleaning supplies.
Preliminary Tasks: Measure your pantry space. This helps in buying the right size containers and shelves.
Essential Materials and Tools
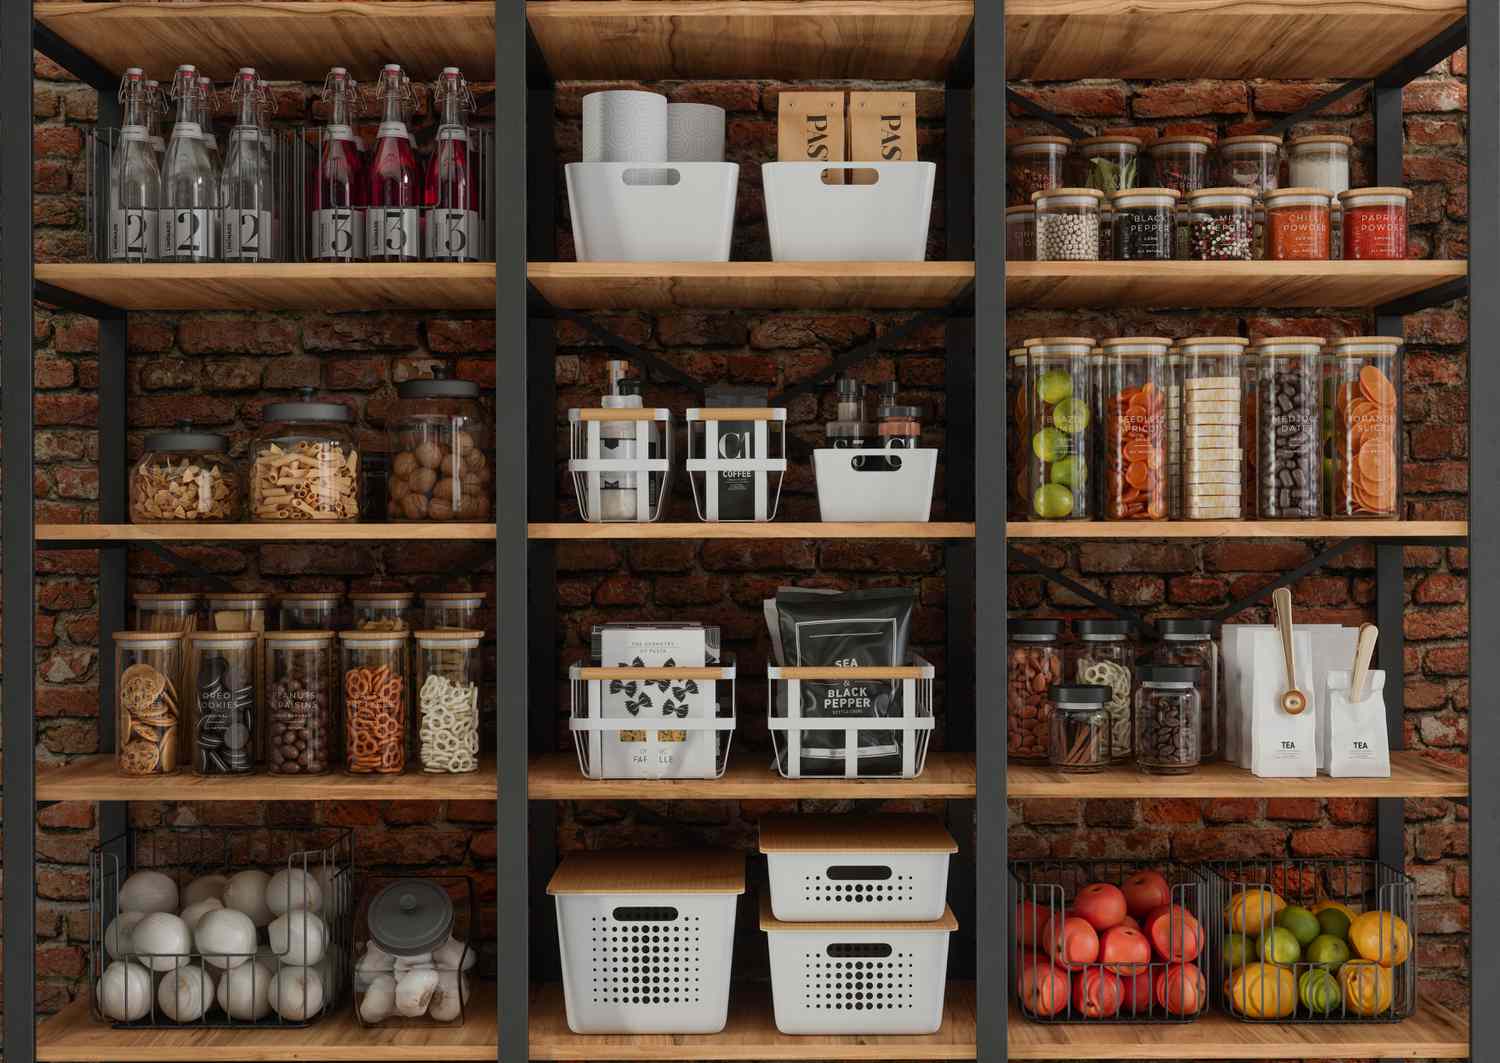
Storage Bins: Clear or labeled bins help keep similar items together. They make it easy to see what you have.
Shelf Liners: These protect shelves from spills and make cleaning easier. Choose non-slip liners to keep items in place.
Labels: Use labels to identify what's in each bin or container. This helps everyone in the household find things quickly.
Mason Jars: Great for storing dry goods like pasta, rice, and beans. They keep food fresh and look nice on shelves.
Lazy Susans: Perfect for corners or deep shelves. They spin, making it easy to reach items in the back.
Wire Baskets: Ideal for storing fruits, vegetables, or snacks. They allow air circulation, keeping produce fresh longer.
Hooks: Use hooks to hang items like aprons, oven mitts, or even small baskets for extra storage.
Step Stool: A small step stool helps you reach high shelves safely. Choose a foldable one for easy storage.
Measuring Tape: Measure your pantry space before buying bins or shelves. This ensures everything fits perfectly.
Screwdriver: Needed if you plan to install hooks or additional shelving. Make sure you have the right type for your screws.
Drill: Useful for making holes for hooks or shelves. A cordless drill is more convenient for tight spaces.
Cleaning Supplies: Before organizing, clean your pantry thoroughly. Use a mild cleaner and a cloth to wipe down shelves and bins.
Skill Level and Time Commitment
Skill Level: Beginner
Time Required: 2-4 hours
- Empty the Pantry: 30 minutes
- Clean Shelves: 15 minutes
- Sort Items: 45 minutes
- Label Containers: 30 minutes
- Reorganize Shelves: 1 hour
Detailed Steps for Organizing
Empty the Pantry:
- Take everything out.
- Place items on a table or counter.
Clean Shelves:
- Wipe down shelves with a damp cloth.
- Let them dry completely.
Sort Items:
- Group similar items together (e.g., canned goods, snacks, spices).
- Check expiration dates and discard expired items.
Plan Layout:
- Decide where each group will go.
- Keep frequently used items at eye level.
Use Containers:
- Place dry goods in clear, labeled containers.
- Use baskets for snacks or small items.
Label Shelves:
- Use labels to mark where each group belongs.
- This helps everyone know where things go.
Arrange Items:
- Put items back according to your plan.
- Keep heavy items on lower shelves.
Maintain Order:
- Regularly check for expired items.
- Return items to their designated spots after use.
Helpful Tips and Tricks
Use Clear Containers: Store dry goods like pasta, rice, and cereal in clear containers. This helps you see what you have and when you need to restock.
Label Everything: Labeling containers and shelves makes it easy to find items quickly. Use a label maker or simple sticky notes.
Group Similar Items: Keep similar items together. For example, store all baking supplies in one area and snacks in another.
Use Baskets and Bins: Baskets and bins help keep smaller items organized. They also make it easy to pull out and see everything inside.
Utilize Door Space: Hang racks or organizers on the inside of pantry doors for extra storage. Great for spices, condiments, or small snacks.
Adjustable Shelving: Install adjustable shelves to accommodate different-sized items. This allows for flexibility as your storage needs change.
First In, First Out: Place newer items behind older ones. This ensures you use up older items before they expire.
Common Mistakes to Avoid:
Overloading Shelves: Avoid putting too many items on one shelf. It can make things hard to find and cause shelves to sag.
Ignoring Expiry Dates: Regularly check and remove expired items. This keeps your pantry fresh and free of clutter.
Not Measuring Space: Measure your pantry before buying containers or organizers. This ensures everything fits perfectly.
Alternatives for Materials or Methods:
Repurpose Jars: Use old jars for storing dry goods. They are often airtight and can be labeled easily.
DIY Labels: Make labels using masking tape and a permanent marker if you don’t have a label maker.
Shoe Organizers: Hang a clear shoe organizer on the door for small items like snacks or spices.
Budgeting for Your Pantry Project
Shelving Units: Basic wire shelving units cost around $50 each. Wooden shelves are pricier, about $100 each. For a small pantry, you might need 2-3 units.
Storage Bins: Plastic bins cost $5-$10 each. Clear ones are best for visibility. You might need 10-15 bins.
Glass Jars: Sets of glass jars cost $20-$30 for a pack of 12. These are great for dry goods like pasta, rice, and beans.
Labels: A pack of adhesive labels costs around $5-$10. Chalkboard labels with a marker cost about $15.
Hooks and Racks: Over-the-door racks cost $20-$30. Wall-mounted hooks for hanging items cost $10-$15 for a pack of 5.
Drawer Organizers: These cost $10-$20 each. They help keep small items like spices organized.
Tools: Basic tools like a screwdriver, hammer, and level might cost around $30 if you don't already have them.
Budget-Friendly Alternatives:
- Use cardboard boxes instead of plastic bins. They are often free from grocery stores.
- Repurpose glass jars from store-bought items instead of buying new ones.
- DIY labels using paper and tape instead of buying pre-made ones.
- Use tension rods as makeshift shelves or dividers. They cost about $5 each.
Total estimated cost: $200-$300. Using budget-friendly alternatives can reduce this to around $100.
Creative Customizations
Shelving Options: Use wooden shelves for a rustic look, or metal shelves for a modern feel. Adjustable shelves can be customized to fit different-sized items.
Containers: Opt for glass jars to see contents easily or plastic bins for a lightweight option. Wicker baskets add a natural touch.
Labels: Use chalkboard labels for a vintage vibe, or printed labels for a clean, uniform appearance. Color-coded labels can help quickly identify categories.
Door Storage: Install hanging racks on the inside of pantry doors for spices or small items. Magnetic strips can hold metal lids or utensils.
Lighting: Add LED strip lights under shelves for better visibility. Motion-sensor lights can automatically turn on when the door opens.
Paint and Wallpaper: Paint the pantry walls a bright color to make the space feel larger. Wallpaper with fun patterns can add personality.
Drawer Inserts: Use adjustable dividers to keep utensils and small items organized. Pull-out drawers can make deep shelves more accessible.
Hooks and Pegboards: Install hooks for hanging pots or aprons. Pegboards can hold various kitchen tools and be rearranged as needed.
Flooring: Consider vinyl tiles for easy cleaning or cork flooring for a softer, eco-friendly option.
Backsplash: Add a tile backsplash behind shelves for easy cleaning and a polished look. Peel-and-stick tiles offer a quick, removable option.
Bins and Baskets: Use stackable bins to maximize vertical space. Wire baskets can provide a clear view of contents.
Lazy Susans: Place lazy Susans on shelves to easily access items in the back. Two-tiered versions can double storage space.
Sliding Doors: Replace traditional doors with sliding barn doors to save space. Frosted glass doors can add a modern touch while hiding clutter.
Custom Built-ins: Create custom built-ins to fit your pantry's exact dimensions. Corner shelves can utilize awkward spaces.
Eco-friendly Materials: Use reclaimed wood for shelves or bamboo containers for a sustainable option. Recycled glass jars can store dry goods.
Decorative Elements: Add plants for a touch of greenery. Artwork or family photos can make the space feel more inviting.
Eco-Friendly Pantry Organization Ideas
Glass jars make excellent storage containers. They are reusable, easy to clean, and you can see what's inside. Use old mason jars or repurpose glass jars from store-bought goods.
Wooden crates or boxes can be used for larger items. Look for reclaimed wood or repurpose old crates. They add a rustic touch and are sturdy.
Baskets made from natural materials like wicker or bamboo are great for organizing. They are biodegradable and add a cozy feel to your pantry.
Labels can be made from recycled paper or cardboard. Use a marker to write on them, and attach with string or clips.
Shelving can be built from reclaimed wood. This reduces waste and gives your pantry a unique look.
Reusable cloth bags are perfect for storing bulk items like grains or beans. They are washable and reduce plastic use.
Repurpose old containers like coffee tins or cereal boxes. Decorate them with fabric or paint to match your kitchen's style.
Compostable liners for bins can help manage waste. Use them for food scraps that can go into your compost pile.
Upcycle old furniture like bookshelves or cabinets. Give them a fresh coat of paint and use them for extra storage.
Avoid plastic as much as possible. Opt for materials that are durable and eco-friendly.
Your Pantry, Your Rules
You've got all the tools now to transform your kitchen pantry into a well-organized haven. Start by sorting items into categories like grains, canned goods, and spices. Use clear containers to keep everything visible and easy to find. Labeling each container helps everyone in the house know where things go. Don't forget to use vertical space by adding shelves or stackable bins. Regularly check for expired items and make it a habit to tidy up every few weeks. With these tips, your pantry will not only look great but also make cooking and meal prep a breeze. Happy organizing!
How do I start organizing my kitchen pantry?
Begin by emptying everything out. This way, you can see what you have and toss expired items. Clean the shelves before putting anything back.
What should I use to store pantry items?
Use clear containers for dry goods like pasta, rice, and cereal. Baskets or bins work great for snacks and smaller items. Label everything to make it easy to find.
How can I maximize space in a small pantry?
Utilize vertical space by adding shelf risers or stackable bins. Door organizers can hold spices or small jars. Consider using lazy Susans for easy access to items in the back.
How often should I reorganize my pantry?
Aim to reorganize every few months. This helps keep things tidy and ensures you’re not holding onto expired or unused items.
What’s the best way to group pantry items?
Group items by category. Keep baking supplies together, snacks in one spot, and canned goods in another. This makes it easier to find what you need quickly.
How can I keep my pantry smelling fresh?
Place an open box of baking soda on a shelf to absorb odors. You can also use sachets of dried herbs or coffee grounds for a pleasant scent.
Any tips for keeping kids' snacks organized?
Designate a low shelf or bin for kids' snacks. Use clear containers so they can see what’s available. This way, they can grab their snacks without making a mess.