
Home>Home & Furniture>Kitchen>How to Build a Sprinter Van Kitchen
Kitchen
How to Build a Sprinter Van Kitchen
Published: August 3, 2024
Learn how to build a functional and stylish Sprinter van kitchen with our step-by-step guide. Perfect for van life enthusiasts seeking comfort and convenience on the road.
(Many of the links in this article redirect to a specific reviewed product. Your purchase of these products through affiliate links helps to generate commission for Twigandthistle.com, at no extra cost. Learn more)
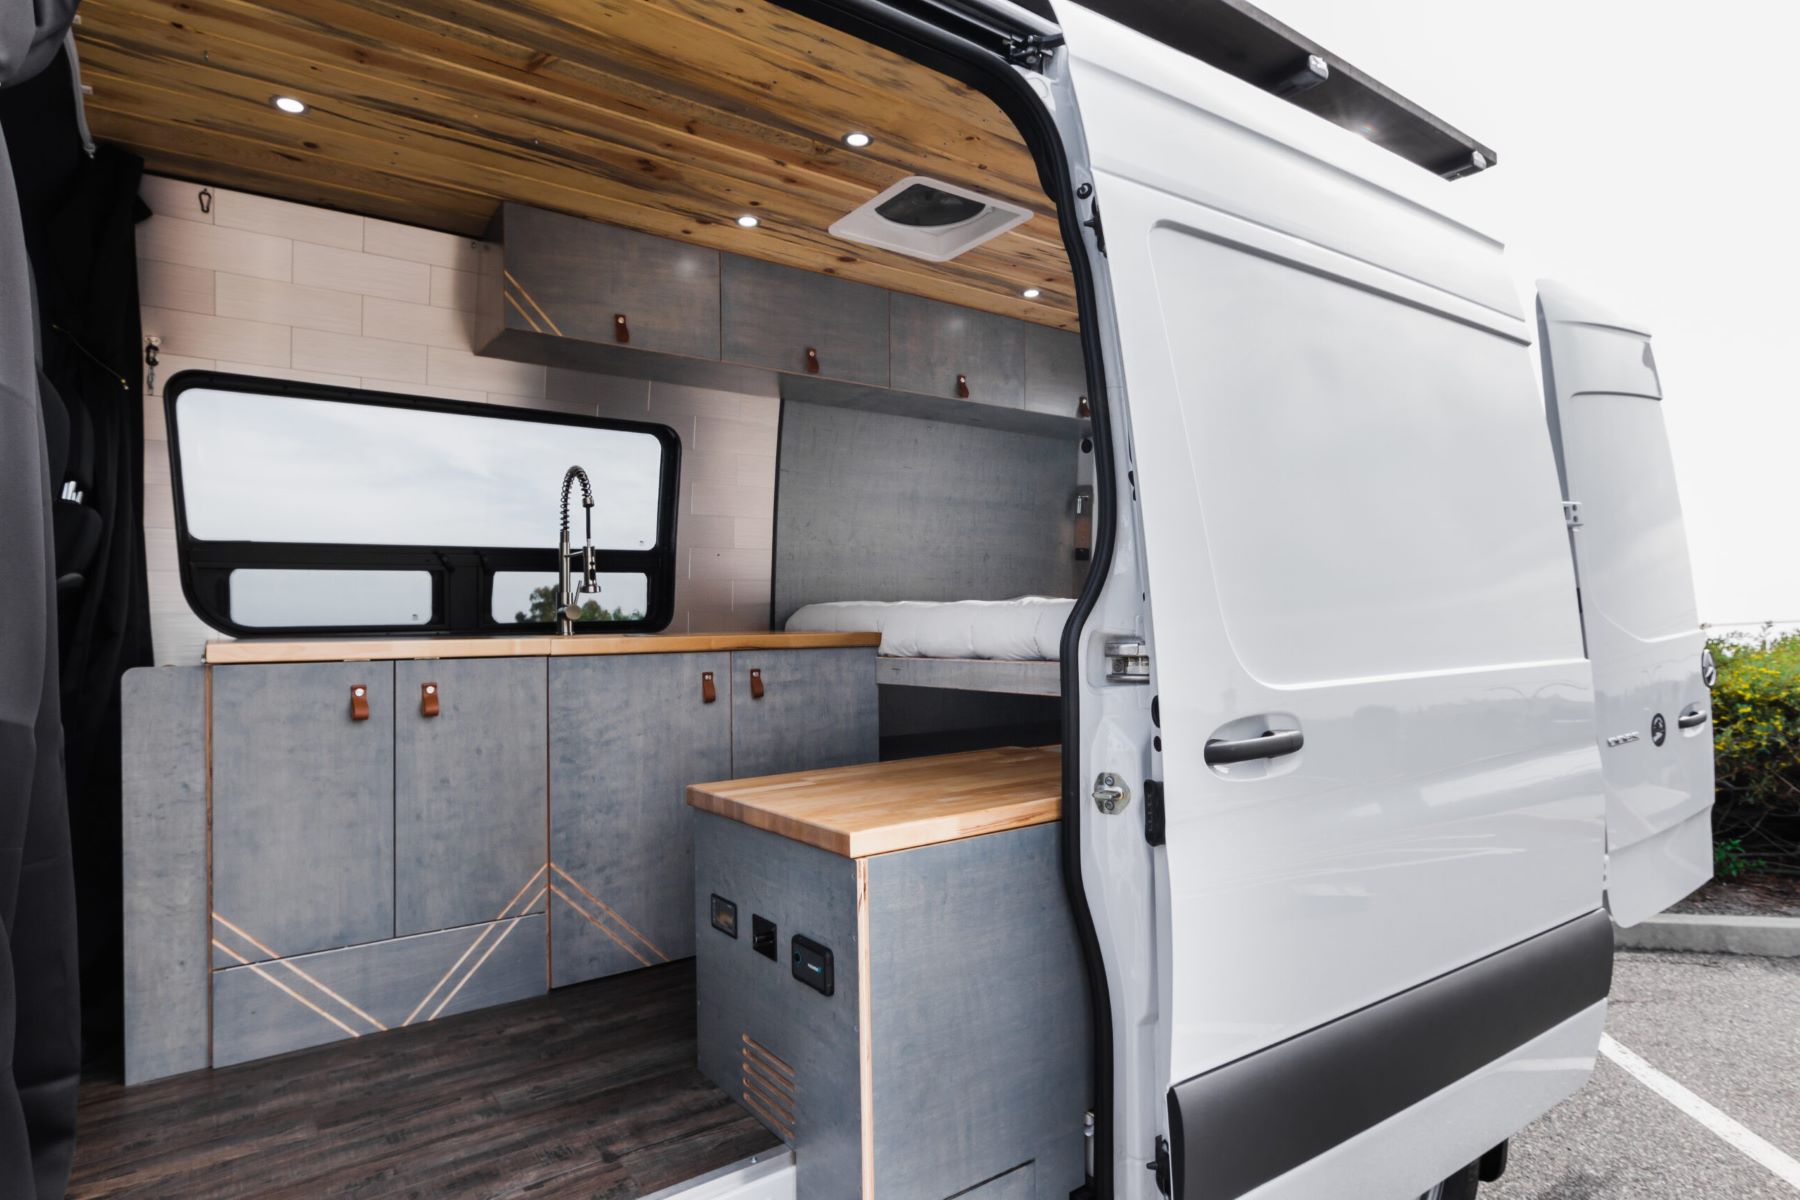
Building a kitchen in a sprinter van turns road trips into comfortable adventures. Whether you're a weekend warrior or planning extended travels, having a functional kitchen makes a huge difference. You don’t need to be a professional carpenter or plumber to make it happen. With some basic tools, creativity, and a bit of patience, you can create a cozy, practical kitchen space in your van. This guide will help you plan, design, and build a kitchen that fits your needs and budget. Ready to transform your van into a mini home on wheels? Let’s get started!
Preparation
Plan Your Layout: Sketch a detailed layout of where you want the sink, stove, fridge, and storage. Measure everything to ensure it fits.
Gather Materials: Collect all necessary materials like plywood, screws, countertop, sink, stove, and fridge. Make sure you have all tools like a saw, drill, and measuring tape.
Safety Gear: Wear safety goggles, gloves, and a dust mask. Keep a first aid kit nearby.
Clear Workspace: Clean out the van and remove any unnecessary items. Ensure you have enough space to move around and work comfortably.
Electrical and Plumbing Prep: Plan where your electrical outlets and plumbing will go. If unsure, consult a professional to avoid mistakes.
Insulation and Ventilation: Insulate the van walls and install proper ventilation to keep the kitchen area safe and comfortable.
Pre-Cut Materials: Cut all wood and materials to size before starting the assembly. This saves time and ensures accuracy.
Dry Fit Components: Place all components in the van to see how they fit. Make adjustments if needed before final installation.
Secure Heavy Items: Ensure heavy items like the fridge and stove are securely fastened to prevent movement while driving.
Test Everything: Before finalizing, test all electrical and plumbing connections to ensure they work properly.
Materials and Tools Needed
Materials:
- Plywood: Used for building cabinets and countertops. Choose high-quality plywood for durability.
- Butcher Block: Ideal for countertops. It's sturdy and gives a nice finish.
- Sink: Essential for washing dishes and food prep. Stainless steel is a good choice.
- Faucet: Needed for water flow. Look for one with a pull-out sprayer.
- Water Tanks: One for fresh water, another for grey water. Ensure they fit your space.
- Water Pump: Moves water from the tank to the faucet. A 12V pump works well.
- Propane Stove: For cooking. A two-burner stove is usually sufficient.
- Refrigerator: Keeps food fresh. A 12V fridge is energy-efficient.
- Cabinet Hardware: Includes hinges, handles, and drawer slides. Choose sturdy options.
- Insulation: Keeps the van warm. Foam board or spray foam works best.
- Sealant: For waterproofing around the sink and countertop. Silicone sealant is effective.
- Electrical Wiring: Powers the pump, fridge, and lights. Use marine-grade wiring for safety.
- Lighting: LED lights are energy-efficient and provide good illumination.
Tools:
- Measuring Tape: Ensures accurate measurements for cutting materials.
- Circular Saw: Cuts plywood and butcher block to size. A jigsaw can also be useful for detailed cuts.
- Drill: For making holes and driving screws. A cordless drill offers flexibility.
- Screwdriver Set: Needed for assembling cabinets and installing hardware.
- Wrench Set: Useful for plumbing connections and tightening bolts.
- Level: Ensures surfaces are even. A small bubble level works well.
- Clamps: Hold materials in place while cutting or assembling. C-clamps are versatile.
- Utility Knife: For cutting insulation and trimming sealant. Keep extra blades handy.
- Sander: Smooths rough edges on wood. An orbital sander is efficient.
- Caulking Gun: Applies sealant neatly. Essential for waterproofing tasks.
- Wire Strippers: Prepares electrical wires for connections. Choose a tool with multiple gauge options.
- Multimeter: Checks electrical connections and ensures safety. A digital multimeter is easy to read.
These materials and tools will help you build a functional and stylish kitchen in your Sprinter van.
Skill Level and Time Required
Skill Level: Intermediate
Time Required: 40-60 hours
- Planning and Design: 5-10 hours
- Gathering Materials: 3-5 hours
- Building the Frame: 10-15 hours
- Installing Appliances: 10-15 hours
- Plumbing and Electrical Work: 10-15 hours
- Finishing Touches: 2-5 hours
Step-by-Step Instructions
Plan Your Layout
- Measure the available space.
- Sketch a layout including sink, stove, storage, and counter space.
Gather Materials
- Plywood or MDF for cabinets.
- Countertop material (wood, laminate, etc.).
- Sink and faucet.
- Portable stove or built-in cooktop.
- Screws, nails, brackets, and adhesive.
Build the Base Cabinets
- Cut plywood to size for the cabinet frames.
- Assemble frames using screws and brackets.
- Attach cabinet doors using hinges.
Install the Countertop
- Cut the countertop to fit the cabinet dimensions.
- Secure the countertop to the cabinet frames with screws or adhesive.
Install the Sink
- Cut a hole in the countertop for the sink.
- Drop the sink into the hole and secure it with clips or adhesive.
- Connect the faucet to the sink.
Set Up the Stove
- Place the portable stove on the countertop or install a built-in cooktop.
- Ensure proper ventilation if using a built-in cooktop.
Add Storage Solutions
- Install shelves or drawers inside the cabinets.
- Add hooks or racks for utensils and pots.
Finish and Secure
- Sand and paint or stain the cabinets and countertop.
- Secure all components to prevent movement while driving.
Test Everything
- Check the stability of the cabinets and countertop.
- Ensure the sink and stove are functioning properly.
Tips and Tricks
Plan your layout carefully. Measure your space and decide where each appliance will go. Use lightweight materials like plywood for cabinets to avoid adding too much weight. Install a vent fan to keep air circulating and reduce moisture buildup. Choose a compact fridge to save space. Use modular units for flexibility and easier installation.
Common mistakes to avoid: Don't forget to insulate your van properly; it helps with temperature control. Avoid using heavy materials that can affect fuel efficiency. Don't overlook the importance of securing all items to prevent them from moving while driving. Avoid placing the sink too far from the water source; it complicates plumbing.
Alternatives for materials or methods: Instead of traditional countertops, consider using butcher block for a rustic look. For cabinets, aluminum frames can be a lightweight and durable option. Instead of a built-in stove, a portable camping stove can offer flexibility. For water storage, collapsible water containers can save space when not in use.
Cost Estimation
Cabinets: Pre-made cabinets cost around $200-$500. DIY plywood cabinets cost about $100-$150.
Countertop: Laminate countertops cost $50-$100. Butcher block countertops cost $100-$200.
Sink: Basic stainless steel sinks cost $30-$60. Higher-end sinks cost $100-$150.
Faucet: Basic faucets cost $20-$40. Higher-end faucets cost $50-$100.
Water System: Water pump costs $30-$60. Freshwater and gray water tanks cost $20-$50 each.
Stove: Portable camping stoves cost $30-$70. Built-in stoves cost $100-$200.
Fridge: Mini-fridges cost $100-$200. 12V fridges cost $300-$600.
Electrical System: Basic wiring and outlets cost $50-$100. Solar panels and batteries cost $300-$600.
Insulation: Foam board insulation costs $20-$40. Spray foam insulation costs $50-$100.
Tools: Basic tools like a drill, saw, and screwdriver set cost $100-$200.
Total Estimated Cost: Budget-friendly options total around $750-$1,200. Higher-end options total around $1,500-$2,500.
Variations and Customizations
Cabinet Materials: Instead of standard plywood, use bamboo for a more eco-friendly option or reclaimed wood for a rustic look.
Countertops: Swap out laminate for butcher block for a warm, natural feel or quartz for a sleek, modern touch.
Sink Styles: Install a farmhouse sink for a classic vibe or a stainless steel sink for durability and a contemporary look.
Faucet Options: Choose a pull-down faucet for convenience or a vintage-style faucet for a unique touch.
Storage Solutions: Add pull-out shelves for easy access or magnetic strips for storing knives and metal utensils.
Lighting: Use LED strip lights under cabinets for a modern touch or vintage Edison bulbs for a cozy atmosphere.
Backsplash: Install peel-and-stick tiles for an easy update or stainless steel panels for a sleek, industrial look.
Flooring: Opt for vinyl planks for durability and water resistance or cork flooring for a softer, eco-friendly option.
Refrigerator: Choose a 12V fridge for energy efficiency or a propane fridge for off-grid living.
Color Schemes: Paint cabinets in bright white for a clean look or navy blue for a bold statement.
Sustainability Tips
Reclaimed wood makes excellent countertops and cabinets. It adds character and reduces waste. Bamboo is another great option. It grows quickly, making it a renewable resource. For insulation, consider sheep's wool or recycled denim. Both materials are natural and effective.
Use low-VOC paints to avoid harmful chemicals. These paints are better for the environment and your health. LED lights consume less energy and last longer than traditional bulbs. Install a solar panel system to power your kitchen appliances. This reduces reliance on non-renewable energy sources.
For the sink, look for recycled stainless steel. It's durable and eco-friendly. Use a composting toilet to manage waste sustainably. This reduces water usage and provides compost for plants.
Repurpose old jars and containers for storage. This keeps items organized and reduces the need for new plastic. Choose natural fiber fabrics for curtains and seat covers. Materials like cotton or linen are biodegradable and sustainable.
Finally, consider a portable induction cooktop. It uses less energy and is safer than gas stoves.
Your Van Kitchen Awaits
Building a Sprinter van kitchen isn't just about having a place to cook; it's about creating a space that feels like home. From choosing the right materials to installing appliances, every step brings you closer to hitting the road with confidence. Remember, planning is key. Measure twice, cut once, and don't rush the process. Use quality tools and don't hesitate to ask for help if needed. Your van kitchen should reflect your style and meet your needs. Whether you're a weekend warrior or a full-time nomad, a well-built kitchen makes all the difference. So, gather your supplies, roll up your sleeves, and get to work. The open road is calling, and with your new kitchen, you're ready to answer. Happy travels and bon appétit!
How much space do I need for a Sprinter van kitchen?
You don't need a ton of space. A compact kitchen can fit in about 4-6 feet of your van. Just make sure to plan for essentials like a stove, sink, and storage.
What materials should I use for the countertops?
Use lightweight, durable materials like plywood with a laminate finish. They’re easy to clean and won’t add too much weight to your van.
How do I get water for the sink?
Install a water tank under the sink with a pump. You can use a foot pump or an electric one. Make sure to have a grey water tank for waste water.
Can I install a fridge in my Sprinter van?
Absolutely! Opt for a 12V fridge that runs off your van’s battery. They’re energy-efficient and perfect for van life.
What kind of stove works best?
A portable propane stove is a great choice. It’s easy to use and doesn’t require complex installation. Just make sure to ventilate properly.
How do I ensure proper ventilation?
Install a roof vent or a small window near the kitchen area. This helps get rid of cooking fumes and keeps the air fresh.
How can I maximize storage?
Use every inch of space wisely. Install overhead cabinets, use drawer organizers, and consider multi-purpose furniture like benches with storage underneath.