
Home>Home & Furniture>Kitchen>How to Build a DIY Dining Table
Kitchen
How to Build a DIY Dining Table
Published: July 26, 2024
Learn how to build a DIY dining table with our step-by-step guide. Perfect for beginners, this project will add a personal touch to your dining space. Get started today!
(Many of the links in this article redirect to a specific reviewed product. Your purchase of these products through affiliate links helps to generate commission for Twigandthistle.com, at no extra cost. Learn more)
Building your own dining table is a rewarding project that adds a personal touch to your home. This guide will break down the steps, making it easy to follow, even for beginners. You don’t need fancy tools or carpentry skills, just some basic materials, patience, and a willingness to learn. Imagine gathering around a table you built with your own hands—how cool is that? Ready to get started? Let’s dive in and create a beautiful, sturdy dining table that will become the heart of your dining room for years to come.
Preparation Steps
Gather Materials: Get wood, screws, nails, sandpaper, wood glue, and a finish like paint or stain. Make sure you have everything before starting.
Safety Gear: Wear safety goggles, gloves, and a dust mask. Protect your eyes, hands, and lungs from dust and splinters.
Workspace Setup: Clear a large, flat area. Ensure good lighting and ventilation. Lay down a drop cloth to catch debris.
Tools Ready: Have a saw, drill, measuring tape, clamps, and a sander within reach. Check that all tools work properly.
Measure Twice, Cut Once: Double-check all measurements. Accurate cuts are crucial for a sturdy table.
Pre-drill Holes: Prevent wood from splitting by pre-drilling holes for screws and nails.
Sand Wood: Smooth all wood pieces with sandpaper. This helps the finish adhere better and prevents splinters.
Dry Fit: Assemble the table without glue or screws to ensure all pieces fit together correctly.
Plan for Finishing: Decide if you will paint or stain the table. Prepare brushes, rags, and the finish product.
Check Instructions: If following a specific plan, review all steps before starting. Make sure you understand the process.
Materials and Tools Needed
Materials:
- Wood Planks: Used for the tabletop and legs. Choose hardwood like oak or maple for durability.
- Wood Screws: Secure the planks together. Ensure they are long enough to hold the pieces firmly.
- Wood Glue: Provides extra strength to the joints. Helps keep the table sturdy.
- Sandpaper: Smooths out rough edges. Use different grits for a fine finish.
- Wood Stain or Paint: Adds color and protects the wood. Choose based on your preferred look.
- Polyurethane Finish: Seals the wood. Protects against spills and scratches.
Tools:
- Tape Measure: Measures wood pieces accurately. Ensures everything fits perfectly.
- Saw: Cuts wood to the desired size. A circular saw or handsaw works well.
- Drill: Makes holes for screws. Also used for driving screws into the wood.
- Clamps: Holds pieces together while glue dries. Keeps everything in place.
- Screwdriver: Tightens screws. A power screwdriver can save time.
- Paintbrush or Rag: Applies stain or paint evenly. Helps achieve a smooth finish.
- Sanding Block or Electric Sander: Speeds up the sanding process. Ensures a smooth surface.
These materials and tools will help you build a sturdy, attractive dining table.
Skill Level and Time Required
Skill Level: Intermediate
Time Required: 2-3 days
- Gather Materials: 1 hour
- Cut Wood: 2-3 hours
- Assemble Frame: 3-4 hours
- Attach Tabletop: 2-3 hours
- Sand and Finish: 6-8 hours
- Drying Time: 24 hours
Step-by-Step Guide
Gather Materials and Tools
- Wood planks (for tabletop and legs)
- Screws
- Wood glue
- Sandpaper
- Stain or paint
- Drill
- Saw
- Measuring tape
- Clamps
Measure and Cut Wood
- Measure the desired length and width of the tabletop.
- Cut wood planks to size for the tabletop.
- Cut four legs to the desired height.
Assemble the Tabletop
- Arrange planks side by side.
- Apply wood glue between each plank.
- Clamp planks together tightly.
- Let glue dry according to the instructions.
Sand the Tabletop
- Use sandpaper to smooth the surface.
- Ensure all edges are even.
Attach the Legs
- Position legs at each corner of the tabletop.
- Drill pilot holes through the legs into the tabletop.
- Secure legs with screws.
Stabilize the Structure
- Add cross supports between legs for extra stability.
- Measure and cut wood for supports.
- Attach supports using screws and wood glue.
Finish the Table
- Sand the entire table to remove rough spots.
- Apply stain or paint for desired finish.
- Let it dry completely.
Final Touches
- Check for any loose screws or rough edges.
- Make any necessary adjustments.
Helpful Tips and Tricks
Measure twice, cut once. Always double-check measurements before cutting wood. This saves time and materials.
Use quality wood. Pine is affordable and easy to work with, but oak or maple offer more durability.
Pre-drill holes. This prevents wood from splitting when you drive screws.
Sand edges. Smooth edges make the table safer and more comfortable.
Apply wood glue. Use glue along with screws for stronger joints.
Stain before assembly. Staining pieces before putting them together ensures even coverage.
Level legs. Make sure all legs are the same length to avoid wobbling.
Common mistakes to avoid:
Skipping sanding. Rough surfaces can cause splinters and look unprofessional.
Ignoring wood grain. Always cut and sand in the direction of the grain to avoid rough edges.
Rushing assembly. Allow glue to dry fully before moving to the next step.
Not sealing wood. Unsealed wood can absorb moisture and warp over time.
Alternatives for materials or methods:
Use plywood. Plywood can be a cheaper alternative to solid wood for the tabletop.
Pocket hole jig. This tool makes hidden joints easier and cleaner.
Metal legs. Metal legs can be a stylish and sturdy alternative to wooden ones.
Pre-made table legs. Buying pre-made legs can save time and ensure uniformity.
Estimating the Cost
Wood: For a standard 6-foot table, you'll need about 20-25 board feet of wood. Pine is budget-friendly, costing around $50-$75. Oak or maple will be pricier, around $150-$200.
Screws and Nails: A box of screws and nails will cost about $10.
Wood Glue: A bottle of wood glue costs around $5.
Sandpaper: A pack of assorted sandpaper grits costs about $10.
Stain or Paint: Depending on your finish choice, a can of stain or paint costs around $15-$25.
Polyurethane: For a protective finish, a can of polyurethane costs about $15.
Tools: If you don’t already have them, a saw ($50-$100), drill ($40-$60), sander ($30-$50), and clamps ($20-$30) are essential.
Budget-Friendly Alternatives: Use reclaimed wood or pallets to save on wood costs. Borrow tools from friends or rent them from a local hardware store.
Total Estimated Cost: For budget options, expect to spend around $150-$200. For higher-end materials, the cost could reach $300-$400.
Different Variations and Customizations
Materials: Instead of traditional wood, try reclaimed wood for a rustic look or plywood for a budget-friendly option. Metal legs can add a modern touch, while hairpin legs give a mid-century vibe.
Colors: Paint the table in bold colors like navy blue or forest green for a statement piece. For a more subtle look, use stains in shades like walnut or oak. Whitewash can give a beachy, coastal feel.
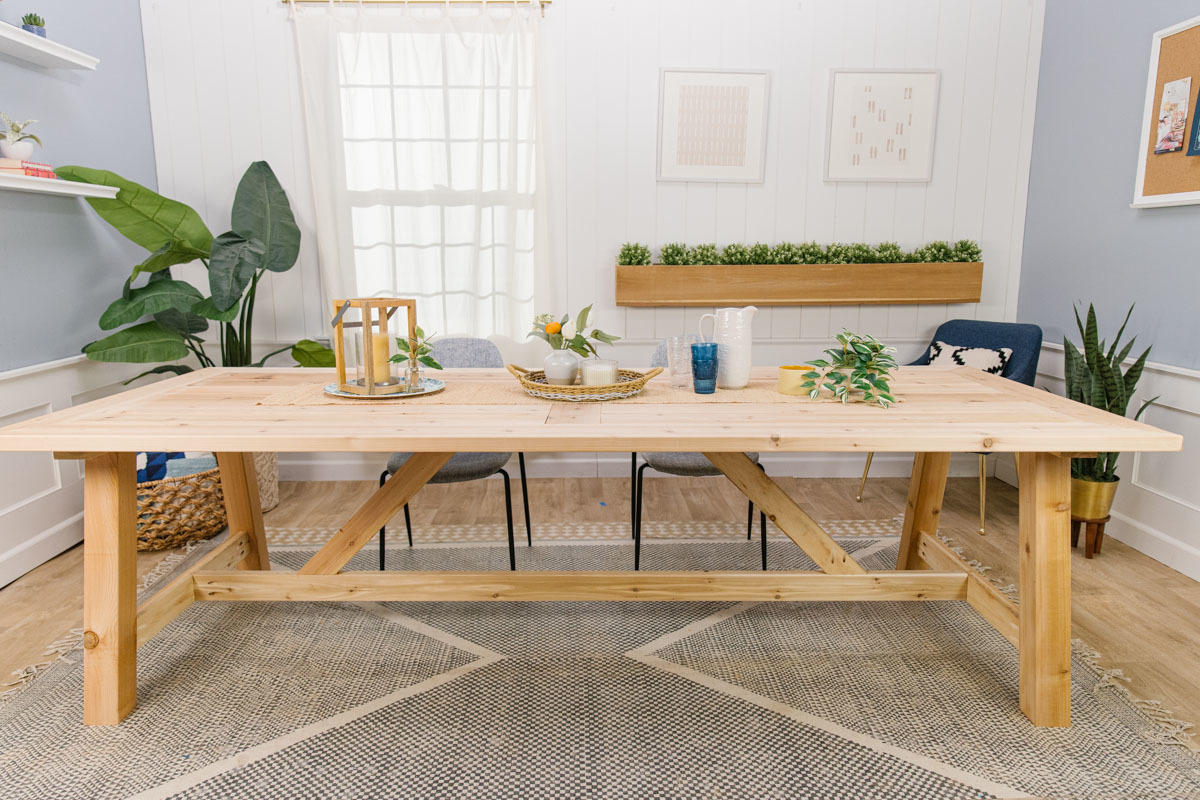
Styles: Add decorative trim or molding to the edges for a classic look. Consider a live-edge tabletop for a natural, organic style. Farmhouse tables with X-brace legs or trestle bases offer a sturdy, timeless design.
Finishes: Use epoxy resin for a glossy, durable finish. Matte finishes can give a more understated, contemporary look. Distressing techniques can create a vintage, worn-in appearance.
Tabletop Shapes: Go beyond rectangular; try round or oval tabletops for a different dining experience. Square tables can fit smaller spaces better.
Additional Features: Incorporate extendable leaves for extra seating during gatherings. Add built-in storage like drawers or shelves underneath for functionality. Inlay designs with contrasting wood or materials can add unique patterns and textures.
Eco-Friendly Tips
Reclaimed wood is a fantastic choice. It gives character and reduces waste. Look for old barn wood, pallets, or even discarded furniture. Sand it down to remove splinters and old finishes.
Bamboo is another eco-friendly option. It grows quickly, making it a renewable resource. Bamboo is strong and has a unique look.
Use non-toxic finishes like water-based stains or natural oils. These are better for the environment and safer for indoor air quality.
Recycled metal can be used for table legs or supports. Old pipes or metal scraps can be repurposed, adding an industrial touch.
Natural adhesives like soy-based glues are a good alternative to traditional, chemical-laden options. They are safer and more sustainable.
Consider using hand tools instead of power tools. This reduces energy consumption and gives a more hands-on feel to your project.
For a unique touch, incorporate glass from old windows or doors as a tabletop insert. This adds a stylish element while reusing materials.
Finally, upcycle old furniture. An old door can become a tabletop, or mismatched chairs can be painted to match your new table. This saves money and resources.
Your Table Awaits
Building your own dining table isn't just about saving money; it's about creating something unique. You've learned how to choose the right wood, measure accurately, and use tools safely. Sanding and staining give your table a polished look, while assembling the pieces brings your vision to life. Don't forget to double-check your work for stability. With patience and effort, you now have a custom piece that reflects your style. Enjoy the satisfaction of knowing you built it yourself. Now, gather around your new table, share meals, and make memories.
What materials do I need to build a DIY dining table?
You’ll need wood planks for the tabletop, table legs or a base, screws, wood glue, sandpaper, stain or paint, and a sealant.
How long does it take to build a dining table?
Depending on your skill level and the complexity of the design, it can take anywhere from a weekend to a few days.
Do I need any special tools?
Basic tools like a saw, drill, screwdriver, measuring tape, clamps, and a sander should do the trick.
Can I customize the size of my table?
Absolutely! Measure your dining area and cut the wood to fit your space. Customization is one of the perks of DIY projects.
How do I ensure the table is sturdy?
Use quality wood and reinforce the joints with screws and wood glue. Make sure the legs are even and the tabletop is securely attached.
What type of wood is best for a dining table?
Hardwoods like oak, maple, or walnut are durable and look great. Pine is a cheaper option but may not be as long-lasting.
How do I finish the table?
Sand the wood until smooth, then apply stain or paint. Once dry, add a sealant to protect the surface from spills and scratches.