
Home>Home & Furniture>Kitchen>DIY Overland Kitchen Build Guide
Kitchen
DIY Overland Kitchen Build Guide
Published: July 31, 2024
Discover how to build your own overland kitchen with our step-by-step guide. Perfect for adventurers, this DIY project combines functionality with style for your outdoor cooking needs.
(Many of the links in this article redirect to a specific reviewed product. Your purchase of these products through affiliate links helps to generate commission for Twigandthistle.com, at no extra cost. Learn more)
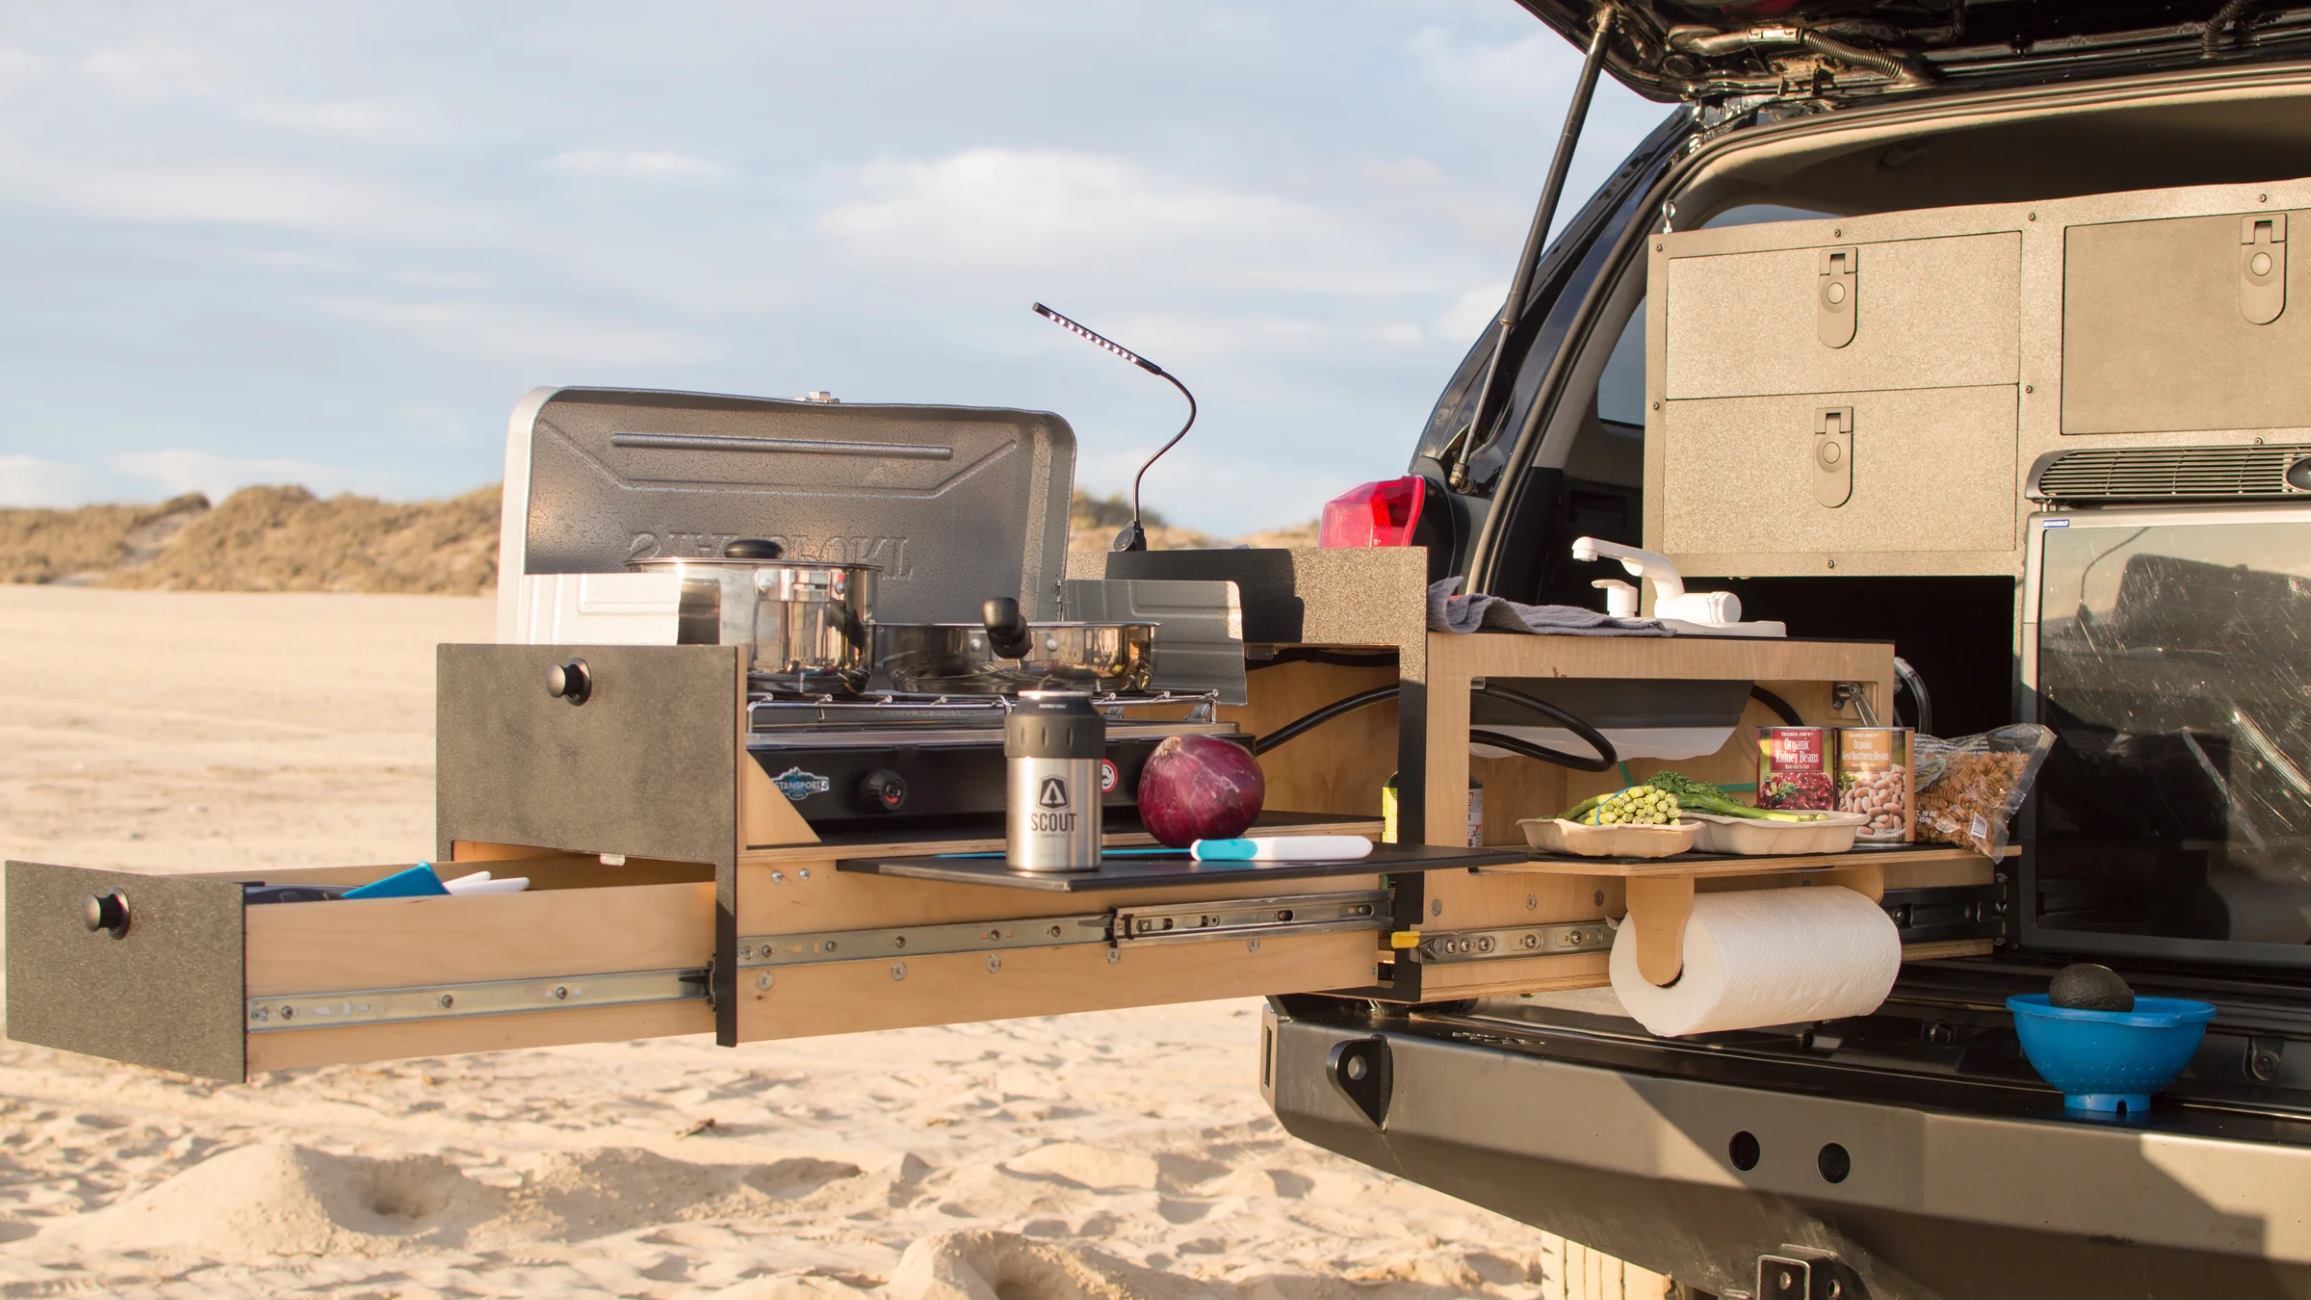
Building your own overland kitchen can be a fun and rewarding project. Whether you’re planning a weekend getaway or a long road trip, having a custom kitchen setup in your vehicle can make life on the road much easier. This guide will walk you through the basics of designing, building, and installing a functional kitchen that fits your specific needs and vehicle. With a few tools, some creativity, and a bit of elbow grease, you'll be ready to cook up delicious meals no matter where your adventures take you. Let's get started!
Getting Ready for Your Overland Kitchen Build
Gather Materials: Collect all necessary tools and materials. This includes wood, screws, hinges, a saw, a drill, and measuring tape.
Plan Your Design: Sketch out your kitchen layout. Decide where each component will go, such as the stove, sink, and storage areas.
Measure Twice, Cut Once: Measure your vehicle’s dimensions. Ensure your kitchen will fit perfectly. Double-check measurements before cutting any materials.
Safety Gear: Wear safety goggles, gloves, and a dust mask. These protect your eyes, hands, and lungs from debris and dust.
Prepare Workspace: Set up a clean, well-lit workspace. Ensure you have enough room to move around and lay out materials.
Check Tools: Ensure all tools are in good working condition. Charge any battery-operated tools beforehand.
Ventilation: Work in a well-ventilated area. This helps avoid inhaling fumes from paint or wood treatments.
Secure Materials: Use clamps to hold materials in place while cutting or drilling. This prevents slipping and ensures accuracy.
Organize Supplies: Keep screws, nails, and other small items in separate containers. This makes them easy to find and prevents losing them.
Test Fit: Before final assembly, do a dry run. Place all components in your vehicle to ensure they fit as planned.
Clear Pathways: Keep walkways clear of tools and materials. This reduces the risk of tripping or accidents.
First Aid Kit: Have a first aid kit nearby. Be prepared for minor injuries like cuts or splinters.
Essential Materials and Tools
- Plywood: Strong, versatile wood for building the main structure.
- Screws: Fasteners to hold everything together securely.
- Hinges: Allow doors and compartments to open and close smoothly.
- Drawer Slides: Enable drawers to glide in and out effortlessly.
- Handles and Knobs: Provide grip for opening doors and drawers.
- Latches: Keep doors and drawers securely closed during travel.
- Sealant: Protects wood from moisture and wear.
- Paint or Stain: Adds color and protects the wood surface.
- Sandpaper: Smooths out rough edges and surfaces.
- Measuring Tape: Ensures accurate dimensions for cutting and assembly.
- Circular Saw: Cuts plywood to the required sizes.
- Drill: Makes holes for screws and other fasteners.
- Screwdriver: Tightens screws into place.
- Clamps: Hold pieces together while assembling.
- Level: Ensures everything is even and straight.
- Pencil: Marks measurements and cutting lines.
- Safety Gear: Includes gloves, goggles, and a dust mask for protection.
These materials and tools will help you build a functional, durable overland kitchen.
Skill Level and Time Commitment
Skill Level: Intermediate
Time Required: 20-30 hours
- Planning and Design: 3-5 hours
- Gathering Materials: 2-3 hours
- Cutting and Assembling: 10-15 hours
- Installing Hardware: 2-3 hours
- Finishing Touches: 3-4 hours
Detailed Step-by-Step Guide
Plan Your Design
- Measure your vehicle's cargo area.
- Sketch a layout for your kitchen setup.
- Decide on storage, cooking, and cleaning areas.
Gather Materials
- Plywood sheets
- Screws and nails
- Hinges and drawer slides
- Handles and latches
- Paint or sealant
Cut the Wood
- Use a saw to cut plywood to your design dimensions.
- Sand edges to smooth rough spots.
Assemble the Frame
- Attach pieces using screws and nails.
- Ensure the structure is sturdy and square.
Install Drawers and Shelves
- Attach drawer slides inside the frame.
- Fit drawers into slides, ensuring smooth operation.
- Add shelves where needed for storage.
Add Hinges and Latches
- Attach hinges to doors and secure them to the frame.
- Install latches to keep doors closed during travel.
Paint or Seal
- Apply paint or sealant to protect the wood.
- Allow it to dry completely.
Install in Vehicle
- Secure the kitchen unit in your vehicle's cargo area.
- Use straps or bolts to keep it in place.
Organize Your Gear
- Place cooking equipment, utensils, and food supplies in drawers and shelves.
- Ensure everything is easily accessible.
Test Your Setup
- Take a short trip to test the kitchen.
- Make adjustments as needed for comfort and convenience.
Helpful Tips and Tricks
Plan Your Layout: Before starting, sketch your kitchen layout. Think about where you want your stove, sink, and storage.
Use Lightweight Materials: Opt for aluminum or plywood to keep the weight down. Heavy materials can affect your vehicle's performance.
Modular Design: Build in sections that can be easily removed or reconfigured. This makes repairs and adjustments simpler.
Secure Everything: Use heavy-duty latches and straps to keep items in place during travel. Loose items can become dangerous projectiles.
Waterproofing: Apply a waterproof sealant to wooden surfaces. This prevents damage from spills or rain.
Easy Access: Ensure frequently used items are within easy reach. This saves time and hassle when cooking.
Ventilation: Install vents or small fans to prevent heat buildup and odors.
Lighting: Add LED strips or battery-powered lights. Cooking in the dark is no fun.
Common Mistakes to Avoid:
Overloading: Avoid adding too many heavy items. This can strain your vehicle's suspension.
Ignoring Ventilation: Lack of airflow can lead to unpleasant smells and heat buildup.
Poor Planning: Not having a clear layout can lead to inefficient use of space.
Alternatives:
Portable Stoves: Instead of a built-in stove, consider a portable camping stove. It's flexible and can be used outside the vehicle.
Collapsible Sinks: Use a collapsible sink to save space when not in use.
Plastic Storage Bins: Instead of custom-built drawers, use plastic bins. They are lightweight and easy to clean.
Budgeting Your Overland Kitchen Project
Plywood: $50-$70 for a 4x8 sheet of 3/4" plywood.
Drawer Slides: $20-$40 per pair, depending on quality and length.
Hinges: $10-$20 for a set of basic hinges.
Handles and Knobs: $10-$30 for a set, depending on style and material.
Screws and Fasteners: $10-$15 for a box of assorted screws and fasteners.
Paint or Stain: $20-$40 for a gallon, depending on brand and finish.
Sealant: $10-$15 for a tube of waterproof sealant.
Butcher Block Countertop: $100-$200, depending on size and wood type.
Sink: $50-$100 for a basic stainless steel sink.
Faucet: $30-$60 for a basic faucet.
Water Pump: $20-$50 for a manual or electric pump.
Water Containers: $10-$30 each, depending on size and material.
Propane Stove: $50-$100 for a basic two-burner stove.
Cooler or Fridge: $100-$300, depending on size and type.
Electrical Components: $50-$100 for wiring, switches, and connectors.
Tools: If you don't already have them, you might need a circular saw ($50-$100), drill ($30-$60), screwdrivers ($10-$20), measuring tape ($5-$10), clamps ($10-$30), and sander ($20-$50).
Total Estimated Cost: $600-$1,300, depending on material choices and tool availability.
Budget-Friendly Alternatives:
- Use reclaimed wood or pallet wood for the structure.
- Opt for a used sink and faucet from a salvage yard.
- Consider a portable camping stove instead of a built-in propane stove.
- Use plastic storage bins instead of custom drawers.
- Look for discounted or second-hand tools.
Creative Variations and Customizations
Materials: Instead of using plywood, try aluminum for a lightweight, durable option. Reclaimed wood can give a rustic look while being eco-friendly. Plastic or composite materials offer water resistance.
Colors: Paint the kitchen unit in bright colors like red or yellow for visibility. Use earth tones like green or brown to blend with nature. Metallic finishes like silver or bronze can give a modern touch.
Styles: For a minimalist design, keep lines clean and storage hidden. A rustic style can include reclaimed wood and vintage hardware. Industrial style might use metal pipes and exposed bolts.
Storage: Add modular storage units that can be rearranged. Use magnetic strips for utensils. Install sliding drawers for easy access.
Countertops: Use stainless steel for durability and easy cleaning. Butcher block offers a warm, natural look. Laminate is budget-friendly and comes in various patterns.
Sink Options: Install a collapsible sink to save space. Use a portable camping sink for flexibility. Consider a built-in sink with a water pump for convenience.
Cooking Surfaces: A portable stove can be moved around. Built-in gas burners offer stability. Induction cooktops are safe and energy-efficient.
Lighting: Use LED strip lights for energy efficiency. Solar-powered lights are eco-friendly. Battery-operated lanterns provide portability.
Power Sources: Install a solar panel system for renewable energy. Use a portable generator for more power. Battery packs can be a lightweight option.
Water Storage: Use collapsible water containers to save space. Install a built-in water tank for convenience. Portable water jugs offer flexibility.
Refrigeration: A portable cooler is easy to move. 12V fridges can be powered by your vehicle. Thermoelectric coolers are energy-efficient.
Customization: Add personal touches like decals or stickers. Use custom handles and knobs for a unique look. Install hooks and racks for extra storage.
Eco-Friendly Building Tips
Reclaimed Wood: Use old pallets or barn wood for countertops and cabinets. Sand them down and apply a non-toxic sealant for a polished look.
Bamboo: This fast-growing plant makes excellent cutting boards, utensils, and even countertops. It's durable and eco-friendly.
Recycled Metal: Salvage metal from old appliances or scrap yards for drawer handles, brackets, and other hardware. It adds a rustic touch while reducing waste.
Natural Paints: Choose paints made from natural ingredients like clay, milk, or plant oils. These are free from harmful chemicals and better for the environment.
Solar Power: Install a small solar panel to power lights and small appliances. This reduces reliance on traditional energy sources.
Insulation: Use recycled denim or wool for insulating your kitchen setup. These materials are effective and sustainable.
Reusable Containers: Opt for glass jars or stainless steel containers for storing food and spices. They last longer and reduce plastic waste.
Water Filtration: Install a portable water filter system to ensure clean drinking water without relying on single-use plastic bottles.
Composting: Set up a small compost bin for food scraps. This reduces waste and provides nutrient-rich soil for any plants you might have.
Upcycled Fabrics: Use old curtains, tablecloths, or clothes to make dish towels, napkins, or even seat cushions. This gives new life to old textiles.
Eco-Friendly Adhesives: Choose adhesives that are free from volatile organic compounds (VOCs). These are better for your health and the planet.
Your Overland Kitchen Awaits
Building your own overland kitchen isn't just about saving money; it's about creating something that fits your needs perfectly. You've learned how to plan, gather materials, and put everything together. Now, it's time to hit the road and enjoy the fruits of your labor. Remember, the key is to keep things simple and functional. Don't stress over perfection. The beauty of DIY projects lies in their uniqueness and personal touch. If something doesn't work out as planned, it's all part of the learning process. So, pack up your gear, load up your new kitchen, and get out there. Adventure awaits, and now you're more prepared than ever to tackle it head-on. Happy travels!
What materials do I need for an overland kitchen build?
You'll need plywood, screws, hinges, drawer slides, and sealant. For the countertop, consider stainless steel or butcher block. Don't forget paint or varnish to protect the wood.
How much space do I need in my vehicle?
Measure your cargo area first. Most overland kitchens fit in SUVs or trucks with a flatbed. You need enough room for drawers, a stove, and storage.
Can I install a sink in my overland kitchen?
Absolutely! A small sink with a water pump and jerry can for fresh water works great. Make sure to have a drain system to manage wastewater.
How do I secure the kitchen in my vehicle?
Use bolts and brackets to attach the kitchen to the vehicle frame. Ratchet straps can also help keep everything in place during bumpy rides.
What kind of stove should I use?
A portable propane stove is popular. It's easy to use and store. Some folks prefer a built-in option, but it requires more planning and space.
How do I ensure my kitchen is weatherproof?
Use weather-resistant materials like marine-grade plywood. Apply sealant to all wood surfaces. Store items in waterproof containers to keep them dry.
Can I add a fridge to my overland kitchen?
Yes, a 12V fridge is a great addition. Make sure your vehicle has a dual battery system to power it without draining your main battery.