
Home>Home & Furniture>Kitchen>DIY Kitchen Cabinet Makeover: Step-by-step Guide
Kitchen
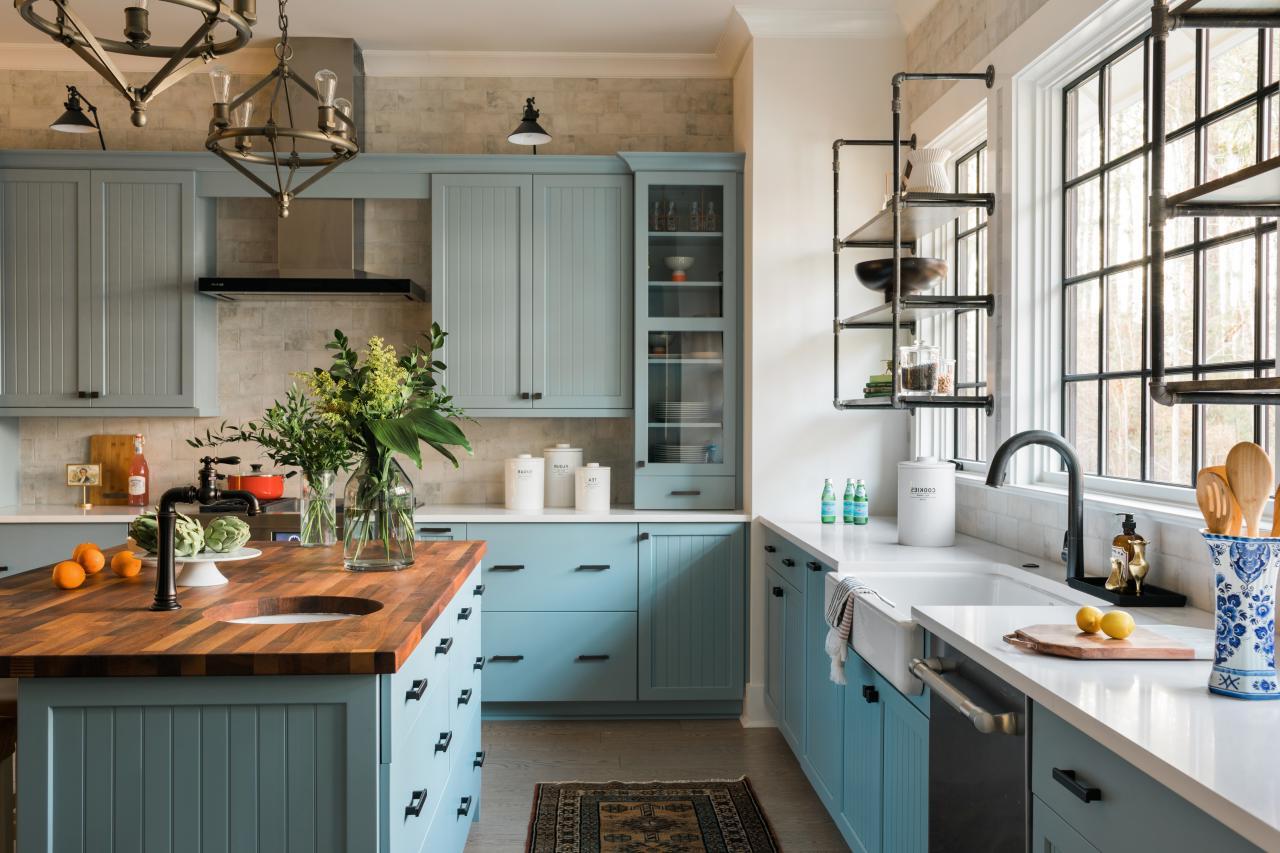
DIY Kitchen Cabinet Makeover: Step-by-step Guide
Published: August 1, 2024
Transform your kitchen with our DIY cabinet makeover guide! Step-by-step instructions, tips, and tricks to give your cabinets a fresh, new look. Perfect for any skill level!
(Many of the links in this article redirect to a specific reviewed product. Your purchase of these products through affiliate links helps to generate commission for Twigandthistle.com, at no extra cost. Learn more)
Revamping your kitchen can seem pricey, but a DIY cabinet makeover offers a budget-friendly solution. With some effort, you can turn old cabinets into eye-catching features without breaking the bank. This guide will show you how to tackle this project step-by-step, whether you're an experienced DIYer or just starting out. From removing old paint to adding new hardware, transforming your kitchen has never been more accessible. Roll up your sleeves, and let's get started on making your kitchen cabinets the highlight of your home. Ready to dive into this rewarding project?
Getting Ready for Your Project
Gather Supplies: Get all necessary tools and materials like sandpaper, paint, brushes, primer, screwdrivers, drop cloths, and painter's tape.
Clear the Area: Remove everything from the cabinets. Clear countertops and cover them with drop cloths to protect from dust and paint.
Label and Remove Doors: Label each cabinet door and drawer with painter's tape to remember their positions. Use a screwdriver to remove doors, drawers, and hardware.
Clean Thoroughly: Clean all surfaces with a degreaser to remove grease and grime. This helps paint stick better.
Sand Surfaces: Lightly sand all surfaces to create a smooth base for painting. Wipe away dust with a damp cloth.
Fill Holes and Cracks: Use wood filler to fill any holes or cracks. Let it dry and sand smooth.
Set Up Workspace: Create a painting station in a well-ventilated area. Lay out drop cloths and set up sawhorses or tables to place doors and drawers.
Safety First: Wear safety goggles, gloves, and a mask to protect from dust and fumes. Ensure good ventilation by opening windows or using fans.
Prime Surfaces: Apply a coat of primer to all surfaces. This helps paint adhere better and provides a uniform base color.
Let Primer Dry: Allow primer to dry completely according to the manufacturer's instructions before moving on to painting.
Gathering Materials and Tools
- Screwdriver: Used to remove cabinet doors and hardware.
- Sandpaper: Smooths out surfaces and removes old paint or finish.
- Painter's Tape: Protects areas you don't want to paint.
- Drop Cloths: Keeps floors and countertops clean from paint drips.
- Paint Brushes and Rollers: Applies paint evenly on cabinets.
- Primer: Prepares the surface for paint, ensuring better adhesion.
- Paint: Gives cabinets a fresh, new look.
- Wood Filler: Fills in any holes or dents in the cabinets.
- Putty Knife: Spreads wood filler smoothly.
- Degreaser: Cleans cabinets, removing grease and grime.
- Drill: Reattaches doors and hardware quickly.
- New Hardware: Updates the look of cabinets with new knobs or handles.
- Measuring Tape: Ensures accurate placement of new hardware.
- Sponge or Cloth: Wipes down cabinets after cleaning and sanding.
- Buckets: Holds water for cleaning and rinsing.
- Protective Gear: Gloves and masks to keep safe from dust and fumes.
Skill Level and Time Commitment
Skill Level: Intermediate
Time Required: 2-3 days
- Removing Cabinet Doors and Hardware: 1-2 hours
- Cleaning and Sanding: 3-4 hours
- Priming: 2-3 hours (including drying time)
- Painting: 4-6 hours (including drying time between coats)
- Reattaching Doors and Hardware: 1-2 hours
Detailed Instructions for Your Makeover
Remove Cabinet Doors and Hardware
- Use a screwdriver to take off doors, hinges, and handles.
- Keep screws and hardware in labeled bags for easy reassembly.
Clean the Cabinets
- Mix warm water and mild dish soap.
- Scrub all surfaces with a sponge to remove grease and grime.
- Let everything dry completely.
Sand the Surfaces
- Use medium-grit sandpaper (120-150 grit) to roughen up the surface.
- Wipe away dust with a damp cloth.
Fill Any Holes or Dents
- Apply wood filler to any imperfections.
- Let it dry, then sand smooth with fine-grit sandpaper (220 grit).
Prime the Cabinets
- Apply a coat of primer using a brush or roller.
- Allow it to dry according to the manufacturer's instructions.
Paint the Cabinets
- Use a high-quality paint designed for cabinets.
- Apply the first coat with a brush or roller, then let it dry.
- Lightly sand between coats with fine-grit sandpaper.
- Apply a second coat and let it dry completely.
Seal the Paint
- Apply a clear polyurethane sealer for extra durability.
- Let it dry thoroughly.
Reattach Doors and Hardware
- Use the labeled bags to find the correct screws and hardware.
- Reattach doors, hinges, and handles to the cabinets.
Install New Knobs or Handles (Optional)
- Measure and mark where new hardware will go.
- Drill holes if necessary, then attach new knobs or handles.
Clean Up
- Dispose of any trash and clean your workspace.
- Enjoy your newly refreshed kitchen cabinets!
Helpful Tips and Tricks
Clean Thoroughly: Before starting, clean cabinets with a degreaser to remove grime and grease. This ensures paint or stain adheres properly.
Label Doors and Hardware: Use masking tape to label each door and its corresponding hardware. This makes reassembly easier.
Sand Lightly: Sand cabinets lightly to create a smooth surface for painting or staining. Use fine-grit sandpaper to avoid damaging the wood.
Use Primer: Apply a primer before painting. Primer helps the paint stick better and provides a more even finish.
Choose Quality Paint: Use high-quality paint designed for cabinets. It’s more durable and easier to clean.
Use a Foam Roller: For a smooth finish, use a foam roller instead of a brush. This reduces brush marks and gives a professional look.
Seal with Polyurethane: After painting, seal cabinets with a clear polyurethane coat. This adds durability and protects against scratches.
Common Mistakes to Avoid:
- Skipping Cleaning: Not cleaning cabinets thoroughly can cause paint to peel.
- Not Labeling: Forgetting to label doors and hardware can lead to confusion during reassembly.
- Skipping Primer: Skipping primer can result in uneven paint and poor adhesion.
- Rushing: Rushing the process can lead to mistakes. Take your time for the best results.
Alternatives:
- Peel-and-Stick Veneer: Instead of painting, use peel-and-stick veneer for a quick update.
- Gel Stain: For a different look, consider using gel stain. It’s easier to apply and doesn’t require stripping the old finish.
- Cabinet Refacing Kits: These kits include everything needed to reface cabinets, including new doors and drawer fronts.
Estimating the Cost
Paint: A gallon of high-quality cabinet paint costs around $40-$50. You might need two gallons, so budget $80-$100.
Primer: A gallon of primer costs about $20-$30. One gallon should be enough.
Sandpaper: A pack of assorted sandpaper (coarse, medium, fine) costs around $10.
Painter's Tape: A roll costs about $5.
Brushes and Rollers: A set of good-quality brushes and rollers costs around $20-$30.
Drop Cloths: A pack of disposable drop cloths costs about $10.
Cleaning Supplies: Degreaser and cleaning cloths cost around $10.
New Hardware: New handles or knobs cost between $2-$5 each. For 20 cabinets, budget $40-$100.
Optional: Paint Sprayer: Renting a paint sprayer costs around $40 per day. Buying one costs around $100-$150.
Total Estimated Cost: $195-$335 without a paint sprayer, $235-$485 with a paint sprayer.
Budget-Friendly Alternatives:
- Use leftover paint from other projects.
- Borrow tools like sanders or paint sprayers from friends or family.
- Buy hardware in bulk or look for sales.
- Use old sheets instead of drop cloths.
Different Ways to Customize
Alternative Materials:
- Wood Veneer: Instead of paint, cover cabinets with wood veneer for a natural look.
- Contact Paper: Use adhesive contact paper for a quick, temporary change.
- Chalkboard Paint: Apply chalkboard paint to cabinet doors for a fun, writable surface.
- Glass Inserts: Replace solid doors with glass inserts to showcase dishes.
Colors:
- Bold Colors: Choose bright colors like teal, red, or yellow for a vibrant kitchen.
- Neutral Tones: Opt for whites, grays, or beiges for a classic, timeless look.
- Two-Tone: Paint upper cabinets one color and lower cabinets another for contrast.
- Distressed Finish: Use techniques to create a weathered, vintage appearance.
Styles:
- Modern: Go for sleek, flat-panel doors with minimal hardware.
- Rustic: Add barn-style doors or use reclaimed wood for a cozy, farmhouse feel.
- Shaker: Install simple, clean-lined shaker-style doors for a versatile look.
- Industrial: Incorporate metal accents and dark colors for an edgy, urban vibe.
Hardware:
- Handles and Knobs: Swap out old hardware for new, stylish handles or knobs.
- Soft-Close Hinges: Install soft-close hinges for a quieter, more luxurious experience.
- Pull-Out Shelves: Add pull-out shelves inside cabinets for better organization.
Additional Features:
- Under-Cabinet Lighting: Install LED strips or puck lights for better visibility.
- Crown Molding: Add crown molding to the tops of cabinets for a finished look.
- Open Shelving: Remove some doors to create open shelving for a modern touch.
Eco-Friendly Tips
Step 1: Assess Your Cabinets
Check the condition of your existing cabinets. If they are structurally sound, you can reuse them instead of buying new ones. This reduces waste and saves money.
Step 2: Remove Cabinet Doors and Hardware
Carefully take off the cabinet doors, hinges, and handles. Keep the hardware if it's in good shape. Reusing hardware is both eco-friendly and cost-effective.
Step 3: Clean and Sand
Clean the surfaces with a mixture of vinegar and water. Sand the cabinets lightly to remove old paint or varnish. Use recycled sandpaper if available.
Step 4: Choose Eco-friendly Paint
Select low-VOC or zero-VOC paint. These paints emit fewer harmful chemicals, making them better for indoor air quality and the environment.
Step 5: Apply Primer
Use a water-based primer to prepare the surface for painting. Water-based primers are less toxic and more environmentally friendly.
Step 6: Paint the Cabinets
Apply the eco-friendly paint in thin, even coats. Allow each coat to dry completely before adding another. This ensures a smooth, durable finish.
Step 7: Replace or Reuse Hardware
If your old hardware is in good condition, reuse it. If not, look for recycled or sustainable options. Many companies offer handles and knobs made from recycled materials.
Step 8: Reassemble
Once the paint is dry, reattach the doors and hardware. Make sure everything is securely fastened.
Step 9: Add Eco-friendly Finishing Touches
Consider adding bamboo or recycled glass countertops for a complete eco-friendly kitchen makeover. These materials are sustainable and add a unique touch to your kitchen.
Step 10: Dispose of Waste Responsibly
Recycle any leftover materials or paint cans. Many communities have special programs for disposing of hazardous materials like paint.
Your Kitchen, Your Masterpiece
You've got all the tools and tips to transform your kitchen cabinets. From sanding to painting, each step brings you closer to a fresh, new look. Remember, patience is key. Rushing through can lead to mistakes. Take your time with each stage, ensuring you get the best results. Don't forget to seal your hard work with a good finish. This not only protects but also enhances the beauty of your cabinets. If you hit a snag, don't stress. DIY projects often come with unexpected challenges. Embrace them as learning opportunities. Your kitchen is more than just a place to cook; it's a reflection of your creativity and effort. So, roll up those sleeves, grab your tools, and get started. Your dream kitchen is just a few steps away. Happy renovating!
How do I prep my kitchen cabinets for painting?
First, remove all cabinet doors and hardware. Clean them with a degreaser to get rid of any grime. Sand the surfaces lightly to help the paint stick better. Wipe off the dust with a damp cloth.
What type of paint should I use for kitchen cabinets?
Use a high-quality latex or oil-based paint. Latex is easier to clean up and dries faster, but oil-based paint is more durable. Choose a semi-gloss or satin finish for easy cleaning.
Do I need to use a primer before painting?
Yes, using a primer is crucial. It helps the paint adhere better and provides a smooth finish. Choose a stain-blocking primer if your cabinets have any stains or dark wood.
How many coats of paint are necessary?
Usually, two coats of paint are enough. Apply the first coat, let it dry completely, then lightly sand before applying the second coat. This ensures a smooth and even finish.
Can I paint over laminate cabinets?
Yes, you can paint over laminate cabinets, but you need to use a special primer designed for laminate surfaces. Sand the laminate lightly before applying the primer to help it adhere better.
How long does the whole process take?
The entire process can take a few days to a week, depending on the size of your kitchen and drying times between coats. Patience is key for a professional-looking finish.
What tools and materials will I need?
You'll need screwdrivers for removing hardware, sandpaper, degreaser, primer, paint, paintbrushes, rollers, and drop cloths. Having everything ready before you start will make the process smoother.