
Home>Home & Furniture>Garage & Basement>DIY Guide: Basement Bathroom Plumbing
Garage & Basement
DIY Guide: Basement Bathroom Plumbing
Published: August 30, 2024
Transform your basement with our DIY guide to basement bathroom plumbing. Step-by-step instructions, expert tips, and essential tools for a seamless installation.
(Many of the links in this article redirect to a specific reviewed product. Your purchase of these products through affiliate links helps to generate commission for Twigandthistle.com, at no extra cost. Learn more)
Adding a bathroom to your basement might seem like a big project, but with some planning and effort, you can get it done. This DIY guide will help you understand the basics of basement bathroom plumbing. From understanding the layout to choosing the right tools and materials, we will cover everything you need. Whether you’re dealing with concrete floors or looking to install a sump pump, this guide aims to make the process more manageable. Roll up your sleeves, gather your tools, and get ready to transform your basement into a functional space with a new bathroom.
Getting Ready for Your Project
Plan Your Layout: Sketch the bathroom layout. Mark where the toilet, sink, and shower will go. This helps visualize the project and ensures everything fits.
Check Local Codes: Research local building codes. Some areas have specific rules for basement plumbing. This step avoids future problems.
Gather Tools and Materials: Collect necessary tools like a pipe cutter, wrench, and plunger. Buy materials such as pipes, fittings, and sealant. Having everything ready saves time.
Turn Off Water Supply: Locate the main water valve and turn it off. This prevents water from flooding the workspace.
Safety Gear: Wear gloves, goggles, and a mask. These protect against debris and harmful fumes.
Clear the Area: Remove any obstacles. A clean workspace reduces accidents and makes moving around easier.
Mark Pipe Routes: Use chalk or tape to mark where pipes will run. This ensures accurate cuts and connections.
Ventilation: Ensure proper ventilation. Open windows or use fans. This helps clear out fumes from adhesives and sealants.
Test Drainage: Before installing fixtures, test the drainage system. Pour water into the pipes to check for leaks or blockages.
Have a Helper: Enlist a friend or family member. Extra hands make lifting and positioning pipes easier.
Gathering Necessary Supplies
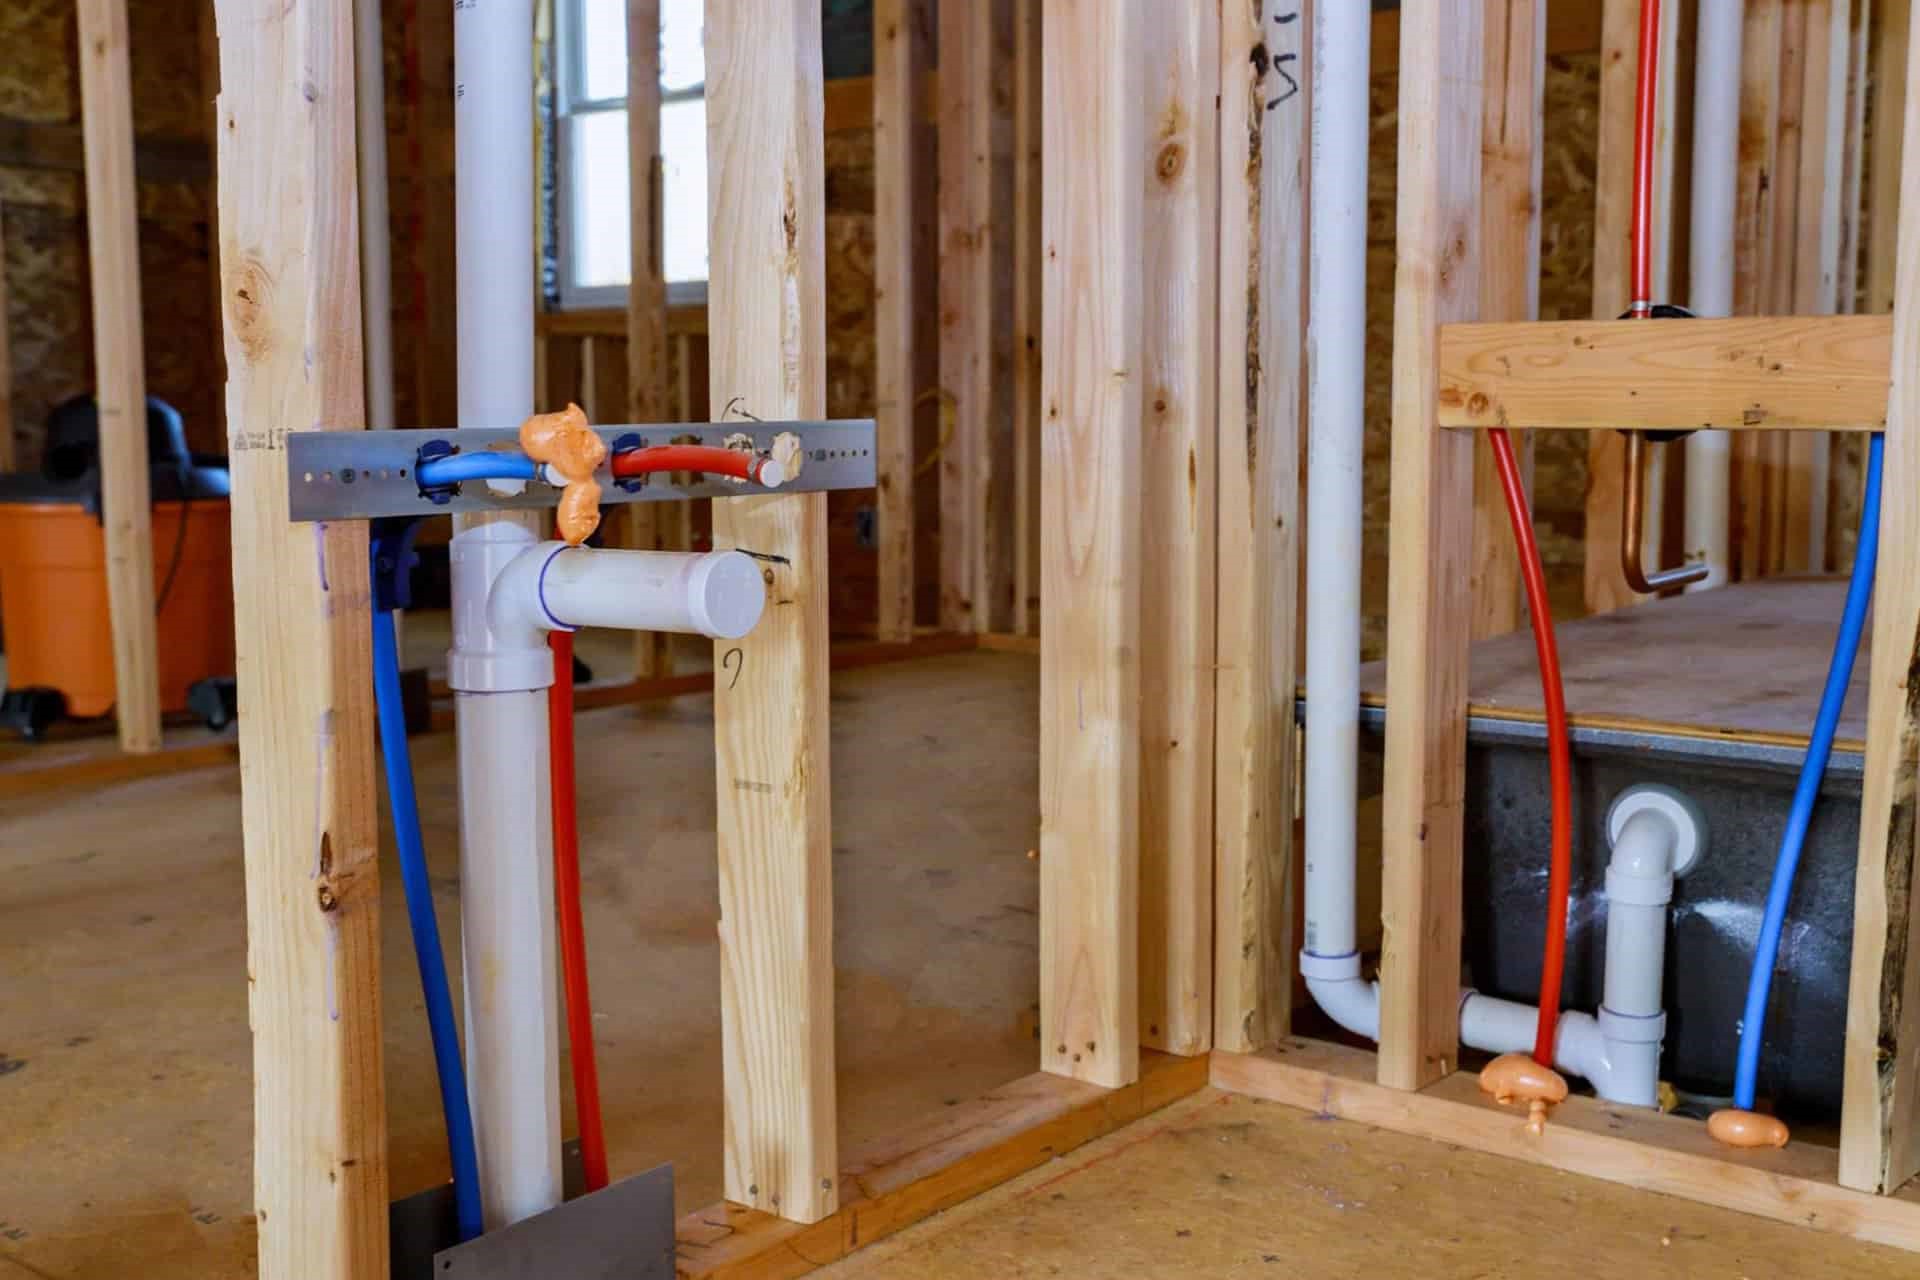
- PVC Pipes and Fittings: These are essential for the drainage system. They connect sinks, toilets, and showers to the main sewer line.
- Pipe Cutter: Used to cut PVC pipes to the required lengths.
- PVC Cement and Primer: These adhesives ensure a watertight seal between pipe connections.
- P-Trap: This U-shaped pipe prevents sewer gases from entering the bathroom.
- Toilet Flange: Connects the toilet to the drain pipe and secures it to the floor.
- Wax Ring: Creates a seal between the toilet and the flange to prevent leaks.
- Shower Pan: A waterproof base for the shower that directs water to the drain.
- Drain Assembly: Includes the drain cover and the pipes that connect to the main drain line.
- Vent Pipes: Allow air to enter the plumbing system, preventing vacuum and ensuring smooth drainage.
- Teflon Tape: Used on threaded pipe joints to prevent leaks.
- Adjustable Wrench: Tightens and loosens nuts and bolts.
- Pipe Wrench: Grips and turns pipes.
- Level: Ensures pipes and fixtures are installed straight.
- Measuring Tape: Measures distances and pipe lengths accurately.
- Bucket: Catches water during pipe cutting or fitting removal.
- Safety Gear: Includes gloves, goggles, and a mask to protect against dust and debris.
- Stud Finder: Locates wall studs for secure mounting of fixtures.
- Drill and Bits: Drills holes for screws and anchors.
- Hacksaw: Cuts through metal pipes if needed.
- Plumber’s Putty: Seals joints and fixtures to prevent leaks.
Required Skills and Time Commitment
Skill Level: Advanced
Time Required: 3-5 days
- Planning and Permits: 1 day
- Rough-In Plumbing: 1-2 days
- Installing Fixtures: 1 day
- Finishing Touches: 1 day
Detailed Steps to Follow
Plan the Layout
- Decide where fixtures like the toilet, sink, and shower will go.
- Check local building codes for plumbing requirements.
Gather Materials
- Pipes (PVC or ABS)
- Fittings (elbows, tees, couplings)
- Pipe cement and primer
- Plumber’s tape
- Drain assembly and P-traps
- Venting pipes
- Tools (pipe cutter, wrench, level, tape measure)
Turn Off Water Supply
- Locate the main water shut-off valve.
- Turn it off to prevent water flow during installation.
Excavate the Floor
- Mark the areas where pipes will be laid.
- Use a jackhammer to break the concrete.
- Dig trenches for the pipes.
Install Drain Lines
- Lay out the main drain line from the bathroom to the main sewer line.
- Connect smaller drain lines from each fixture to the main drain.
- Ensure proper slope (1/4 inch per foot) for drainage.
Install Vent Pipes
- Connect vent pipes to the drain lines.
- Run vent pipes vertically to the roof or an existing vent stack.
Connect Water Supply Lines
- Run hot and cold water lines to each fixture.
- Use plumber’s tape on threaded connections to prevent leaks.
- Secure pipes with brackets.
Install Fixtures
- Position the toilet, sink, and shower in their designated spots.
- Connect each fixture to the corresponding drain and water supply lines.
Test the System
- Turn the water supply back on.
- Check for leaks at all connections.
- Flush the toilet and run water in the sink and shower to ensure proper drainage.
Backfill and Patch the Floor
- Once everything is working, backfill the trenches with gravel.
- Pour new concrete to patch the floor.
Finish the Bathroom
- Install flooring, walls, and any other finishing touches.
- Ensure all fixtures are securely in place and functioning properly.
Helpful Hints and Advice
Plan your layout before starting. Knowing where pipes, drains, and fixtures will go helps avoid mistakes. Measure twice, cut once to ensure accuracy.
Use a laser level to ensure pipes are straight. This prevents water flow issues later. Dry-fit all pipes and fittings before gluing to check for proper fit.
Install a backwater valve to prevent sewage backup. This is crucial in basements. Use PEX tubing instead of copper for easier installation and flexibility.
Ventilation is key. Proper venting prevents sewer gases from entering your home. Check local codes to ensure compliance with regulations.
Common mistakes to avoid: Not sloping drain pipes correctly can cause clogs. Using the wrong type of glue for PVC pipes can lead to leaks. Forgetting to install a vent pipe can result in poor drainage.
Alternatives: Instead of traditional PVC, consider ABS pipes for better durability. For venting, air admittance valves can be used if running a vent pipe is difficult.
Budgeting for Your Project
Pipes and Fittings: $200-$300
Toilet: $100-$200
Sink: $50-$150
Shower or Bathtub: $200-$500
Drainage System: $100-$200
Water Heater: $300-$600
Ventilation Fan: $50-$100
Waterproofing Materials: $50-$100
Tile and Grout: $100-$300
Drywall and Insulation: $100-$200
Paint: $20-$50
Plumbing Tools: $100-$200
Miscellaneous Supplies: $50-$100
Total Estimated Cost: $1,420-$3,000
Budget-Friendly Alternatives:
- Toilet: Basic models for $50-$100
- Sink: Used or discounted sinks for $20-$50
- Shower or Bathtub: Second-hand options for $100-$200
- Water Heater: Smaller units for $150-$300
- Tile and Grout: Vinyl flooring for $50-$100
- Plumbing Tools: Borrow from friends or rent for $50-$100
Personalizing Your Space
Pipes: Use PVC for affordability or copper for durability. PEX tubing offers flexibility and ease of installation.
Fixtures: Choose chrome for a modern look, brushed nickel for a classic touch, or oil-rubbed bronze for a rustic feel.
Toilets: Install a standard toilet for simplicity or a tankless model for a sleek design. Consider a dual-flush system to save water.
Sinks: Opt for a pedestal sink to save space, a vanity sink for extra storage, or a wall-mounted sink for a minimalist style.
Showers: Use prefabricated shower kits for easy installation or custom-tiled showers for a personalized touch. Add a rainfall showerhead for luxury.
Flooring: Tile is durable and water-resistant, vinyl is budget-friendly and easy to install, or concrete for an industrial look.
Walls: Use waterproof drywall or cement board behind tiles. Paint with mold-resistant paint for added protection.
Lighting: Install recessed lighting for a clean look, vanity lights for focused illumination, or LED strips for modern ambiance.
Ventilation: Add a ceiling fan for basic ventilation or a humidity-sensing fan for automatic moisture control.
Storage: Use built-in shelves for a seamless look, freestanding cabinets for flexibility, or floating shelves for a contemporary feel.
Eco-Friendly Project Ideas
Reclaimed Wood: Use reclaimed wood for vanities or shelving. It adds character and reduces waste.
Low-Flow Fixtures: Install low-flow toilets and faucets. They save water and lower utility bills.
PEX Piping: Choose PEX piping over traditional copper. It’s flexible, easier to install, and has a lower environmental impact.
Recycled Tiles: Opt for tiles made from recycled materials. They look great and help reduce landfill waste.
Eco-Friendly Insulation: Use insulation made from recycled denim or cellulose. It’s effective and better for the environment.
LED Lighting: Install LED lights. They use less energy and last longer than traditional bulbs.
Water-Based Sealants: Use water-based sealants and adhesives. They emit fewer harmful chemicals.
Salvaged Fixtures: Look for salvaged sinks, tubs, or toilets. They can be refurbished and add a unique touch.
Dual-Flush Toilets: Consider dual-flush toilets. They offer two flush options, saving water with each use.
Compostable Materials: Use compostable or biodegradable materials where possible. They break down naturally and reduce waste.
Your Basement Bathroom Awaits
You've got the know-how to tackle basement bathroom plumbing. From planning the layout to installing pipes and fixtures, each step brings you closer to a functional space. Remember, patience and precision are key. Double-check measurements, ensure proper sealing, and test for leaks. If something seems off, don't hesitate to consult a professional. Your hard work will pay off with a bathroom that adds value and convenience to your home. So, roll up those sleeves, gather your tools, and get started. Your basement bathroom is just a few steps away from becoming a reality. Happy plumbing!
How do I start planning for a basement bathroom?
First, measure your space. Know where existing plumbing lines are. Sketch a layout with the toilet, sink, and shower. Check local codes for permits and requirements.
What tools and materials will I need?
You'll need PVC pipes, pipe cement, a pipe cutter, wrenches, a drill, and safety gear. Don't forget a toilet, sink, and shower fixtures.
How do I connect to the main sewer line?
Locate the main sewer line. Dig a trench from your bathroom to the line. Use a Y-fitting to connect. Ensure the slope of the pipe allows for proper drainage.
Do I need a sump pump?
If your sewer line is above the basement floor, yes. A sump pump will lift wastewater up to the sewer line. Choose one with enough power for your needs.
How do I install a toilet in the basement?
Place the flange on the floor. Connect the drain pipe to the flange. Secure the toilet to the flange with bolts. Attach the water supply line.
Can I install a shower in my basement bathroom?
Absolutely! Use a pre-fabricated shower pan or build a custom base. Connect the drain to your plumbing. Install walls and fixtures.
What should I do if I encounter a plumbing issue?
Turn off the water supply immediately. Check for leaks or blockages. If unsure, call a professional plumber. Better safe than sorry!