
Home>Home & Furniture>Garage & Basement>DIY Garage Hooks: Organize Your Space Efficiently
Garage & Basement
DIY Garage Hooks: Organize Your Space Efficiently
Published: September 28, 2024
Discover how to efficiently organize your garage with DIY hooks. Learn step-by-step instructions, tips, and tricks to maximize your space and keep everything in order.
(Many of the links in this article redirect to a specific reviewed product. Your purchase of these products through affiliate links helps to generate commission for Twigandthistle.com, at no extra cost. Learn more)
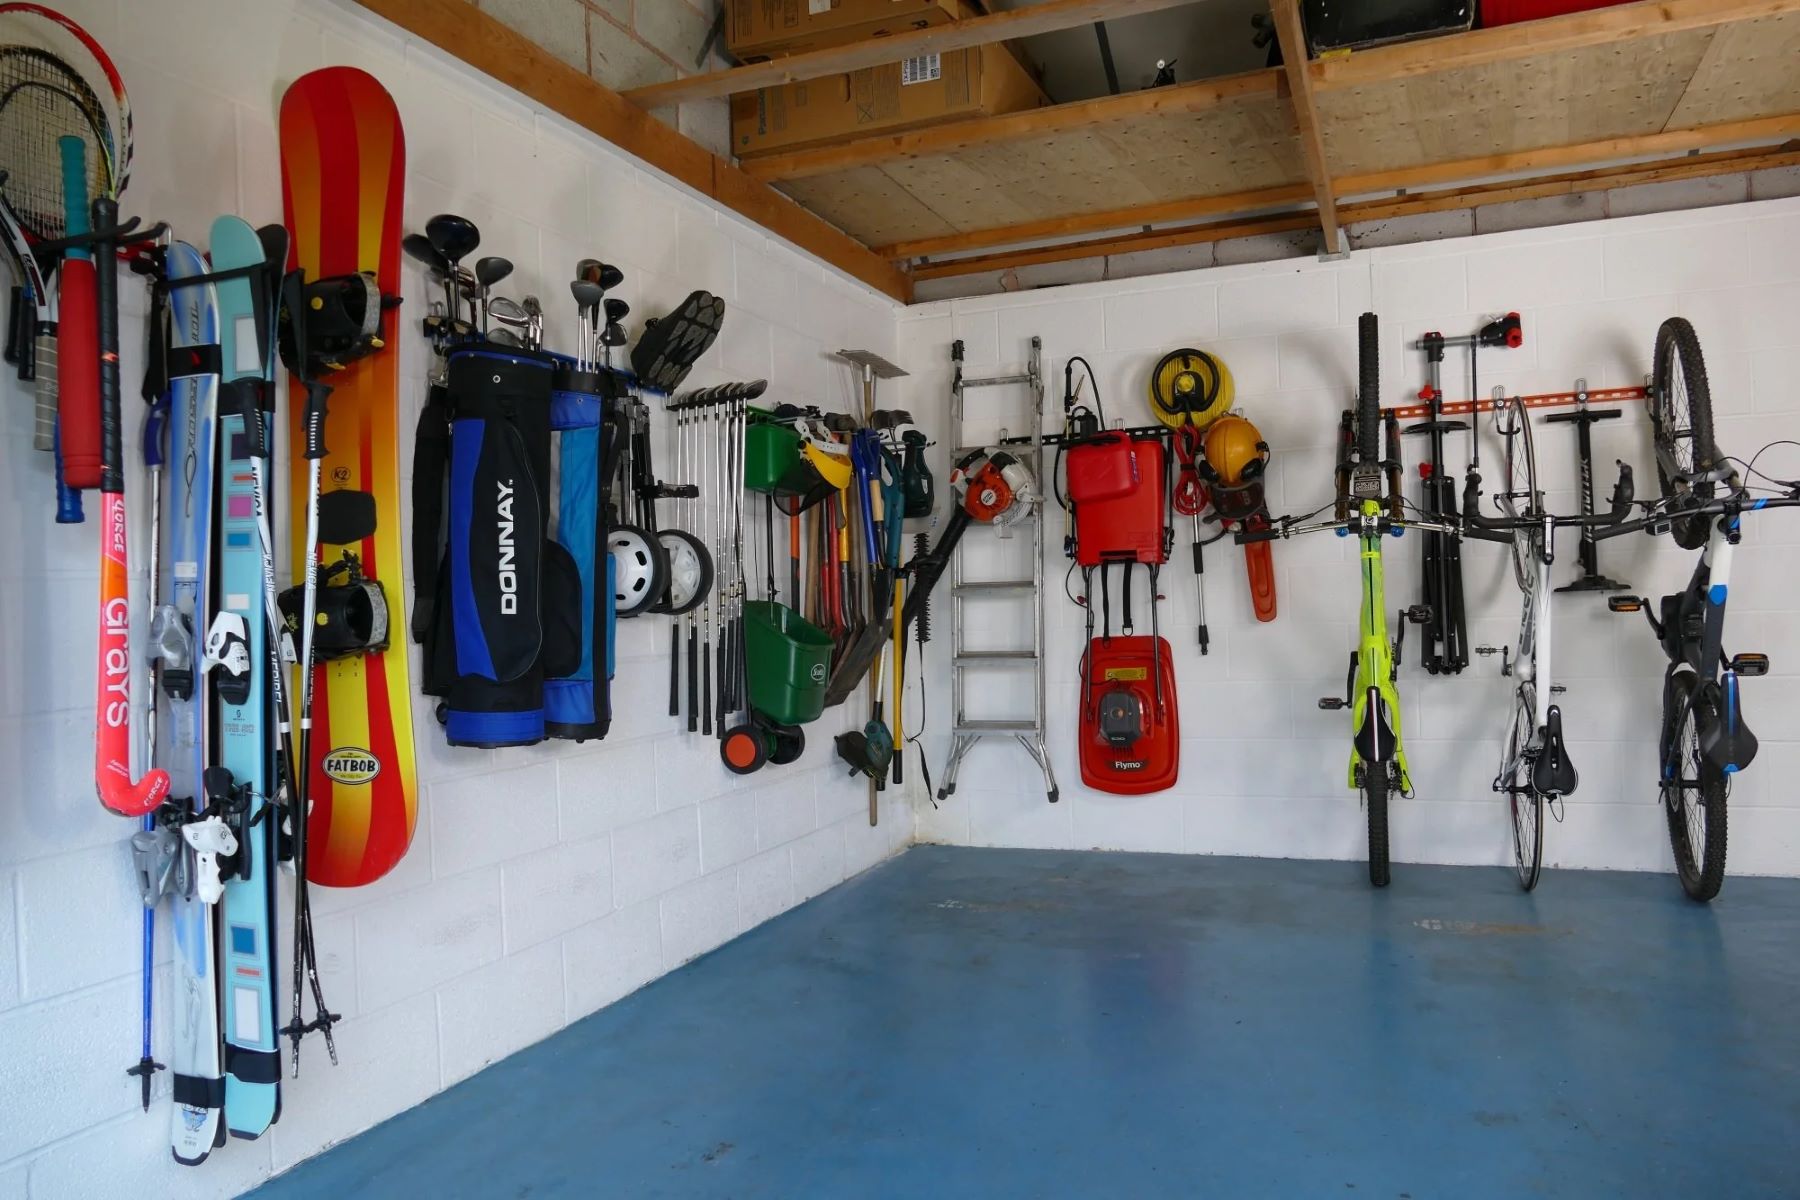
Garages often become cluttered with tools, bikes, and other items, making it hard to find what you need. One easy way to tackle this mess is by using DIY garage hooks. These simple tools can transform your space into a well-organized area where everything has its place. Not only do hooks help maximize storage, but they also keep items off the floor, making your garage safer. You don’t need to be a professional to install them either; with a few basic tools and some patience, anyone can do it. Ready to clean up and reclaim your garage space?
Getting Ready for Your Project
Gather Materials: Collect hooks, screws, a drill, a stud finder, a measuring tape, a pencil, and safety gear like gloves and goggles.
Safety First: Wear gloves to protect hands and goggles to shield eyes from debris.
Clear the Area: Move items away from the walls where hooks will be installed. This ensures a clutter-free workspace.
Find Studs: Use a stud finder to locate wall studs. Mark these spots with a pencil. Hooks anchored in studs hold more weight.
Measure and Mark: Measure where each hook will go. Mark these spots with a pencil, ensuring they are level and evenly spaced.
Pre-Drill Holes: Use a drill to make small pilot holes at the marked spots. This makes it easier to insert screws.
Install Hooks: Align hooks with the pre-drilled holes. Use screws to secure them firmly into the wall.
Test Stability: Gently tug on each hook to ensure they are securely fastened.
Organize Items: Hang tools, bikes, or other items on the hooks. Arrange them in a way that maximizes space and accessibility.
Gather Your Materials and Tools
Hooks: Choose heavy-duty hooks that can support the weight of your items. Look for ones with a rubber coating to prevent scratches.
Screws: Use sturdy screws that match the size of your hooks. Ensure they are long enough to secure the hooks into the wall studs.
Wall Anchors: If you can't find a stud, use wall anchors to provide extra support. These prevent the hooks from pulling out of the drywall.
Drill: A power drill makes it easier to create holes for your screws and anchors. Use a drill bit that matches the size of your screws.
Stud Finder: This tool helps locate wall studs behind the drywall. Mounting hooks on studs ensures they can hold heavier items.
Level: Ensures your hooks are straight. A level helps keep everything aligned, making your garage look neat.
Measuring Tape: Measure the distance between hooks to ensure even spacing. This helps in organizing items efficiently.
Pencil: Mark spots on the wall where you plan to drill. This helps in accurate placement of hooks.
Screwdriver: Tighten screws into the wall anchors or studs. A screwdriver ensures the hooks are securely fastened.
Safety Glasses: Protect your eyes from dust and debris while drilling. Safety glasses are essential for any DIY project.
Work Gloves: Protect your hands from sharp edges and splinters. Work gloves provide a better grip on tools and materials.
Required Skills and Time Commitment
Skill Level: Beginner
Time Required: 1-2 hours
- Gather Materials: 10 minutes
- Measure and Mark: 15 minutes
- Drill Holes: 20 minutes
- Install Hooks: 30 minutes
- Organize Items: 20-30 minutes
Instructions for Building Garage Hooks
Gather Materials
- Hooks (various sizes)
- Screws
- Drill
- Screwdriver
- Stud finder
- Measuring tape
- Pencil
Plan Hook Placement
- Decide what items you will hang.
- Measure the space where hooks will go.
- Mark spots with a pencil.
Find Studs
- Use a stud finder to locate studs in the wall.
- Mark stud locations with a pencil.
Drill Pilot Holes
- Drill small holes where you marked for hooks.
- Ensure holes align with studs for heavier items.
Install Hooks
- Place hooks over pilot holes.
- Use a screwdriver to secure hooks with screws.
Test Hooks
- Gently pull on hooks to ensure they are secure.
- Hang items to check weight distribution.
Organize Items
- Hang tools, bikes, or other items on hooks.
- Adjust as needed for optimal organization.
Helpful Tips and Tricks
Measure Twice, Drill Once: Before drilling holes, measure the space and mark where hooks will go. This avoids unnecessary holes.
Use Stud Finders: Hooks hold more weight when attached to wall studs. Use a stud finder to locate them.
Pre-Drill Holes: Pre-drilling prevents wood from splitting and makes screw insertion easier.
Label Hooks: Label each hook for specific items like bikes, tools, or hoses. This keeps everything organized.
Use Heavy-Duty Hooks: For heavier items, use heavy-duty hooks. Regular hooks might bend or break.
Group Similar Items: Hang similar items together. This makes finding things quicker.
Adjustable Hooks: Use adjustable hooks for items of different sizes. They offer more flexibility.
Common Mistakes to Avoid:
Overloading Hooks: Don’t hang items heavier than the hook’s weight limit. This can cause hooks to fall.
Ignoring Wall Type: Different walls need different anchors. Drywall, brick, and concrete all require specific anchors.
Not Using a Level: Hooks should be level. Uneven hooks look messy and can cause items to fall.
Alternatives for Materials or Methods:
Magnetic Strips: Use magnetic strips for metal tools. They save space and keep tools visible.
Pegboards: Pegboards offer flexibility. You can move hooks around as needed.
Adhesive Hooks: For lighter items, use adhesive hooks. They don’t require drilling and are easy to remove.
PVC Pipe: Cut PVC pipes into sections and mount them on the wall. They can hold long items like brooms or rakes.
Estimating the Cost
Materials:
- Hooks: $10-$20 for a pack of 10 heavy-duty hooks.
- Wood Screws: $5 for a box of 50.
- Wall Anchors: $5 for a pack of 20.
- Plywood or Pegboard: $20-$30 for a 4x8 sheet.
Tools:
- Drill: $30-$50 (if you don't already have one).
- Screwdriver: $5-$10.
- Measuring Tape: $5.
- Level: $10.
Total Cost: $90-$135.
Budget-Friendly Alternatives:
- Hooks: Use old coat hooks or repurpose sturdy nails.
- Wall Anchors: Skip if screwing directly into studs.
- Plywood: Use scrap wood or old shelves.
- Tools: Borrow from friends or family.
Different Ways to Customize
Materials: Instead of traditional metal hooks, consider using wooden pegs for a rustic look. PVC pipes can be cut and shaped into hooks for a lightweight, durable option. Recycled materials like old tools or bike parts can add a unique touch.
Colors: Paint hooks in bright colors to make them stand out or match your garage's color scheme. Use metallic paints for a sleek, modern look. For a more subtle approach, neutral tones like black, white, or gray can blend seamlessly with any decor.
Styles: Opt for industrial-style hooks made from black iron pipes for a rugged appearance. Vintage hooks with ornate designs can add character. Minimalist hooks with clean lines and simple shapes work well in contemporary spaces.
Mounting Options: Use magnetic hooks for easy repositioning. Wall-mounted racks with multiple hooks can maximize storage. Ceiling-mounted hooks are great for hanging bikes or other large items.
Additional Features: Add labels to each hook for easy identification. Incorporate shelves above or below hooks for extra storage. Use adjustable hooks that can be moved or resized as needed.
Eco-Friendly Tips
Reclaimed wood can be used to create sturdy hooks. Old pallets or leftover planks from other projects work well. Repurposed metal items, like bent spoons or old tools, can serve as hooks. Recycled plastic bottles can be cut and shaped into hooks. Natural fibers like jute or hemp rope can be used to wrap hooks for a rustic look. Upcycled coat hangers can be bent into hook shapes. Salvaged hardware like old door knobs or handles can be mounted on walls for hanging items. Eco-friendly paint or finishes can be used to protect and decorate your hooks.
Keep Your Garage Tidy
DIY garage hooks are a game-changer. They help you organize tools, bikes, and other gear without breaking the bank. With just a few materials and some elbow grease, you can transform a cluttered space into a neat, functional area. Plus, making your own hooks gives you the freedom to customize them to fit your needs perfectly. No more tripping over stuff or wasting time searching for that one tool. Just grab some hooks, a drill, and get to work. Your garage will thank you.
How do I install garage hooks?
First, decide where you want the hooks. Use a stud finder to locate wall studs for extra support. Mark the spots, drill pilot holes, then screw in the hooks. Easy peasy!
What types of items can I hang on garage hooks?
You can hang bikes, tools, ladders, hoses, and even sports equipment. Just make sure the hooks are strong enough to hold the weight.
Are there different types of garage hooks?
Yep! There are utility hooks, bike hooks, ladder hooks, and screw-in hooks. Each type is designed for specific items, so choose wisely.
How much weight can garage hooks hold?
It depends on the hook. Some can hold up to 50 pounds, while others are designed for lighter items. Always check the packaging for weight limits.
Can I install garage hooks on drywall?
You can, but it's better to attach them to wall studs for more support. If you must use drywall, get anchors to help distribute the weight.
Do I need any special tools to install garage hooks?
Not really. A drill, screws, and a stud finder should do the trick. Maybe a level if you want everything perfectly straight.
How do I know where to place my garage hooks?
Think about what you use most often. Place hooks at eye level for easy access. For heavier items, put them lower to avoid accidents.