
Home>Home & Furniture>Garage & Basement>DIY Basement Bar Build Guide
Garage & Basement
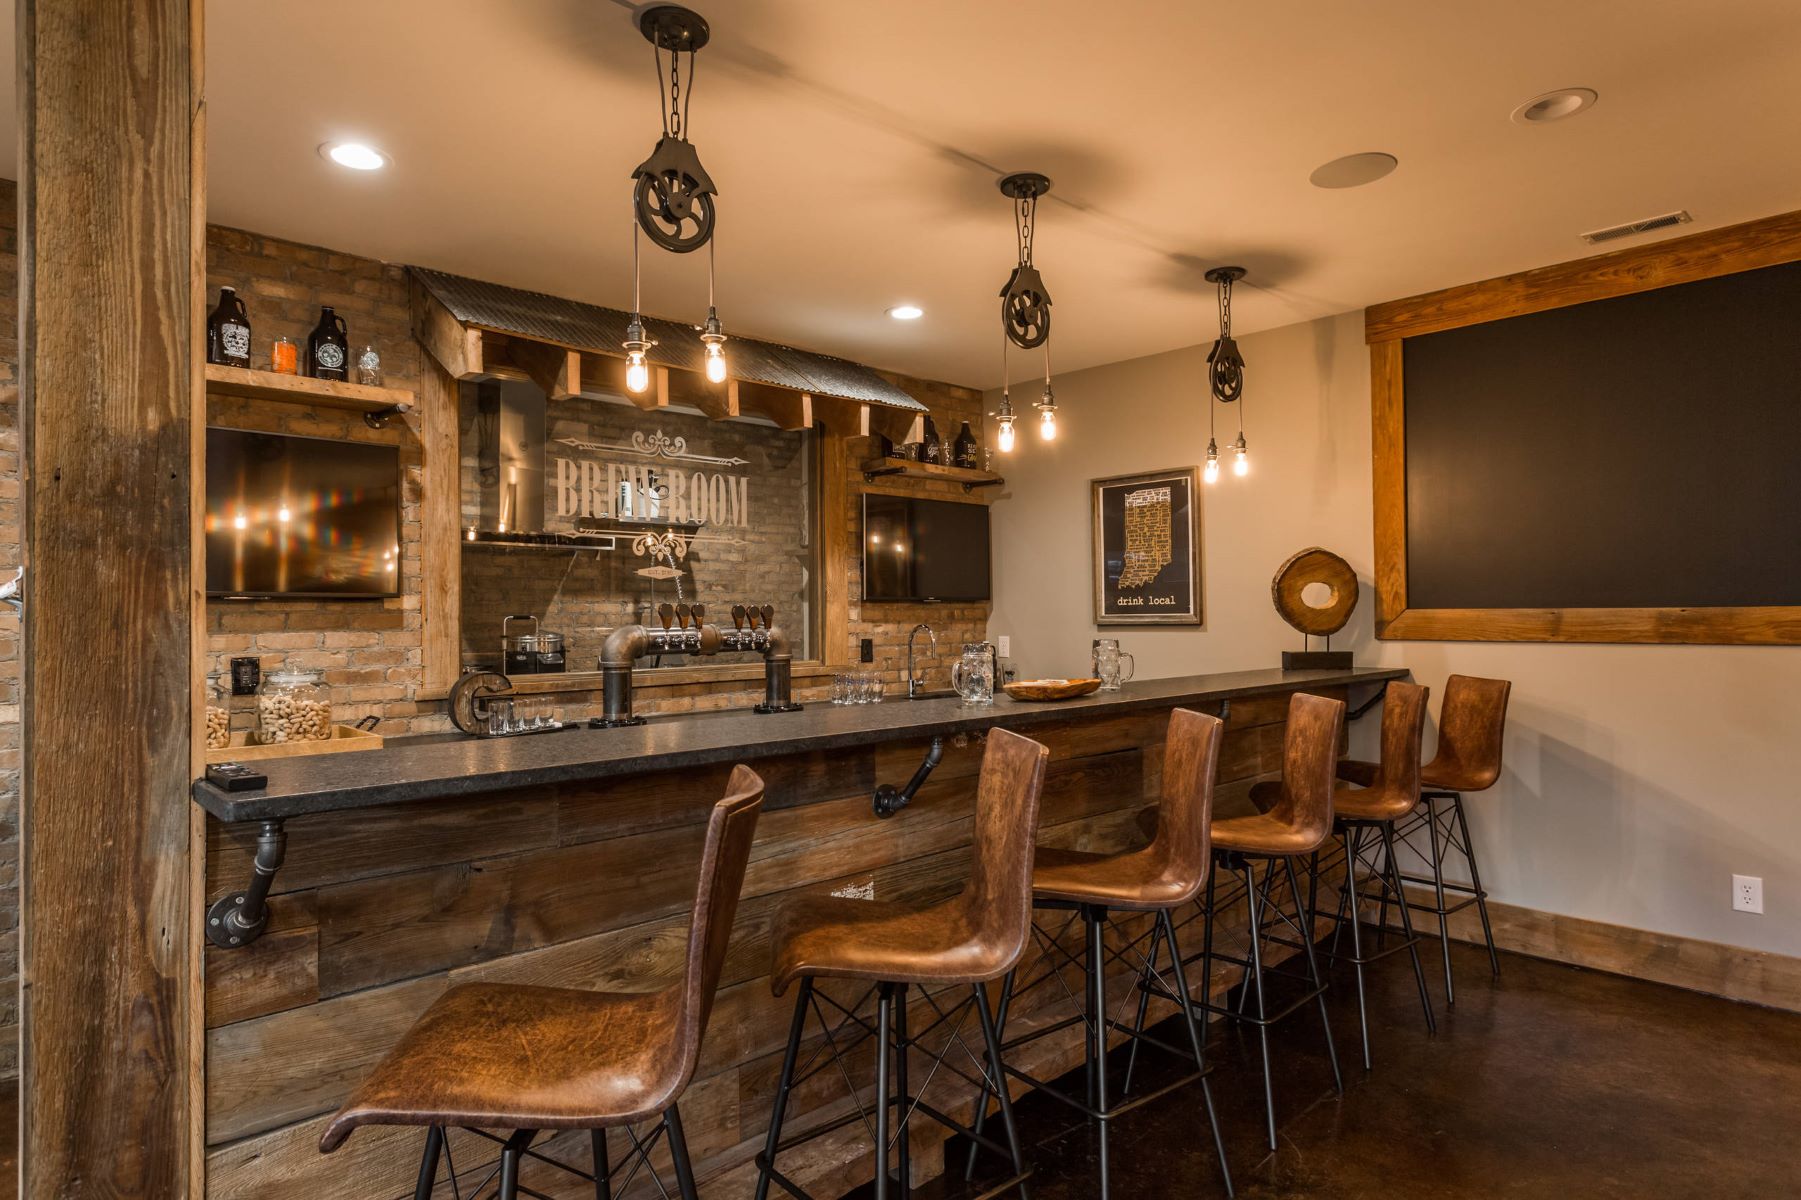
DIY Basement Bar Build Guide
Published: August 28, 2024
Learn how to build your own DIY basement bar with our step-by-step guide. Transform your basement into the ultimate entertainment space with these expert tips and tricks!
(Many of the links in this article redirect to a specific reviewed product. Your purchase of these products through affiliate links helps to generate commission for Twigandthistle.com, at no extra cost. Learn more)
Building a basement bar yourself can be a fulfilling project. Imagine having a cozy spot at home where you can relax or entertain friends. This guide will help you through the entire process, from planning to the final touches. With some basic tools, materials, and a bit of patience, you can create a bar that suits your style and needs. Whether you prefer a rustic look or a modern design, this project allows for plenty of customization. Ready to transform that unused basement corner into your new favorite hangout spot? Let's get started!
Getting Ready for Your Project
Plan Your Design: Sketch out your bar's layout. Decide on dimensions, materials, and features like a sink or fridge.
Gather Materials and Tools: Collect wood, screws, nails, a saw, a drill, a level, and safety gear like gloves and goggles.
Clear the Workspace: Remove any clutter from the basement. Ensure there's enough room to move around and store materials.
Check for Permits: Some areas require permits for plumbing or electrical work. Verify local regulations.
Inspect the Basement: Look for moisture issues or leaks. Fix any problems to prevent future damage.
Measure and Mark: Use a tape measure to mark where the bar will go. Double-check measurements for accuracy.
Safety First: Wear safety goggles, gloves, and a dust mask. Keep a first aid kit nearby.
Prepare the Floor: Ensure the floor is level. Use a level tool to check and make adjustments if needed.
Set Up Lighting: Good lighting is crucial. Use portable work lights if necessary.
Organize Tools and Materials: Keep everything within reach. Arrange tools on a workbench or table for easy access.
What You Need: Materials and Tools
- Lumber: Used for framing the bar structure. Common types include 2x4s and plywood.
- Drywall: Covers the frame to create smooth walls.
- Screws and Nails: Essential for securing lumber and drywall.
- Wood Glue: Provides extra strength to joints.
- Bar Top Material: Options include wood, granite, or laminate. This forms the surface of the bar.
- Stain or Paint: Adds color and protection to the wood.
- Sealant: Protects the bar top from spills and stains.
- Sandpaper: Smooths rough edges and surfaces.
- Level: Ensures everything is even and straight.
- Tape Measure: Measures dimensions accurately.
- Circular Saw: Cuts lumber to size.
- Drill: Makes holes for screws and other hardware.
- Screwdriver: Tightens screws.
- Hammer: Drives nails into wood.
- Clamps: Holds pieces together while glue dries.
- Paintbrushes or Rollers: Applies paint or stain.
- Safety Gear: Includes gloves, goggles, and a dust mask for protection.
- Lighting Fixtures: Illuminates the bar area.
- Plumbing Supplies: Needed if adding a sink. Includes pipes, fittings, and a faucet.
- Electrical Supplies: For outlets and lighting. Includes wires, outlets, and switches.
- Bar Stools: Provides seating.
- Shelving: Stores bottles and glasses.
- Mini Fridge: Keeps drinks cold.
- Decorative Items: Personalizes the space. Examples include signs, artwork, and glassware.
How Much Skill and Time You Need
Skill Level: Intermediate
Time Required: 2-3 weekends
- Planning and Design: 4-6 hours
- Framing and Drywall: 1 weekend
- Electrical and Plumbing: 1 weekend
- Finishing Touches: 1 weekend
Important Keywords: Skill Level, Time Required, Planning and Design, Framing and Drywall, Electrical and Plumbing, Finishing Touches
Follow These Steps
Plan Your Bar
- Measure the space.
- Sketch a layout.
- Decide on features (sink, fridge, shelves).
Gather Materials
- Wood for framing and shelves.
- Plywood for bar top.
- Screws, nails, and brackets.
- Paint or stain.
- Plumbing supplies (if adding a sink).
Build the Frame
- Cut wood to size.
- Assemble the base frame using screws.
- Attach vertical supports.
- Secure top frame.
Install Plumbing (Optional)
- Shut off water supply.
- Install pipes and fittings.
- Connect sink to water supply and drain.
Add Shelving
- Measure and cut shelves.
- Attach brackets to the frame.
- Secure shelves in place.
Create the Bar Top
- Cut plywood to size.
- Sand edges for smoothness.
- Attach to the top frame using screws.
Finish the Bar
- Sand all surfaces.
- Apply paint or stain.
- Let dry completely.
Install Lighting (Optional)
- Choose LED strips or pendant lights.
- Mount lights under shelves or above the bar.
- Connect to power source.
Stock and Decorate
- Add bar stools.
- Stock with beverages and glassware.
- Decorate with personal touches.
Helpful Tips and Tricks
Plan Your Layout: Sketch your bar's layout before starting. Measure your space to ensure everything fits.
Use Pre-made Cabinets: Save time by using pre-made kitchen cabinets for storage. They are sturdy and easy to install.
Lighting: Install LED strip lights under shelves for a modern look. They are energy-efficient and add ambiance.
Countertop Options: Consider using butcher block or laminate countertops. Both are affordable and easy to work with.
Plumbing: If adding a sink, ensure you have access to existing plumbing. Hire a professional if unsure about connecting pipes.
Electrical Outlets: Plan for enough outlets for appliances like blenders, mini-fridges, and coffee makers.
Bar Top: Use a durable material like hardwood or epoxy resin for the bar top. Both are long-lasting and look great.
Stools: Choose adjustable bar stools to accommodate different heights. They add comfort and flexibility.
Backsplash: Use peel-and-stick tiles for an easy and stylish backsplash. They are simple to install and come in various designs.
Storage: Install floating shelves for glassware and bottles. They save space and keep items within reach.
Mistakes to Avoid:
- Skipping Permits: Check local building codes and get necessary permits.
- Ignoring Ventilation: Ensure proper ventilation to avoid musty smells.
- Overloading Circuits: Don't overload electrical circuits with too many appliances.
- Poor Lighting: Avoid dim lighting; it makes the space feel unwelcoming.
- Neglecting Comfort: Ensure bar stools and seating are comfortable for long periods.
Material Alternatives:
- Countertops: Use concrete or recycled glass for a unique look.
- Shelving: Metal or reclaimed wood can add character.
- Flooring: Consider vinyl planks or tiles for durability and easy cleaning.
Estimating the Cost
Lumber: $200-$300 for framing and shelving. Drywall: $50-$100 for walls. Paint: $30-$50 for a gallon. Bar Countertop: $100-$500 depending on material (wood, laminate, etc.). Bar Stools: $50-$150 each. Lighting: $50-$200 for fixtures. Plumbing: $100-$300 for a sink and faucet. Electrical Supplies: $50-$100 for outlets and wiring. Tools: $100-$200 for basics like a saw, drill, and level. Total Estimate: $730-$1,900.
Budget-Friendly Alternatives: Use reclaimed wood for the countertop, saving $50-$100. Opt for second-hand bar stools at $20-$50 each. Choose basic lighting fixtures for $20-$50. Skip the sink if not essential, saving $100-$300. This can reduce the total cost to around $500-$1,200.
Different Ways to Customize
Materials: Instead of traditional wood, use reclaimed wood for a rustic look or metal for an industrial vibe. Consider concrete countertops instead of granite for a modern touch.
Colors: Paint the bar in bold colors like navy blue or deep green for a dramatic effect. For a more neutral palette, use soft grays or beiges. Add a pop of color with bright bar stools or shelves.
Styles: For a classic look, incorporate brass fixtures and leather bar stools. A minimalist design can be achieved with clean lines, white surfaces, and simple decor. For a cozy feel, add warm lighting, wood accents, and plush seating.
Shelving: Use floating shelves for a sleek appearance or pipe shelving for an industrial look. Install glass shelves to display glassware elegantly.
Lighting: Hang pendant lights above the bar for focused lighting. Use LED strip lights under the counter for a modern touch. Consider vintage Edison bulbs for a warm, nostalgic feel.
Backsplash: Choose subway tiles for a timeless look or mosaic tiles for a splash of color. A mirrored backsplash can make the space feel larger and more open.
Seating: Opt for bar stools with backs for comfort or backless stools for a more streamlined look. Mix and match different styles for an eclectic feel.
Storage: Incorporate wine racks or built-in coolers for storing beverages. Add cabinets with glass doors to display your collection of spirits and glassware.
Decor: Personalize the space with neon signs, artwork, or a chalkboard wall for writing drink specials. Add plants for a touch of greenery and freshness.
Eco-Friendly Tips
Reclaimed wood can be used for the bar top and shelves. It adds character and reduces waste. Recycled glass countertops are another eco-friendly option. They come in various colors and are durable.
Bamboo is a sustainable material for flooring. It grows quickly and is strong. Cork flooring is also a good choice. It’s renewable and provides a soft surface.
Use low-VOC paints to reduce harmful emissions. These paints are better for indoor air quality.
LED lighting is energy-efficient and lasts longer than traditional bulbs. It saves money on electricity bills.
Repurpose old furniture for seating and storage. This reduces the need to buy new items and keeps old ones out of landfills.
Install a water-saving faucet if your bar has a sink. It conserves water and lowers utility bills.
Insulate the basement walls with eco-friendly materials like recycled denim or cellulose. This helps maintain a comfortable temperature and reduces energy use.
Use natural sealants and adhesives. They are less toxic and better for the environment.
Solar panels can power your bar area. They reduce reliance on non-renewable energy sources.
Compostable or reusable cups and straws are better than single-use plastic. They cut down on waste and are more sustainable.
Cheers to Your New Basement Bar
You've got the know-how to build a basement bar that’ll impress everyone. From planning your layout to choosing the right materials, each step brings you closer to a space where memories are made. Remember, the key is in the details—those little touches like lighting and decor that make your bar unique. Don't rush; take your time to ensure everything is just right. Now, grab your tools, roll up your sleeves, and get started. Before you know it, you'll be mixing drinks and enjoying your new hangout spot. Cheers to your hard work and creativity!
How much space do I need for a basement bar?
You don't need a ton of space. A small corner or a section of your basement will do. Just make sure there's enough room for a counter, some stools, and storage for drinks and glasses.
What materials should I use for the bar counter?
Wood, granite, or even concrete can work well. Wood is easier to work with if you're a beginner. Granite and concrete look sleek but might need professional help.
Do I need special plumbing for a sink?
Yes, if you want a sink, you'll need to connect it to your home's water supply and drainage system. It might be a good idea to hire a plumber for this part.
How do I handle electrical work for lighting and outlets?
For safety, hire an electrician to install outlets and lighting. You'll need good lighting for the bar area and maybe some accent lights to set the mood.
Can I build a bar on a budget?
Absolutely! Use reclaimed wood for the counter, repurpose old furniture for storage, and shop for deals on stools and decor. DIY projects can save you a lot of money.
What kind of seating works best?
Bar stools are the go-to choice. Look for ones that are comfortable and match your bar's style. Adjustable height stools can be handy if you have guests of different heights.
How do I keep my bar organized?
Use shelves, cabinets, or a bar cart to store bottles, glasses, and tools. Label everything so you can find what you need quickly. A well-organized bar makes serving drinks a breeze.