
Home>Home & Furniture>Doors & Windows>How to Build Folding Garage Doors
Doors & Windows
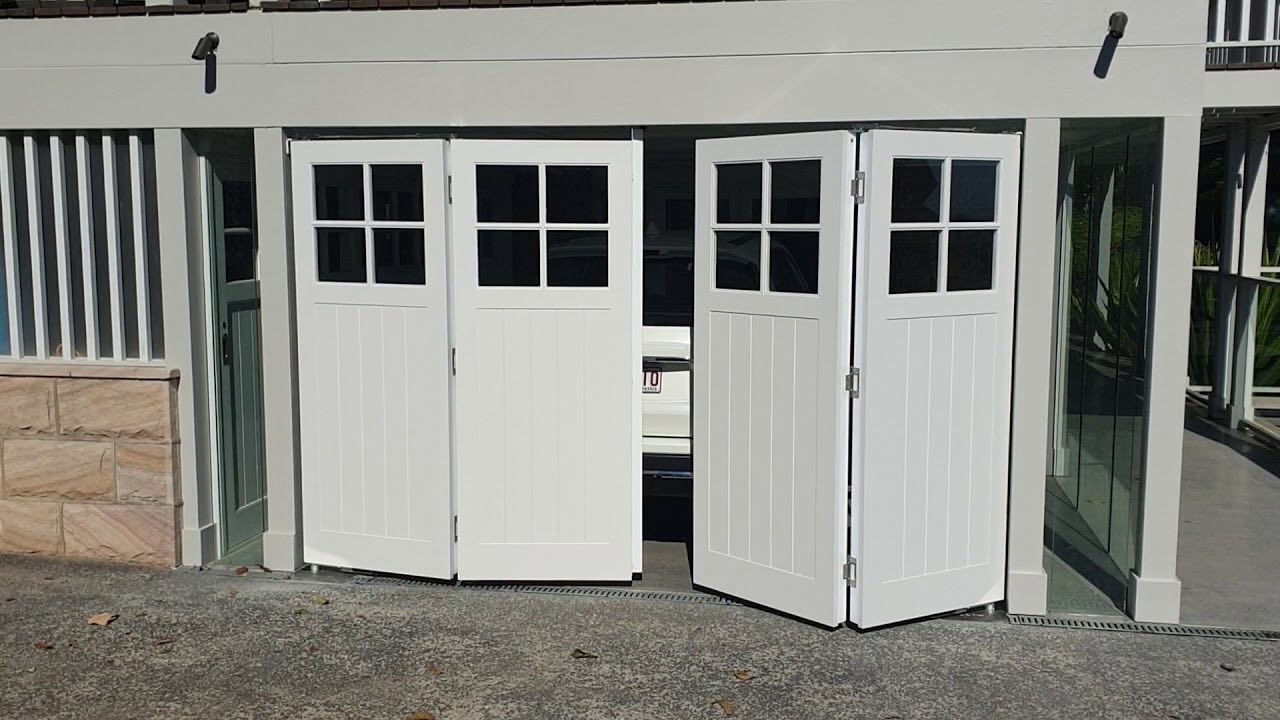
How to Build Folding Garage Doors
Published: September 13, 2024
Learn how to build folding garage doors with our step-by-step guide. Enhance your garage's functionality and aesthetics with these easy-to-follow instructions.
(Many of the links in this article redirect to a specific reviewed product. Your purchase of these products through affiliate links helps to generate commission for Twigandthistle.com, at no extra cost. Learn more)
Folding garage doors save space and offer a stylish look. Making them requires some basic tools and materials. Anyone with a bit of DIY experience can tackle this project. Building your own also means you can customize the size and style. In this guide, we'll walk through each step to create your own folding doors. From measuring to final installation, you’ll gain knowledge and confidence. Whether you need to replace old doors or just want something new, this project is manageable. Ready to get started? Grab your tools, and let’s dive in!
Getting Ready for the Project
Measure the Opening: Use a tape measure to get the exact dimensions of your garage door opening. Write down the height and width.
Gather Materials: Collect all necessary materials like wood panels, hinges, screws, handles, and a track system. Make sure everything is within reach.
Safety Gear: Wear safety goggles, gloves, and a dust mask. This protects your eyes, hands, and lungs from debris and dust.
Clear the Workspace: Remove any obstacles from the garage area. Ensure you have enough space to move around and work comfortably.
Check Tools: Ensure you have all required tools like a drill, saw, screwdriver, and level. Test them to make sure they work properly.
Prepare Wood Panels: Cut the wood panels to the correct size using a saw. Sand the edges to make them smooth.
Mark Hinge Locations: Use a pencil to mark where the hinges will go on the panels. This ensures they line up correctly when folding.
Pre-drill Holes: Drill pilot holes for screws at the marked hinge locations. This makes it easier to attach the hinges later.
Install Track System: Follow the manufacturer's instructions to install the track system at the top of the garage opening. Make sure it is level.
Organize Hardware: Lay out all screws, hinges, and handles in an organized manner. This makes it easier to find what you need during assembly.
Test Fit Panels: Place the panels in the track system to ensure they fit properly. Make any necessary adjustments before final assembly.
Gather Your Materials and Tools
- Plywood Sheets: Used for the main panels of the doors. Choose a sturdy type for durability.
- 2x4 Lumber: Provides the frame for the doors. Ensures stability and strength.
- Hinges: Allows the doors to fold. Heavy-duty ones are best for garage doors.
- Screws and Nails: Essential for assembling the frame and attaching the plywood.
- Wood Glue: Adds extra strength to the joints.
- Paint or Stain: Protects the wood from weather and gives a finished look.
- Sandpaper: Smooths the wood surfaces before painting or staining.
- Measuring Tape: Ensures accurate measurements for cutting wood.
- Circular Saw: Cuts the plywood and lumber to the required sizes.
- Drill: Makes holes for screws and helps with assembly.
- Screwdriver: Tightens screws during assembly.
- Level: Ensures the doors are even and straight.
- Clamps: Holds pieces together while the glue dries.
- Safety Gear: Includes gloves, goggles, and ear protection for safe working conditions.
Required Skills and Time Commitment
Skill Level: Advanced
Time Required: 2-3 days
- Planning and Measuring: 4-6 hours
- Cutting and Preparing Materials: 6-8 hours
- Assembling Door Panels: 4-6 hours
- Installing Hinges and Tracks: 4-5 hours
- Final Adjustments and Finishing Touches: 2-3 hours
Detailed Step-by-Step Guide
Gather Materials and Tools
- Plywood sheets
- Hinges
- Screws
- Wood glue
- Paint or stain
- Measuring tape
- Saw
- Drill
- Screwdriver
- Sandpaper
Measure the Garage Opening
- Measure the width and height of the garage door opening.
- Divide the width by the number of panels you want (usually 4).
Cut the Plywood Panels
- Cut plywood sheets into panels based on your measurements.
- Sand edges to smooth rough spots.
Assemble the Panels
- Lay panels flat on the ground.
- Apply wood glue to edges where panels will join.
- Attach hinges between panels, ensuring they fold correctly.
Install the Top Track
- Measure and cut the top track to fit the width of the garage opening.
- Secure the track to the top of the opening using screws.
Attach Rollers to Panels
- Attach rollers to the top of each panel.
- Ensure rollers fit into the top track.
Install the Bottom Track
- Measure and cut the bottom track to match the top track.
- Secure the bottom track to the floor of the garage opening.
Mount the Panels
- Lift panels and insert rollers into the top track.
- Ensure panels align with the bottom track.
Secure Panels to Bottom Track
- Attach bottom rollers or guides to panels.
- Ensure smooth movement along the bottom track.
Test the Folding Mechanism
- Open and close the doors to ensure they fold and unfold smoothly.
- Adjust hinges or tracks if needed.
Paint or Stain the Doors
- Apply paint or stain to the doors for a finished look.
- Allow to dry completely before use.
Add Handles and Locks
- Attach handles to the outside of the doors.
- Install locks for security.
Helpful Tips and Tricks
Measure Twice, Cut Once: Accurate measurements are crucial. Double-check dimensions before cutting any material.
Use Quality Hinges: Strong, durable hinges ensure smooth folding and long-lasting doors. Cheap hinges may rust or break.
Pre-drill Holes: Prevent wood from splitting by pre-drilling holes for screws. This also makes assembly easier.
Weatherproofing: Apply weatherstripping around the edges to keep out drafts and moisture. This helps maintain indoor temperature and protects your belongings.
Reinforce Joints: Use wood glue along with screws for extra strength at joints. This prevents wobbling and increases durability.
Level the Ground: Ensure the ground where the doors will fold is level. Uneven surfaces can cause doors to stick or not close properly.
Test Fit: Assemble the doors without glue or screws first to check fit and alignment. This allows adjustments before final assembly.
Paint or Stain Before Assembly: Painting or staining parts before assembly ensures even coverage and protects wood from the elements.
Use a Guide: Follow a detailed guide or blueprint to avoid missing steps. This helps keep the project on track.
Common Mistakes to Avoid:
- Skipping Measurements: Inaccurate measurements lead to ill-fitting doors.
- Using Cheap Materials: Low-quality wood or hardware can result in weak, unreliable doors.
- Ignoring Weatherproofing: Failing to weatherproof can cause damage from moisture and temperature changes.
- Rushing Assembly: Hurrying can lead to mistakes and poor craftsmanship.
Material Alternatives:
- Plywood: Instead of solid wood, use high-quality plywood for a budget-friendly option.
- Composite Materials: Consider composite materials for added durability and resistance to weather.
- Metal Hinges: Stainless steel or brass hinges resist rust better than standard steel.
Method Alternatives:
- Sliding Doors: If space is limited, sliding doors might be a better option than folding ones.
- Pre-made Kits: For those less confident in DIY, pre-made folding door kits simplify the process.
Estimating the Costs
Plywood Sheets: $50 each. You might need 4, so $200 total.
2x4 Lumber: $3 per piece. Plan for 10 pieces, totaling $30.
Hinges: $5 each. You'll need 8, so $40.
Handles: $10 each. Two handles will cost $20.
Locks: $15 each. One lock will be $15.
Screws and Nails: $20 for a mixed pack.
Paint or Stain: $30 for a gallon.
Weatherstripping: $15 for a roll.
Tools: If you don't have them, a drill ($50), saw ($60), and measuring tape ($10) will be necessary.
Total Estimated Cost: Around $490.
Budget-Friendly Alternatives:
- Use reclaimed wood instead of new plywood, saving up to $100.
- Borrow tools from friends or rent them, reducing costs by $120.
- Opt for basic hinges and handles, saving $20.
These changes could lower the total cost to around $270.
Different Variations and Customizations
Materials: Instead of traditional wood, try using metal like aluminum or steel for a modern look. PVC or composite materials can offer durability with less maintenance.
Colors: Paint the doors in bold colors like red or blue for a striking appearance. For a more classic look, use neutral tones like white, gray, or beige. Stain the wood to highlight its natural grain.
Styles: Add windows to the top panels for extra light. Use frosted glass for privacy. Incorporate decorative hardware like hinges and handles in black or brass for a vintage feel.
Patterns: Create a chevron or herringbone pattern with the wood panels. Use reclaimed wood for a rustic, eco-friendly option.
Mechanisms: Install automatic openers for convenience. Use heavy-duty hinges and rollers to ensure smooth operation.
Insulation: Add insulated panels to keep the garage temperature stable. Use weatherstripping around the edges to prevent drafts.
Finishes: Apply a glossy finish for a sleek, modern look. Use a matte finish for a more understated appearance. Consider a textured finish to hide minor imperfections.
Accents: Add trim or molding around the edges for a polished look. Use contrasting colors for the trim to make it stand out.
Customization: Personalize with monograms or family crests. Add decorative elements like carvings or metal inlays for a unique touch.
Eco-Friendly Tips
Reclaimed Wood: Use old barn wood or pallets. These materials add character and reduce waste.
Recycled Metal: Opt for recycled steel or aluminum for hinges and frames. These metals are durable and eco-friendly.
Low-VOC Paint: Choose paints with low volatile organic compounds. They are better for indoor air quality and the environment.
Natural Insulation: Use sheep wool or recycled denim for insulation. These materials are effective and sustainable.
Solar-Powered Tools: Use solar-powered tools to reduce electricity consumption. This method is both eco-friendly and cost-effective.
Bamboo Panels: Consider bamboo for door panels. Bamboo grows quickly and is a renewable resource.
Eco-Friendly Sealants: Use water-based sealants. They are less harmful to the environment compared to traditional options.
Recycled Glass Windows: Install windows made from recycled glass. They provide natural light and reduce the need for artificial lighting.
Upcycled Hardware: Reuse old door handles, locks, and other hardware. This reduces waste and gives a unique look.
Energy-Efficient Design: Design doors to fit tightly. This minimizes air leaks and improves energy efficiency.
Bringing It All Together
Building folding garage doors isn't as hard as it seems. With some basic tools and a bit of patience, you can create a functional and stylish addition to your garage. Remember to measure twice, cut once. Use sturdy materials for long-lasting results. Hinges and tracks should be installed carefully for smooth operation. Don't forget to sand and paint for a polished look. If you hit a snag, plenty of online resources can help. Just take your time, follow the steps, and you'll have a set of folding garage doors you can be proud of. Happy building!
How much space do I need for folding garage doors?
You’ll need enough room for the doors to fold back. Measure the width of your garage opening and ensure there’s space on either side for the panels to stack.
What materials work best for folding garage doors?
Wood, steel, and aluminum are popular choices. Wood looks great but needs more maintenance. Steel is durable but can rust. Aluminum is lightweight and rust-resistant.
Can I install folding garage doors by myself?
Yes, if you’re handy with tools and follow instructions carefully. You might need a friend to help with lifting and aligning the panels.
How do I maintain folding garage doors?
Regularly check hinges, tracks, and rollers for wear. Lubricate moving parts and clean the panels to keep them looking good and functioning smoothly.
Are folding garage doors secure?
They can be very secure if you use strong materials and quality locks. Adding a deadbolt or security bar can enhance protection.
How much do folding garage doors cost?
Prices vary based on materials and size. DIY kits can range from a few hundred to a couple of thousand dollars. Custom options will cost more.
Can I customize the look of my folding garage doors?
Absolutely! You can paint or stain wood doors, choose different finishes for metal, and even add windows or decorative hardware.