
Home>Home & Furniture>Doors & Windows>How to Build a Homemade Old Window Greenhouse
Doors & Windows
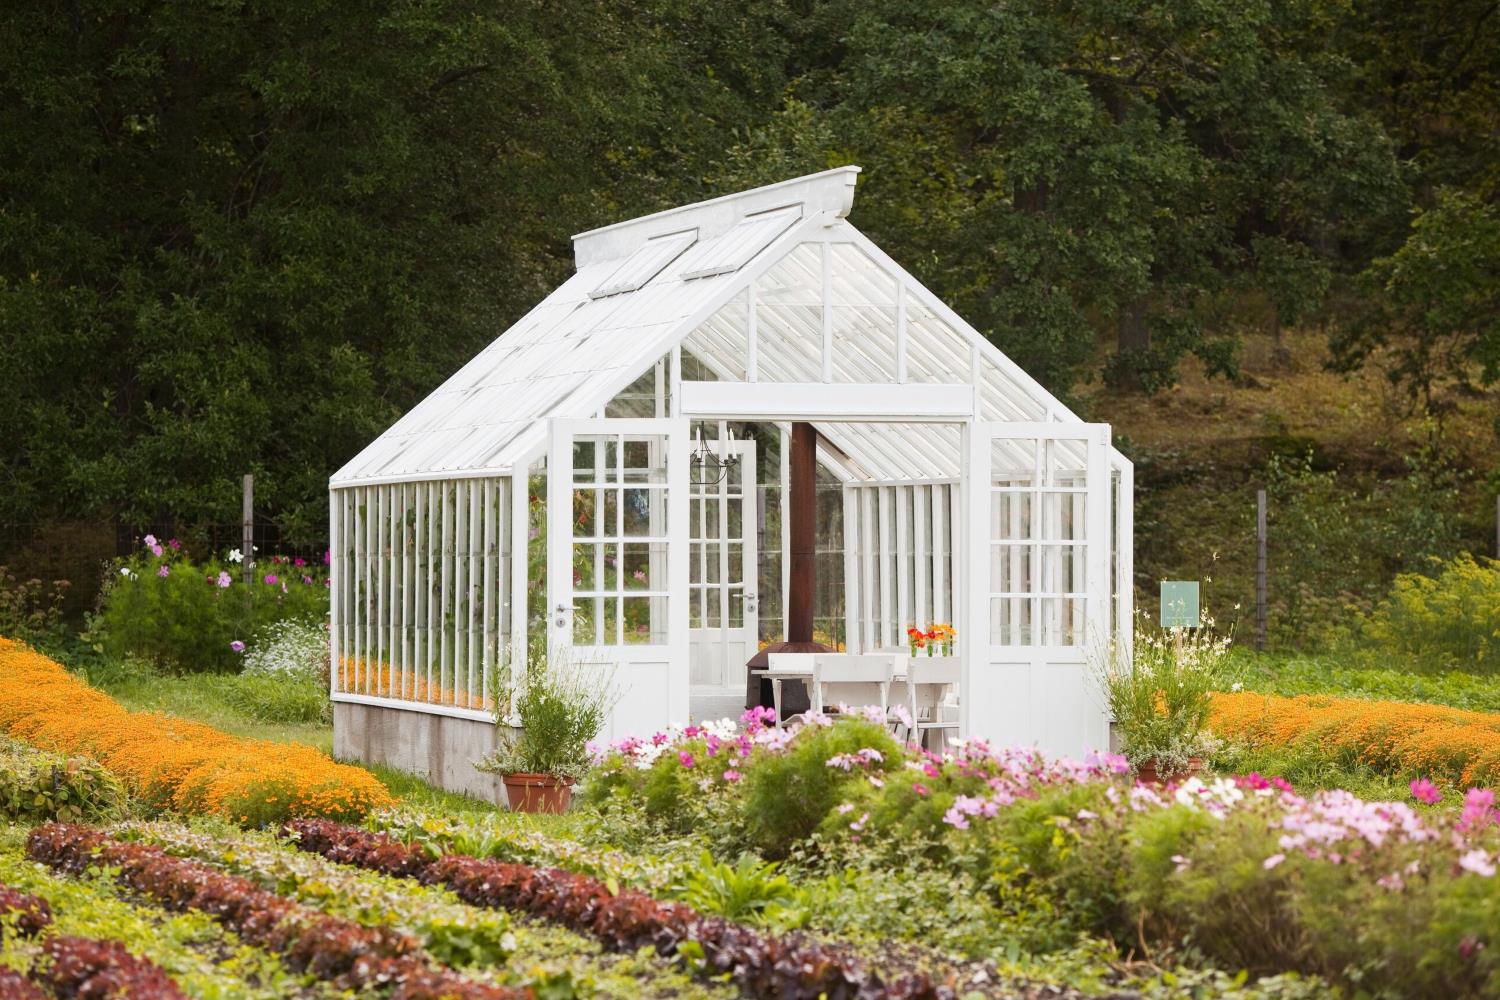
How to Build a Homemade Old Window Greenhouse
Published: August 14, 2024
Learn how to build a charming homemade greenhouse using old windows. Follow our step-by-step guide to create an eco-friendly and unique garden space.
(Many of the links in this article redirect to a specific reviewed product. Your purchase of these products through affiliate links helps to generate commission for Twigandthistle.com, at no extra cost. Learn more)
Building a homemade greenhouse using old windows is a fun and eco-friendly project. It recycles materials while giving your plants a cozy place to grow. Even if you're not an expert carpenter, with patience and basic tools, you can create a charming greenhouse. This project allows you to design a unique structure, tailored to your garden space. Plus, it offers a great way to spend time outdoors and learn new skills. In this guide, we'll walk through the steps to transform old windows into a functional greenhouse. Get ready to bring new life to discarded windows.
Getting Ready to Build
Gather Materials: Collect old windows, wood for the frame, screws, nails, hinges, and weatherproof sealant. Ensure windows are clean and free of cracks.
Choose a Location: Pick a sunny spot in your yard. Make sure the ground is level and has good drainage.
Measure and Plan: Measure the windows and plan the greenhouse dimensions. Sketch a simple blueprint to guide your build.
Prepare the Ground: Clear the area of debris and level the ground. Lay a foundation using gravel or concrete blocks for stability.
Safety Gear: Wear gloves, safety glasses, and sturdy shoes. Keep a first aid kit nearby.
Set Up Workspace: Organize tools and materials in a convenient spot. Ensure you have enough space to move around safely.
Cut Wood for Frame: Measure and cut wood pieces according to your blueprint. Sand edges to avoid splinters.
Assemble Frame: Use screws and nails to build the frame. Make sure it’s sturdy and square.
Attach Windows: Secure windows to the frame using hinges and screws. Apply weatherproof sealant around edges to prevent leaks.
Install Roof: Use additional windows or clear plastic for the roof. Ensure it’s securely attached and sealed.
Ventilation: Plan for ventilation by installing a small window or vent that can open and close.
Final Check: Inspect the greenhouse for any weak spots or gaps. Make necessary adjustments to ensure stability and weatherproofing.
Gather Your Materials and Tools
Old Windows: These will form the walls and roof of the greenhouse. Collect enough to cover the desired size.
Wooden Beams: Used for the frame. Ensure they are sturdy enough to support the windows.
Screws and Nails: Essential for securing the windows and wooden beams together.
Hinges: Needed for any windows that will function as doors or vents.
Screwdriver and Hammer: Tools for driving screws and nails into the wood.
Measuring Tape: Ensures accurate measurements for cutting wood and placing windows.
Saw: Used to cut the wooden beams to the required lengths.
Level: Ensures the structure is even and stable.
Drill: Makes holes for screws, making assembly easier.
Caulk and Caulking Gun: Seals gaps between windows to prevent drafts and water leaks.
Sandpaper: Smooths rough edges on wood and windows.
Paint or Wood Sealant: Protects the wooden frame from weather damage.
Gloves and Safety Glasses: Protects hands and eyes during construction.
Ladder: Helps reach higher areas safely during assembly.
Skill Level and Time Needed
Skill Level: Intermediate
Time Required: Approximately 2-3 days
- Gather Materials: Collect old windows, wood for framing, screws, hinges, and a door latch.
- Prepare the Site: Clear and level the area where the greenhouse will stand.
- Build the Frame: Construct a wooden frame to fit the windows.
- Attach Windows: Secure windows to the frame using screws and hinges.
- Install the Door: Use one window as a door, attaching it with hinges and a latch.
- Seal Gaps: Use weather stripping or caulk to seal any gaps between windows.
This project requires basic carpentry skills and some experience with tools.
Step-by-Step Guide
Gather Materials
- Old windows (at least 6)
- Wood for framing (2x4s work well)
- Screws and nails
- Hinges
- Latch
- Paint or sealant
- Tools: saw, drill, screwdriver, hammer, measuring tape, level
Prepare the Windows
- Clean windows thoroughly.
- Check for any broken glass; replace if necessary.
- Sand down any rough edges.
Build the Base
- Measure and cut wood for the base frame.
- Assemble the base using screws and a drill.
- Ensure the base is level.
Construct the Frame
- Measure and cut wood for the vertical supports and top frame.
- Attach vertical supports to the base.
- Secure the top frame to the vertical supports.
Attach Windows
- Position windows around the frame.
- Secure windows to the frame using screws.
- Leave one window unattached for the door.
Install the Door
- Attach hinges to one side of the door window.
- Secure the door to the frame.
- Attach a latch to keep the door closed.
Seal and Paint
- Apply sealant to all wood surfaces to protect from moisture.
- Paint the wood if desired for added protection and aesthetics.
Add Shelving (Optional)
- Measure and cut wood for shelves.
- Attach shelves inside the greenhouse using screws.
Final Touches
- Check for stability and make any necessary adjustments.
- Ensure all windows and the door open and close smoothly.
Place and Use
- Position the greenhouse in a sunny spot.
- Start planting!
Helpful Tips and Tricks
Measure twice, cut once. Always double-check measurements before cutting wood or glass. This saves time and materials.
Use reclaimed wood. Old pallets or barn wood can add character and save money.
Seal gaps. Use weather stripping or caulk to seal gaps between windows. This keeps heat inside.
Reinforce corners. Use metal brackets or corner braces to strengthen the structure.
Paint or seal wood. Protect wood from moisture by painting or sealing it. This extends the life of your greenhouse.
Install a vent. Proper ventilation prevents overheating. A simple window or vent fan works well.
Use gravel for flooring. Gravel helps with drainage and keeps the interior dry.
Common mistakes to avoid:
Skipping the foundation. A solid foundation prevents shifting and settling. Use concrete blocks or treated lumber.
Ignoring sun exposure. Place the greenhouse where it gets plenty of sunlight, ideally south-facing.
Overlooking ventilation. Lack of ventilation can cause plants to overheat or develop mold.
Using untreated wood. Untreated wood rots quickly. Always use treated or sealed wood.
Alternatives for materials or methods:
Plastic sheeting instead of glass. If old windows are hard to find, use clear plastic sheeting. It's lightweight and easy to work with.
PVC pipes for framing. PVC pipes are a lightweight, inexpensive alternative to wood for the frame.
Automatic vent openers. These openers adjust vents based on temperature, ensuring proper airflow without manual effort.
Shade cloth for cooling. Use shade cloth to reduce heat during hot months. It’s easy to install and remove.
Estimating the Cost
Old windows: Free if you can find them at salvage yards or from friends. Otherwise, around $10-$20 each. You’ll need about 10-15 windows, so budget $100-$300.
Lumber: For the frame, you’ll need 2x4s and 4x4s. Expect to spend around $100-$150.
Screws and nails: A box of each will cost about $20.
Hinges and latches: For the door and any windows that open, budget around $30.
Caulk and weatherstripping: To seal gaps, expect to spend about $20.
Gravel or pavers: For the floor, budget around $50-$100.
Paint or sealant: To protect the wood, expect to spend around $30.
Tools: If you don’t already have them, you’ll need a saw, drill, screwdriver, measuring tape, and level. These could cost around $100-$200 if bought new.
Total cost: Roughly $450-$850.
Budget-friendly alternatives:
- Old windows: Check online marketplaces or local recycling centers for free or cheaper options.
- Lumber: Look for reclaimed wood or pallets.
- Tools: Borrow from friends or rent from a local hardware store.
Creative Variations and Customizations
Alternative Materials: Instead of old windows, use reclaimed wood or pallets for the frame. For the panels, consider polycarbonate sheets or acrylic glass. These materials can be lighter and more durable.
Colors: Paint the frame with bright colors like turquoise or yellow for a cheerful look. For a more rustic feel, use earth tones like brown or olive green. You can also go for a classic white for a clean, timeless appearance.
Styles: For a vintage look, use distressed wood and antique hardware. If you prefer a modern style, opt for sleek lines and minimalist design. Add decorative elements like stained glass or etched designs on the panels for a unique touch.
Roof Options: Instead of a flat roof, consider a gable roof or a slanted roof for better water drainage. Use corrugated metal or shingles for a different aesthetic.
Ventilation: Add hinged windows or ventilation panels to improve airflow. Install a small fan or solar-powered vent for better temperature control.
Shelving: Incorporate adjustable shelves or hanging baskets inside the greenhouse for more planting space. Use metal racks or wooden planks depending on your style preference.
Foundation: Instead of placing the greenhouse directly on the ground, build a raised platform or use concrete blocks for better stability and drainage.
Lighting: Install solar-powered lights or LED strips inside the greenhouse for extended growing hours. Use fairy lights for a whimsical touch.
Doors: Use a sliding barn door or a French door for easy access. Add a screen door to keep pests out while allowing airflow.
Decor: Add planter boxes around the exterior or hang flower pots from the roof. Use garden statues or wind chimes for added charm.
Eco-Friendly Building Tips
Old windows make great greenhouse walls. They let in lots of light and can often be found for free or cheap. Reclaimed wood works well for the frame. It’s sturdy and gives the greenhouse a rustic look. Recycled bricks or stones can be used for the foundation. They help keep the structure stable.
Non-toxic paint or sealant protects the wood from weather. Choose eco-friendly options to avoid harmful chemicals. Rain barrels can collect water for plants. This saves water and helps the environment.
Compost can be used to enrich the soil. It’s a natural way to give plants the nutrients they need. Solar lights can provide light at night without using electricity. They charge during the day and light up when it gets dark.
Old shelves or tables can be repurposed for plant stands. This keeps plants organized and off the ground. Recycled glass jars or bottles can be used as planters. They add a unique touch and reduce waste.
Natural ventilation can be achieved by leaving some windows slightly open. This keeps air flowing and helps plants grow. Mulch made from leaves or grass clippings can keep soil moist and reduce the need for watering.
Using eco-friendly materials and methods helps create a sustainable greenhouse. It’s good for the environment and can save money. Plus, it gives old items a new life.
Your Greenhouse Awaits
Building a greenhouse from old windows is a rewarding project. It gives you a unique space to grow plants year-round. Plus, it’s a great way to recycle materials. You’ve learned how to select windows, prepare the site, and assemble the structure. Now, all that’s left is to enjoy your new greenhouse. Watch your plants thrive in their new home. Don’t forget to maintain the structure and check for any repairs needed. This DIY project not only saves money but also adds charm to your garden. So, grab those tools, gather your windows, and start building. Your plants will thank you, and you’ll have a cozy spot to nurture your green thumb. Happy gardening!
How do I start building a greenhouse from old windows?
First, gather old windows of similar sizes. Clean them up, remove any old paint, and make sure the glass is intact. Then, design a simple frame using wood or metal to fit the windows.
What tools will I need?
You’ll need a screwdriver, hammer, measuring tape, saw, drill, and screws. A level helps keep everything straight.
How do I ensure the greenhouse is sturdy?
Use strong wood for the frame and secure the windows tightly with screws. Reinforce corners with brackets and make sure the structure is level.
Can I use different-sized windows?
Yes, but it’s easier if they’re similar. If using different sizes, plan the layout carefully so they fit together without gaps.
What should I do about ventilation?
Include a couple of windows that can open for airflow. You can also add small vents or a fan to keep air circulating.
How do I protect the wood from weather?
Apply a weatherproof sealant or paint to the wood. This helps prevent rot and extends the life of your greenhouse.
Where should I place my greenhouse?
Choose a spot with plenty of sunlight and good drainage. Avoid areas prone to strong winds unless you can anchor the greenhouse securely.