
Home>Home & Furniture>Doors & Windows>How to Build a High Lift Garage Door
Doors & Windows
How to Build a High Lift Garage Door
Published: September 16, 2024
Learn how to build a high lift garage door with our step-by-step guide. Enhance your garage space and functionality with expert tips and detailed instructions.
(Many of the links in this article redirect to a specific reviewed product. Your purchase of these products through affiliate links helps to generate commission for Twigandthistle.com, at no extra cost. Learn more)
Thinking about upgrading your garage door to a high lift one? Great choice! High lift garage doors are perfect for creating extra space in your garage. They let your garage door open higher, making room for storage or even a car lift. This guide will walk you through the basic steps to build one. You'll need some tools, a bit of patience, and a clear plan. Whether you're a seasoned DIYer or just starting out, this project is manageable with some effort. Get ready to transform your garage into a more functional space!
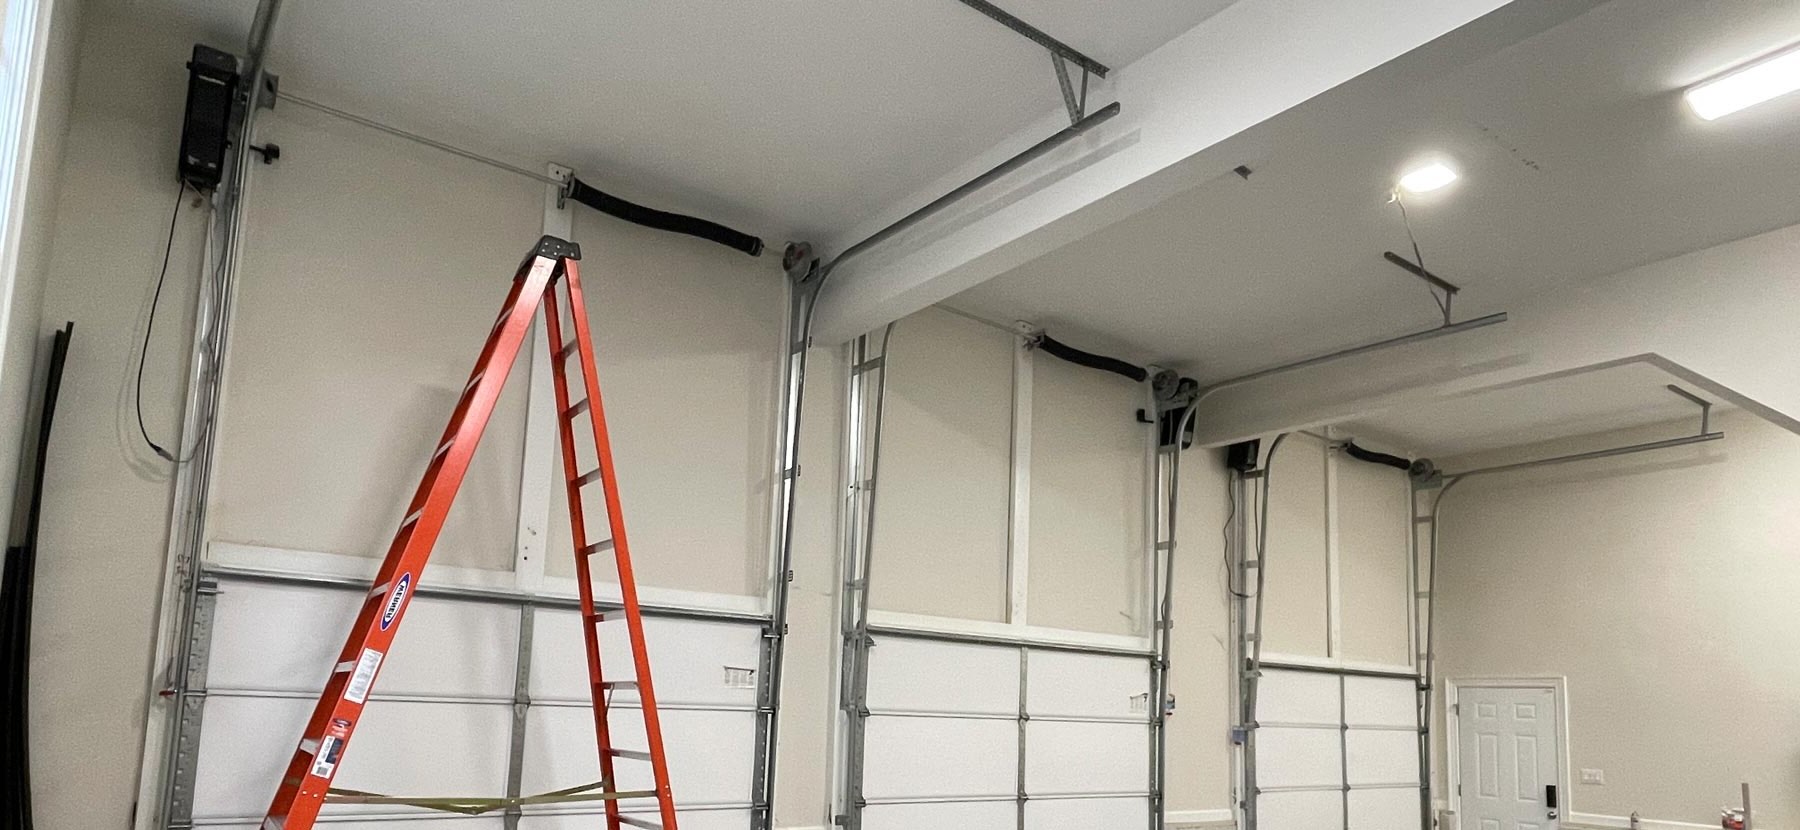
Getting Ready for the Project
Gather Tools and Materials: Collect a ladder, drill, wrenches, measuring tape, level, high-lift conversion kit, and safety gear like gloves and goggles.
Clear the Workspace: Remove any obstacles from the garage. Ensure there’s enough room to work around the door and tracks.
Disconnect Power: Unplug the garage door opener to avoid accidental activation during the project.
Release Tension: Carefully release the tension in the torsion spring using winding bars. This step is crucial for safety.
Measure and Mark: Measure the height of the garage and mark where the new tracks will be installed. Ensure the measurements are accurate.
Install New Tracks: Attach the high-lift tracks to the wall, following the marks made earlier. Use a level to ensure they’re straight.
Reattach Springs: Install the new torsion springs that come with the high-lift kit. Make sure they are properly aligned and secure.
Reconnect Opener: Adjust the garage door opener to accommodate the new height. This may involve repositioning the motor and adjusting the chain or belt.
Test the Door: Manually lift the door to ensure it moves smoothly along the new tracks. Make any necessary adjustments.
Safety Check: Double-check all bolts, screws, and connections. Ensure everything is tight and secure before reconnecting the power.
Reconnect Power: Plug the garage door opener back in and test the door using the remote. Make sure it opens and closes without issues.
Gathering Your Materials and Tools
Materials Needed:
- High Lift Conversion Kit: Includes brackets, tracks, and springs designed for high lift doors.
- Torsion Springs: Provide the necessary lift for the door.
- Cables: Connect the door to the springs.
- Track Extension: Extends the existing tracks to accommodate the high lift.
- Drums: Help in winding the cables.
- Angle Iron: Used for mounting the tracks and springs.
- Fasteners: Bolts, nuts, and screws to secure all components.
- Lubricant: Keeps the moving parts functioning smoothly.
Tools Needed:
- Wrench Set: Tightens and loosens bolts and nuts.
- Drill: Makes holes for mounting brackets and tracks.
- Level: Ensures everything is aligned properly.
- Tape Measure: Measures distances accurately.
- Clamps: Holds parts in place during installation.
- Ladder: Reaches high areas safely.
- Safety Glasses: Protects eyes from debris.
- Gloves: Protects hands while working.
High Lift Conversion Kit contains all the specialized parts needed to convert a standard garage door to a high lift system. Torsion Springs are crucial for lifting the door, while Cables connect the door to these springs. Track Extension pieces lengthen the existing tracks, allowing the door to lift higher. Drums are used to wind the cables properly. Angle Iron provides a sturdy mounting surface for the tracks and springs. Fasteners like bolts, nuts, and screws secure all components together. Lubricant ensures smooth operation of moving parts.
Wrench Set is essential for tightening and loosening bolts and nuts. A Drill is needed to make holes for mounting brackets and tracks. A Level ensures everything is aligned correctly. A Tape Measure helps in measuring distances accurately. Clamps hold parts in place during installation. A Ladder is necessary to reach high areas safely. Safety Glasses protect your eyes from debris, and Gloves protect your hands while working.
Required Skills and Time Commitment
Skill Level: Advanced
Time Required: 6-8 hours
- Preparation and Planning: 1-2 hours
- Removing Old Tracks and Springs: 1 hour
- Installing New Tracks and Springs: 2-3 hours
- Adjusting and Testing: 1-2 hours
Detailed Steps to Follow
Measure the Space
- Measure the height and width of the garage door opening.
- Measure the distance from the top of the opening to the ceiling.
Purchase Materials
- Buy a high lift garage door conversion kit.
- Get additional tracks, springs, and cables if needed.
Prepare the Area
- Clear the garage area.
- Disconnect the existing garage door opener.
Remove Existing Tracks
- Unscrew and remove the current horizontal tracks.
- Keep the vertical tracks in place.
Install New Vertical Tracks
- Attach the new vertical tracks to the existing ones.
- Ensure they are level and secure.
Install High Lift Tracks
- Attach the high lift tracks to the new vertical tracks.
- Secure them to the ceiling using brackets.
Install New Springs
- Remove the old springs carefully.
- Install the new high lift springs according to the kit instructions.
Attach Cables
- Connect the new cables to the bottom brackets of the door.
- Run the cables through the pulleys and attach them to the springs.
Adjust the Opener
- Reconnect the garage door opener.
- Adjust the opener settings for the new high lift configuration.
Test the Door
- Open and close the door several times.
- Ensure it operates smoothly and make any necessary adjustments.
Secure All Components
- Tighten all bolts and screws.
- Double-check that all parts are securely in place.
Clean Up
- Remove any debris or old parts.
- Store tools and leftover materials properly.
Helpful Tips and Tricks
Measure Twice, Cut Once: Always double-check measurements before cutting materials. This ensures everything fits perfectly.
Use Quality Materials: Opt for heavy-duty tracks and springs designed for high lift systems. They handle the extra weight and stress better.
Follow Manufacturer Instructions: Each high lift kit has specific guidelines. Stick to them to avoid mistakes.
Lubricate Moving Parts: Regularly lubricate tracks, rollers, and springs. This reduces wear and tear, extending the door's lifespan.
Secure Tracks Properly: Ensure tracks are firmly anchored to the wall. Loose tracks can cause the door to malfunction.
Balance the Door: After installation, check the door's balance. An unbalanced door can strain the opener and other components.
Safety First: Always wear safety gear like gloves and goggles. High lift doors involve heavy parts and tensioned springs.
Common Mistakes to Avoid:
Skipping Instructions: Ignoring the manual can lead to improper installation and potential damage.
Using Incorrect Springs: High lift doors need specific springs. Using the wrong type can cause the door to fail.
Improper Track Alignment: Misaligned tracks can cause the door to jam or operate unevenly.
Neglecting Safety Measures: Not using safety cables or failing to release spring tension properly can result in serious injury.
Alternatives for Materials or Methods:
DIY Kits: Consider purchasing a high lift conversion kit. These kits include all necessary parts and detailed instructions.
Professional Help: If unsure about any step, hire a professional. They ensure the job is done correctly and safely.
Recycled Materials: Use recycled or repurposed materials for some parts to save money and reduce waste.
Automated Systems: Invest in an automated opener designed for high lift doors. These systems offer convenience and added security.
Estimating the Costs
High lift garage door conversion kit: $300-$500
Torsion springs: $100-$200
Cables: $20-$50
Tracks: $100-$200
Brackets and hardware: $50-$100
Garage door opener: $200-$400
Tools (drill, wrenches, etc.): $50-$100 if you don't already have them
Safety gear (gloves, goggles): $20-$40
Total cost: $840-$1,590
Budget-friendly alternatives:
- Used or refurbished parts: Check local classifieds or online marketplaces for cheaper options.
- Borrow tools: Ask friends or family to lend you tools.
- DIY garage door opener installation: Save on labor costs by installing it yourself.
Different Ways to Customize
Materials: Instead of standard steel tracks, consider using aluminum for a lighter, rust-resistant option. For the door panels, fiberglass can be a durable, lightweight alternative to traditional wood or steel.
Colors: Paint the door in a bold color like red or blue to make it stand out. For a more classic look, choose neutral tones like beige, gray, or white. You can also use a two-tone color scheme to add visual interest.
Styles: Opt for a modern design with clean lines and minimal hardware for a sleek appearance. For a more traditional look, add decorative hardware like handles and hinges. You could also install windows in the top panel for added light and style.
Mechanisms: Upgrade to a smart garage door opener that can be controlled via a smartphone app. This adds convenience and security. If noise is a concern, choose a belt-drive opener instead of a chain-drive for quieter operation.
Insulation: Use insulated panels to improve energy efficiency and reduce noise. This is especially useful if the garage is attached to the house or used as a workspace.
Safety Features: Install safety sensors that detect obstacles and prevent the door from closing on them. Adding a battery backup system ensures the door can still operate during power outages.
Customization: Add a mural or custom artwork to the door for a unique, personalized touch. This can be a fun project that adds character to your home.
Lighting: Incorporate LED strip lights along the tracks or around the door frame for better visibility and a modern look. This can also enhance safety when entering or exiting the garage at night.
Weatherproofing: Use weatherstripping around the edges of the door to keep out drafts, rain, and pests. This helps maintain a comfortable temperature inside the garage and protects stored items.
Handles and Locks: Upgrade to decorative handles and a keyless entry system for added security and convenience. This can also enhance the overall appearance of the door.
Eco-Friendly Suggestions
Reclaimed wood can be used for the frame and supports. This reduces waste and gives your project a rustic look. Recycled metal can be used for brackets and hinges. It’s strong and eco-friendly.
Insulation made from recycled materials like denim or cellulose can help keep your garage energy-efficient. Low-VOC paint is better for the environment and your health.
LED lighting inside the garage uses less energy and lasts longer than traditional bulbs. Solar panels can power the door opener, reducing electricity use.
Rainwater collection systems can be installed to wash the garage floor or water plants around the garage. Compostable materials for packaging and shipping any parts you need can also reduce waste.
Reuse old parts from your existing garage door if they are still in good condition. This saves money and resources. Local sourcing of materials reduces transportation emissions and supports local businesses.
Your Garage Door Awaits
You've got the know-how to tackle this project. From gathering materials to installing tracks and springs, each step brings you closer to a functional high lift garage door. Remember, safety first. Double-check measurements and connections to avoid any mishaps. If something feels off, don't hesitate to consult a professional. Your effort will pay off with a smoother, more efficient garage door. Now, grab those tools and get to work. Your garage door awaits!
What tools do I need to build a high lift garage door?
You'll need wrenches, screwdrivers, drill, tape measure, level, safety glasses, and a ladder.
How much clearance is required for a high lift garage door?
Typically, you'll need at least 12 inches of clearance above the door. Measure carefully to ensure there's enough space.
Can I convert my existing garage door to a high lift system?
Yes, you can convert it. You'll need a conversion kit that includes new tracks, springs, and cables.
How long does it take to install a high lift garage door?
Installation usually takes about 4-6 hours. If you're new to DIY projects, it might take a bit longer.
Is it safe to install a high lift garage door by myself?
It's safe if you follow the instructions and use proper safety gear. If you're unsure, consider hiring a professional.
How do I maintain my high lift garage door?
Regularly lubricate the moving parts, check for loose bolts, and ensure the tracks are clean. This will keep it running smoothly.
What are the benefits of a high lift garage door?
High lift doors provide more overhead space, making them ideal for tall vehicles or using the garage for storage.