
Home>Home & Furniture>Doors & Windows>How to Build a DIY Mobile Home Skirting Access Door
Doors & Windows
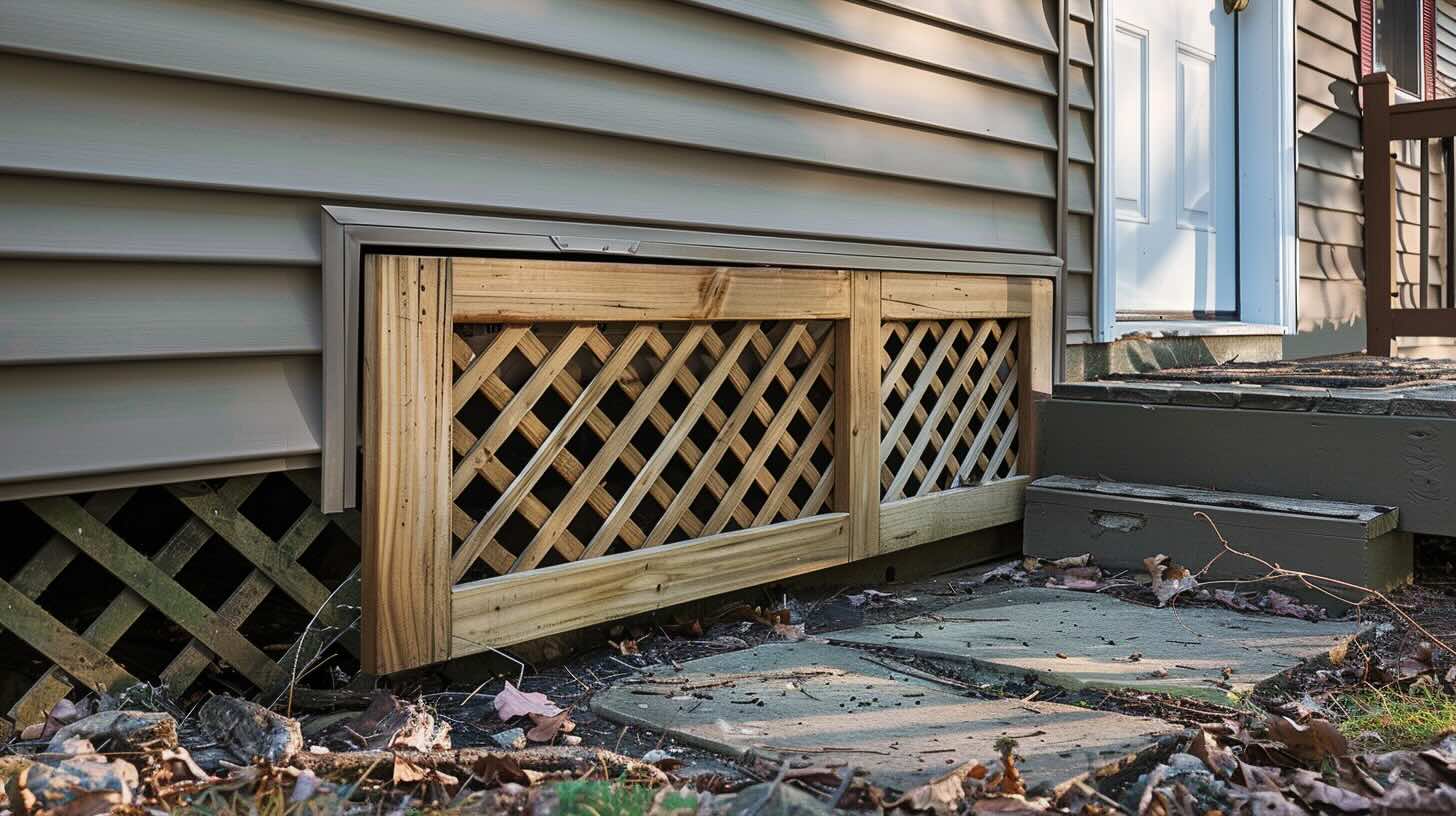
How to Build a DIY Mobile Home Skirting Access Door
Published: September 18, 2024
Learn how to build a DIY mobile home skirting access door with our step-by-step guide. Enhance your home's appearance and functionality with this easy project.
(Many of the links in this article redirect to a specific reviewed product. Your purchase of these products through affiliate links helps to generate commission for Twigandthistle.com, at no extra cost. Learn more)
Building a DIY mobile home skirting access door can save you money and make your home more convenient. Whether you need to get under your home for maintenance or storage, an access door provides a handy solution. This project is a straightforward way to improve your skirting without spending a lot of time or money. Even if you're new to DIY projects, you can handle this task with a few tools and materials. This guide will walk you through the necessary steps, ensuring your access door is sturdy, functional, and blends well with your existing skirting.
Getting Ready for the Project
Gather Materials: Collect plywood, hinges, screws, a latch, measuring tape, a saw, a drill, and safety gear like gloves and goggles.
Measure the Opening: Measure the space where the access door will go. Write down the height and width.
Cut the Plywood: Use the saw to cut the plywood to the size needed for the door. Make sure the edges are smooth.
Prepare the Workspace: Clear the area around the skirting. Ensure there's enough room to move and work comfortably.
Safety First: Wear gloves to protect your hands and goggles to shield your eyes from dust and debris.
Attach Hinges: Secure the hinges to one side of the plywood door. Make sure they are evenly spaced.
Install the Door: Position the door in the opening and attach the other side of the hinges to the skirting.
Add the Latch: Fix the latch on the opposite side of the hinges to keep the door closed securely.
Test the Door: Open and close the door several times to ensure it moves smoothly and stays shut when latched.
Items You Will Need
Materials Needed:
- Plywood: Used for the door panel. Choose a sturdy, weather-resistant type.
- 2x4 Lumber: Forms the frame of the access door.
- Hinges: Allows the door to swing open and closed.
- Latch or Lock: Keeps the door securely closed.
- Wood Screws: Fastens the plywood and lumber together.
- Weather Stripping: Seals the edges to prevent drafts and pests.
- Paint or Sealant: Protects the wood from moisture and weather damage.
Tools Needed:
- Tape Measure: Ensures accurate measurements.
- Circular Saw: Cuts the plywood and lumber to size.
- Drill: Makes holes for screws and installs hinges and latch.
- Screwdriver: Tightens screws.
- Hammer: Useful for any additional nailing.
- Level: Ensures the door is installed straight.
- Pencil: Marks measurements on wood.
- Safety Gear: Includes gloves and safety glasses to protect yourself while working.
Required Skills and Time
Skill Level: Intermediate
Time Required: Approximately 3-4 hours
- Measure and Cut Materials: 1 hour
- Assemble Frame: 1 hour
- Attach Hinges and Latch: 30 minutes
- Install Door: 1 hour
- Finishing Touches: 30 minutes
Instructions for Building
Gather Materials:
- Plywood or metal sheet
- Hinges
- Screws
- Latch or lock
- Measuring tape
- Saw
- Drill
- Screwdriver
- Paint or sealant (optional)
Measure the Opening:
- Use a measuring tape to find the height and width of the space where the door will go.
- Add an extra inch to each side for a proper fit.
Cut the Door Panel:
- Mark the measurements on the plywood or metal sheet.
- Use a saw to cut the panel to size.
Attach Hinges:
- Place hinges on one side of the door panel.
- Mark where the screws will go.
- Drill pilot holes for the screws.
- Screw the hinges onto the door panel.
Install the Door Frame:
- If there isn't a frame, create one using additional plywood or metal strips.
- Attach the frame around the opening using screws.
Mount the Door:
- Hold the door panel in place within the frame.
- Mark where the hinges will attach to the frame.
- Drill pilot holes in the frame.
- Screw the hinges into the frame, securing the door.
Add a Latch or Lock:
- Choose a spot for the latch or lock on the opposite side of the hinges.
- Mark where the screws will go.
- Drill pilot holes.
- Attach the latch or lock using screws.
Test the Door:
- Open and close the door to ensure it moves smoothly.
- Adjust hinges or latch if needed.
Seal and Paint (Optional):
- Apply a sealant to protect the door from weather.
- Paint the door to match the skirting.
Final Check:
- Ensure all screws are tight.
- Confirm the door is secure and functional.
Helpful Hints
Measure Twice, Cut Once: Always double-check measurements before cutting materials. This saves time and prevents mistakes.
Use Treated Wood: For the frame, use pressure-treated wood to resist moisture and pests.
Pre-drill Holes: Pre-drill screw holes to avoid splitting wood. This makes assembly smoother.
Weatherproofing: Apply weatherstripping around the door edges to keep out drafts and moisture.
Hinges and Latches: Use heavy-duty hinges and a sturdy latch to ensure the door stays secure.
Paint or Seal: Paint or seal the door and frame to protect against weather damage.
Ventilation: Add a vent to the door if the space behind it needs airflow.
Common Mistakes to Avoid:
- Incorrect Measurements: Misjudging dimensions can lead to gaps or a door that doesn't fit.
- Skipping Weatherproofing: Ignoring weatherproofing can cause moisture damage.
- Using Untreated Wood: Untreated wood deteriorates faster, especially in damp conditions.
- Weak Hinges: Flimsy hinges can break, making the door unusable.
Alternatives:
- Metal Frame: For added durability, consider a metal frame instead of wood.
- Composite Materials: Use composite materials for the door to resist rot and pests.
- Sliding Door: A sliding door can be an alternative if space is limited for a swinging door.
Budgeting for Your Project
Plywood: $20-$30 per sheet (4x8 feet)
2x4 Lumber: $3-$5 per piece (8 feet long)
Hinges: $5-$10 for a pair
Latch or Lock: $5-$15
Screws: $5 for a box
Paint or Sealant: $10-$20
Caulk: $5
Tools:
- Saw: $30-$50 (if you don't already have one)
- Drill: $40-$60 (if needed)
- Measuring Tape: $5-$10
- Paintbrush: $2-$5
Total Estimated Cost: $130-$210
Budget-Friendly Alternatives:
- Use reclaimed wood or scrap plywood: Free or very cheap
- Borrow tools from friends or neighbors: Free
- Opt for basic hinges and latches: $3-$5 each
Personalizing Your Design
Materials: Instead of using wood, try vinyl or metal for a more durable door. Vinyl is lightweight and easy to clean, while metal offers extra strength.
Colors: Paint the door to match your home’s exterior. Use weather-resistant paint in colors like white, gray, or beige. For a bold look, consider red or blue.
Styles: Add decorative trim around the door for a polished look. Use molding or beadboard to create a frame. Install a small window or vent for added functionality and style.
Handles and Locks: Choose a decorative handle or knob that matches your home’s style. Install a lock for added security. Keyed locks or slide bolts work well.
Hinges: Use piano hinges for a seamless look or strap hinges for a rustic touch. Concealed hinges can give a modern, clean appearance.
Insulation: Add foam board or spray foam insulation to the door for better temperature control. This helps keep the space under your home warmer in winter and cooler in summer.
Weatherstripping: Install weatherstripping around the edges to keep out drafts, moisture, and pests. Rubber or vinyl weatherstripping works well.
Decorative Elements: Attach house numbers or a nameplate to the door. Add a small planter or wreath for a welcoming touch.
Lighting: Install a solar-powered light above the door for better visibility at night. This also adds a decorative element.
Ventilation: Include a vent or louver in the door to allow airflow. This helps prevent moisture buildup under your home.
Reinforcement: For added strength, reinforce the door with cross braces or metal plates. This is especially useful if you live in an area with strong winds.
Eco-Friendly Suggestions
Reclaimed Wood: Use old pallets or leftover wood from other projects. Sand and treat the wood to ensure durability.
Recycled Metal: Old metal sheets or scraps can be repurposed. Cut them to size and ensure edges are smooth to avoid injury.
Eco-Friendly Paint: Choose low-VOC or zero-VOC paint. These options are better for the environment and your health.
Insulation: Use recycled insulation materials. Options like denim insulation or recycled foam boards work well.
Fasteners: Opt for stainless steel or other durable, rust-resistant fasteners. These will last longer and reduce waste.
Weatherstripping: Install weatherstripping made from recycled rubber. This helps seal gaps and improves energy efficiency.
Hinges and Handles: Reuse old hinges and handles from discarded furniture. Clean and refurbish them for a vintage look.
Sealant: Use eco-friendly sealants. These are less harmful to the environment and provide a strong seal.
Design: Plan a simple, functional design. This reduces material waste and makes construction easier.
Tools: Borrow or rent tools instead of buying new ones. This saves money and reduces resource consumption.
Your DIY Project is Complete
You've done it! Building a DIY mobile home skirting access door wasn't as tough as it seemed, right? With some basic tools, a bit of patience, and a sprinkle of creativity, you've added both functionality and style to your home. Now, accessing the area beneath your mobile home is a breeze. Plus, you saved some cash by doing it yourself. Remember, the key to any successful DIY project is planning and attention to detail. Don't forget to maintain your new access door to keep it in top shape. Who knows? Maybe this project has sparked your interest in tackling more DIY home improvements. Keep that can-do attitude and you'll be amazed at what you can achieve. Happy building!
What materials do I need for a DIY mobile home skirting access door?
You’ll need plywood, hinges, screws, a latch, a saw, a drill, and measuring tape.
How do I measure for the access door?
Measure the height and width of the area where you want the door. Add a couple of inches to each side for a snug fit.
What’s the best way to cut the plywood?
Use a circular saw or a jigsaw. Make sure to cut slowly and follow your measurements carefully.
How do I attach the hinges to the door?
Position the hinges on one side of the plywood, then screw them in place. Attach the other side to the skirting.
How do I secure the access door?
Install a latch or a lock on the opposite side of the hinges. This will keep the door closed and secure.
Can I paint or decorate the access door?
Absolutely! Use outdoor paint to match your skirting or add some personal flair.
How long will this project take?
It usually takes about 2-3 hours, depending on your skill level and tools.