
Home>Home & Furniture>Doors & Windows>How to Build a DIY Garage Door Vent
Doors & Windows
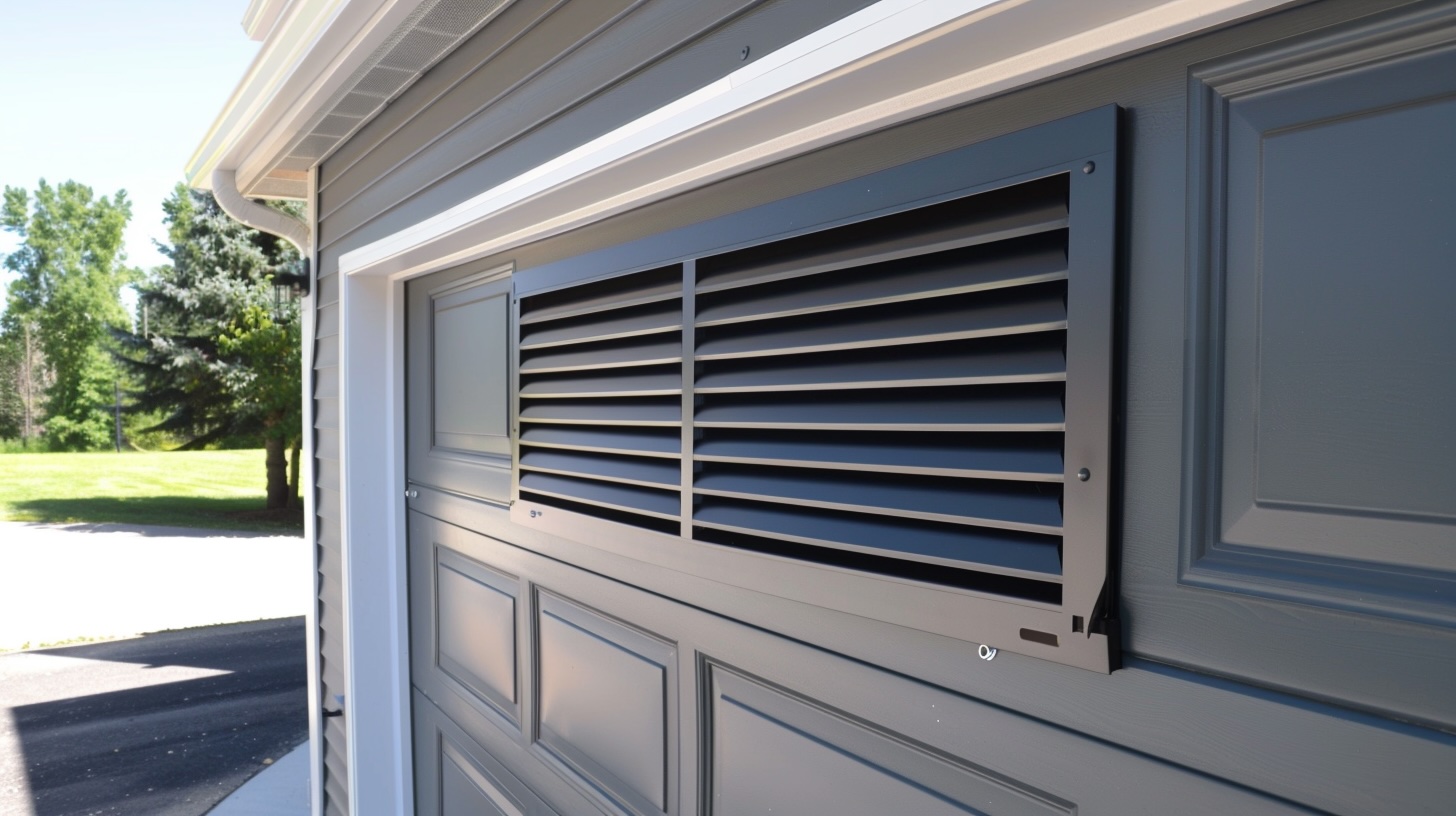
How to Build a DIY Garage Door Vent
Published: September 15, 2024
Learn how to build a DIY garage door vent with our step-by-step guide. Improve ventilation, reduce humidity, and enhance your garage's air quality easily and affordably.
(Many of the links in this article redirect to a specific reviewed product. Your purchase of these products through affiliate links helps to generate commission for Twigandthistle.com, at no extra cost. Learn more)
Ever noticed how stuffy garages can get? Building a DIY garage door vent is an easy way to improve airflow, keeping your space cooler and reducing moisture buildup. This simple project doesn't need many tools or materials. Even if you're new to DIY projects, you can handle it. This guide will show you how to get the job done step-by-step, so your garage can breathe fresh air. Ready to start? Let’s dive in and learn the basics of how to make your garage more comfortable with a homemade vent.
Getting Ready for Your Project
- Gather Materials: Get a vent kit, measuring tape, pencil, drill, jigsaw, screws, screwdriver, safety goggles, and gloves.
- Measure and Mark: Measure the spot where the vent will go. Mark the area with a pencil.
- Safety Gear: Wear safety goggles and gloves to protect eyes and hands.
- Prepare Workspace: Clear the garage door area. Ensure there's enough light.
- Drill Pilot Holes: Drill small holes at the corners of the marked area.
- Cut the Opening: Use a jigsaw to cut along the marked lines.
- Install the Vent: Place the vent into the opening. Secure it with screws using a screwdriver.
- Check for Gaps: Ensure no gaps around the vent. Seal if necessary.
- Clean Up: Remove any debris and tools from the workspace.
Gathering Materials and Tools
Materials:
- Vent Covers: These allow air to flow in and out while keeping pests out.
- Screws: Used to secure the vent covers to the garage door.
- Caulk: Seals around the vent to prevent air leaks.
- Caulk Gun: Dispenses the caulk smoothly.
- Weather Stripping: Helps seal gaps around the vent for better insulation.
Tools:
- Drill: Makes holes for screws and vent installation.
- Screwdriver: Tightens screws to secure the vent covers.
- Measuring Tape: Ensures accurate placement of vents.
- Pencil: Marks where to cut and drill.
- Jigsaw: Cuts the garage door to fit the vent covers.
- Level: Ensures vents are installed straight.
- Safety Glasses: Protects eyes while cutting and drilling.
- Gloves: Protects hands during installation.
Summary:
- Vent Covers: Allow airflow, keep pests out.
- Screws: Secure vents.
- Caulk: Seals edges.
- Caulk Gun: Applies caulk.
- Weather Stripping: Insulates gaps.
- Drill: Makes holes.
- Screwdriver: Tightens screws.
- Measuring Tape: Ensures accuracy.
- Pencil: Marks spots.
- Jigsaw: Cuts door.
- Level: Aligns vents.
- Safety Glasses: Protects eyes.
- Gloves: Protects hands.
Required Skills and Time Commitment
Skill Level: Intermediate
Time Required: 2-4 hours
Steps:
- Gather Materials: Vent cover, drill, screws, measuring tape, pencil.
- Measure and Mark: Decide where the vent will go. Use the measuring tape and pencil to mark the spot.
- Drill Holes: Carefully drill holes at the marked spots.
- Attach Vent Cover: Secure the vent cover using screws.
- Check Fit: Ensure the vent cover is snug and secure.
Tips:
- Wear safety goggles.
- Double-check measurements before drilling.
- Use a level to ensure the vent cover is straight.
Detailed Steps to Follow
Gather Materials:
- Vent cover
- Jigsaw
- Drill
- Screws
- Measuring tape
- Pencil
- Safety goggles
- Work gloves
Choose Location:
- Pick a spot on the garage door for the vent.
- Ensure it’s not near any moving parts.
Measure and Mark:
- Use the measuring tape to mark the vent cover’s dimensions.
- Draw the outline with a pencil.
Drill Pilot Holes:
- Put on safety goggles and work gloves.
- Drill holes at each corner of the marked outline.
Cut the Opening:
- Insert the jigsaw blade into one of the pilot holes.
- Carefully cut along the pencil outline.
Smooth Edges:
- Use sandpaper to smooth any rough edges around the cut.
Attach Vent Cover:
- Place the vent cover over the opening.
- Drill screws into the pre-drilled holes to secure the vent cover.
Check Fit:
- Ensure the vent cover is snug and secure.
- Make any adjustments if needed.
Clean Up:
- Remove any debris from the area.
- Store tools and leftover materials properly.
Helpful Tips and Tricks
Measure Twice, Cut Once: Accurate measurements are crucial. Double-check dimensions before cutting any materials.
Use a Template: Create a cardboard template for the vent holes. This ensures uniformity and saves time.
Proper Tools: Use a jigsaw for cutting the vent holes. It provides better control and cleaner cuts.
Seal the Edges: After cutting, sand the edges smooth and apply a weather-resistant sealant to prevent rust and wear.
Install Mesh: Attach a fine mesh screen behind the vent to keep out insects and debris.
Vent Placement: Position vents at the top and bottom of the door for optimal airflow.
Common Mistakes to Avoid:
- Incorrect Measurements: Always double-check to avoid misaligned or uneven vents.
- Skipping Sealant: Unsealed edges can lead to rust and damage over time.
- Poor Vent Placement: Placing vents too low or too high can reduce effectiveness.
Material Alternatives:
- Metal Vents: Use aluminum or stainless steel for durability.
- Plastic Vents: Lightweight and easy to install, but less durable.
- Wooden Frames: For a rustic look, use treated wood, but ensure it's weatherproofed.
Method Alternatives:
- Pre-made Vents: Purchase pre-made vents for easier installation.
- Hinged Vents: Install hinged vents for adjustable airflow.
Estimating the Cost
Materials:
- Vent Covers: $20-$30 each (you'll need two)
- Screws: $5 for a small box
- Caulk: $5-$10 for a tube
- Caulk Gun: $10
- Weather Stripping: $10-$15
Tools:
- Drill: $50-$100 (if you don't have one)
- Drill Bits: $10-$20
- Measuring Tape: $5-$10
- Pencil: $1
- Utility Knife: $10
Total Cost: $126-$226
Budget-Friendly Alternatives:
- Borrow a drill from a friend or neighbor.
- Use a manual screwdriver instead of a drill.
- Buy a used caulk gun from a thrift store.
- Use leftover screws from previous projects.
- Look for discounted vent covers at a hardware store.
Different Ways to Customize
Materials: Instead of using wood, try metal or PVC for a more durable vent. Metal can withstand harsh weather better, while PVC is lightweight and easy to cut.
Colors: Paint the vent to match your garage door. Use spray paint for a smooth finish or brush-on paint for a more textured look. Consider using bright colors for a pop of color or neutral tones for a subtle appearance.
Styles: Create a louvered vent for better airflow or a mesh screen to keep out bugs. Louvered vents can be made by angling slats of wood or metal. Mesh screens can be attached using a staple gun or screws.
Shapes: Instead of a standard rectangular vent, try a circular or oval shape. Use a jigsaw to cut out the desired shape from your material.
Decorative Elements: Add decorative grilles or trim around the vent for a more polished look. Grilles can be bought pre-made or crafted from metal or wood. Trim can be painted or stained to match or contrast with the garage door.
Insulation: For better temperature control, add insulation around the vent. Use foam strips or weatherstripping to seal gaps and prevent drafts.
Security: Increase security by adding a lockable cover or reinforced bars. A lockable cover can be made from metal or wood and secured with a padlock. Reinforced bars can be welded or screwed into place to prevent unauthorized access.
Installation: Instead of permanently attaching the vent, make it removable for easy cleaning or replacement. Use hinges and a latch to create a door-like vent that can be opened and closed as needed.
Eco-Friendly Suggestions
Reusing old materials can make your project more eco-friendly. For the frame, consider using reclaimed wood from old furniture or pallets. This reduces waste and gives the wood a second life.
For the vent cover, repurpose an old metal screen or mesh. You might find these in old windows or screen doors. If you need to buy new, look for recycled aluminum mesh, which is durable and sustainable.
Use non-toxic paint or sealant to protect the wood. Many conventional paints contain harmful chemicals, but eco-friendly options are available at most hardware stores.
When attaching the vent, opt for recycled screws or nails. These are often made from reclaimed metals and are just as strong as new ones.
Finally, consider adding a solar-powered fan to improve airflow. Solar fans use renewable energy, reducing your carbon footprint.
Your DIY Garage Door Vent is Ready
You've done it! Your garage door vent is installed, and now your garage has better airflow. This project wasn't just about cutting a hole and sticking a vent in. You measured, cut, and installed with precision. Now, your garage will stay cooler in summer and drier in winter. Plus, you might notice fewer odors and less moisture buildup.
Remember, regular maintenance is key. Check the vent periodically for any blockages or damage. If you see any issues, fix them right away to keep everything running smoothly.
Enjoy the benefits of your hard work. Your garage is now a more comfortable and functional space. Whether you're working on your car, doing a DIY project, or just storing stuff, you'll appreciate the improved environment. Great job!
Why should I install a garage door vent?
A garage door vent helps improve airflow, reduce heat buildup, and prevent moisture problems. It keeps your garage cooler in summer and drier in winter.
What tools will I need for this project?
You’ll need a drill, jigsaw, measuring tape, screwdriver, and vent cover. Don’t forget safety glasses and gloves for protection.
How do I choose the right vent size?
Measure your garage door and consider the ventilation needs. A standard vent size is usually 12x12 inches, but you might need larger or multiple vents for bigger garages.
Where should I place the vent on the garage door?
Place the vent near the top of the door for hot air to escape. If you’re adding multiple vents, space them evenly for balanced airflow.
How do I cut the hole for the vent?
Mark the vent’s outline on the door, then use a drill to make starter holes at the corners. Cut along the outline with a jigsaw.
How do I secure the vent cover?
Position the vent cover over the hole and use screws to attach it securely. Make sure it’s flush with the door to avoid gaps.
Can I install a vent on any type of garage door?
Most garage doors, whether metal, wood, or composite, can have vents installed. Just ensure the door’s material can be cut and drilled safely.