
Home>Home & Furniture>Doors & Windows>DIY Herringbone Barn Door Guide
Doors & Windows
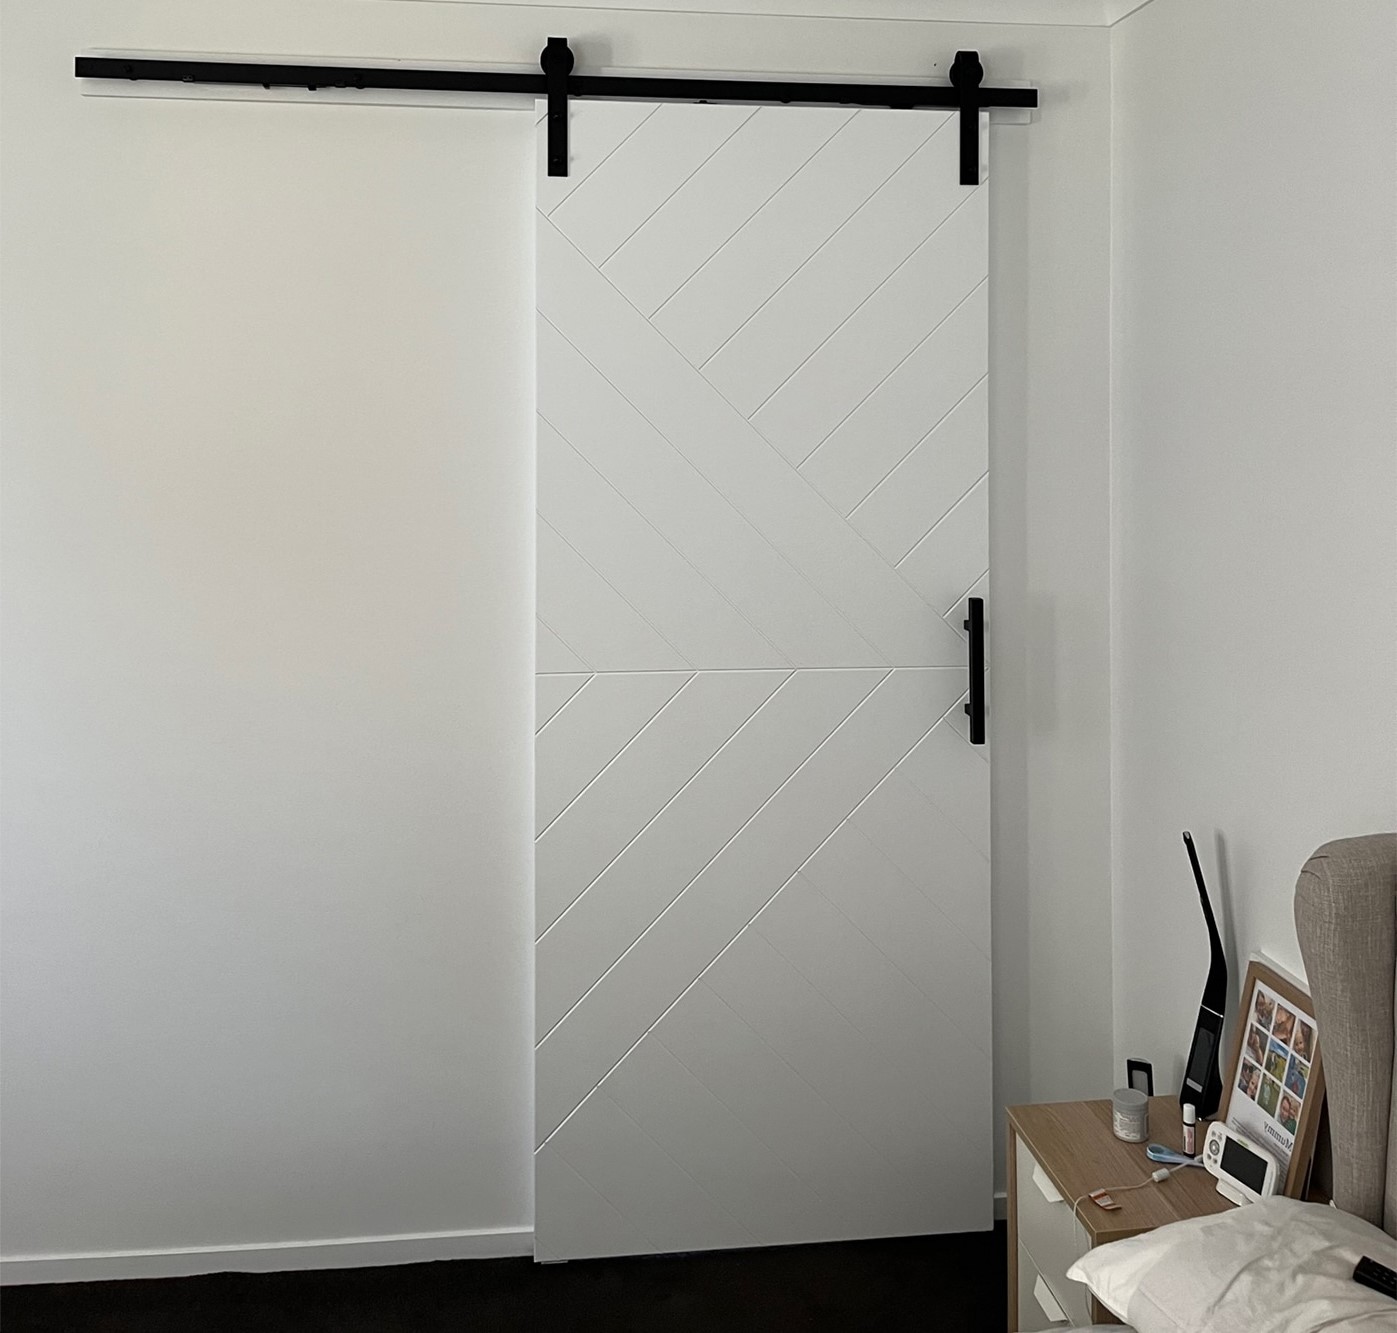
DIY Herringbone Barn Door Guide
Published: September 16, 2024
Learn how to create a stunning DIY herringbone barn door with our step-by-step guide. Perfect for adding a rustic touch to any room. Easy, affordable, and stylish!
(Many of the links in this article redirect to a specific reviewed product. Your purchase of these products through affiliate links helps to generate commission for Twigandthistle.com, at no extra cost. Learn more)
Building your own herringbone barn door can be exciting and rewarding. This guide helps you create a stunning piece for your home. Herringbone patterns add a touch of elegance and are easier to make than they appear. With some basic tools, patience, and a bit of creativity, you’ll soon have a stylish door that transforms any space. Even if you're new to woodworking, this project is manageable and fun. Ready to get started on your DIY journey? Grab your tools, and let's begin this exciting project. Your unique herringbone barn door awaits!
Getting Ready for Your Project
Gather Materials: Get wood planks, screws, nails, a door handle, hinges, a sliding door track, wood glue, a saw, sandpaper, and a measuring tape.
Safety Gear: Wear safety goggles, gloves, and a dust mask to protect yourself from wood dust and splinters.
Workspace Setup: Clear a large, flat area to work. Ensure good lighting and ventilation. Lay down a drop cloth to catch sawdust and protect the floor.
Measure and Cut: Measure the door frame and cut wood planks to size. Double-check measurements to avoid mistakes.
Sand Wood: Smooth all wood pieces with sandpaper to remove rough edges and splinters.
Layout Design: Arrange the wood planks in a herringbone pattern on the floor. Adjust until satisfied with the look.
Pre-drill Holes: Mark and pre-drill holes for screws and nails. This prevents wood from splitting.
Assemble Door: Start gluing and screwing planks together according to the herringbone design. Ensure each piece is secure.
Attach Hardware: Fix the door handle, hinges, and sliding door track. Follow manufacturer instructions for proper installation.
Final Check: Inspect the door for stability and smooth operation. Make any necessary adjustments before mounting.
Materials and Tools Checklist
- Wood Planks: These are the main materials for the door. Choose high-quality wood like pine or oak for durability.
- Barn Door Hardware Kit: Includes the track, rollers, and handles. Essential for hanging and sliding the door.
- Wood Glue: Used to bond the wood planks together securely.
- Wood Screws: Fasten the planks and hardware. Ensure they are the right length to avoid splitting the wood.
- Sandpaper: Smooths the wood surfaces. Use different grits for a fine finish.
- Wood Stain or Paint: Adds color and protects the wood. Choose a finish that matches your decor.
- Measuring Tape: Ensures accurate measurements for cutting and fitting the planks.
- Circular Saw: Cuts the wood planks to the required size. A miter saw can also be used for angled cuts.
- Drill: Makes holes for screws and hardware. A cordless drill is convenient for mobility.
- Clamps: Hold the wood pieces together while the glue dries.
- Level: Ensures the door hangs straight. A crucial tool for proper alignment.
- Pencil: Marks measurements and cutting lines on the wood.
- Safety Gear: Includes safety glasses, gloves, and ear protection. Keeps you safe while working.
Skill Level and Time Commitment
Skill Level: Intermediate
Time Required: 1-2 days
- Gather Materials: 1-2 hours
- Cut Wood Pieces: 2-3 hours
- Assemble Door Frame: 1-2 hours
- Create Herringbone Pattern: 3-4 hours
- Sand and Finish: 2-3 hours
- Install Hardware: 1-2 hours
Important Keywords: Intermediate, 1-2 days, Gather Materials, Cut Wood Pieces, Assemble Door Frame, Create Herringbone Pattern, Sand and Finish, Install Hardware
How to Build a Herringbone Barn Door
Gather Materials and Tools
- Wooden planks
- Barn door hardware kit
- Screws and nails
- Wood glue
- Measuring tape
- Saw
- Drill
- Sandpaper
- Stain or paint
- Brush or roller
Measure and Cut Wood
- Measure the door frame.
- Cut planks to fit the frame dimensions.
- Cut additional planks at 45-degree angles for the herringbone pattern.
Assemble the Frame
- Lay out the frame pieces.
- Use wood glue and screws to secure the frame.
- Ensure the frame is square using a carpenter's square.
Create Herringbone Pattern
- Lay angled planks inside the frame.
- Alternate the direction to form the herringbone pattern.
- Trim excess wood at the edges.
Secure Herringbone Planks
- Apply wood glue to the back of each plank.
- Nail or screw planks into the frame.
- Ensure planks are flush with the frame.
Sand and Finish
- Sand the entire door to smooth rough edges.
- Apply stain or paint.
- Allow to dry completely.
Install Hardware
- Attach barn door hardware to the top of the door.
- Follow the hardware kit instructions for installation.
- Mount the door on the track.
Test and Adjust
- Slide the door back and forth.
- Make any necessary adjustments to ensure smooth operation.
Helpful Tips and Tricks
Measure Twice, Cut Once: Always double-check measurements before cutting wood. Mistakes can be costly.
Use a Template: Create a cardboard or paper template for the herringbone pattern. This helps visualize the layout and ensures accuracy.
Pre-Sand Wood Pieces: Sand each piece before assembly. It’s easier than sanding the entire door later.
Glue and Nail: Apply wood glue to each piece before nailing. This adds extra strength to the door.
Stain Before Assembly: Stain or paint the wood pieces before putting them together. This prevents uneven coloring and makes the process cleaner.
Use a Square: Ensure each piece is square with the frame. A carpenter’s square can help keep lines straight.
Dry Fit First: Lay out all pieces without glue or nails to check the fit. Adjust as needed before final assembly.
Clamp It Down: Use clamps to hold pieces in place while the glue dries. This prevents shifting and ensures a tight bond.
Common Mistakes to Avoid:
Rushing Measurements: Incorrect measurements lead to gaps or misalignment. Take your time.
Skipping the Template: Without a template, the pattern can become uneven or crooked.
Ignoring Wood Grain: Align wood grain in the same direction for a uniform look. Mixed grains can appear messy.
Not Pre-Sanding: Skipping this step makes the final sanding harder and less effective.
Alternatives for Materials or Methods:
Plywood Base: Use plywood as a base for the herringbone pattern. It provides a sturdy foundation.
Reclaimed Wood: Reclaimed wood adds character and is eco-friendly. Ensure it’s clean and free of pests.
Peel-and-Stick Planks: For a quicker project, use peel-and-stick wood planks. They’re easy to apply and remove.
Paint Instead of Stain: Paint can offer a modern look and cover imperfections better than stain.
Pocket Screws: Use pocket screws instead of nails for a cleaner look and stronger joints.
Budgeting for Your DIY Barn Door
Wood: You'll need about 20-25 square feet of wood. Pine or plywood costs around $50-$70. Higher-quality wood like oak or maple can cost $100-$150.
Barn Door Hardware Kit: These kits include tracks, rollers, and handles. Prices range from $50-$150 depending on quality and style.
Screws and Nails: A box of screws and nails costs about $10.
Wood Stain or Paint: A quart of wood stain or paint costs around $15-$25.
Sandpaper: A pack of sandpaper costs about $5.
Tools: If you don't already have them, you might need a saw ($30-$100), drill ($40-$100), measuring tape ($10), level ($15), and paintbrushes ($5).
Total Cost: For budget-friendly options, expect to spend around $200-$250. For higher-quality materials, the cost could be $300-$400.
Budget-Friendly Alternatives:
- Use pine or plywood instead of oak or maple.
- Look for discounted hardware kits online or at local stores.
- Borrow tools from friends or family to save on costs.
Creative Variations and Customizations
Materials: Instead of traditional wood, try reclaimed wood for a rustic look or plywood for a budget-friendly option. Metal sheets can add an industrial touch.
Colors: Use stain to highlight natural wood grain or paint for a bold statement. Whitewash can give a beachy vibe, while dark stains offer a more sophisticated appearance.
Styles: For a modern twist, use geometric patterns instead of the classic herringbone. Chevron patterns are another stylish alternative.
Hardware: Swap out standard barn door hardware for black iron for a farmhouse feel or brushed nickel for a sleek, modern look. Leather straps can add a unique touch.
Finishes: Consider a matte finish for a contemporary look or a glossy finish for a polished appearance. Distressed finishes can add character and charm.
Handles: Use antique handles for a vintage feel or sleek, minimalist handles for a modern aesthetic. Custom-made handles can make your door truly unique.
Accents: Add decorative nails or metal inlays for extra flair. Stenciling or wood burning can personalize the design further.
Eco-Friendly Building Tips
Reclaimed wood makes an excellent choice for a herringbone barn door. Old pallets, barn wood, or even leftover flooring can be repurposed. This not only saves money but also reduces waste.
Eco-friendly stains and finishes should be used. Look for products labeled as low-VOC (volatile organic compounds) or water-based. These are better for your health and the environment.
Recycled hardware can add a rustic touch. Check local salvage yards or online marketplaces for second-hand door handles, hinges, and tracks.
Natural adhesives like wood glue made from plant-based materials can be a sustainable alternative to synthetic options.
Energy-efficient tools should be used. Hand tools or battery-operated tools with rechargeable batteries can reduce energy consumption.
Sustainable packaging for any new materials purchased is important. Opt for suppliers who use minimal or recyclable packaging.
Local sourcing of materials reduces the carbon footprint associated with transportation. Visit nearby lumber yards or hardware stores to find what you need.
Upcycling old furniture or other wooden items can provide unique pieces for your project. An old table or dresser might have just the right wood for your door.
Your DIY Masterpiece Awaits
You've got all the tools and steps needed to create a stunning herringbone barn door. From gathering materials to the final installation, each step brings you closer to a unique piece that adds charm to your space. Remember, patience and precision are key. Don't rush the process; take your time to ensure everything fits perfectly. If you hit a snag, don't stress. Troubleshooting is part of the fun. Once finished, you'll have a door that's not just functional but also a testament to your craftsmanship. So, roll up your sleeves, get your hands dirty, and enjoy the satisfaction of building something beautiful with your own hands. Happy building!
How do I choose the right wood for my herringbone barn door?
Pick hardwood like oak or maple for durability. Softwoods like pine are cheaper but might dent easier. Make sure the wood is straight and free of knots.
What tools will I need?
You’ll need a saw, drill, measuring tape, level, wood glue, clamps, and screws. A miter saw is handy for those angled cuts.
How do I get the herringbone pattern right?
Start by cutting your wood pieces at a 45-degree angle. Lay them out on the floor first to get the pattern right. Use a chalk line to keep everything straight.
Should I stain or paint my barn door?
It’s up to you! Staining shows off the wood grain, while painting gives a more modern look. Just make sure to sand and prime the wood first.
How do I install the barn door?
Attach a track to the wall above the doorway. Make sure it’s level. Then, hang the door on the track using the hardware that comes with the kit.
Can I make a herringbone barn door if I’m a beginner?
Absolutely! Just take your time and measure twice before cutting. Watching a few tutorials can also help you get the hang of it.
How do I maintain my barn door?
Wipe it down with a damp cloth to keep it clean. Check the hardware periodically to make sure everything stays tight and secure.