
Home>Home & Furniture>Doors & Windows>DIY Fall Door Decor: Step-by-Step Guide
Doors & Windows
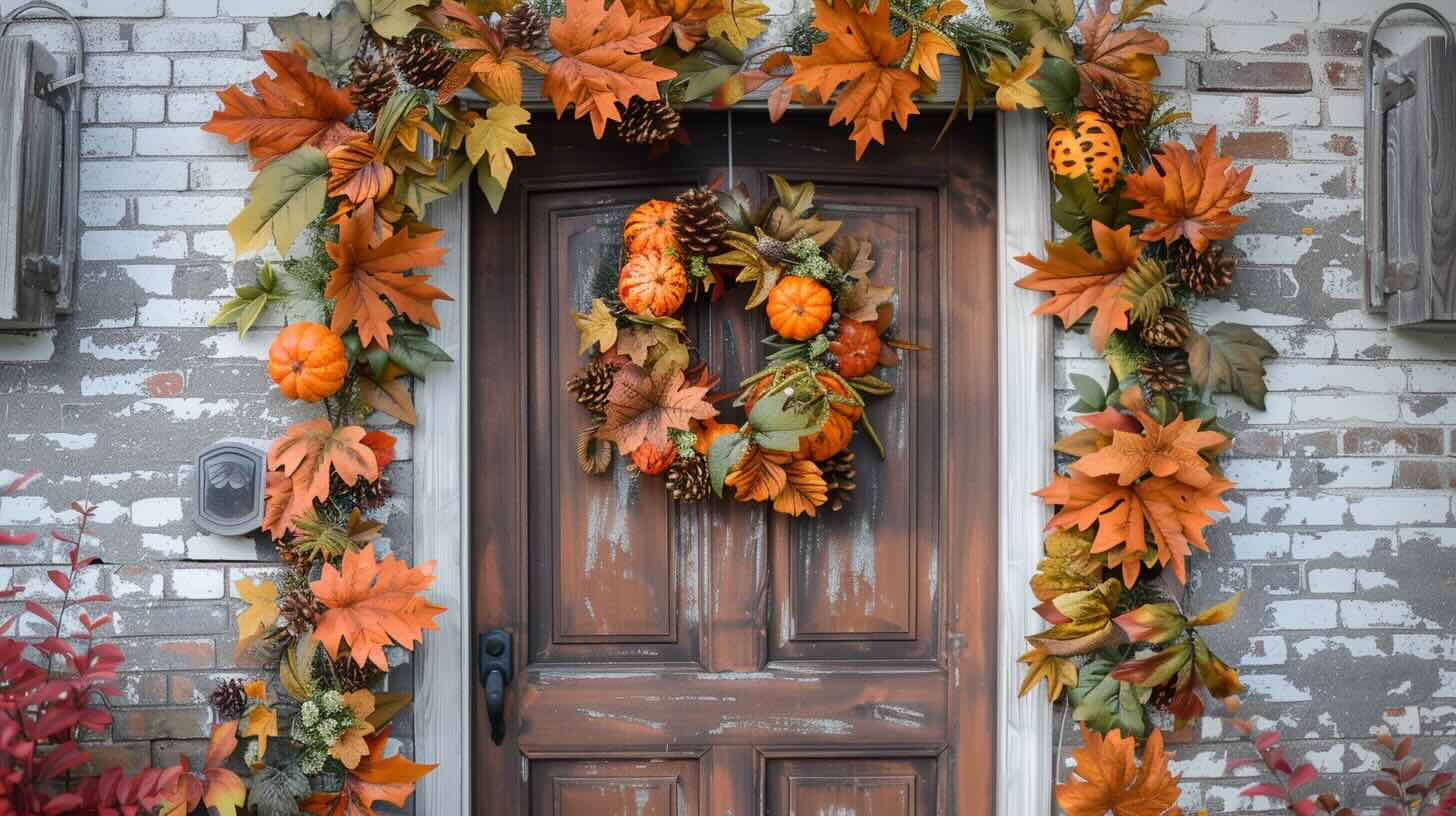
DIY Fall Door Decor: Step-by-Step Guide
Published: September 13, 2024
Transform your entryway with our DIY Fall Door Decor guide! Step-by-step instructions to create stunning, seasonal decorations that welcome autumn with style.
(Many of the links in this article redirect to a specific reviewed product. Your purchase of these products through affiliate links helps to generate commission for Twigandthistle.com, at no extra cost. Learn more)
Fall is a great time to add some seasonal charm to your front door. With a bit of creativity and a few supplies, you can create beautiful DIY fall door decor that will make your home feel warm and welcoming. Whether you're a crafting pro or just looking for a fun weekend project, this guide will walk you through everything you need to know. From gathering materials to adding the finishing touches, we’ll cover each step. Ready to get started? Let’s dive into creating something special that captures the spirit of autumn!
Getting Ready for Your Project
Gather Materials: Collect all necessary items like wreath forms, faux leaves, pumpkins, ribbons, hot glue gun, and scissors.
Choose a Design: Decide on a theme or color scheme for your fall decor. This helps in selecting matching materials.
Set Up Workspace: Find a clean, flat surface to work on. Ensure good lighting and enough space to spread out materials.
Safety First: Wear gloves when handling hot glue guns or sharp tools. Keep a first aid kit nearby for minor injuries.
Clean Door Surface: Wipe down the door where the decor will hang. This ensures better adhesion and a clean look.
Measure and Mark: Use a measuring tape to mark where you want to place the decor. This helps in achieving symmetry.
Test Hanging Method: Check if your hanging method (hooks, nails, or adhesive strips) can support the weight of the decor.
Organize Materials: Lay out all materials in the order you plan to use them. This makes the process smoother and quicker.
Check Tools: Ensure all tools are in working condition. Replace any faulty items to avoid interruptions.
Plan for Cleanup: Have a trash bag or bin nearby for easy disposal of scraps and packaging.
Materials and Tools Needed
- Wreath Form: A circular base to attach decorations. Can be made of foam, wire, or grapevine.
- Hot Glue Gun: Essential for attaching decorations securely. Make sure to have extra glue sticks.
- Scissors: For cutting ribbons, fabric, or other materials.
- Wire Cutters: Needed for trimming floral wire or stems.
- Floral Wire: Helps secure larger items to the wreath form.
- Fall Foliage: Artificial leaves, branches, and flowers in autumn colors.
- Mini Pumpkins and Gourds: Small decorative pumpkins and gourds add a festive touch.
- Ribbon: Choose fall-themed ribbons for bows or accents.
- Burlap: Adds a rustic feel. Can be used as a base layer or for bows.
- Pinecones: Natural elements that enhance the fall theme.
- Acorns: Small accents that complement the foliage.
- Twine: Useful for hanging the wreath or adding rustic details.
- Decorative Picks: Pre-made picks with berries, leaves, or small pumpkins for easy decoration.
- Command Hooks: For hanging the finished wreath on the door without damage.
Skill Level and Time Required
Skill Level: Beginner
Time Required: 1-2 hours
- Gather Materials: 15 minutes
- Prepare the Base: 10 minutes
- Attach Decorations: 30-45 minutes
- Add Final Touches: 15-20 minutes
This project is perfect for those new to DIY. It’s simple, quick, and fun!
Step-by-Step Instructions
Gather Materials
- Wreath base (grapevine or foam)
- Faux fall leaves
- Mini pumpkins or gourds
- Pinecones
- Hot glue gun
- Ribbon
- Scissors
Prepare the Wreath Base
- Lay the wreath base on a flat surface.
- Ensure it's clean and free of debris.
Attach Faux Leaves
- Use the hot glue gun to attach faux leaves around the wreath base.
- Overlap leaves slightly for a fuller look.
Add Mini Pumpkins and Gourds
- Glue mini pumpkins or gourds evenly around the wreath.
- Alternate colors and sizes for variety.
Incorporate Pinecones
- Glue pinecones between the pumpkins and leaves.
- Ensure they are securely attached.
Create a Bow
- Cut a length of ribbon.
- Tie it into a bow and adjust the loops.
Attach the Bow
- Glue the bow to the bottom or top of the wreath.
- Ensure it’s centered and secure.
Final Touches
- Check for any loose items and re-glue if necessary.
- Fluff leaves and bow for a polished look.
Hang the Wreath
- Use a door hanger or ribbon loop to hang the wreath on your door.
- Adjust as needed to ensure it hangs straight.
Helpful Tips and Tricks
Choose a Theme: Pick a color scheme or theme like pumpkins, leaves, or scarecrows. This keeps your decor cohesive.
Use a Base: Start with a sturdy base like a grapevine wreath or wooden sign. This gives your decor structure.
Layer Elements: Add layers with different textures like burlap, ribbon, or faux leaves. This adds depth and interest.
Hot Glue Gun: Use a hot glue gun for attaching items. It’s quick and holds well.
Balance: Arrange items symmetrically or asymmetrically, but keep it balanced. This makes it visually appealing.
Personal Touch: Add something personal like a monogram or family name. This makes it unique.
Weatherproof: Use weather-resistant materials if your door is exposed to the elements. This ensures your decor lasts longer.
Common Mistakes to Avoid:
- Overcrowding: Don’t overcrowd your base. Less is often more.
- Ignoring Proportions: Make sure your decor fits the size of your door.
- Weak Adhesives: Avoid using weak adhesives like tape. They won’t hold up.
- Clashing Colors: Stick to your color scheme to avoid a chaotic look.
Alternatives:
- Materials: Instead of faux leaves, use real dried leaves for a natural look.
- Methods: Instead of hot glue, use floral wire for a more adjustable option.
- Base: Swap a grapevine wreath for a foam wreath if you want a different texture.
Estimating the Cost
Wreath Base: $5-$10. Look for foam or grapevine bases at craft stores.
Artificial Leaves: $10-$15. Buy packs of mixed fall leaves.
Mini Pumpkins and Gourds: $5-$10. Plastic or foam versions work well.
Ribbon: $3-$7. Choose fall colors like orange, brown, or gold.
Hot Glue Gun: $10-$15. Essential for attaching decorations.
Glue Sticks: $3-$5. Make sure they fit your glue gun.
Scissors: $5-$10. Good for cutting ribbon and trimming leaves.
Wire Cutters: $5-$10. Useful for cutting stems on artificial flowers.
Optional: Battery-Operated Fairy Lights: $5-$10. Adds a cozy glow.
Total Estimated Cost: $51-$92.
Budget-Friendly Alternatives:
- Use a cardboard base instead of foam or grapevine: Free if you have cardboard at home.
- Collect real leaves and pinecones from outside: Free.
- Use twine or yarn instead of ribbon: $2-$3.
- Borrow a hot glue gun from a friend or neighbor: Free.
- Skip the fairy lights if not necessary: Saves $5-$10.
Creative Variations and Customizations
Alternative materials can add a unique touch. Instead of traditional wreath bases, use a grapevine wreath, wooden hoop, or even a picture frame. For a rustic look, try burlap or twine instead of ribbon. Faux leaves and flowers can be swapped with dried flowers, pinecones, or acorns.
Colors can change the vibe. Classic fall colors like orange, red, and yellow are great, but consider muted tones like burgundy, mustard, or olive green for a more sophisticated look. For a modern twist, use metallics like gold, copper, or bronze.
Styles can vary too. For a minimalist style, use fewer elements with clean lines. A boho style might include feathers, macramé, or beads. For a farmhouse look, incorporate wooden signs, checkered fabric, or rustic metal accents.
Mix and match these ideas to create a personalized fall door decor that suits your taste and home.
Eco-Friendly Tips
Gather Materials: Look around your home for reusable or recyclable items. Old fabric, cardboard, twine, and even dried leaves can be perfect for fall decor.
Create a Base: Use a recycled cardboard piece as the base for your door decor. Cut it into a circle or any shape you like.
Add Texture: Wrap the cardboard with old fabric or burlap. Secure it with reused twine or string.
Decorate with Nature: Collect fallen leaves, pinecones, and acorns from your yard. Attach these natural elements to your base using eco-friendly glue or twine.
Personal Touch: Add a personal touch with recycled paper cutouts or old buttons. You can also use dried flowers from your garden.
Hang It Up: Use a recycled ribbon or string to hang your creation on the door. Make sure it’s secure but easy to remove.
Optional Extras: If you have old, unused candles, melt them down to create small wax ornaments. Attach these to your decor for a cozy fall look.
Maintenance: Keep your decor looking fresh by occasionally replacing natural elements like leaves and flowers. This way, your door decor stays vibrant throughout the season.
Your Fall Door Awaits
You've got all the tools and tips to create a stunning fall door decor. From gathering supplies to adding those final touches, every step is a chance to show off your creativity. Remember, there's no right or wrong way to do it. Mix and match colors, play with different textures, and let your personality shine through. If something doesn't look right, tweak it until it does. The best part about DIY is making it your own. So, grab your materials, get to work, and enjoy the process. Your door will soon be the talk of the neighborhood. Happy decorating!
How do I choose the right materials for my fall door decor?
Look for natural elements like pinecones, leaves, and branches. Fabric like burlap or felt works great too. Wreath forms made of foam or wire are sturdy bases.
What tools will I need?
You'll need a hot glue gun, scissors, wire cutters, and floral wire. A ruler or measuring tape can help with precise cuts.
How can I make my decor weatherproof?
Use weather-resistant materials like plastic leaves and waterproof glue. Sealants can protect natural elements. Hang your decor under a covered porch to shield it from rain.
Can I reuse old decorations?
Absolutely! Repurpose old wreaths, ribbons, and ornaments. A little spray paint can give them a fresh look. Mix and match to create something unique.
How do I attach my decor to the door?
Use a wreath hanger or command hooks. Floral wire can secure lightweight items. For heavier pieces, suction cups with hooks work well.
Any tips for arranging the elements?
Start with a focal point like a large pumpkin or bow. Layer smaller items around it. Balance colors and textures for a cohesive look. Step back often to see how it looks from a distance.
How can I make my decor last longer?
Store it in a cool, dry place when not in use. Avoid direct sunlight to prevent fading. Handle with care to keep elements intact.