
Home>Home & Furniture>Doors & Windows>DIY Decorative Cabinet Door Inserts
Doors & Windows
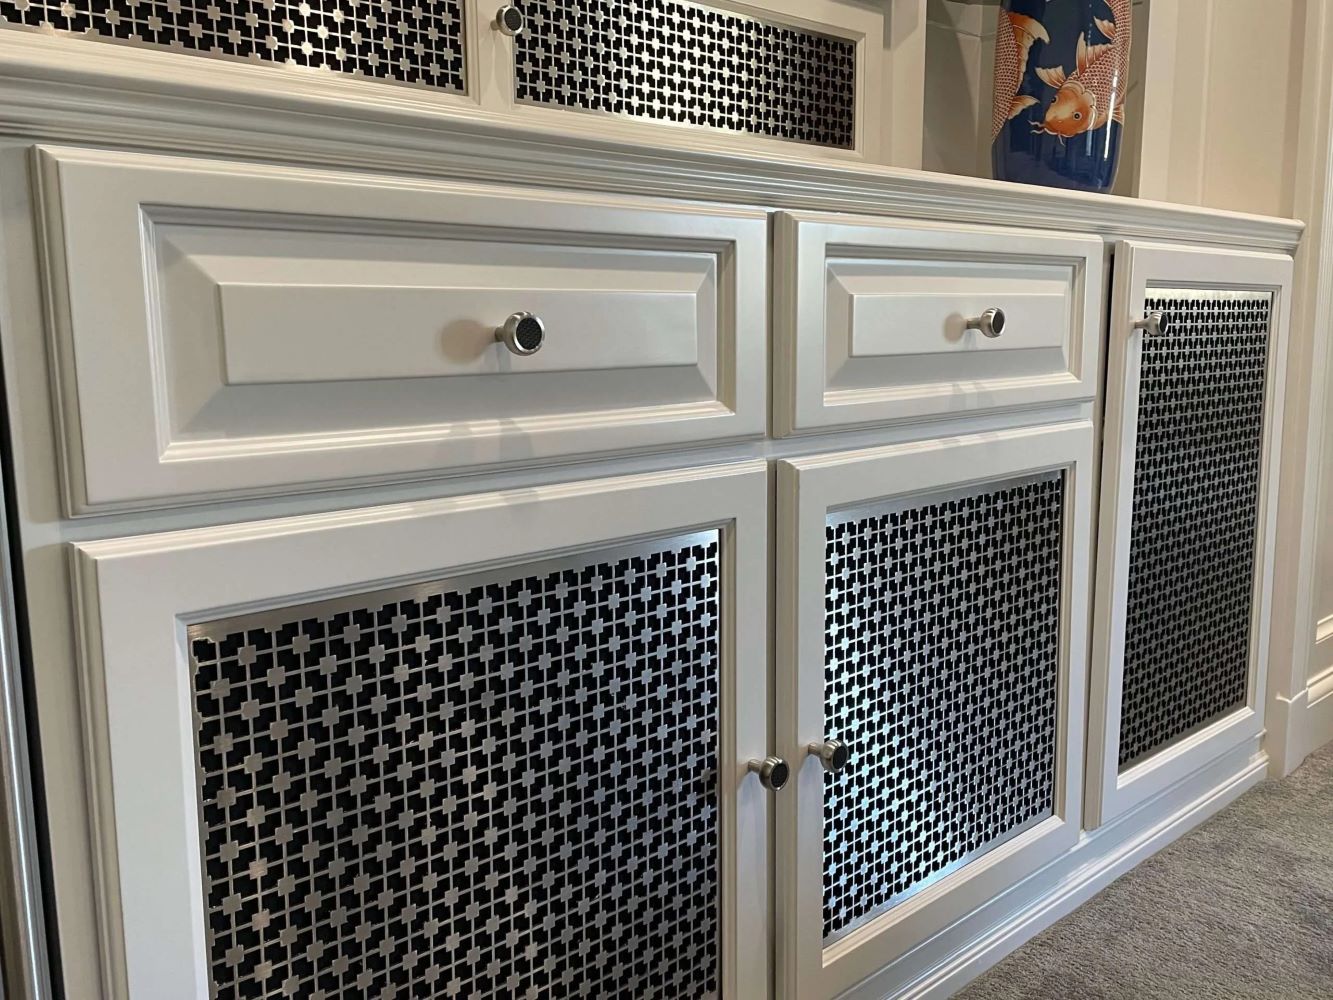
DIY Decorative Cabinet Door Inserts
Published: September 9, 2024
Transform your kitchen with DIY decorative cabinet door inserts. Discover step-by-step instructions, materials needed, and creative ideas to elevate your space effortlessly.
(Many of the links in this article redirect to a specific reviewed product. Your purchase of these products through affiliate links helps to generate commission for Twigandthistle.com, at no extra cost. Learn more)
Transform your kitchen or bathroom with DIY decorative cabinet door inserts. This simple project allows you to express your personal style while updating old or plain cabinets. Materials like glass, metal, fabric, or wood can add fresh charm. You don’t need to be a skilled carpenter; just a few tools and some creativity will do. Think of it as a fun weekend project that offers lasting beauty. Plus, changing inserts is often cheaper than replacing entire cabinets. Ready to give your space a quick, stylish lift? Let’s get started!
Getting Ready for the Project
Gather Materials: Collect all necessary items like decorative inserts, measuring tape, pencil, safety goggles, gloves, and a saw.
Measure and Mark: Measure the cabinet doors accurately. Mark where the inserts will go using a pencil.
Safety First: Wear safety goggles and gloves to protect your eyes and hands while cutting and handling materials.
Prepare Workspace: Set up a clean, flat workspace. Ensure good lighting and ventilation.
Remove Doors: Take off the cabinet doors from their hinges. Place them on your workspace.
Cut Openings: Use a saw to cut out the marked areas on the cabinet doors where the inserts will fit.
Smooth Edges: Sand down the cut edges to make them smooth and even.
Install Inserts: Fit the decorative inserts into the cut openings. Secure them with adhesive or screws as needed.
Reattach Doors: Once inserts are securely in place, reattach the cabinet doors to their hinges.
Clean Up: Clear your workspace of any debris and put away tools safely.
What You Need to Get Started
Cabinet Doors: The base for your project. Choose doors with removable panels or ones you can cut out.
Decorative Inserts: Options include glass, metal, or fabric. Pick something that matches your style.
Measuring Tape: Essential for accurate measurements of the panels and inserts.
Pencil: For marking measurements and cutting lines.
Jigsaw: Needed to cut out the panel sections from the cabinet doors.
Sandpaper: Smooths out rough edges after cutting.
Wood Glue: Secures the inserts in place.
Clamps: Holds pieces together while the glue dries.
Screwdriver: Removes and reattaches cabinet door hardware.
Safety Gear: Includes goggles and gloves to protect yourself while cutting and sanding.
Paint or Stain: Optional, for finishing the cabinet doors to match your decor.
Brushes or Rollers: Used to apply paint or stain evenly.
Drop Cloth: Protects your work area from paint or stain spills.
Utility Knife: Trims any excess material from the inserts.
Ruler or Straight Edge: Ensures straight lines when marking and cutting.
Caulk or Sealant: Seals any gaps around the inserts for a finished look.
How Much Time and Skill You Need
Skill Level: Intermediate
Time Required: 4-6 hours
- Measure and Cut Inserts: 1-2 hours
- Remove Cabinet Doors: 30 minutes
- Install Inserts: 1-2 hours
- Reattach Doors: 30 minutes
- Finishing Touches: 30 minutes
Follow These Steps
Gather Materials:
- Decorative inserts (glass, metal, or wood)
- Measuring tape
- Pencil
- Jigsaw or router
- Sandpaper
- Wood glue
- Clamps
- Paint or stain (optional)
- Screwdriver
- Screws
Measure and Mark:
- Remove cabinet doors.
- Measure the area where inserts will go.
- Mark the measurements on the doors using a pencil.
Cut the Panel:
- Use a jigsaw or router to cut out the marked area.
- Sand the edges to smooth them.
Prepare the Inserts:
- Cut inserts to fit the cut-out area if needed.
- Sand the edges of the inserts.
Attach the Inserts:
- Apply wood glue around the edges of the cut-out area.
- Place the insert into the cut-out.
- Use clamps to hold the insert in place until the glue dries.
Secure the Inserts:
- Once the glue is dry, use screws to secure the insert from the back of the door.
- Make sure screws are not too long to avoid poking through the front.
Finish the Doors:
- Paint or stain the doors if desired.
- Allow the paint or stain to dry completely.
Reattach the Doors:
- Use a screwdriver to reattach the doors to the cabinets.
- Ensure doors are aligned properly.
Final Touches:
- Check for any loose screws or edges.
- Clean the inserts and doors for a polished look.
Helpful Tips and Tricks
Measure accurately before cutting any materials. Use a template to ensure each insert fits perfectly. Sand edges of cut materials to avoid splinters. Paint or stain inserts before installation for a cleaner look. Use adhesive strips for temporary placement to check alignment.
Common mistakes to avoid: Not measuring properly can lead to ill-fitting inserts. Using the wrong type of adhesive may cause damage. Forgetting to sand edges can result in rough finishes. Not checking for level alignment can make the inserts look crooked.
Alternatives: Instead of wood, consider using metal grilles or glass panels for a different look. Peel-and-stick wallpaper can be a quick and easy option for a decorative touch. Fabric inserts can add texture and color, secured with a staple gun or adhesive.
How Much Will It Cost?
Materials:
- Wood Panels (for inserts): $30-$50
- Decorative Mesh or Glass: $20-$40
- Paint or Stain: $10-$20
- Sandpaper: $5
- Wood Glue: $5
- Screws or Nails: $5
Tools:
- Jigsaw: $30-$60
- Drill: $40-$80
- Paintbrushes: $5-$10
- Measuring Tape: $5-$10
- Clamps: $10-$20
Total Cost: $160-$300
Budget-Friendly Alternatives:
- Repurpose Old Wood: Free or low cost
- Use Acrylic Sheets Instead of Glass: $10-$20
- Borrow Tools from Friends or Family: Free
- Buy Used Tools: Half the price of new ones
Different Ways to Customize
Materials: Use glass, metal, or wood for different looks. Glass can be clear, frosted, or stained. Metal options include perforated sheets or decorative grilles. Wood can be carved, painted, or stained.
Colors: Paint inserts in bold colors like red, blue, or yellow for a vibrant look. Use neutral tones like white, gray, or beige for a classic feel. Metallic finishes like gold, silver, or bronze add a touch of elegance.
Styles: For a modern look, use sleek glass or metal inserts. A rustic style can be achieved with distressed wood or woven rattan. Vintage styles work well with stained glass or ornate metal grilles.
Patterns: Create geometric patterns with wood strips or metal pieces. Use stencils to paint intricate designs on glass or wood. Fabric inserts can add a soft texture and come in various patterns like floral, stripes, or checks.
Lighting: Add LED strips behind glass inserts for a backlit effect. Use battery-operated puck lights inside cabinets to highlight decorative inserts.
Hardware: Change cabinet knobs and handles to match the insert style. Use antique brass for a vintage look or sleek chrome for a modern touch.
Mix and Match: Combine different materials like wood and metal or glass and fabric for a unique look. Use contrasting colors to make the inserts stand out.
Eco-Friendly Ideas
Bamboo is a great choice. It grows quickly and is very strong. Use it for a natural look.
Reclaimed wood can add character. Old pallets or barn wood work well. Sand and stain them for a fresh look.
Cork is another option. It’s renewable and adds texture. Use cork tiles or sheets.
Recycled glass can be used for inserts. It’s eco-friendly and comes in many colors.
Fabric scraps can be repurposed. Stretch them over a frame for a soft touch.
Metal mesh from old screens or fences can be reused. It adds an industrial feel.
Old windows can be cut to size. Use them as glass inserts for a vintage look.
Paint with low VOCs (volatile organic compounds) is better for the environment. Choose eco-friendly brands.
Natural stains and finishes are also good. Look for products made from plant oils or beeswax.
Upcycling materials you already have saves money and reduces waste. Look around your home for items you can repurpose.
Your Cabinet, Your Style
You've got the know-how to transform cabinet doors into something special. With a bit of creativity and some basic tools, you can make inserts that reflect your style. Whether you choose glass, metal, or wood, each material offers a unique look. Don't be afraid to mix and match. Experimenting with different patterns and textures can lead to surprising results. Remember, the goal is to make your space feel more like home. So, grab your tools, pick your materials, and start crafting. Your cabinets will thank you, and so will anyone who sees your handiwork. Happy DIY-ing!
How do I choose the right material for my cabinet door inserts?
Consider the style of your kitchen or room. Glass adds a modern touch, while wood gives a rustic feel. Metal can be sleek and industrial. Think about durability and maintenance too.
Can I install cabinet door inserts myself?
Absolutely! With some basic tools and a bit of patience, you can do it yourself. Just make sure to measure accurately and follow instructions carefully.
What tools will I need for this project?
You’ll need a measuring tape, screwdriver, saw, adhesive, and possibly a drill. Having sandpaper and paint might help if you want to customize the inserts.
How do I measure my cabinet doors for inserts?
Measure the height and width of the inner panel of the door. Subtract a bit for clearance so the insert fits snugly but not too tight. Double-check your measurements before cutting anything.
Can I paint or stain my inserts?
Yes, you can! Wood inserts can be stained or painted to match your decor. Metal and glass inserts can be spray-painted if you want a different look. Just make sure to use the right type of paint.
How do I maintain and clean my cabinet door inserts?
For glass, use a glass cleaner. Wood inserts can be wiped with a damp cloth and a bit of mild soap. Metal inserts might need a special cleaner to prevent rust. Regular cleaning keeps them looking fresh.
Are there any safety tips I should follow?
Always wear safety goggles when cutting materials. Use gloves to protect your hands. Make sure your tools are in good condition and follow all safety instructions. Don’t rush; take your time to avoid mistakes.