
Home>Home & Furniture>Doors & Windows>DIY Cornice Board
Doors & Windows
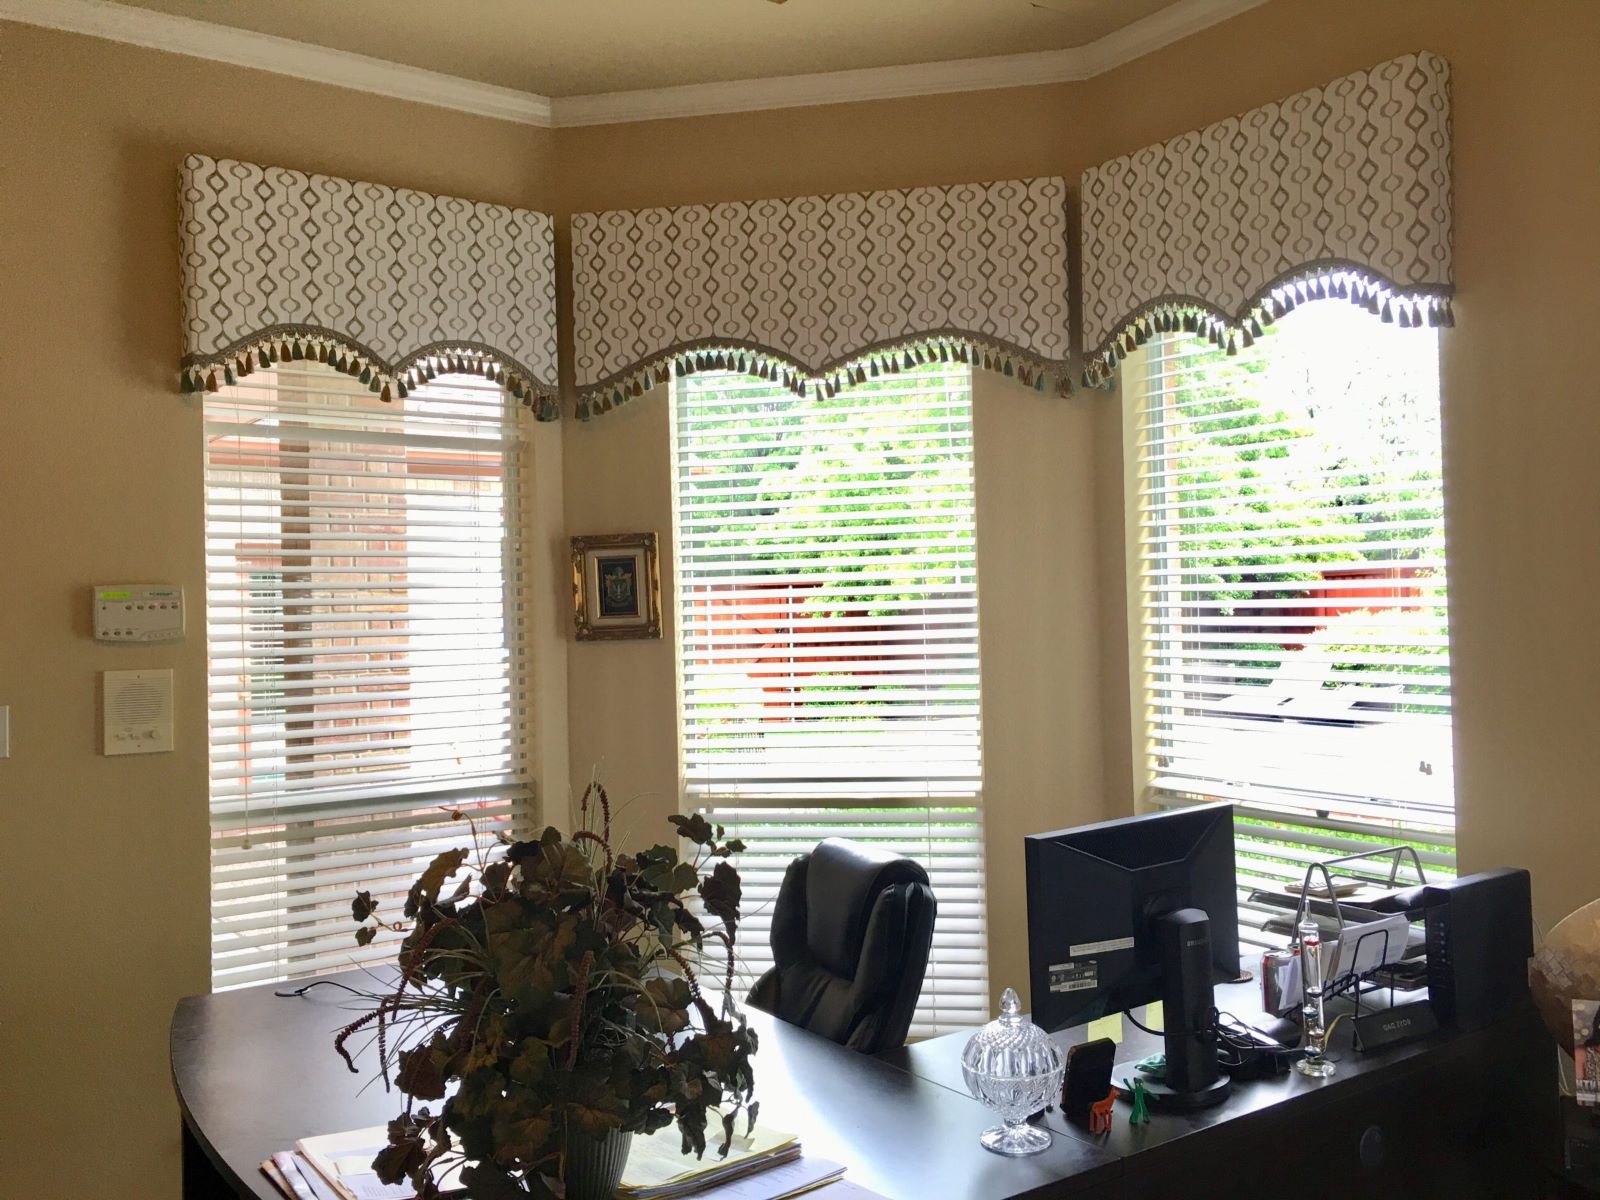
DIY Cornice Board
Published: August 11, 2024
Learn how to create a stylish DIY cornice board with our step-by-step guide. Perfect for adding a custom touch to your windows. Easy, affordable, and fun!
(Many of the links in this article redirect to a specific reviewed product. Your purchase of these products through affiliate links helps to generate commission for Twigandthistle.com, at no extra cost. Learn more)
Want to add a touch of elegance to your windows without spending a fortune? Creating your own cornice board can be a fun and rewarding project. Cornice boards are decorative boxes that sit at the top of your windows, adding a polished look to any room. They can hide curtain rods and give your windows a finished, stylish appearance. You can make one with simple materials and tools, turning your home into a chic, cozy space. Ready to give it a try? Let's dive into the basics of making a DIY cornice board.
Getting Ready for Your Project
Measure Your Window: Use a tape measure to get the width and height of your window. Add a few inches to each side for a more dramatic look.
Gather Materials: You’ll need plywood, batting, fabric, a staple gun, screws, a saw, a drill, and a measuring tape.
Safety Gear: Wear safety goggles and gloves when cutting wood. Keep a first aid kit nearby.
Cut the Plywood: Cut the plywood to the desired size using a saw. Sand the edges to avoid splinters.
Attach Batting: Lay the batting over the plywood and staple it securely. This gives the cornice board a soft, padded look.
Cover with Fabric: Stretch the fabric over the batting and staple it to the back of the plywood. Make sure it’s smooth and wrinkle-free.
Prepare the Workspace: Clear a large, flat area to work on. Ensure good lighting and ventilation.
Drill Holes: Drill holes in the plywood for mounting. Make sure they are evenly spaced.
Mounting Brackets: Attach mounting brackets to the wall above the window. Use a level to ensure they are straight.
Install the Cornice Board: Lift the cornice board and secure it to the brackets with screws. Double-check that it’s level.
Clean Up: Dispose of any leftover materials and clean your workspace. Store tools safely.
What You Need to Get Started
Plywood: Forms the base structure of the cornice board. Choose a thickness that provides stability without being too heavy.
Foam Padding: Adds a soft layer to the cornice board, making it look plush and professional.
Batting: Covers the foam padding, giving a smooth surface for the fabric.
Fabric: The outer layer that will be visible. Pick a fabric that matches your room's decor.
Staple Gun: Secures the fabric, batting, and foam to the plywood.
Staples: Used with the staple gun to attach materials to the plywood.
Measuring Tape: Ensures accurate measurements for cutting plywood, foam, batting, and fabric.
Scissors: Cuts fabric, batting, and foam to the required sizes.
Saw: Cuts the plywood to the desired dimensions.
L-Brackets: Used to mount the cornice board to the wall securely.
Screws: Fastens the L-brackets to the wall and the cornice board.
Drill: Makes holes for screws and helps in mounting the cornice board.
Sandpaper: Smooths the edges of the plywood to prevent splinters.
Pencil: Marks measurements on plywood, fabric, and foam for precise cutting.
Iron: Removes wrinkles from the fabric before attaching it to the board.
How Much Time and Skill Is Needed?
Skill Level: Intermediate
Time Required: 4-6 hours
Steps:
- Measure and Cut Wood: 1 hour
- Assemble Frame: 1 hour
- Add Batting and Fabric: 1-2 hours
- Attach Mounting Hardware: 30 minutes
- Install Cornice Board: 30 minutes
Follow These Steps
Materials Needed:
- Plywood (cut to desired size)
- Foam padding
- Fabric
- Staple gun
- L-brackets
- Screws
- Measuring tape
- Pencil
- Scissors
- Drill
Steps:
Measure the Window:
- Use a measuring tape to measure the width of the window.
- Add a few inches on each side for the cornice board to extend beyond the window frame.
Cut the Plywood:
- Mark the measurements on the plywood.
- Use a saw to cut the plywood to the desired size.
Attach Foam Padding:
- Lay the foam padding on a flat surface.
- Place the plywood on top of the foam.
- Cut the foam to match the size of the plywood.
- Use a staple gun to attach the foam to the plywood.
Cover with Fabric:
- Lay the fabric on a flat surface, pattern side down.
- Place the foam-covered plywood on top of the fabric.
- Cut the fabric, leaving extra inches on all sides.
- Pull the fabric tight and staple it to the back of the plywood.
Attach L-Brackets:
- Measure and mark where the L-brackets will go on the back of the cornice board.
- Use a drill to attach the L-brackets with screws.
Mount the Cornice Board:
- Hold the cornice board above the window to mark where the brackets will attach to the wall.
- Drill holes into the wall at the marked spots.
- Screw the L-brackets into the wall to secure the cornice board.
Final Adjustments:
- Ensure the cornice board is level.
- Make any necessary adjustments to the fabric or foam.
Your cornice board is now complete and ready to enhance your window!
Helpful Tips and Tricks
Measure carefully before cutting any materials. Double-check your measurements to avoid mistakes. Use lightweight materials like foam board or plywood for easier handling. Pre-drill holes for screws to prevent splitting the wood. Iron your fabric before attaching it to avoid wrinkles. Use a staple gun to secure fabric tightly. Add batting under the fabric for a softer look.
Common mistakes include not measuring correctly, leading to uneven edges. Avoid using heavy materials that can be difficult to install. Skipping the ironing step can result in a sloppy appearance. Over-stapling can cause the fabric to bunch up.
For alternatives, consider using adhesive Velcro instead of staples for easier fabric changes. Command strips can replace screws for a less permanent installation. Cardboard can substitute for wood if you need a temporary or lightweight option.
How Much Will It Cost?
Materials:
- Plywood: $20-$30
- Batting: $10-$15
- Fabric: $15-$25
- L-Brackets: $5-$10
- Screws: $3-$5
- Staples: $2-$4
Tools:
- Staple Gun: $10-$20
- Drill: $30-$50 (if you don't own one)
- Measuring Tape: $5-$10
- Scissors: $5-$10
Total Cost: $105-$179
Budget-Friendly Alternatives:
- Use old fabric or bedsheets instead of buying new fabric.
- Borrow a drill from a friend or neighbor.
- Use recycled wood or cardboard instead of plywood.
Different Ways to Customize
Fabric Choices: Use velvet for a luxurious look, cotton for a casual feel, or burlap for a rustic touch.
Paint and Stain: Paint the cornice board in bold colors like red or blue for a statement piece. Stain it in natural wood tones for a classic appearance.
Trim and Embellishments: Add decorative trim like tassels or fringe. Use nailhead trim for a more sophisticated look.
Shape and Size: Create a curved or scalloped edge instead of a straight one. Make it extra wide for a dramatic effect or narrow for a subtle touch.
Materials: Instead of wood, use foam board for a lightweight option. Try metal sheets for an industrial vibe.
Patterns: Cover the board with geometric patterns for a modern look. Use floral prints for a vintage feel.
Lighting: Attach LED strip lights behind the cornice board for a glowing effect. Use spotlights to highlight the fabric or trim.
Mounting: Hang the cornice board with decorative brackets for added flair. Use hidden mounts for a seamless appearance.
Eco-Friendly Ideas
Use reclaimed wood for the base. Old pallets or leftover wood from other projects work great. Sand them down to remove splinters and give a smooth finish.
For padding, recycle old blankets or towels. Cut them to fit the board and staple them securely. This adds a soft layer without buying new materials.
Cover the padding with fabric scraps. Old curtains, tablecloths, or even clothes can be repurposed. Choose patterns that match your room’s decor.
Use non-toxic glue or staples to attach the fabric. Avoid harmful chemicals to keep the project eco-friendly.
For hanging, repurpose old brackets or hooks. Check your garage or ask friends if they have any spare ones.
Finally, paint or stain the wood with eco-friendly products. Look for water-based paints or natural stains to reduce environmental impact.
Finishing Touches
Making your own cornice board can be a fun and rewarding project. You've learned how to measure, cut, and assemble the materials. Adding your own style with fabric or paint makes it unique. Remember, the key is to take your time and enjoy the process. If something doesn't go as planned, don't stress. Mistakes are part of learning. With patience and creativity, you'll end up with a beautiful cornice board that adds a personal touch to your home. So, gather your tools, follow the steps, and get started. Your windows will thank you!
What materials do I need to make a cornice board?
You'll need wood, fabric, batting, staple gun, screws, L-brackets, and a saw.
How do I measure for a cornice board?
Measure the width of your window, then add a few inches on each side for a more dramatic look. Decide on the height and depth based on your preference.
Can I make a cornice board without sewing?
Absolutely! Use a staple gun to attach the fabric to the wood. No sewing required.
How do I attach the cornice board to the wall?
Use L-brackets. Screw one side into the wall and the other into the cornice board. Make sure it's level.
What type of fabric works best?
Choose a medium-weight fabric like cotton or linen. Avoid anything too heavy or too light.
Can I paint the cornice board instead of using fabric?
Sure thing! Just sand the wood, apply primer, then paint with your chosen color.
How long does it take to make a cornice board?
Typically, it takes about 2-3 hours from start to finish, depending on your skill level.