
Home>Home & Furniture>Doors & Windows>DIY Barn Door Shutters Ideas
Doors & Windows
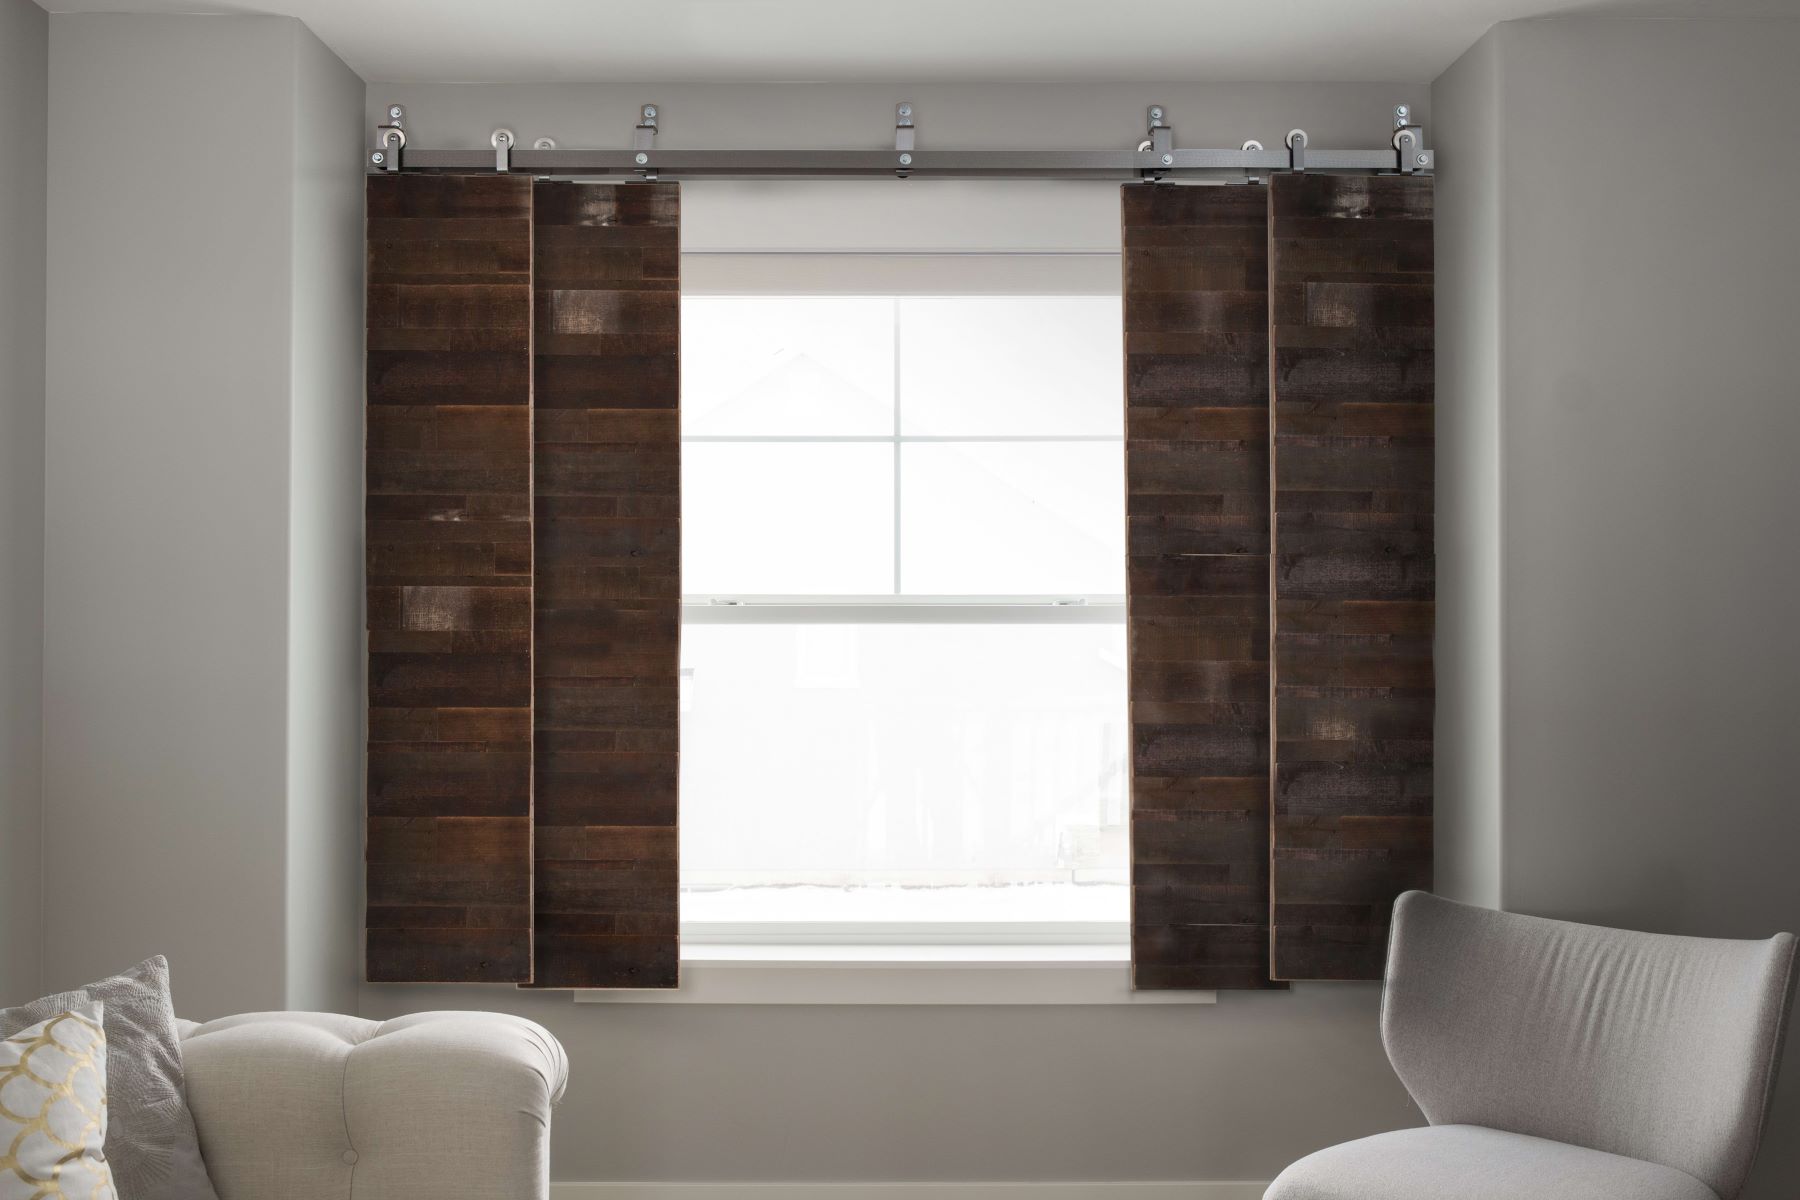
DIY Barn Door Shutters Ideas
Published: September 7, 2024
Discover creative and stylish DIY barn door shutters ideas to enhance your home decor. Learn how to build and customize your own shutters with our step-by-step guide.
(Many of the links in this article redirect to a specific reviewed product. Your purchase of these products through affiliate links helps to generate commission for Twigandthistle.com, at no extra cost. Learn more)
Barn door shutters add a rustic charm to any home. They’re not just functional but also a fun DIY project. With a few tools and some basic materials, you can transform ordinary windows into eye-catching features. These shutters offer privacy, control over light, and a touch of farmhouse elegance. Whether your style leans towards vintage or modern, barn door shutters can fit right in. Plus, making them yourself can be a rewarding experience, adding a personal touch to your space. Ready to get started? Let’s dive into some creative ideas for barn door shutters.
Getting Ready for Your Project
Measure Your Windows: Use a tape measure to get the exact dimensions of your windows. Write down the width and height.
Gather Materials: Collect wood planks, screws, hinges, a drill, a saw, sandpaper, paint or stain, and a measuring tape.
Safety Gear: Wear safety goggles, gloves, and a dust mask to protect yourself while cutting and sanding wood.
Prepare Workspace: Set up a clean, flat area to work. Ensure good lighting and ventilation.
Cut Wood Planks: Use a saw to cut the wood planks to the measured dimensions. Sand the edges to smooth them out.
Assemble Shutters: Lay out the planks side by side. Attach cross braces using screws and a drill.
Paint or Stain: Apply paint or stain to the shutters. Let them dry completely.
Attach Hinges: Secure hinges to the shutters and then to the window frame.
Test Fit: Hang the shutters to ensure they open and close smoothly. Make any necessary adjustments.
Gathering Materials and Tools
- Wood Boards: Choose sturdy wood like pine or cedar for the shutters. These will form the main structure.
- Measuring Tape: Essential for getting accurate dimensions of your windows and wood pieces.
- Saw: A circular or hand saw will help cut the wood boards to the required sizes.
- Sandpaper: Smooths out rough edges on the wood for a polished finish.
- Wood Stain or Paint: Adds color and protects the wood from weather damage.
- Paintbrushes or Rollers: Used to apply the stain or paint evenly.
- Hinges: Allows the shutters to swing open and closed. Choose heavy-duty ones for durability.
- Screws and Screwdriver: Secure the hinges and other hardware to the shutters and the wall.
- Drill: Makes holes for screws and other hardware.
- Level: Ensures the shutters are hung straight.
- Pencil: Marks measurements and placement points.
- Protective Gear: Safety glasses and gloves to protect yourself while working.
These materials and tools will help you create functional and stylish barn door shutters for your home.
Skill Level and Time Commitment
Skill Level: Intermediate
Time Required: 6-8 hours
- Measure and Cut Wood: 1-2 hours
- Assemble Shutters: 2-3 hours
- Sand and Paint: 1-2 hours
- Install Hardware: 1 hour
Step-by-Step Guide
Measure Your Windows
- Use a tape measure to get the height and width of your windows.
- Write down these measurements.
Choose Your Wood
- Pick sturdy wood like pine or cedar.
- Ensure the wood is straight and free of knots.
Cut the Wood
- Cut the wood to match your window measurements.
- You will need two vertical boards and several horizontal slats.
Sand the Wood
- Use sandpaper to smooth all edges and surfaces.
- Wipe off any dust with a damp cloth.
Assemble the Shutters
- Lay out the vertical boards.
- Place the horizontal slats across them.
- Use wood glue to attach the slats to the vertical boards.
- Reinforce with screws for extra strength.
Paint or Stain
- Choose a paint or stain color.
- Apply evenly with a brush or roller.
- Let it dry completely.
Attach Hinges
- Place hinges on the outer edges of the shutters.
- Use screws to secure them.
Install the Shutters
- Hold the shutters up to your window frame.
- Mark where the hinges will go.
- Drill pilot holes for the screws.
- Attach the shutters to the window frame using the screws.
Add Handles
- Choose handles that match your style.
- Attach them to the shutters with screws.
Check Alignment
- Open and close the shutters to ensure they move smoothly.
- Make any necessary adjustments.
Helpful Tips and Tricks
Measure Twice, Cut Once: Always double-check measurements before cutting wood. This saves time and materials.
Use Quality Wood: Pine or cedar works well. They are durable and look great.
Pre-drill Holes: Prevent wood from splitting by pre-drilling holes for screws.
Sand Edges: Smooth edges with sandpaper to avoid splinters and give a polished look.
Stain or Paint Before Assembly: It's easier to stain or paint wood pieces before putting them together. This ensures even coverage.
Level and Plumb: Use a level to ensure shutters hang straight. Crooked shutters can ruin the look.
Heavy-Duty Hardware: Use strong hinges and handles. Barn door shutters are heavy and need sturdy hardware.
Weatherproofing: Apply a weatherproof sealant if shutters will be exposed to the elements. This extends their lifespan.
Common Mistakes to Avoid:
Skipping Primer: Always use a primer before painting. It helps paint adhere better and last longer.
Ignoring Wood Grain: Pay attention to the wood grain when cutting and assembling. This affects the final look.
Wrong Screw Length: Using screws that are too long or too short can weaken the structure. Match screw length to wood thickness.
Alternatives for Materials or Methods:
Reclaimed Wood: For a rustic look, use reclaimed wood. It's eco-friendly and adds character.
Sliding Mechanism: Instead of traditional hinges, consider a sliding barn door track. This saves space and adds a unique touch.
Composite Materials: Use composite wood for a low-maintenance option. It resists rot and insects better than natural wood.
Decorative Hardware: Swap plain handles for decorative ones to add a personal touch.
Budgeting Your Project
Wood: For a standard-sized barn door shutter, you'll need about 20-25 square feet of wood. Pine is budget-friendly at around $2 per square foot. Total: $40-$50.
Hardware: Hinges, handles, and sliding door tracks are essential. A basic hardware kit costs about $50-$70.
Paint or Stain: A gallon of paint or stain costs around $20-$30. This should be enough for two coats.
Sandpaper: A pack of sandpaper costs about $5.
Screws and Nails: A box of screws and nails costs around $10.
Tools: If you don't already own them, you might need a saw ($50), drill ($40), and a sander ($30).
Total Estimated Cost: $215-$285.
Budget-Friendly Alternatives:
- Use reclaimed wood, which can often be found for free or at a low cost.
- Opt for basic hardware kits without decorative elements to save money.
- Borrow or rent tools from friends or a local tool library.
Creative Variations and Customizations
Materials: Use reclaimed wood for a rustic look or plywood for a budget-friendly option. Metal sheets can add an industrial touch.
Colors: Paint shutters in bold colors like red or blue for a farmhouse vibe. For a modern feel, use neutral tones like gray or white. Stain the wood to highlight its natural grain.
Styles: Add cross braces or Z-patterns for a traditional barn door look. For a sleek design, go with flat panels. Incorporate decorative hardware like wrought iron handles or hinges.
Finishes: Apply a distressed finish for a vintage appearance. Use a high-gloss finish for a contemporary style. Seal with matte varnish to keep a natural look.
Decorative Elements: Attach decorative trim or molding to the edges. Add stenciled designs or carved patterns for a personalized touch. Install small windows or mirrors for added functionality.
Eco-Friendly Tips
Use reclaimed wood from old barns, fences, or pallets. This gives a rustic look and reduces waste. Bamboo is another great option; it grows quickly and is very sustainable. For paint, choose low-VOC or natural paints to avoid harmful chemicals. Recycled metal hardware can add a vintage touch while being eco-friendly. Consider using natural stains like coffee or tea for coloring the wood. Upcycling old doors or shutters into barn door shutters can save money and resources. Insulate the shutters with sheep wool or cotton batting for an eco-friendly option.
Your DIY Barn Door Shutters Await
You've got the tools and ideas to create barn door shutters that add charm to your space. Whether you go for a rustic look or something more modern, the key is to let your creativity shine. Remember to measure twice, cut once, and don't be afraid to make mistakes. Each project is a learning experience. Use quality materials to ensure your shutters stand the test of time. A fresh coat of paint or stain can make a world of difference. Share your creations with friends and family—they might get inspired too. Now, grab your tools and get started. Your perfect barn door shutters are just a few steps away. Happy building!
How do I measure for barn door shutters?
Measure the width and height of your window opening. Add a few inches to each side for overlap. This ensures the shutters cover the window completely when closed.
What materials are best for barn door shutters?
Wood is a popular choice due to its durability and rustic look. Metal can also be used for a more industrial feel. Composite materials offer a balance between durability and cost.
Can I install barn door shutters myself?
Absolutely! With the right tools and a bit of patience, you can install them yourself. Basic tools like a drill, level, and screws are usually all you need.
How do I maintain barn door shutters?
Regular cleaning with a damp cloth keeps them looking fresh. For wood shutters, occasional sanding and repainting might be needed to maintain their appearance.
Are barn door shutters energy-efficient?
Yes, they can help insulate your home by blocking out drafts and sunlight. This can lead to lower energy bills and a more comfortable living space.
Can I customize the design of my barn door shutters?
Definitely! You can choose different colors, finishes, and hardware to match your home’s style. Adding decorative elements like cross-bracing or cut-outs can make them unique.
How much do barn door shutters cost?
Costs vary based on materials, size, and customization. On average, expect to spend between $100 and $500 per shutter. DIY options can be more affordable.