
Home>Home & Furniture>Doors & Windows>DIY Attic Door Ideas: Creative Ways to Upgrade Your Space
Doors & Windows
DIY Attic Door Ideas: Creative Ways to Upgrade Your Space
Published: September 6, 2024
Discover creative DIY attic door ideas to upgrade your space. From stylish designs to functional solutions, transform your attic with these innovative and easy-to-follow tips.
(Many of the links in this article redirect to a specific reviewed product. Your purchase of these products through affiliate links helps to generate commission for Twigandthistle.com, at no extra cost. Learn more)
Upgrading your attic door is a fantastic way to add function and style to your home. Often overlooked, the attic door can become a unique focal point with just a bit of creativity. Whether you're looking to enhance your home's aesthetic or make accessing your attic easier, there are countless DIY ideas to explore. From rustic barn doors to sleek, modern designs, the possibilities are endless. Transforming your attic entrance can also increase your home's value while providing a fun project to tackle. Get ready to discover new ways to elevate your attic space!
Getting Ready for Your Project
Measure the Space: Use a tape measure to get accurate dimensions of the attic door and surrounding area. Write down these measurements.
Gather Materials: Collect all necessary tools and materials like a saw, screws, hinges, paint, and wood. Make sure everything is within reach.
Clear the Area: Remove any obstacles or clutter around the attic entrance. This ensures you have enough room to work safely.
Set Up Workspace: Lay down a drop cloth or old sheet to protect the floor. Arrange tools and materials neatly for easy access.
Wear Safety Gear: Put on safety goggles, gloves, and a dust mask. This protects you from dust, debris, and potential injuries.
Check for Wiring: Inspect the area for any electrical wiring or plumbing. Avoid cutting into these to prevent accidents.
Plan the Design: Sketch out your design on paper. Decide on the style, color, and any additional features like handles or locks.
Pre-Cut Materials: If possible, pre-cut wood or other materials to the required sizes. This saves time and ensures precision.
Test Fit: Before final installation, do a test fit of all components. Make adjustments as needed to ensure everything aligns properly.
Ventilation: Ensure the workspace is well-ventilated, especially if using paint or adhesives. Open windows or use fans to circulate air.
Gathering Materials and Tools
- Plywood: Used for creating a sturdy door panel.
- Hinges: Essential for attaching the door to the frame, allowing it to open and close.
- Screws: Needed for securing hinges and other hardware.
- Screwdriver: Tool for driving screws into place.
- Measuring Tape: Ensures accurate measurements for cutting and fitting materials.
- Saw: Used to cut plywood and other materials to the required size.
- Sandpaper: Smooths rough edges on the plywood.
- Paint or Stain: Adds color or finish to the door, enhancing its appearance.
- Paintbrushes or Rollers: Tools for applying paint or stain evenly.
- Door Handle or Knob: Provides a way to open and close the door.
- Latch or Lock: Keeps the door securely closed.
- Level: Ensures the door is installed straight.
- Pencil: Marks measurements and cutting lines.
- Safety Glasses: Protects eyes while cutting or sanding materials.
- Work Gloves: Protects hands during the project.
- Drop Cloth: Keeps the work area clean by catching paint drips and sawdust.
Skill Level and Time Needed
Skill Level: Intermediate
Time Required: 4-6 hours
- Measure and Cut Materials: 1 hour
- Install Hinges and Latch: 1 hour
- Attach Insulation: 1 hour
- Paint or Stain: 1-2 hours
- Final Adjustments: 1 hour
Instructions to Follow Step by Step
Measure the Opening
- Use a tape measure to get the exact dimensions of the attic door opening.
- Write down the measurements.
Choose Your Design
- Decide if you want a simple hatch, a pull-down ladder, or a decorative door.
- Sketch your design on paper.
Gather Materials
- Purchase wood, hinges, screws, and any other materials needed for your chosen design.
- Make sure you have tools like a saw, drill, and screwdriver.
Cut the Wood
- Use the measurements to cut the wood pieces for the door.
- Sand the edges to smooth them out.
Assemble the Door
- Attach the pieces together using screws and wood glue.
- Ensure the door is sturdy and square.
Install Hinges
- Attach hinges to one side of the door.
- Secure the other side of the hinges to the attic opening.
Add a Latch or Lock
- Install a latch or lock to keep the door securely closed.
- Test to make sure it works properly.
Paint or Stain
- Apply paint or stain to match your home’s decor.
- Let it dry completely before using.
Install Insulation (Optional)
- Add insulation to the back of the door to improve energy efficiency.
- Secure it with adhesive or screws.
Test the Door
- Open and close the door several times to ensure it operates smoothly.
- Make any necessary adjustments.
Helpful Tips and Tricks
Use Insulated Panels: Adding insulated panels to your attic door helps keep your home warm in winter and cool in summer.
Install Weatherstripping: Weatherstripping around the door frame prevents drafts and keeps energy costs down.
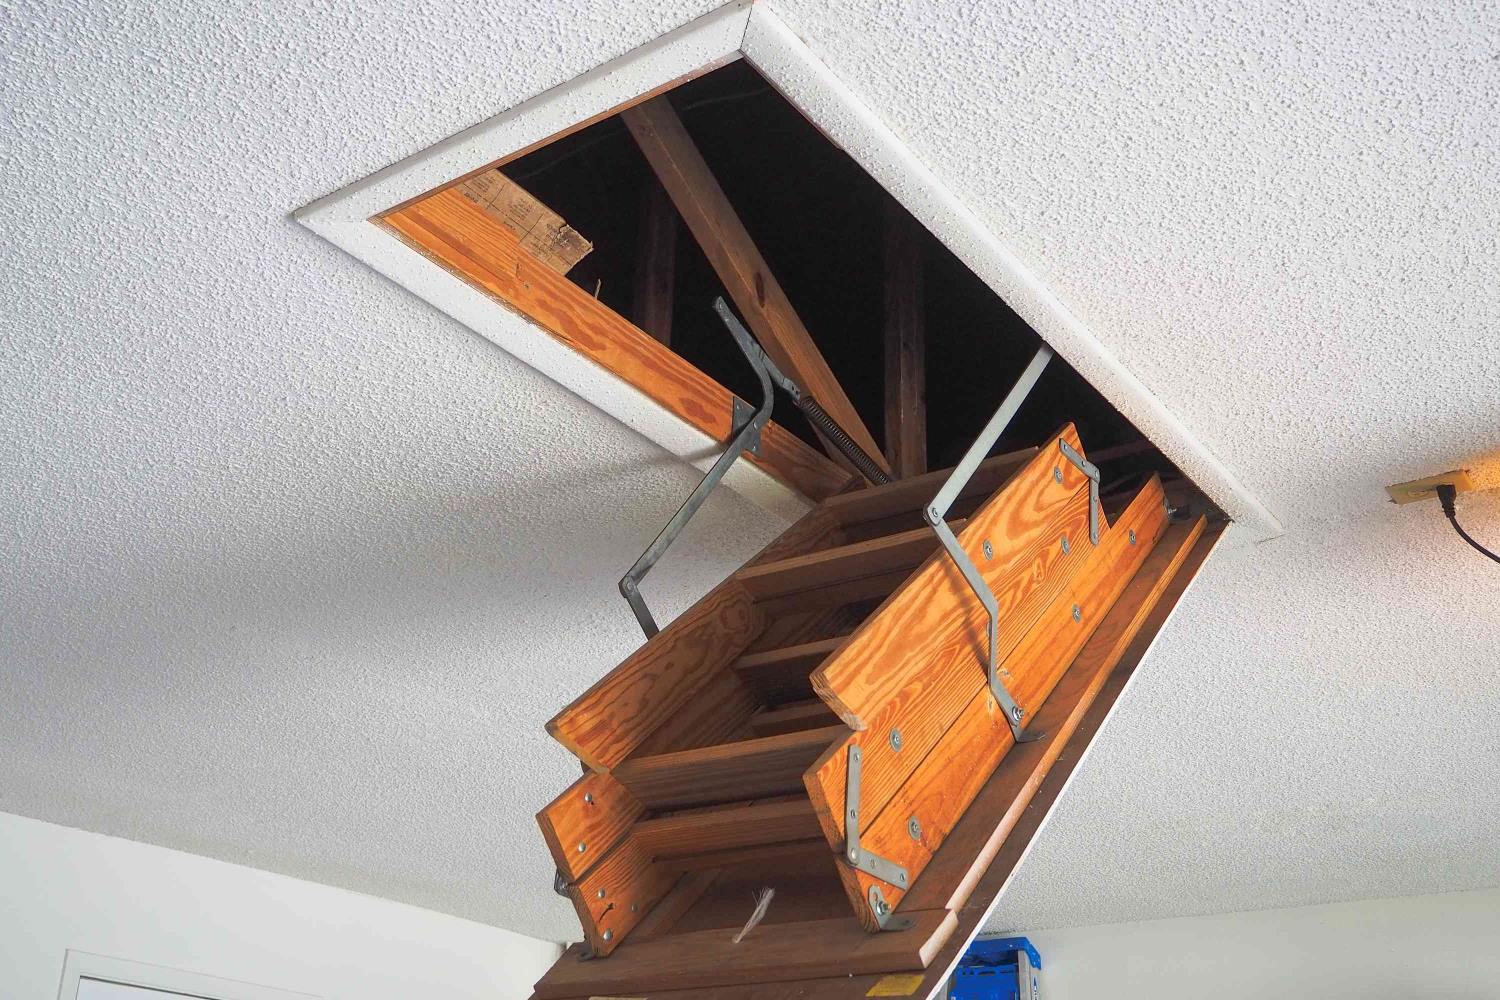
Add a Pull-Down Ladder: A pull-down ladder makes accessing the attic easier and safer. Ensure it's sturdy and properly installed.
Paint or Stain: Painting or staining the attic door can make it blend with your home's decor. Choose a color that matches your interior.
Use Magnetic Catches: Magnetic catches keep the door securely closed without the need for a bulky latch.
Add Trim: Adding decorative trim around the door frame gives it a polished look. Use wood or PVC trim for durability.
Install a Handle: A handle or knob makes opening and closing the door easier. Choose one that matches your home's style.
Use a Draft Stopper: A draft stopper at the bottom of the door helps block cold air from entering your living space.
Common Mistakes to Avoid:
- Ignoring Insulation: Not insulating the door can lead to higher energy bills.
- Poor Ladder Installation: An improperly installed ladder can be dangerous.
- Skipping Weatherstripping: This can result in drafts and energy loss.
- Using Weak Materials: Weak materials can lead to a flimsy door that doesn't last.
Alternatives for Materials or Methods:
- Plywood Instead of MDF: Plywood is more durable and moisture-resistant.
- Foam Board Insulation: Foam board is easier to cut and install than fiberglass.
- Velcro Strips for Closure: Velcro strips can be a simple alternative to magnetic catches.
- Rope Ladder: A rope ladder can be a space-saving alternative to a pull-down ladder.
Estimating the Cost
Materials:
- Plywood: $20-$30 per sheet (you might need 1-2 sheets)
- Hinges: $10-$15 for a set of 2
- Latch or Lock: $5-$10
- Insulation: $15-$20 for a small roll
- Weatherstripping: $5-$10
- Paint or Stain: $10-$20 per can
- Trim: $10-$15 for a few pieces
Tools:
- Saw: $30-$50 (if you don't already have one)
- Drill: $40-$60 (if needed)
- Screwdriver: $5-$10
- Paintbrushes: $5-$10
- Measuring Tape: $5-$10
- Sandpaper: $5
Total Estimated Cost: $165-$270
Budget-Friendly Alternatives:
- Use reclaimed wood instead of buying new plywood.
- Borrow tools from friends or family.
- Look for discounted paint at local hardware stores.
- Use basic hinges and latches instead of decorative ones.
Different Variations and Customizations
Materials: Instead of traditional wood, consider using reclaimed barn wood for a rustic look. Plywood offers a budget-friendly option, while metal can give an industrial vibe. For a modern touch, try glass panels with frosted or tinted finishes.
Colors: Paint the door a bold color like navy blue or deep red to make it a focal point. For a more subtle look, use neutral tones like beige, gray, or white. Staining the wood can highlight its natural grain and add warmth.
Styles: Install a sliding barn door for a farmhouse feel. A folding door can save space in tight areas. For a sleek, contemporary look, a flush door with hidden hinges works well. Add decorative trim or molding to give the door a classic, elegant appearance.
Hardware: Swap out standard handles for antique brass or matte black hardware. Leather pulls can add a unique, tactile element. Consider installing soft-close hinges to prevent slamming.
Insulation: Add foam insulation or weather stripping to improve energy efficiency. This helps keep the attic temperature stable and reduces noise.
Decorative Elements: Attach a mirror to the door to make the space feel larger. Use chalkboard paint for a functional message board. Stenciling or decals can add personalized designs without much effort.
Lighting: Integrate LED strip lights around the door frame for a modern, illuminated effect. A small pendant light above the door can add both style and function.
Accessibility: Install a pull-down ladder for easy access. For a more permanent solution, consider a spiral staircase if space allows.
Eco-Friendly Tips
Reclaimed Wood: Use old barn wood or pallets to create a rustic attic door. Sand and treat the wood to ensure durability.
Recycled Metal: Repurpose old metal sheets or panels for a modern, industrial look. Ensure edges are smooth to avoid injury.
Insulation: Add eco-friendly insulation like sheep wool or cotton to the door. This helps maintain temperature and reduces energy use.
Low-VOC Paint: Choose paints with low volatile organic compounds. These are better for the environment and your health.
Sliding Barn Door: Install a sliding door using reclaimed wood and recycled metal hardware. This saves space and adds character.
Upcycled Windows: Incorporate old windows into the door design. This allows natural light into the attic, reducing the need for artificial lighting.
Natural Fibers: Use jute or hemp for door handles or decorative elements. These materials are sustainable and add a unique touch.
Salvaged Hardware: Find old hinges, knobs, or handles at thrift stores or salvage yards. Clean and restore them for a vintage look.
Eco-Friendly Adhesives: Use non-toxic glues and adhesives. These are safer for you and the planet.
DIY Chalkboard Door: Paint the door with chalkboard paint made from natural ingredients. This provides a fun, reusable surface for notes or drawings.
Your Attic Awaits
Upgrading your attic door can be a game-changer. Adding insulation helps keep your home cozy, while a pull-down ladder makes access a breeze. A barn door adds rustic charm, and a hidden door can create a secret storage spot. Don't forget to paint or stain the door to match your home's style. Simple changes like these can make a big difference. So grab your tools, get creative, and transform that attic entrance. You'll be amazed at how a small project can have such a huge impact. Happy DIY-ing!
How can I make my attic door more energy-efficient?
Adding weatherstripping around the edges of the door can help seal gaps. You can also install an insulated door cover to keep heat in during winter and out during summer.
What are some creative ways to decorate my attic door?
You can paint it with chalkboard paint for a fun, writable surface. Another idea is to use wallpaper or decals to add some flair. Adding a mirror can also make the space feel larger.
How do I install a pull-down attic ladder?
First, measure the opening and buy a ladder that fits. Cut the ceiling to the right size, then attach the ladder frame to the joists. Finally, secure the ladder and test it for stability.
Can I turn my attic door into a hidden entrance?
Absolutely! You can disguise it with a bookshelf or a panel that blends with the wall. Hinges and a latch can make it functional yet concealed.
What materials are best for an attic door?
Wood is sturdy and easy to customize, while metal offers durability. PVC is lightweight and resistant to moisture, making it a good option for humid areas.
How do I make my attic door safer?
Install a lock to prevent unauthorized access. Adding handrails and non-slip treads on the ladder can also make it safer to use.
Can I add a window to my attic door?
Yes, you can cut a section out and install a small window. Make sure to use tempered glass for safety and seal it properly to prevent drafts.