
Home>Home & Furniture>Bedroom>DIY Toy Story Room Makeover
Bedroom
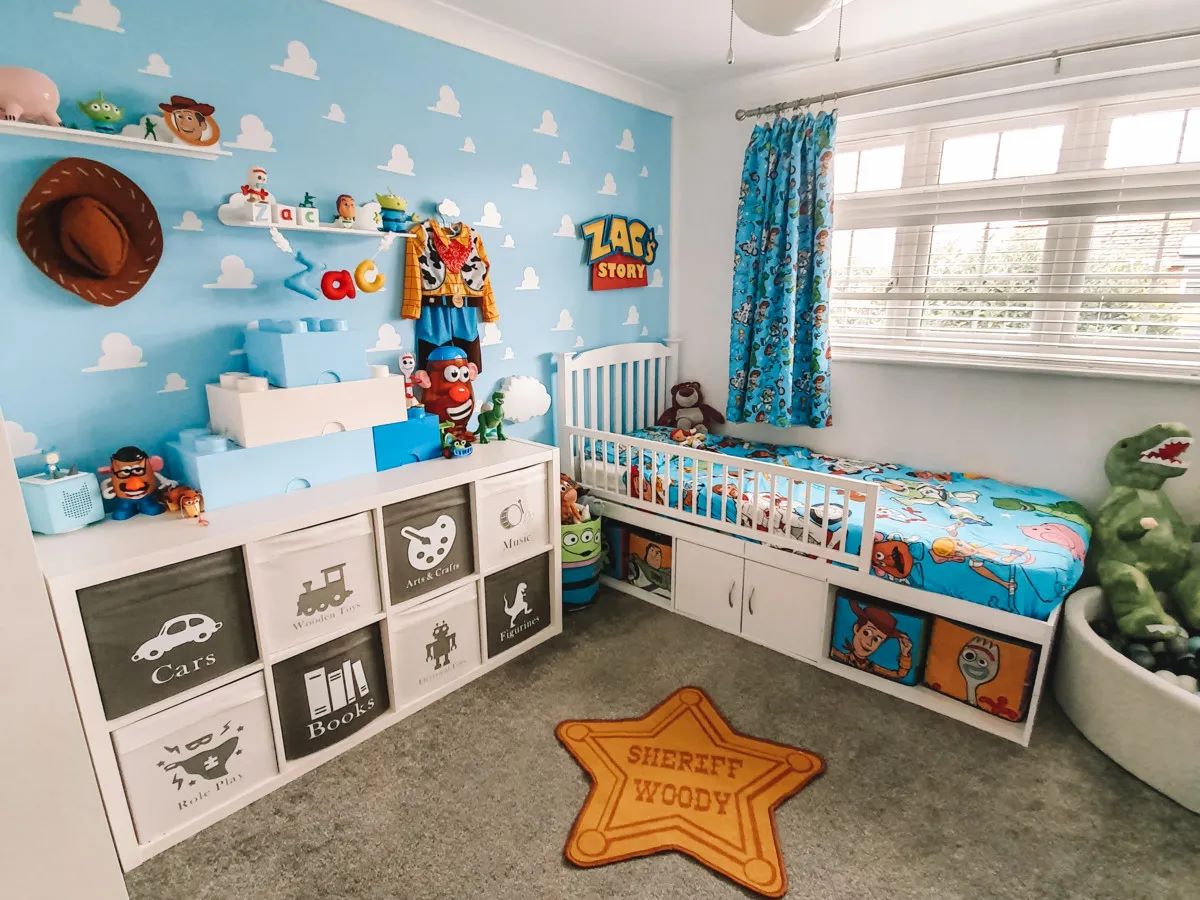
DIY Toy Story Room Makeover
Published: July 23, 2024
Transform your child's room into a magical Toy Story wonderland with our DIY makeover guide. Step-by-step instructions, creative ideas, and budget-friendly tips included!
(Many of the links in this article redirect to a specific reviewed product. Your purchase of these products through affiliate links helps to generate commission for Twigandthistle.com, at no extra cost. Learn more)
Transforming a room into a Toy Story-themed haven can be an exciting project for kids and parents. With a little creativity, some paint, and a few themed decorations, you can bring the magic of Woody, Buzz, and the gang right into your home. Whether you’re looking to completely revamp the space or add subtle touches, this guide will help you create a fun, imaginative environment inspired by the beloved movie. Ready to get started? Grab your tools, gather some supplies, and let’s dive into this DIY adventure together.
Getting Ready for the Makeover
Plan Your Design: Sketch out where you want to place different elements like wall decals, furniture, and accessories. This helps visualize the final look.
Gather Materials: Collect all necessary items such as paint, brushes, wall decals, themed bedding, and any other decorations. Make sure you have everything before starting.
Clear the Room: Remove furniture, toys, and other items from the room. This makes it easier to work and prevents damage to belongings.
Set Up a Workspace: Designate an area for tools and materials. Keep it organized to avoid losing small items like screws or stickers.
Safety Gear: Wear gloves, goggles, and a mask if painting or using strong adhesives. This protects your skin, eyes, and lungs.
Prep the Walls: Clean walls to remove dust and grime. Fill any holes or cracks with spackle and sand them smooth. This ensures a clean surface for paint or decals.
Tape and Cover: Use painter's tape to protect trim, windows, and outlets. Cover the floor with a drop cloth to catch spills and drips.
Ventilation: Open windows and use fans to keep the room well-ventilated, especially when painting or using adhesives. This helps fumes dissipate.
Test Paint Colors: Apply small patches of paint to the wall to see how they look when dry. This helps avoid color mistakes.
Organize Tools: Keep tools like screwdrivers, hammers, and measuring tape within reach. This saves time and effort during the makeover.
Double-Check Measurements: Measure twice before cutting or placing items. This ensures everything fits perfectly.
Involve the Kids: Let kids help with simple tasks like placing stickers or choosing colors. This makes the project fun and engaging for them.
Supplies and Tools Checklist
Paint and Brushes: Use blue and green paint for walls to mimic the sky and grass. Brushes of various sizes help with detailed work.
Painter's Tape: Essential for creating clean lines and protecting areas not meant to be painted.
Stencils: Toy Story character stencils make it easier to paint characters on walls.
Wall Decals: Stickers of Buzz Lightyear, Woody, and other characters add detail without needing artistic skills.
Furniture: Toy Story-themed bedsheets, pillowcases, and curtains. Consider a toy chest painted like Andy's toy box.
Lighting: A Buzz Lightyear nightlight or a lamp with a Toy Story lampshade.
Rugs and Mats: Toy Story area rugs or mats to complete the look.
Shelves: Install shelves to display Toy Story toys and memorabilia.
Screwdriver and Screws: Needed for assembling furniture and installing shelves.
Measuring Tape: Ensures accurate placement of decals, shelves, and other items.
Drop Cloths: Protect floors and furniture from paint spills.
Sandpaper: Smooths surfaces before painting.
Step Ladder: Helps reach higher areas when painting or placing decals.
Glue Gun: Useful for attaching small decorations securely.
Craft Supplies: Colored paper, markers, and scissors for creating custom decorations.
Required Skills and Time Commitment
Skill Level: Intermediate
Time Required: 2-3 days
- Planning and Shopping: 4-6 hours
- Painting Walls: 6-8 hours
- Installing Wall Decals: 2-3 hours
- Assembling Furniture: 3-4 hours
- Decorating and Final Touches: 4-5 hours
Detailed Steps to Transform the Room
Plan Your Design
- Decide on a theme: Woody, Buzz Lightyear, or a mix.
- Sketch a rough layout of the room.
Gather Materials
- Paint: Blue for the sky, white for clouds.
- Stencils: Stars, clouds, Toy Story characters.
- Wall decals: Characters, quotes.
- Furniture: Toy chest, themed bedspread, curtains.
- Accessories: Toys, posters, lamps.
Prepare the Room
- Clear out furniture and toys.
- Clean walls to remove dust and dirt.
Paint the Walls
- Apply blue paint for the sky background.
- Let it dry completely.
- Use stencils to paint white clouds.
Add Wall Decals
- Place decals of Toy Story characters and quotes.
- Smooth out any air bubbles.
Decorate with Accessories
- Arrange Toy Story toys on shelves.
- Hang posters and themed artwork.
- Place themed bedspread and curtains.
Organize Furniture
- Position the bed, toy chest, and other furniture.
- Ensure everything is easily accessible.
Final Touches
- Add themed lamps and nightlights.
- Place a rug with Toy Story designs.
- Double-check for any missing details.
Enjoy your new Toy Story-themed room!
Helpful Hints and Techniques
Plan the layout before starting. Decide where each character or element will go. This helps avoid clutter.
Use stencils for painting characters on walls. They make it easier to get clean lines and details.
Wall decals are a great alternative to painting. They are easy to apply and remove if you change your mind.
Repurpose old toys as decorations. For example, use a Woody doll as a shelf ornament or a Buzz Lightyear as a bookend.
Create a feature wall with a large mural or a collection of framed posters. This becomes the room's focal point.
Incorporate colors from the movie. Use blue, green, and yellow for walls, bedding, and accessories.
DIY cloud ceiling with cotton batting and LED lights. This adds a whimsical touch and mimics Andy's room.
Label storage bins with character names or images. This keeps the room organized and adds to the theme.
Common mistakes to avoid:
Avoid overcrowding the room with too many decorations. It can make the space feel chaotic.
Don't ignore the importance of lighting. Use themed lamps or nightlights to enhance the ambiance.
Skipping the planning phase can lead to a disjointed look. Always have a clear vision before starting.
Alternatives for materials or methods:
Instead of painting, use removable wallpaper with Toy Story designs. It's less permanent and easier to change.
For a budget-friendly option, print high-quality images of characters and frame them instead of buying expensive posters.
Use fabric paint to customize plain bedding or curtains with Toy Story motifs. This adds a personal touch without breaking the bank.
Budget Breakdown
Paint: $30-$50 per gallon. You might need 2-3 gallons for walls and ceiling.
Wall Decals: $20-$50 for a set. Look for Woody, Buzz, and other characters.
Bedding Set: $40-$80. Includes sheets, pillowcases, and comforter.
Curtains: $20-$40. Choose Toy Story-themed or matching colors.
Rug: $30-$60. A themed rug or one with matching colors.
Furniture: $100-$300. This includes a bed frame, dresser, and nightstand. Look for second-hand options to save money.
Lighting: $20-$50. A themed lamp or nightlight.
Accessories: $20-$50. Includes toys, posters, and other decorations.
Tools: $50-$100. Basic tools like a screwdriver, hammer, and paintbrushes.
Total Cost: $330-$780.
Budget-Friendly Alternatives:
- Paint: Use leftover paint or buy smaller cans for accents.
- Wall Decals: Print your own and use double-sided tape.
- Bedding: Use plain bedding and add themed pillowcases.
- Curtains: Make your own using fabric and a sewing machine.
- Rug: Look for sales or use a plain rug with themed stickers.
- Furniture: Upcycle old furniture with paint and new handles.
- Lighting: Use existing lamps and add themed stickers.
- Accessories: DIY crafts like painted frames or homemade toys.
Personalize Your Toy Story Room
Wall Colors: Use sky blue paint with white clouds for a classic Toy Story look. For a twist, try galaxy-themed walls with dark blue, purple, and stars to mimic Buzz Lightyear’s space adventures.
Bedding: Choose character-themed bedding featuring Woody, Buzz, and other characters. Alternatively, use solid colors like blue, green, or yellow, then add character pillows or blankets.
Furniture: Paint furniture in bright primary colors like red, blue, and yellow. For a more subtle approach, use wood tones and add Toy Story decals or stencils.
Lighting: Install a cloud-shaped ceiling light or a rocket lamp for a fun touch. String lights shaped like stars or planets can add a magical feel.
Decor: Hang posters or canvas prints of Toy Story scenes. Create a gallery wall with framed pictures of favorite characters. Use shelves to display Toy Story toys and memorabilia.
Rugs: Choose a cowboy-themed rug for a Woody vibe or a space-themed rug for Buzz. A simple colorful rug can also work, adding a pop of color to the room.
Curtains: Use Toy Story-themed curtains or opt for solid colors that match the room’s palette. Add star-shaped curtain tiebacks for a fun detail.
Storage: Use toy chests or bins with Toy Story designs. Label storage bins with character names or images to keep things organized.
DIY Projects: Create a custom headboard with a Toy Story mural. Make a growth chart shaped like Buzz’s rocket or Woody’s boot. Paint a dresser with character faces or scenes.
Accessories: Add throw pillows with Toy Story quotes or images. Use character-themed clocks, lamps, and wall hooks. Decorate with stickers or decals that can be easily changed as tastes evolve.
Eco-Friendly Ideas for Your Project
Repurpose old furniture by painting it with non-toxic paint in Toy Story colors. Use recycled cardboard to create wall decorations like stars or clouds. Upcycle fabric scraps into themed pillows or curtains. Choose bamboo or cork flooring, which are sustainable and durable. For lighting, opt for LED bulbs, which use less energy. Create a Buzz Lightyear rocket from recycled plastic bottles. Use eco-friendly wallpaper made from natural materials. Make a Woody hat rack using reclaimed wood. Decorate with second-hand toys from thrift stores.
Your Toy Story Room Awaits
You've got all the tools and tips to transform a room into a Toy Story wonderland. From painting walls with clouds to adding character decals, every detail counts. Don't forget the DIY projects like making a Woody hat rack or a Buzz Lightyear lamp. These touches make the room unique.
Remember, planning is key. Sketch out your ideas, gather your materials, and take it one step at a time. Involve the kids; they'll love helping out and adding their own flair.
Lastly, enjoy the process. It's not just about the end result but also the memories you create along the way. So roll up your sleeves, get creative, and bring Andy’s room to life. Your little one will feel like they've stepped right into their favorite movie. Happy decorating!
How do I start a Toy Story room makeover?
Begin by choosing a color scheme that matches the Toy Story theme. Think about sky blue for walls, with cloud decals or stencils. You can also add accent colors like green, red, and yellow.
What kind of furniture works best?
Opt for simple, sturdy furniture. A wooden bed frame can be painted to look like Andy's bed. Add a toy chest and some shelves for displaying Toy Story figures and memorabilia.
How can I make the room feel more like Toy Story?
Use themed bedding and curtains. Add posters or wall art featuring characters like Woody, Buzz, and Jessie. Rugs with a Toy Story design can also add a fun touch.
Any tips for DIY decorations?
Create your own cardboard cutouts of characters. Paint wooden letters to spell out "Andy" and hang them on the wall. Make a DIY alien mobile using green pom-poms and googly eyes.
What about lighting?
Use a cloud-shaped ceiling light or a rocket lamp to keep with the theme. String lights can add a magical touch, especially if they’re shaped like stars or planets.
How can I involve my kids in the makeover?
Let them help with painting and decorating. They can choose their favorite characters to feature and help with craft projects like making paper plate aliens or decorating picture frames.
Are there budget-friendly options?
Absolutely! Thrift stores and garage sales can be gold mines for inexpensive furniture. DIY projects like making your own wall art or repurposing old toys as decorations can save money too.