
Home>Home & Furniture>Bathroom>DIY Rustic Bathroom Ideas
Bathroom
DIY Rustic Bathroom Ideas
Published: July 16, 2024
Transform your space with these DIY rustic bathroom ideas. Discover tips, materials, and step-by-step guides to create a cozy, vintage-inspired oasis.
(Many of the links in this article redirect to a specific reviewed product. Your purchase of these products through affiliate links helps to generate commission for Twigandthistle.com, at no extra cost. Learn more)
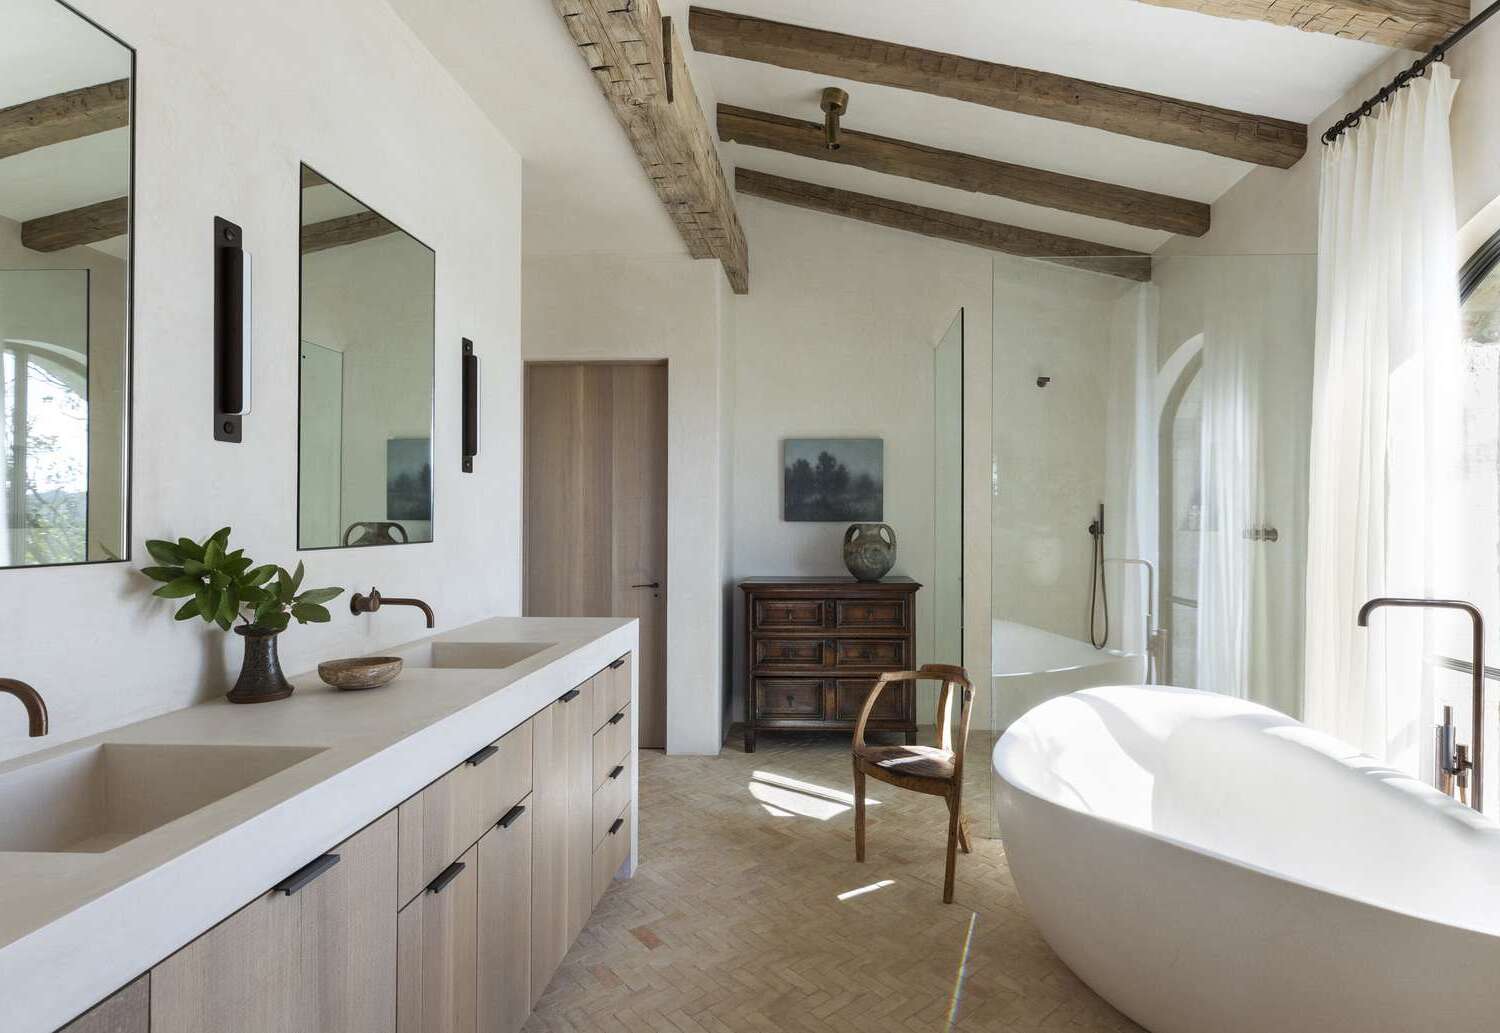
Thinking about giving your bathroom a cozy, rustic touch? You’re in luck! Rustic style blends natural elements with vintage charm, creating a warm, inviting space. Old wooden signs, weathered mirrors, and metal accents can make your bathroom feel like a charming cabin retreat. Whether you're an experienced DIYer or just starting, transforming your bathroom into a rustic haven doesn't have to break the bank. Simple additions and creative repurposing of materials can go a long way. Let’s explore a few easy, budget-friendly ideas to help you achieve that perfect rustic look. Ready to get started? Let’s dive in!
Getting Ready for Your Rustic Bathroom Project
Gather Materials: Collect all necessary tools and materials like wood, nails, screws, paint, brushes, and sandpaper. Make sure you have everything before starting.
Create a Plan: Sketch out your design. Decide where each piece will go and measure your space accurately.
Safety Gear: Wear safety goggles, gloves, and a dust mask. These protect your eyes, hands, and lungs from debris and chemicals.
Clear the Area: Remove any items from the bathroom. This gives you a clean workspace and prevents accidents.
Ventilation: Ensure the room is well-ventilated. Open windows or use fans to circulate air, especially when painting or staining.
Prepare Surfaces: Sand down any rough edges on wood. Clean walls and surfaces to ensure paint or adhesive sticks properly.
Organize Tools: Keep tools like hammers, screwdrivers, and drills within reach. This saves time and keeps your workspace tidy.
Check Plumbing: Ensure all plumbing is in good condition. Fix any leaks before starting your project to avoid water damage.
Lighting: Set up adequate lighting. Good visibility helps you work more accurately and safely.
Test Fit: Before permanently attaching anything, do a test fit. This ensures everything fits as planned and allows for adjustments.
Essential Materials and Tools
- Wood Planks: Essential for creating rustic shelves or wall panels. Choose reclaimed wood for an authentic look.
- Sandpaper: Smooths rough edges on wood planks. Helps achieve a polished finish.
- Wood Stain: Adds color and protects wood surfaces. Pick a shade that complements your bathroom decor.
- Paintbrushes: Needed for applying wood stain or paint. Different sizes help with detailed work.
- Screws and Nails: Secure wood planks to walls or other surfaces. Ensure they are the right size for your project.
- Hammer: Drives nails into wood. A basic tool for any DIY project.
- Screwdriver: Tightens screws. Choose a manual or electric one based on your preference.
- Measuring Tape: Ensures accurate measurements for cutting wood planks. Precision is key.
- Saw: Cuts wood planks to the desired size. A hand saw or electric saw works.
- Level: Ensures shelves and panels are straight. Prevents crooked installations.
- Drill: Makes holes for screws. An electric drill speeds up the process.
- Hooks and Hangers: Adds functionality to your rustic bathroom. Use for towels or decorations.
- Sealant: Protects wood from moisture. Essential for bathroom projects.
- Decorative Items: Enhance the rustic feel. Think mason jars, vintage mirrors, or woven baskets.
Skill Level and Time Commitment
Skill Level: Intermediate
Time Required: 2-3 weekends
- Installing Wooden Shelves: Requires basic carpentry skills. Estimated time: 4-6 hours.
- Creating a Barn Door: Needs intermediate woodworking skills. Estimated time: 8-10 hours.
- Distressing Furniture: Involves painting and sanding techniques. Estimated time: 3-4 hours.
- Adding Rustic Light Fixtures: Basic electrical knowledge needed. Estimated time: 2-3 hours.
- Installing Shiplap Walls: Requires measuring, cutting, and nailing. Estimated time: 6-8 hours.
Detailed Step-by-Step Guide
Choose a Color Scheme
- Pick earthy tones like browns, greens, or grays.
- Use neutral colors for a calming effect.
Install Wooden Elements
- Add a wooden vanity or shelves.
- Use reclaimed wood for a more rustic look.
Add Vintage Fixtures
- Replace modern faucets with antique-style ones.
- Install a clawfoot tub if space allows.
Incorporate Natural Materials
- Use stone tiles for the floor or shower.
- Add a stone sink or countertop.
Use Rustic Accessories
- Hang woven baskets for storage.
- Place mason jars for holding toiletries.
Install Rustic Lighting
- Choose iron or bronze light fixtures.
- Use Edison bulbs for a vintage feel.
Add Greenery
- Place potted plants around the bathroom.
- Use hanging plants for added texture.
Decorate with Textiles
- Use burlap or linen curtains.
- Add a woven rug for warmth.
Create a Feature Wall
- Use shiplap or barn wood for one wall.
- Paint it in a distressed finish for added character.
Personalize with DIY Projects
- Make a wooden towel rack.
- Craft a mirror frame from reclaimed wood.
Helpful Tips and Tricks
Use reclaimed wood for shelves or a vanity. It adds character and is eco-friendly. Mix metals like bronze and iron for fixtures. This gives a vintage feel. Install a barn door instead of a regular door. It saves space and looks cool. Add natural elements like stone or pebbles around the sink or tub. It brings the outdoors in. Use mason jars for storage. They’re cheap and fit the rustic theme.
Common mistakes to avoid: Don’t overdo the wood. Too much can make the space look dark. Avoid using too many different types of wood. Stick to one or two kinds. Don’t forget about ventilation. Rustic bathrooms can get musty without proper airflow. Avoid clutter. Keep the space simple and functional.
Alternatives for materials or methods: Instead of real wood, use wood-look tiles. They’re easier to clean and maintain. For a rustic look without metal, try matte black fixtures. They give a similar vibe. If a barn door isn’t possible, use a shower curtain with a rustic pattern. It’s a simple swap that makes a big difference.
Estimating the Cost
Wood Planks for walls or accents: $100-$200. Reclaimed Wood can be cheaper or even free if sourced locally.
Paint for walls: $30-$50 per gallon. Budget-friendly brands can be found for $20.
Barn Door hardware: $50-$100. DIY sliding doors can save money.
Vintage Fixtures like faucets and handles: $100-$200. Second-hand stores might offer cheaper options.
Rustic Vanity: $200-$500. Repurposing old furniture can cut costs.
Lighting: $50-$150. Edison bulbs and simple fixtures can be more affordable.
Decorative Items like mirrors, shelves, and baskets: $50-$100. Thrift stores often have unique finds.
Tools: Basic tools like a hammer, screwdriver, and drill: $50-$100. Borrowing from friends or family can save money.
Total estimated cost: $630-$1,400.
Unique Variations and Customizations
Wood Choices: Use reclaimed wood for a more authentic rustic feel. Pallet wood can be a budget-friendly option. For a polished look, consider oak or walnut.
Colors: Stick to earth tones like browns, greens, and grays. Whitewashed wood can add a lighter, airy feel. Bold colors like deep blue or forest green can create a striking contrast.
Fixtures: Swap out modern fixtures for vintage-style ones. Copper or bronze faucets add warmth. Iron fixtures can give an industrial edge.
Tiles: Use stone tiles for a natural look. Subway tiles in neutral colors can provide a clean, classic backdrop. Patterned tiles can add a unique touch.
Storage: Install open shelving made from wood planks. Use baskets or crates for storage. Repurpose old furniture like dressers into vanities.
Lighting: Opt for Edison bulbs for a vintage vibe. Mason jar lights can add a charming touch. Lantern-style fixtures can enhance the rustic feel.
Decor: Add antique mirrors with wooden frames. Use woven baskets for towels. Plants in rustic pots can bring in a touch of nature.
Flooring: Consider hardwood floors or wood-look tiles. Stone flooring can also add a rugged, natural element. Area rugs in neutral tones can add warmth.
Walls: Use shiplap or wood paneling for a rustic look. Brick walls can add texture. Painted wood in soft colors can create a cozy atmosphere.
Accessories: Incorporate metal accents like towel bars and hooks. Use vintage signs or artwork. Rustic baskets can hold toiletries or extra towels.
Eco-Friendly Ideas
Reclaimed Wood: Use old barn wood or pallets for shelves, mirrors, or even a vanity. Sand and seal the wood to protect it from moisture.
Repurposed Furniture: Turn an old dresser into a bathroom vanity. Cut out space for the sink and plumbing, then seal the wood to make it water-resistant.
Natural Stone: Opt for stones like river rocks or slate for flooring or shower walls. These materials are durable and give a rustic feel.
Eco-Friendly Paint: Choose low-VOC or zero-VOC paints. These paints are better for the environment and your health.
Recycled Glass: Use recycled glass tiles for a unique backsplash or shower wall. They come in various colors and add a touch of elegance.
Bamboo: Consider bamboo for flooring or accessories. Bamboo grows quickly, making it a sustainable choice.
Vintage Fixtures: Hunt for vintage faucets, towel racks, and light fixtures. These items add character and reduce the need for new manufacturing.
Compostable Decor: Use natural fibers like jute or cotton for rugs and towels. These materials are biodegradable and eco-friendly.
Energy-Efficient Lighting: Install LED bulbs or fixtures. They use less energy and last longer than traditional bulbs.
Water-Saving Fixtures: Choose low-flow showerheads and faucets. These fixtures help conserve water without sacrificing performance.
Your Rustic Bathroom Awaits
Creating a rustic bathroom isn't just about the look; it's about the feel. Using natural materials like wood and stone, you can transform any space into a cozy retreat. Don't forget the small details like vintage fixtures, woven baskets, and handmade decorations. These touches bring warmth and character.
Remember, DIY projects let you put your personal stamp on everything. Whether it's a reclaimed wood shelf or a hand-painted sign, your creativity shines through. Plus, you save money and get the satisfaction of doing it yourself.
So grab your tools, gather your materials, and start crafting your dream bathroom. With a bit of effort and imagination, you'll have a space that's both functional and beautiful. Enjoy the process and the end result. Happy DIY-ing!
How can I create a rustic look in my bathroom?
Use natural materials like wood and stone. Add vintage fixtures and textured fabrics. Think about using a neutral color palette with earthy tones.
What type of wood works best for a rustic bathroom?
Reclaimed wood is perfect. It has a weathered look that adds character. Cedar and pine are also great choices because they're durable and have a natural, rustic feel.
How do I make my bathroom look vintage?
Incorporate antique mirrors, clawfoot tubs, and old-fashioned faucets. Use distressed furniture and vintage accessories like old jars and baskets.
Can I mix modern elements with rustic decor?
Absolutely! Combine sleek fixtures with rustic wood or stone accents. This creates a balanced look that's both cozy and contemporary.
What kind of lighting should I use?
Go for soft, warm lighting. Edison bulbs or lantern-style fixtures work well. Wall sconces with a vintage look can add charm and warmth.
How do I keep a rustic bathroom from looking too dark?
Use light-colored wood and neutral tones. Add mirrors to reflect light and make the space feel larger. Natural light is also key, so keep windows uncovered or use sheer curtains.
What are some easy DIY projects for a rustic bathroom?
Try making a wooden towel rack or floating shelves. Mason jar organizers for toiletries are simple and add a rustic touch. You can also create a stone accent wall with peel-and-stick tiles.