
Home>Create & Decorate>DIY & Crafts>How To Build A Hall Tree
DIY & Crafts
How To Build A Hall Tree
Published: June 13, 2024

Content Creator specializing in woodworking and interior transformations. Caegan's guides motivate readers to undertake their own projects, while his custom furniture adds a personal touch.
Learn how to build a DIY hall tree with our step-by-step guide. Get creative with your crafts and add a stylish touch to your entryway. Start your project today!
(Many of the links in this article redirect to a specific reviewed product. Your purchase of these products through affiliate links helps to generate commission for Twigandthistle.com, at no extra cost. Learn more)
Introduction
So, you want to add some charm and functionality to your entryway? A hall tree might just be the perfect solution! This versatile piece of furniture combines a bench, coat rack, and storage all in one, making it a practical and stylish addition to any home. Whether you're a seasoned DIY enthusiast or just starting out, building your own hall tree can be a rewarding project that adds a personal touch to your space. In this guide, we'll walk you through the steps to create your very own hall tree, from choosing the right materials to adding the finishing touches. Let's get started!
Choosing the Right Materials
When it comes to building a hall tree, selecting the right materials is crucial for both the aesthetic appeal and the durability of the finished piece. Here are some key materials to consider:
1. Wood
Opt for sturdy and visually appealing wood such as oak, maple, or pine for the main structure of the hall tree. Consider the overall style of your home and choose a wood type that complements the existing decor.
2. Hooks and Hardware
Select durable and stylish hooks and hardware to ensure that your hall tree not only looks great but also functions well. Look for hooks that can withstand the weight of heavy coats and bags without bending or breaking.
3. Bench Cushion
If your hall tree will include a bench, choose a high-quality cushion that provides both comfort and durability. Consider a fabric that is easy to clean and complements the color scheme of your entryway.
4. Paint or Stain
Decide whether you want to paint or stain the hall tree. If you opt for paint, choose a color that coordinates with your home's color palette. If staining, select a stain that enhances the natural beauty of the wood.
By carefully selecting the right materials, you can ensure that your DIY hall tree not only looks fantastic but also stands the test of time.
Designing Your Hall Tree
Designing your hall tree is where you can let your creativity shine. Consider the following elements as you plan the design:
-
Overall Style: Decide on the overall style of your hall tree. Whether it's rustic, modern, or traditional, make sure the design complements the existing decor of your home.
-
Dimensions: Measure the available space in your entryway to determine the appropriate dimensions for your hall tree. Consider the height, width, and depth to ensure it fits comfortably in the designated area.
-
Storage Needs: Assess your storage needs. Determine how many hooks, cubbies, or shelves you'll need to accommodate coats, bags, shoes, and other items that tend to clutter the entryway.
-
Bench or No Bench: Decide if you want to include a bench in your hall tree. A bench provides a convenient spot for putting on and taking off shoes, but if space is limited, you may opt for a simpler design without a bench.
-
Aesthetic Details: Consider adding aesthetic details such as decorative molding, beveled edges, or carved accents to elevate the visual appeal of your hall tree.
By carefully considering these design elements, you can create a hall tree that not only meets your practical needs but also enhances the overall look of your entryway.
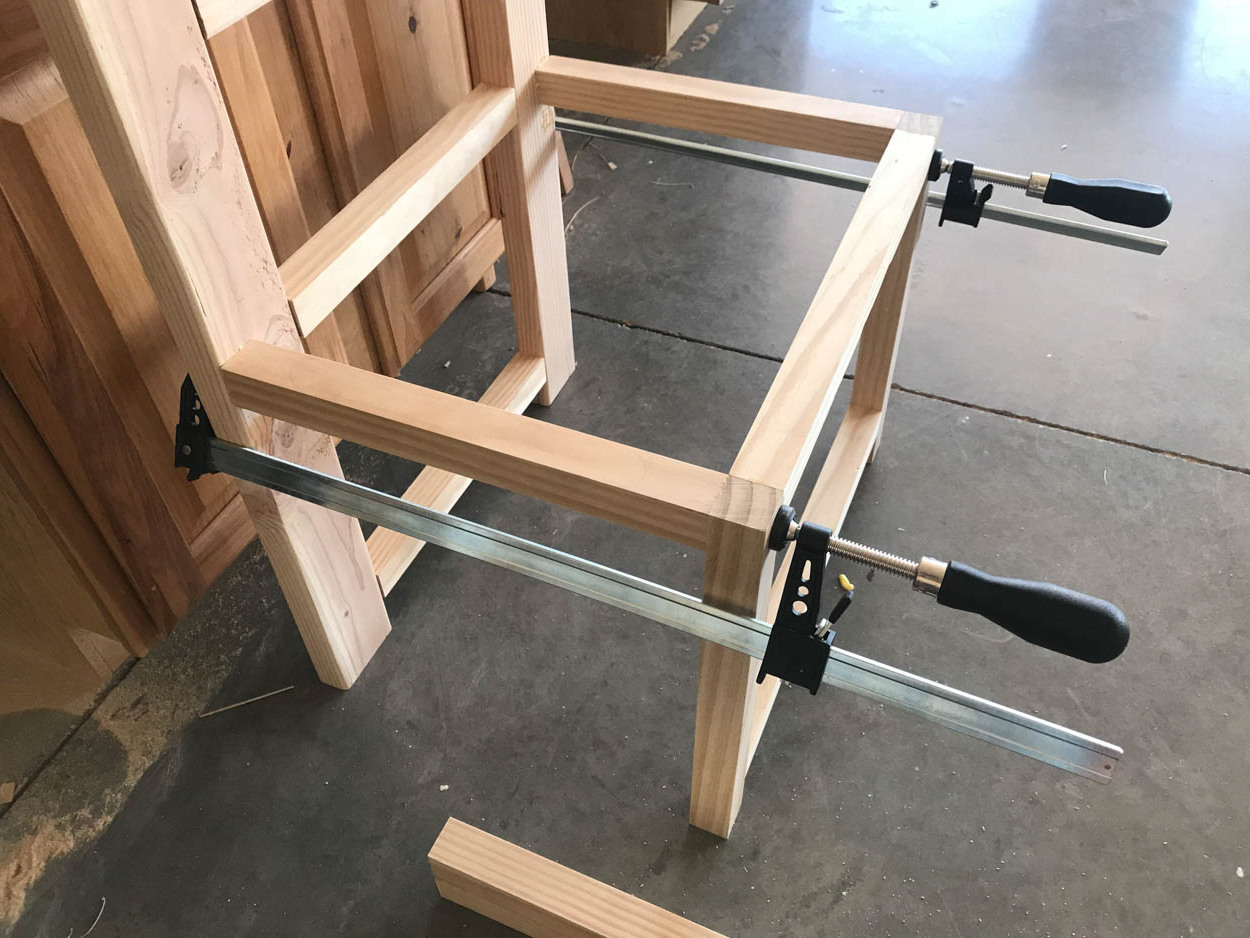
Building the Frame
Building the frame is a crucial step in creating a sturdy and reliable hall tree. Follow these steps to construct the frame:
-
Cutting the Wood: Begin by cutting the wood to the appropriate dimensions based on your design plan. Use a saw to carefully cut the pieces for the sides, top, bottom, and any additional shelves or compartments.
-
Assembling the Sides: Once the pieces are cut, assemble the sides of the frame. Use a level to ensure that the sides are perfectly vertical and secure them together using wood glue and screws.
-
Adding the Top and Bottom: Attach the top and bottom pieces to the assembled sides, creating a box-like structure. Double-check the measurements to ensure everything fits snugly.
-
Reinforcing the Frame: To reinforce the frame, consider adding corner braces or L-brackets to provide additional stability and support. This is especially important if your hall tree will be bearing a significant amount of weight.
-
Creating Support for the Bench (if applicable): If your hall tree includes a bench, create a support structure for the bench seat. This may involve adding additional pieces of wood or installing a support beam underneath the seat area.
-
Sanding and Smoothing: Once the frame is assembled, sand the surfaces to remove any rough edges or splinters. This will prepare the frame for the finishing touches, ensuring a polished final result.
By following these steps, you can build a strong and durable frame for your hall tree, providing a solid foundation for the rest of the construction process.
Adding Storage Options
When it comes to adding storage options to your hall tree, there are several creative and practical solutions to consider. Here are some ideas to maximize the functionality of your hall tree:
-
Cubbies and Shelves: Incorporate cubbies and shelves to provide designated spaces for items such as hats, gloves, and small bags. Consider varying the sizes of the compartments to accommodate different types of belongings.
-
Built-In Bench Storage: If your hall tree includes a bench, take advantage of the space beneath the seat by adding built-in storage. This can be achieved by installing hinged bench seats that lift up to reveal hidden compartments, perfect for storing shoes or seasonal accessories.
-
Overhead Storage: Utilize the vertical space above the bench or coat rack by adding overhead storage compartments. This can be in the form of a shelf or a series of hooks for hanging items such as umbrellas, scarves, or dog leashes.
-
Drawer Inserts: If your hall tree features drawers, consider incorporating drawer inserts to keep smaller items organized. These inserts can include dividers or compartments to neatly store keys, sunglasses, or other miscellaneous items.
-
Accessory Hooks: Install additional hooks or pegs specifically designed for hanging accessories such as hats, purses, or pet leashes. These smaller hooks can be strategically placed to maximize storage without overcrowding the hall tree.
By incorporating these storage options into your hall tree design, you can create a functional and organized entryway solution that meets your specific storage needs while adding a touch of personalized style to your home.
Finishing Touches
The finishing touches are what truly bring your DIY hall tree to life, adding personality and style to the finished piece. Here are some essential finishing touches to consider:
-
Paint or Stain: Apply the chosen paint or stain to the hall tree, ensuring even coverage and paying attention to detail. Consider using a high-quality brush or roller to achieve a smooth and professional finish.
-
Protective Finish: Once the paint or stain has dried, apply a protective finish such as polyurethane to seal and protect the wood. This will not only enhance the appearance but also provide durability and resistance to wear and tear.
-
Hardware Installation: Install the hooks, knobs, or handles onto the hall tree. Ensure they are securely attached and evenly spaced for a polished look. This is also the time to add any decorative hardware that complements the overall design.
-
Bench Cushion: If your hall tree includes a bench, add the cushion to provide comfort and style. Ensure the cushion fits snugly and securely, and consider adding decorative pillows or upholstery for an extra touch of coziness.
-
Decorative Accents: Consider adding decorative accents such as trim, molding, or embellishments to enhance the visual appeal of the hall tree. These small details can make a big difference in the overall aesthetic.
-
Final Inspection: Take a final look at the hall tree to ensure everything is secure, level, and visually appealing. Make any necessary adjustments or touch-ups to achieve a flawless result.
By paying attention to these finishing touches, you can elevate your DIY hall tree from a simple construction project to a stunning and functional piece of furniture that adds character and charm to your entryway.
Conclusion
In conclusion, building your own hall tree can be a rewarding and fulfilling DIY project that adds both practicality and style to your home. By carefully choosing the right materials, designing a functional and aesthetically pleasing structure, and adding thoughtful storage options and finishing touches, you can create a customized hall tree that perfectly suits your entryway needs. Whether you're a seasoned DIY enthusiast or a novice looking to embark on a new project, the process of building a hall tree allows for creativity, personalization, and the satisfaction of creating a useful piece of furniture with your own hands. So, roll up your sleeves, gather your materials, and get ready to build a hall tree that will be a standout feature in your home for years to come.