
Home>Create & Decorate>DIY & Crafts>Dunk Tank DIY: How To Build Your Own Water Fun!
DIY & Crafts
Dunk Tank DIY: How To Build Your Own Water Fun!
Published: June 16, 2024

Content Creator specializing in woodworking and interior transformations. Caegan's guides motivate readers to undertake their own projects, while his custom furniture adds a personal touch.
Learn how to create your own dunk tank for endless water fun with our DIY guide. Get creative with our DIY & Crafts tips and tricks!
(Many of the links in this article redirect to a specific reviewed product. Your purchase of these products through affiliate links helps to generate commission for Twigandthistle.com, at no extra cost. Learn more)
Introduction
So, you want to add some splashy fun to your next outdoor event? Building your own dunk tank can be a fantastic way to bring laughter and excitement to parties, fundraisers, or even just a hot summer day in the backyard. In this guide, we'll walk you through the step-by-step process of creating your very own dunk tank. Whether you're a DIY enthusiast or just looking for a new project, building a dunk tank can be a rewarding and enjoyable experience. Let's dive in and get started on creating some watery amusement!
Materials Needed
To get started on your DIY dunk tank project, you'll need to gather the following materials:
- 2×4 lumber: You'll need several pieces of 2×4 lumber to construct the frame of the dunk tank.
- Plywood: Get a large sheet of plywood to create the tank walls and floor.
- Nails and screws: Stock up on nails and screws to secure the frame and tank together.
- Tarp or heavy-duty plastic sheeting: This will be used to line the inside of the tank to hold the water.
- Hinges and latches: These will be essential for creating a door on the tank for the "dunkee" to enter and exit.
- Water pump: You'll need a water pump to fill the tank and keep the water circulating.
- Water balloons or softballs: These will serve as the ammunition for the dunk tank target.
- Target seat: A sturdy seat for the "dunkee" to sit on while waiting to be dunked.
- Paint: Choose some bright and fun colors to paint the tank and target to add to the festive atmosphere.
- Safety gear: Don't forget safety goggles, gloves, and any other protective gear you may need during the construction process.
Gathering these materials will set you up for success as you embark on your dunk tank DIY adventure!
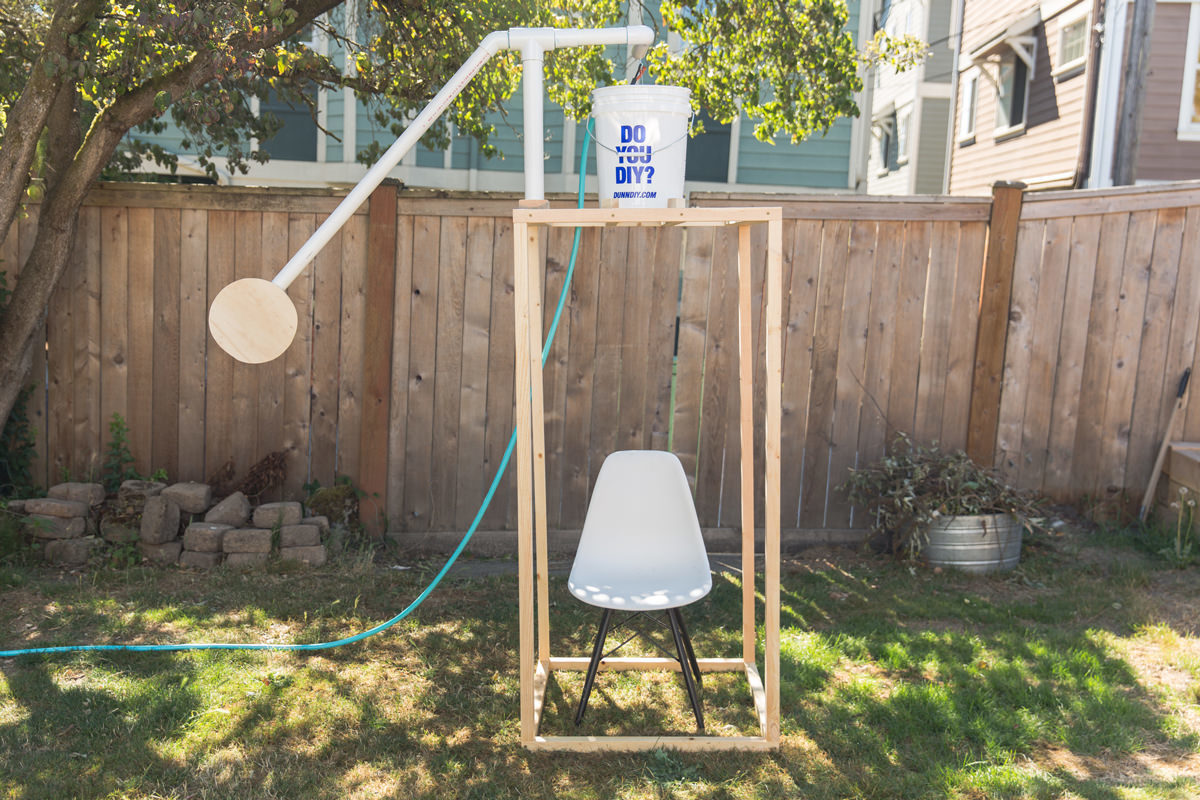
Step 1: Building the Frame
The first step in creating your DIY dunk tank is constructing the sturdy frame that will support the tank structure. Follow these steps to build the frame:
-
Measure and Cut the Lumber: Begin by measuring and cutting the 2×4 lumber to the desired lengths for the frame. You'll need to create a rectangular base and vertical supports to hold the tank in place.
-
Assemble the Base: Use nails and screws to securely attach the pieces of lumber together, forming a strong and stable base for the tank.
-
Add Vertical Supports: Attach the vertical supports to the corners of the base, ensuring they are straight and securely fastened. These supports will hold the tank walls in place.
-
Reinforce the Frame: To ensure the frame can support the weight of the water, consider adding additional cross-bracing for extra stability.
By carefully constructing a solid frame, you'll create a reliable foundation for the rest of the dunk tank assembly.
Step 2: Assembling the Tank
After completing the frame, the next step is to assemble the tank itself. Here's a detailed guide on how to accomplish this:
-
Cut the Plywood: Measure and cut the plywood to the appropriate dimensions for the tank walls and floor. Ensure the pieces fit snugly within the frame.
-
Secure the Tank Walls: Use nails and screws to attach the plywood walls to the vertical supports of the frame. Make sure the walls are securely fastened and can withstand the pressure of the water.
-
Create the Tank Floor: Place the plywood sheet on the bottom of the frame to form the tank's floor. Secure it in place to ensure it can support the weight of the water without bowing or bending.
-
Line the Tank: Use a tarp or heavy-duty plastic sheeting to line the inside of the tank, creating a waterproof barrier to hold the water. Ensure the liner is securely fastened and free of any tears or holes.
-
Install the Door: Cut a section of the tank wall to create a door for the "dunkee" to enter and exit. Attach hinges and latches to allow for easy opening and closing while maintaining a secure seal.
By following these steps, you'll successfully assemble the tank, creating a watertight enclosure ready to be filled for some dunking fun!
Step 3: Filling the Tank
Once the tank is assembled, it's time to fill it with water to prepare for the dunking festivities. Follow these steps to ensure a smooth and successful filling process:
-
Connect the Water Source: Position the dunk tank near a water source, such as a hose or outdoor spigot. Ensure that the water source can reach the tank and that you have a reliable connection.
-
Start Filling: Begin filling the tank with water using the water pump or by directly filling it from the water source. Monitor the water level as it rises, ensuring that it does not overflow.
-
Check for Leaks: As the tank fills, inspect the seams and liner for any signs of leakage. Address any leaks immediately by reinforcing the seams or patching the liner to prevent water loss.
-
Monitor the Water Level: Keep an eye on the water level as the tank fills. Once it reaches the desired depth, shut off the water source to prevent overfilling.
-
Test the Water Quality: Before using the dunk tank, ensure that the water is clean and free of debris. If necessary, use a pool skimmer or filtration system to remove any impurities.
By following these steps, you'll effectively fill the tank with water, ensuring that it's ready for some splashy fun without any hiccups.
Step 4: Setting Up the Target
Setting up the target is a crucial step in ensuring that your DIY dunk tank delivers maximum fun and excitement. Here's a detailed guide on how to set up the target for a successful dunking experience:
-
Position the Target: Choose a location in front of the dunk tank where the throwers will have a clear line of sight to the target. Ensure that the area is clear of any obstacles and provides enough space for participants to take their shots.
-
Create the Target Structure: Construct a sturdy target structure using wood or metal. The target should be securely anchored to the ground to prevent it from tipping over when hit by water balloons or softballs.
-
Design the Target Surface: Paint the target with colorful and eye-catching designs to make it visually appealing. Consider adding point values to different sections of the target to make the game more engaging and competitive.
-
Set the Distance: Determine the throwing distance from the target to the throwing line. This distance should be challenging but achievable for participants of all ages.
-
Provide Ammunition: Place a supply of water balloons or softballs near the throwing line for participants to use as ammunition. Ensure that the ammunition is easily accessible and that there is an ample supply for continuous gameplay.
-
Establish Safety Measures: Set up a safety perimeter around the target area to prevent non-participants from getting too close. Clearly mark the boundaries and communicate the safety rules to all participants.
By following these steps, you'll effectively set up the target for your DIY dunk tank, creating an exciting and interactive experience for everyone involved.
Step 5: Safety Precautions
Ensuring the safety of participants and spectators is paramount when setting up and operating a DIY dunk tank. Here are essential safety precautions to consider:
-
Secure the Tank: Double-check that the tank is stable and securely positioned to prevent tipping or shifting during use. It should be on level ground and anchored to prevent accidental movement.
-
Clear Instructions: Clearly communicate the rules and guidelines for using the dunk tank. Provide instructions on how to safely enter and exit the tank, as well as guidelines for throwing at the target.
-
Supervision: Assign responsible individuals to supervise the dunk tank area at all times. They should enforce safety rules, monitor participant behavior, and intervene if any unsafe actions are observed.
-
Participant Restrictions: Establish age and size restrictions for participants to ensure that only individuals who can safely engage in the activity are allowed to participate.
-
Safety Gear: Provide safety gear such as life jackets or floatation devices for participants who may not be strong swimmers, especially if the tank is deep.
-
Non-Slip Surface: Ensure that the area around the tank and the target is free from slippery surfaces. Consider using non-slip mats or applying a non-slip coating to prevent accidents.
-
Emergency Plan: Have a clear emergency plan in place, including first aid supplies, access to emergency services, and a designated individual responsible for managing emergencies.
-
Water Quality: Regularly monitor and maintain the water quality in the tank to prevent the growth of bacteria or algae. Keep the water clean and safe for all participants.
By implementing these safety precautions, you can create a fun and enjoyable dunk tank experience while prioritizing the well-being of everyone involved.
Conclusion
Congratulations! You've successfully learned how to build your very own DIY dunk tank. By following the step-by-step process outlined in this guide, you've gained the knowledge and skills needed to create a fun and entertaining attraction for various events and gatherings. Whether it's a backyard party, a school carnival, or a charity fundraiser, your homemade dunk tank is sure to be a hit.
Remember, safety should always be a top priority when operating a dunk tank. By adhering to the safety precautions and guidelines provided, you can ensure that everyone enjoys the dunk tank experience in a secure and controlled environment.
So, gather your materials, roll up your sleeves, and get ready to make a splash with your custom-built dunk tank. With creativity and a little bit of DIY spirit, you can bring joy and laughter to any occasion with your one-of-a-kind water fun creation. Get ready to dunk, laugh, and make unforgettable memories with your very own DIY dunk tank!