
Home>Create & Decorate>DIY & Crafts>DIY Teardrop Trailer Building Guide
DIY & Crafts
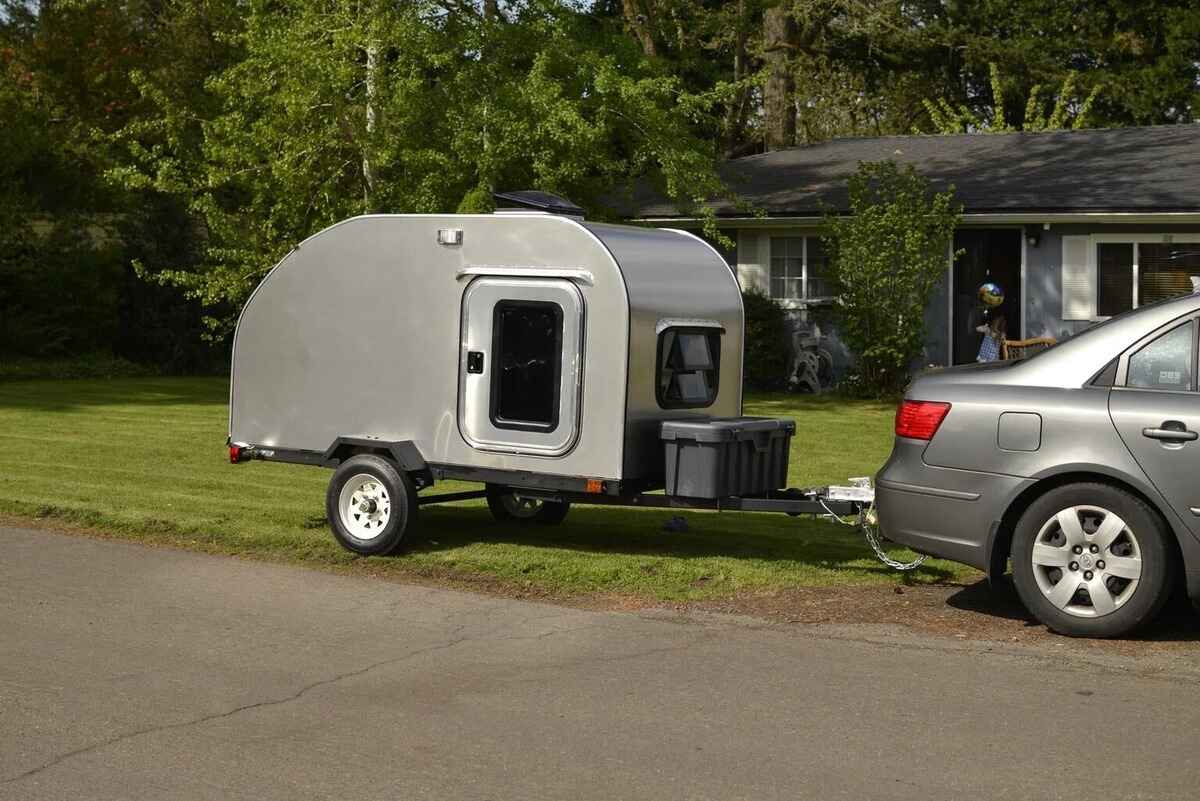
DIY Teardrop Trailer Building Guide
Published: June 3, 2024

Content Creator specializing in woodworking and interior transformations. Caegan's guides motivate readers to undertake their own projects, while his custom furniture adds a personal touch.
Discover the ultimate DIY teardrop trailer building guide for your next crafting adventure. Get expert tips, step-by-step instructions, and creative ideas for your DIY and crafts project.
(Many of the links in this article redirect to a specific reviewed product. Your purchase of these products through affiliate links helps to generate commission for Twigandthistle.com, at no extra cost. Learn more)
Introduction
Are you ready to embark on an exciting DIY project that will take your camping adventures to the next level? Building your own teardrop trailer can be a rewarding and cost-effective way to create a cozy and functional space for your outdoor getaways. Whether you're a seasoned DIY enthusiast or a novice looking for a new challenge, this comprehensive guide will walk you through the step-by-step process of constructing your very own teardrop trailer. From choosing the right trailer frame to adding the finishing touches, you'll learn everything you need to know to bring your vision to life. So, roll up your sleeves and get ready to dive into the world of DIY teardrop trailer building!
Choosing the Right Trailer Frame
When it comes to building a teardrop trailer, selecting the right trailer frame is a crucial first step. Here are some key factors to consider when choosing the perfect trailer frame for your DIY project:
-
Size and Weight Capacity: Determine the size and weight capacity you'll need for your teardrop trailer. Consider the overall dimensions of the trailer, as well as the weight of the materials and supplies you plan to carry. Ensure that the trailer frame can support the intended load without compromising safety and stability.
-
Material: Trailer frames are commonly made of steel or aluminum. Steel frames are known for their strength and durability, while aluminum frames offer lightweight and corrosion-resistant properties. Consider the advantages of each material and choose one that aligns with your specific needs and preferences.
-
Suspension System: The type of suspension system on the trailer frame will impact the ride quality and handling of your teardrop trailer. Look for a suspension system that provides smooth towing and stability, especially on rough terrain. Additionally, consider the ease of maintenance and potential upgrades for the suspension system.
-
Customization Options: Some trailer frames come with built-in features or customization options that can enhance the overall functionality of your teardrop trailer. Features such as adjustable couplers, integrated wiring systems, and mounting points for accessories can streamline the construction process and allow for personalization.
-
Budget and Availability: Set a budget for the trailer frame and explore the availability of options within your price range. Compare prices from different suppliers and consider factors such as warranty, customer support, and shipping costs when making your decision.
By carefully evaluating these factors, you can select a trailer frame that forms a solid foundation for your DIY teardrop trailer project. Once you've chosen the right trailer frame, you'll be one step closer to bringing your vision of a custom-built teardrop trailer to life.
Designing the Teardrop Trailer
Designing your teardrop trailer is an exciting phase that allows you to unleash your creativity and tailor the trailer to your specific needs and preferences. Here are the essential steps to consider when designing your teardrop trailer:
-
Layout and Floor Plan: Begin by sketching out the layout and floor plan of your teardrop trailer. Consider the interior space needed for sleeping, storage, and any additional features you wish to incorporate. Keep in mind that the compact nature of teardrop trailers requires efficient use of space.
-
Aerodynamics and Shape: The distinctive teardrop shape is not only visually appealing but also serves a functional purpose. The aerodynamic design reduces wind resistance, resulting in improved fuel efficiency and easier towing. Ensure that your design maintains the classic teardrop silhouette while accommodating your desired interior layout.
-
Material Selection: Choose suitable materials for the construction of the trailer shell. Lightweight yet durable materials such as plywood, aluminum, and fiberglass are commonly used. Consider the structural integrity, weight, and weather resistance of the materials to ensure a well-built and long-lasting teardrop trailer.
-
Ventilation and Windows: Adequate ventilation is essential for a comfortable camping experience. Incorporate windows and vents into your design to promote airflow and natural light within the trailer. Consider the placement of windows to maximize views and privacy while maintaining the structural integrity of the trailer shell.
-
Exterior Finishes and Accents: Personalize the exterior of your teardrop trailer with finishes and accents that reflect your style. Whether it's a vibrant paint color, retro-inspired decals, or polished aluminum skin, the exterior design adds character to your DIY creation.
-
Utility Connections and Storage: Plan for utility connections such as electrical hookups and storage compartments for propane tanks, batteries, and camping gear. Efficiently integrating these elements into your design ensures convenience and functionality during your outdoor adventures.
-
Interior Features and Amenities: Consider the interior amenities you'd like to include, such as a comfortable sleeping area, storage cabinets, a galley kitchen, and lighting. The design phase is the ideal time to envision the interior space and plan for the features that will enhance your camping experience.
By carefully considering these design elements, you can create a teardrop trailer that not only meets your practical needs but also reflects your personal style and vision. Once the design phase is complete, you'll be ready to move on to the next exciting stage of bringing your teardrop trailer to life.
Gathering Materials and Tools
Before diving into the construction of your teardrop trailer, it's essential to gather all the necessary materials and tools to ensure a smooth and efficient building process. Here's a detailed breakdown of the materials and tools you'll need to have on hand:
Materials
-
Trailer Frame: Ensure you have the selected trailer frame, including any additional components or accessories that may have been included in your purchase.
-
Trailer Shell Materials: Depending on your design, gather the materials for constructing the trailer shell, such as plywood, aluminum sheets, fiberglass, or composite panels. Consider the quantity and dimensions needed based on your design specifications.
-
Fasteners and Hardware: Stock up on a variety of fasteners, including screws, bolts, nuts, washers, and rivets. Additionally, gather hinges, latches, handles, and other hardware required for assembling the trailer components.
-
Sealants and Adhesives: Acquire sealants and adhesives suitable for bonding and weatherproofing the trailer shell. Choose products designed for outdoor use and compatible with the materials you're working with.
-
Electrical Components: If your design includes lighting, fans, or other electrical features, gather the necessary wiring, switches, LED lights, and electrical connectors. Consider the power source and any additional electrical accessories you plan to install.
-
Insulation and Weatherproofing: Depending on your camping preferences and the climate you'll be traveling in, gather insulation materials and weatherproofing products to ensure comfort and protection from the elements.
-
Interior Finishes: Plan for interior finishes such as wall coverings, flooring materials, and any additional decorative elements to personalize the interior space of your teardrop trailer.
Tools
-
Measuring and Marking Tools: Equip yourself with measuring tapes, rulers, squares, and marking tools to ensure accurate and precise cuts and placements during the construction process.
-
Cutting Tools: Depending on the materials you're working with, gather a selection of cutting tools such as a circular saw, jigsaw, handsaw, or utility knife. Ensure that the blades are suitable for the materials being cut.
-
Fastening Tools: Prepare a range of tools for fastening components, including drills, impact drivers, rivet guns, and a variety of drill bits and driver bits.
-
Assembly and Finishing Tools: Include tools for assembly and finishing, such as clamps, sanders, files, and paint brushes. These tools will aid in securing components and achieving a professional finish.
-
Safety Gear: Prioritize safety by having personal protective equipment on hand, including safety glasses, gloves, dust masks, and hearing protection.
By gathering the right materials and tools before starting the construction process, you'll set yourself up for a successful and enjoyable DIY teardrop trailer build. With everything in place, you'll be ready to bring your vision to life and create a custom-built teardrop trailer that's tailored to your camping adventures.
Building the Trailer Frame
Building the trailer frame is a critical phase in the construction of your DIY teardrop trailer. The frame serves as the foundation that supports the entire structure, ensuring stability and structural integrity during travel and camping. Here's a detailed guide to help you navigate the process of building the trailer frame:
1. Frame Preparation
Before assembling the trailer frame, ensure that the selected trailer frame is free from any defects or damage. Inspect the frame for any signs of corrosion, dents, or misalignment, and address any issues before proceeding. Additionally, gather the necessary tools and materials, including welding equipment, clamps, and protective gear, to prepare for the construction process.
2. Frame Assembly
Begin by laying out the components of the trailer frame according to the manufacturer's instructions or design specifications. If you're customizing the frame or making modifications, carefully measure and mark the locations for welding or fastening the frame components. Use clamps to secure the frame components in place before welding or fastening to ensure accurate alignment and fit.
3. Welding or Fastening
Depending on the type of trailer frame and your skill level, you may choose to weld or fasten the frame components together. If welding, follow proper welding techniques and safety precautions to create strong and durable joints. Alternatively, if fastening, use high-quality fasteners and hardware to securely connect the frame components, ensuring that the joints are robust and reliable.
4. Reinforcement and Bracing
Consider reinforcing critical areas of the trailer frame to enhance its strength and durability. This may involve adding gussets, cross braces, or additional support structures to key stress points. Reinforcement measures help distribute the load evenly and minimize flexing or twisting of the frame during towing and travel.
5. Trailer Attachment Points
Ensure that the trailer frame includes attachment points for the trailer axle, suspension system, and hitch. These attachment points should be strategically positioned and securely integrated into the frame to ensure proper weight distribution and towing stability. Follow the manufacturer's guidelines or design specifications for the correct placement and installation of these components.
6. Surface Treatment
After the frame assembly is complete, consider applying a protective coating or finish to the frame to guard against corrosion and environmental damage. Depending on the material of the frame, options such as painting, powder coating, or galvanizing can provide long-term protection and enhance the aesthetic appeal of the trailer frame.
By following these steps and paying attention to detail during the construction of the trailer frame, you'll create a solid and reliable foundation for your teardrop trailer. The well-constructed frame will set the stage for the next phases of the build, bringing you closer to the realization of your custom-built teardrop trailer.
Constructing the Teardrop Shell
Constructing the teardrop shell is a pivotal stage in the creation of your DIY teardrop trailer, as it forms the exterior structure that provides shelter and protection during your camping adventures. Here's a comprehensive guide to help you navigate the process of constructing the teardrop shell:
1. Template Creation
Begin by creating a detailed template of the teardrop shell design on a large, flat surface. The template serves as a guide for cutting and shaping the materials needed to form the shell. Ensure that the template accurately reflects the dimensions and contours of your design, including the door and window openings.
2. Material Preparation
Gather the materials specified in your design, such as plywood, aluminum sheets, fiberglass, or composite panels, and prepare them for construction. Depending on the chosen material, use appropriate cutting tools to accurately cut the panels according to the template dimensions. Take care to achieve precise cuts to ensure a seamless assembly.
3. Shell Assembly
Lay out the cut panels according to the template and begin assembling the teardrop shell. Depending on your design, you may opt for a traditional wooden frame construction or a more modern composite panel assembly. Secure the panels together using suitable fasteners, adhesives, or a combination of both, ensuring a strong and weather-resistant bond.
4. Structural Integrity
Assemble the shell in a manner that ensures structural integrity and stability. Consider reinforcing critical joints and seams to withstand the stresses encountered during travel and camping. Pay attention to the attachment points for doors, windows, and any exterior accessories, ensuring they are securely integrated into the shell structure.
5. Weatherproofing and Sealing
Once the shell assembly is complete, focus on weatherproofing and sealing the exterior surfaces. Apply appropriate sealants and adhesives to seal joints, seams, and penetrations, preventing water intrusion and enhancing the overall durability of the shell. Consider adding protective trim and edging to further safeguard vulnerable areas.
6. Exterior Finishes
Personalize the exterior of the teardrop shell with finishes that align with your aesthetic preferences. Whether it's a sleek aluminum skin, a classic wood finish, or a custom paint job, the exterior finish adds character and visual appeal to your teardrop trailer. Ensure that the chosen finish provides adequate protection against the elements.
7. Window and Door Installation
Cut openings for windows and doors as per your design specifications and install them securely into the shell. Properly sealed and fitted windows and doors contribute to the overall functionality, ventilation, and aesthetic appeal of the teardrop trailer. Follow manufacturer guidelines for installation and weatherproofing.
By following these steps and maintaining attention to detail throughout the construction process, you'll successfully construct a sturdy and well-crafted teardrop shell for your DIY trailer. The completed shell sets the stage for the next phases of the build, bringing you closer to the realization of your custom-built teardrop trailer.
Installing Doors and Windows
Installing doors and windows is a crucial step in the construction of your DIY teardrop trailer, as it directly impacts the functionality, comfort, and aesthetic appeal of the trailer. Here's a detailed guide to help you navigate the process of installing doors and windows:
-
Door Placement and Sizing: Begin by determining the placement and sizing of the entry door based on your trailer's design and layout. Consider factors such as ease of access, interior space utilization, and exterior aesthetics. Carefully measure and mark the door opening on the teardrop shell, ensuring precise dimensions for a proper fit.
-
Door Installation: Once the door opening is prepared, proceed with installing the entry door according to the manufacturer's instructions. Ensure that the door frame is securely mounted and aligned, providing a tight seal when closed. Pay attention to weatherproofing details, such as installing rubber gaskets or seals to prevent water infiltration.
-
Window Placement and Design: Plan the placement and design of windows to maximize natural light, ventilation, and scenic views within the teardrop trailer. Consider the size, shape, and quantity of windows based on your camping preferences and interior layout. Mark the window openings on the shell, taking care to maintain structural integrity.
-
Window Installation: Cut the window openings in the teardrop shell according to your design specifications, ensuring accuracy and smooth edges. Install the windows using appropriate sealing methods and hardware to create a watertight and airtight seal. Consider using butyl tape or silicone sealant to secure the windows and prevent leaks.
-
Weatherproofing and Sealing: After installing the doors and windows, focus on weatherproofing the surrounding areas to prevent water intrusion and air leaks. Apply sealants and gaskets around the door and window frames to create a tight seal against the elements. Test the doors and windows for proper operation and sealing.
-
Interior Trim and Finishing: Complete the installation by adding interior trim around the door and window frames to create a clean and finished appearance. The trim not only enhances the aesthetics but also conceals any gaps and provides a smooth transition between the shell and the interior surfaces. Choose trim materials that complement the overall interior design.
-
Security and Hardware: Ensure that the doors and windows are equipped with secure locking mechanisms and hardware to safeguard the trailer's contents and provide peace of mind during travel and camping. Test the functionality of the locks and handles to ensure smooth operation and reliable security.
By following these steps and paying attention to detail during the installation of doors and windows, you'll enhance the functionality, comfort, and visual appeal of your DIY teardrop trailer. The completed installation brings you closer to the realization of a custom-built teardrop trailer that's tailored to your outdoor adventures.
Adding Interior Features
Designing the interior of your teardrop trailer is an exciting opportunity to create a comfortable and functional living space for your camping adventures. Here's a detailed guide to help you add essential interior features to your DIY teardrop trailer:
1. Sleeping Area
Design a cozy and inviting sleeping area that maximizes space and comfort. Consider incorporating a platform bed with storage compartments underneath to optimize the use of available space. Choose a comfortable mattress or sleeping pad that suits your preferences and provides a restful night's sleep during your outdoor excursions.
2. Storage Solutions
Efficient storage is essential in a compact teardrop trailer. Integrate storage solutions such as overhead cabinets, under-bed drawers, and shelving units to organize camping gear, clothing, and supplies. Utilize vertical space and consider multi-functional furniture that doubles as storage, such as benches with lift-up seats.
3. Galley Kitchen
Create a functional galley kitchen area equipped with essential amenities for meal preparation. Install a countertop with a built-in sink and a portable stove or compact cooktop. Incorporate storage for cookware, utensils, and provisions, ensuring easy access to kitchen essentials while maximizing space efficiency.
4. Lighting and Electrical Features
Illuminate the interior of your teardrop trailer with strategically placed LED lights or battery-powered lamps. Consider installing a power source, such as a deep-cycle battery or solar panels, to provide electricity for lighting, charging devices, and powering small appliances. Plan the placement of electrical outlets and switches for convenience and accessibility.
5. Climate Control
Ensure comfort during varying weather conditions by incorporating climate control features. Consider installing a vent fan or small air conditioning unit to regulate airflow and temperature within the trailer. Additionally, include insulation in the walls and ceiling to provide thermal comfort and soundproofing.
6. Interior Finishes
Personalize the interior of your teardrop trailer with finishes that reflect your style and create a welcoming atmosphere. Choose durable and easy-to-clean materials for wall coverings, flooring, and upholstery. Consider adding decorative elements, such as curtains, rugs, and cushions, to infuse personality into the space.
7. Entertainment and Connectivity
Enhance the camping experience by incorporating entertainment and connectivity features. Install a sound system, portable speakers, or a multimedia setup for music and movie nights. Consider adding USB charging ports and connectivity options for electronic devices to stay connected while off the grid.
By carefully considering and implementing these interior features, you can transform your DIY teardrop trailer into a comfortable and well-equipped home away from home. The thoughtful design and integration of interior amenities will elevate your camping experiences and create lasting memories in your custom-built teardrop trailer.
Wiring and Electrical Work
When it comes to the wiring and electrical work in your DIY teardrop trailer, attention to detail and safety are paramount. Here's a comprehensive guide to help you navigate the process of wiring and electrical installation:
-
Electrical System Design: Begin by designing the electrical system layout, considering the power requirements for lighting, appliances, charging devices, and any other electrical components. Plan the placement of the battery, fuse box, and electrical panel, ensuring accessibility and protection from the elements.
-
Power Source Selection: Choose a suitable power source for your teardrop trailer, such as a deep-cycle battery or solar panels. Assess the power demands of your electrical components to determine the appropriate capacity and type of power source. Consider the longevity and recharging options for the selected power supply.
-
Wiring and Connections: Select high-quality wiring and connectors for the electrical system, ensuring proper gauge and insulation for the anticipated loads. Route the wiring neatly and securely, avoiding potential pinch points and abrasion. Use appropriate connectors and terminals for reliable electrical connections.
-
Lighting Installation: Install LED lights or other low-power consuming lighting fixtures in designated areas of the trailer, such as the sleeping area, kitchen, and living space. Ensure that the lighting layout provides adequate illumination while minimizing power consumption. Consider dimmer switches or multi-level lighting for versatility.
-
Switches and Controls: Position switches and controls for lighting, fans, and other electrical devices in convenient and accessible locations within the trailer. Incorporate weather-resistant switches and protective covers for outdoor applications. Test the functionality of switches and controls to ensure proper operation.
-
Charging and Power Outlets: Install USB charging ports and 12-volt power outlets for charging electronic devices and powering small appliances. Consider the placement of outlets near sleeping areas and the kitchen for added convenience. Ensure that the outlets are securely mounted and properly wired.
-
Safety Measures: Implement safety measures such as circuit protection devices, including fuses and circuit breakers, to prevent electrical overloads and short circuits. Use ground fault circuit interrupters (GFCIs) in areas where water or moisture may be present, such as the kitchen and bathroom.
-
Weatherproofing and Enclosures: Protect the electrical components and connections from moisture and environmental exposure by using weatherproof enclosures and sealants. Seal entry points for wiring with grommets and cable glands to prevent water intrusion. Consider the use of marine-grade or outdoor-rated electrical components for added durability.
-
Testing and Inspection: Thoroughly test the entire electrical system, including wiring, connections, and devices, to ensure proper functionality and safety. Use a multimeter to check voltage, continuity, and insulation resistance. Consider having a qualified electrician inspect the electrical work to verify compliance with safety standards.
By following these steps and adhering to electrical codes and best practices, you can establish a reliable and safe electrical system in your DIY teardrop trailer. The well-executed wiring and electrical work will provide the necessary power and functionality for a comfortable and enjoyable camping experience.
Finishing Touches and Final Assembly
As you approach the final stages of building your DIY teardrop trailer, it's time to focus on the finishing touches and the exciting process of final assembly. This phase involves adding the last details that will enhance the functionality, aesthetics, and overall appeal of your custom-built trailer. Here's a detailed guide to help you complete the finishing touches and bring all components together for the final assembly:
-
Exterior Detailing: Pay attention to the exterior details that will elevate the visual appeal of your teardrop trailer. Consider adding decorative trim, pinstriping, or custom decals to personalize the exterior. Additionally, apply a protective coating or sealant to the exterior surfaces to safeguard the trailer against the elements and enhance its longevity.
-
Awnings and Exterior Accessories: If desired, install awnings or exterior accessories that expand the functionality of your teardrop trailer. Awnings provide shade and protection from the elements, creating an outdoor living space. Additionally, consider adding exterior lighting, bike racks, or other accessories that align with your camping needs.
-
Final Sealing and Weatherproofing: Conduct a thorough inspection of the trailer's exterior and interior to identify any areas that require additional sealing or weatherproofing. Address any potential areas of water intrusion or air leaks by applying sealants, gaskets, or weather-stripping as needed. Ensure that all exterior penetrations are properly sealed to prevent moisture ingress.
-
Interior Detailing and Decor: Focus on interior detailing to create a welcoming and comfortable living space within the trailer. Add decorative elements such as curtains, throw pillows, and wall art to infuse personality and warmth into the interior. Consider coordinating colors and textures to create a cohesive and inviting atmosphere.
-
Final Assembly of Components: Bring together all the components of the teardrop trailer, including the trailer frame, shell, doors, windows, and interior features. Ensure that each component is securely fastened and aligned according to the design specifications. Double-check the attachment points and connections to guarantee structural integrity and stability.
-
Functional Testing: Before hitting the road, conduct comprehensive functional testing of all systems and components within the trailer. Test the lighting, electrical outlets, appliances, and any installed amenities to ensure proper operation. Verify that doors and windows open and close smoothly, and that all interior features are fully functional.
-
Safety and Compliance Checks: Prior to finalizing the assembly, perform safety checks to confirm that the trailer meets regulatory standards and safety requirements. Check the trailer's towing connections, lighting, and braking systems to ensure compliance with road safety regulations. Additionally, verify that the trailer's weight distribution and load capacity align with safety guidelines.
-
Customization and Personalization: Take the opportunity to add any final customizations or personal touches that will make the teardrop trailer uniquely yours. Whether it's adding a nameplate, installing custom cabinetry, or incorporating special features, this is the time to infuse your trailer with elements that reflect your individual style and preferences.
By meticulously attending to the finishing touches and orchestrating the final assembly with precision and care, you'll bring your DIY teardrop trailer project to its culmination. The completion of the finishing touches and final assembly marks the realization of your vision, transforming a collection of components into a fully functional and personalized teardrop trailer ready for unforgettable outdoor adventures.
Conclusion
In conclusion, the journey of building your own DIY teardrop trailer is a rewarding and fulfilling endeavor that culminates in the creation of a personalized and functional camping companion. From the initial selection of the trailer frame to the meticulous detailing of the interior and exterior, every step in the process contributes to the realization of a custom-built teardrop trailer tailored to your specific needs and preferences.
As you reflect on the comprehensive guide provided, it's evident that the construction of a teardrop trailer requires careful planning, attention to detail, and a creative vision. The integration of essential features, the execution of wiring and electrical work, and the final touches and assembly all play a crucial role in bringing your DIY project to fruition.
With the completion of the finishing touches and final assembly, your teardrop trailer stands as a testament to your craftsmanship and dedication. It represents not only a functional camping shelter but also a reflection of your individuality and passion for outdoor exploration.
As you embark on future adventures with your custom-built teardrop trailer, may it serve as a source of joy, comfort, and lasting memories. Whether it's a weekend getaway or an extended road trip, your DIY creation is poised to accompany you on countless journeys, providing a cozy retreat amidst the beauty of nature.
In the end, the DIY teardrop trailer building experience is not just about constructing a camper; it's about embracing the spirit of adventure, craftsmanship, and self-expression. The completion of your teardrop trailer marks the beginning of a new chapter filled with exploration, relaxation, and the freedom to roam with a home that's uniquely yours.