
Home>Create & Decorate>DIY & Crafts>DIY Shutters: Transform Your Windows With These Easy Steps
DIY & Crafts
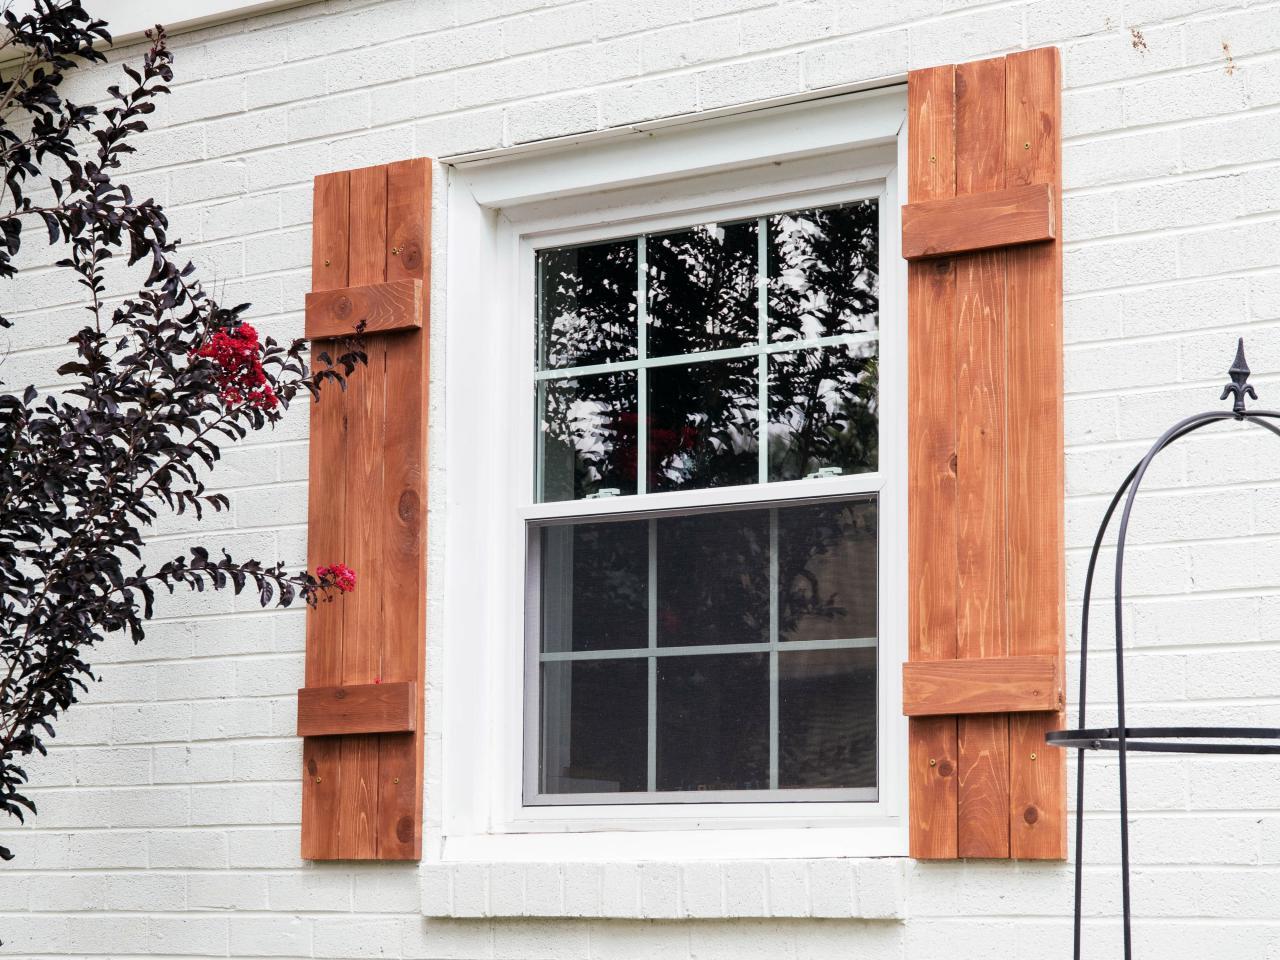
DIY Shutters: Transform Your Windows With These Easy Steps
Published: June 9, 2024

Senior Editor in Create & Decorate, Kathryn combines traditional craftsmanship with contemporary trends. Her background in textile design and commitment to sustainable crafts inspire both content and community.
Transform your windows with these easy DIY shutter steps. Enhance your home with our DIY & Crafts project guide.
(Many of the links in this article redirect to a specific reviewed product. Your purchase of these products through affiliate links helps to generate commission for Twigandthistle.com, at no extra cost. Learn more)
Introduction
Are you looking to give your home a fresh new look? DIY shutters are a fantastic way to transform your windows and add a touch of charm to your home. With just a few simple materials and some basic tools, you can create custom shutters that perfectly complement your home's style. In this guide, we'll walk you through the step-by-step process of building and installing your own shutters, so you can enjoy the satisfaction of a job well done and the beauty of your newly enhanced windows. Let's get started!
Materials Needed
To get started on your DIY shutter project, you'll need a few essential materials. Here's a list of what you'll require:
- Wood: Choose a sturdy and weather-resistant wood such as cedar, pine, or redwood for your shutters.
- Screws and Nails: Make sure to have the appropriate screws and nails for assembling the shutters.
- Hinges: Select durable hinges that can withstand outdoor conditions if you're installing exterior shutters.
- Drill and Drill Bits: A drill will be necessary for making holes and driving screws.
- Saw: Depending on your preference, you can use a circular saw, miter saw, or table saw for cutting the wood to size.
- Measuring Tape and Square: Accurate measurements are crucial, so ensure you have these tools on hand.
- Sandpaper: Smooth out any rough edges and surfaces with sandpaper.
- Paint or Stain: Choose a high-quality paint or stain to finish your shutters and protect them from the elements.
- Paintbrushes or Stain Applicators: Use these to apply the paint or stain evenly.
Gather these materials before you begin, and you'll be well-prepared to tackle the DIY shutter project.
Measuring and Planning
Before diving into the construction of your DIY shutters, it's crucial to take accurate measurements and plan out the design. Here's a step-by-step guide to help you through this phase:
-
Measure Your Windows: Using a measuring tape, carefully measure the height and width of each window where you plan to install the shutters. Double-check your measurements to ensure accuracy.
-
Determine the Style: Decide on the style of shutters you want. Whether you prefer traditional louvered shutters, board and batten, or another design, this is the time to make that decision.
-
Plan the Layout: Sketch out a rough design of your shutters, considering the number of panels and the overall look you want to achieve. This will help you visualize the end result and guide you during the construction phase.
-
Consider the Mounting: Determine whether you want your shutters to be mounted on the outside or inside of the window frame. This will impact the measurements and the way the shutters are constructed.
-
Account for Clearances: If you're installing exterior shutters, ensure there's enough clearance between the shutters and any surrounding trim or siding. This prevents any interference when opening or closing the shutters.
By carefully measuring and planning the design of your shutters, you'll set the stage for a successful DIY project and ensure that the end result fits your windows perfectly.
Cutting and Sanding
Once you have your measurements and design plan in place, it's time to move on to the cutting and sanding phase of your DIY shutter project. Follow these steps to ensure your shutters are precisely cut and have a smooth, professional finish:
-
Cut the Wood: Using a saw of your choice, carefully cut the wood according to the measurements you've taken. Whether you're creating individual slats for louvered shutters or larger panels for a different style, accuracy is key. Take your time to make clean, straight cuts for a polished final look.
-
Sand the Edges and Surfaces: After cutting the wood, use sandpaper to smooth out any rough edges and surfaces. Pay special attention to the corners and edges to ensure they are free of splinters and rough spots. This step is essential for both the appearance and safety of your shutters.
-
Create Decorative Details (Optional): If you're adding any decorative details, such as beveled edges or routed designs, this is the stage to do so. Use the appropriate tools and techniques to achieve the desired look, keeping in mind the overall style of your shutters.
-
Check for Proper Fit: Once the cutting and sanding are complete, hold the pieces up to your windows to ensure they fit as intended. Making any necessary adjustments at this stage will save you time and effort later in the process.
By carefully cutting and sanding your wood, you'll be one step closer to having beautifully crafted shutters that are ready for the next phase of assembly and finishing.
Assembling the Shutters
With the individual components of your shutters prepared, it's time to assemble them into the final, functional pieces. Follow these steps to ensure a smooth and successful assembly process:
-
Lay Out the Pieces: Begin by laying out all the cut pieces of your shutters in the order they will be assembled. This will give you a clear visual guide and help prevent any confusion during the assembly process.
-
Attach the Slats or Panels: If you're creating louvered shutters, start by attaching the slats to the frame. Use a square to ensure the slats are aligned perfectly, and then secure them in place using screws or nails. For panel-style shutters, attach the panels to the frame in the same manner.
-
Add Cross Braces (If Needed): Depending on the size and design of your shutters, you may need to add cross braces for additional support. Measure and cut the cross braces to fit between the slats or panels, then attach them securely to the frame.
-
Install Hinges: If your shutters are designed to open and close, it's time to install the hinges. Position the hinges on the back of the shutters, ensuring they are evenly spaced and aligned with the window frame. Secure the hinges in place with screws, taking care to keep them straight and level.
-
Test the Movement: Once the hinges are installed, test the movement of the shutters to ensure they open and close smoothly. Make any necessary adjustments to the hinges or hardware to guarantee proper functionality.
-
Reinforce the Joints: To ensure the longevity of your shutters, reinforce the joints with additional screws or nails as needed. This will provide extra stability and durability, especially for shutters installed in outdoor environments.
By following these steps, you'll be able to assemble your DIY shutters with confidence, knowing that they are well-constructed and ready for the finishing touches.
Painting or Staining
Once your shutters are assembled, it's time to add the finishing touch with a coat of paint or stain. This step not only enhances the visual appeal of your shutters but also provides crucial protection against the elements. Here's how to approach the painting or staining process:
-
Prepare the Surface: Before applying any paint or stain, ensure that the surface of the shutters is clean and free of dust or debris. Wipe down the wood with a damp cloth and allow it to dry completely before proceeding.
-
Choose Your Finish: Decide whether you want to paint your shutters for a vibrant, colorful look or stain them to highlight the natural beauty of the wood. Consider the overall aesthetic of your home and the desired level of maintenance when making this decision.
-
Apply Primer (If Painting): If you opt for paint, applying a primer beforehand can help the paint adhere better and provide a more even finish. Use a high-quality primer suitable for the type of paint you'll be using.
-
Select the Right Paint or Stain: Choose a paint or stain specifically formulated for exterior use, as it will offer better protection against sunlight, moisture, and temperature changes. Look for products with UV resistance and weatherproof properties.
-
Apply Even Coats: Whether painting or staining, apply the finish in thin, even coats using a paintbrush or stain applicator. Ensure complete coverage while avoiding drips or pooling of the finish.
-
Allow for Drying Time: After each coat, allow the paint or stain to dry according to the manufacturer's instructions. This may involve waiting for a specific amount of time before applying additional coats.
-
Consider Additional Protection: For added durability, consider applying a clear sealant over the paint or stain. This extra layer of protection can help prolong the life of your shutters, especially in harsh weather conditions.
By carefully painting or staining your shutters, you'll not only enhance their appearance but also safeguard them against the elements, ensuring that they remain a beautiful and functional addition to your home for years to come.
Installing the Shutters
Now that your DIY shutters are fully assembled and finished, it's time to proceed with the installation process. Follow these steps to ensure a successful and secure installation of your custom shutters:
-
Gather Necessary Tools: Before beginning the installation, gather the tools you'll need, including a drill, screws, screwdriver, and a level. Having these tools on hand will make the installation process smoother and more efficient.
-
Position the Shutters: Hold the shutters up to the window to determine the placement and ensure they align properly. Use a level to check that the shutters are straight and plumb before proceeding with the installation.
-
Mark the Screw Holes: Once you've positioned the shutters correctly, use a pencil to mark the locations for the screw holes on the window frame. This will serve as a guide for where to drill the pilot holes for the screws.
-
Drill Pilot Holes: Using a drill bit that is slightly smaller than the screws you'll be using, carefully drill pilot holes at the marked locations. Pilot holes help prevent the wood from splitting when the screws are inserted.
-
Attach the Shutters: With the pilot holes in place, hold the shutters back up to the window and align them with the drilled holes. Secure the shutters to the window frame using the appropriate screws, ensuring they are tightly fastened.
-
Test the Movement: After attaching the shutters, test their movement to ensure they open and close smoothly. Check that they are aligned with the window frame and operate as intended.
-
Add Additional Support (If Needed): Depending on the size and weight of the shutters, you may need to add additional support, such as L-brackets or support arms, to ensure they remain stable and secure when open.
-
Repeat for Multiple Shutters: If you're installing multiple sets of shutters, repeat the above steps for each window, ensuring that they are all positioned and secured correctly.
By following these steps, you can confidently install your DIY shutters, knowing that they are securely in place and ready to enhance the aesthetic appeal and functionality of your home's windows.
Conclusion
Congratulations on completing your DIY shutter project! By following the step-by-step process outlined in this guide, you've successfully transformed your windows with custom-built shutters that reflect your personal style and enhance the overall look of your home. Whether you opted for traditional louvered shutters, charming board and batten designs, or any other style, your efforts have undoubtedly added a touch of character and elegance to your living space.
As you admire your newly installed shutters, take pride in the fact that you've not only achieved a visually appealing upgrade but also gained valuable DIY skills and experience. The satisfaction of creating something with your own hands and seeing the tangible results is truly rewarding. Additionally, the cost-effectiveness of DIY shutters compared to purchasing pre-made ones further adds to the sense of accomplishment.
With your newly acquired knowledge and skills, you may even feel inspired to take on more DIY home improvement projects in the future. Whether it's building furniture, tackling outdoor landscaping, or exploring other creative endeavors, the possibilities are endless. Embrace the confidence and creativity that come with DIY projects, and continue to infuse your living space with your unique vision and craftsmanship.
As you enjoy the beauty and functionality of your DIY shutters, remember that maintenance is key to preserving their appeal and durability. Regularly inspect and clean your shutters, and address any signs of wear or damage promptly to ensure they continue to enhance your home for years to come.
Thank you for embarking on this DIY journey with us. We hope this guide has empowered you to take on future projects with enthusiasm and confidence. Here's to the joy of DIY and the endless possibilities it brings to your home and beyond!