
Home>Create & Decorate>DIY & Crafts>DIY Quail Cage: Step-by-Step Guide To Building Your Own
DIY & Crafts
DIY Quail Cage: Step-by-Step Guide To Building Your Own
Published: June 2, 2024

Content Creator specializing in woodworking and interior transformations. Caegan's guides motivate readers to undertake their own projects, while his custom furniture adds a personal touch.
Discover how to build your own DIY quail cage with our step-by-step guide. Perfect for DIY & Crafts enthusiasts looking for a fun and practical project. Start building today!
(Many of the links in this article redirect to a specific reviewed product. Your purchase of these products through affiliate links helps to generate commission for Twigandthistle.com, at no extra cost. Learn more)
Introduction
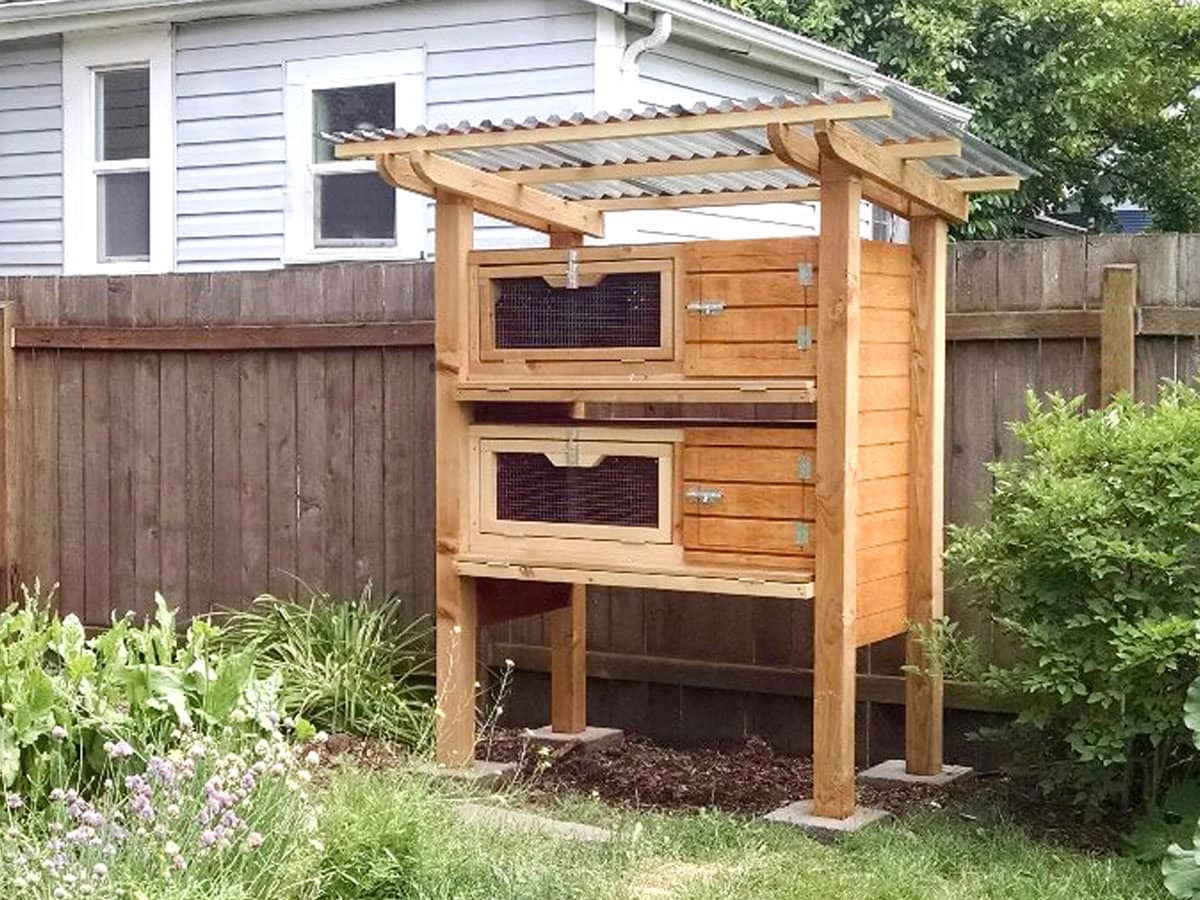
Are you considering raising quails and in need of a suitable habitat for them? Building your own quail cage can be a rewarding and cost-effective solution. Not only does it allow you to customize the cage to suit your specific needs, but it also provides a sense of accomplishment. In this guide, we will walk you through the step-by-step process of constructing a quail cage, from gathering the necessary materials to adding the final touches. Whether you're a seasoned DIY enthusiast or a beginner looking for a new project, this guide will equip you with the knowledge and confidence to create a comfortable and secure home for your quails.
Materials Needed
To get started on your DIY quail cage project, you'll need to gather the following materials:
- Wood: For the frame of the cage, you'll need sturdy and untreated wood. Consider using 2x4s or similar lumber for the main structure.
- Wire Mesh: Opt for a durable wire mesh with small gaps to prevent the quails from escaping and to protect them from predators.
- Screws and Nails: Ensure you have a variety of screws and nails in different sizes to secure the components of the cage.
- Hinges and Latches: These will be essential for creating doors and access points within the cage.
- Roofing Material: Depending on your preference, you can use corrugated metal, plywood, or another suitable material for the cage's roof.
- Nesting Boxes and Perches: If you plan to incorporate nesting boxes and perches into the cage, gather the necessary materials for constructing these features.
- Tools: Don't forget essential tools such as a saw, drill, wire cutters, and a staple gun to aid in the construction process.
By ensuring you have all the required materials on hand, you can streamline the building process and minimize interruptions.
Planning Your Quail Cage
Before diving into the construction of your quail cage, it's crucial to invest time in meticulous planning. Consider the following factors to ensure the cage meets the specific needs of your quails:
-
Size and Space: Determine the number of quails you plan to house in the cage and calculate the space required for each bird. Quails need ample room to move around and exhibit natural behaviors, so ensure the cage dimensions accommodate their needs.
-
Location: Choose a suitable location for the quail cage, considering factors such as sunlight exposure, protection from harsh weather conditions, and proximity to a water source. Additionally, ensure the ground is level to facilitate stable installation.
-
Ventilation and Protection: Plan for adequate ventilation within the cage to maintain air circulation. Simultaneously, consider how to protect the quails from predators by incorporating sturdy wire mesh and secure doors.
-
Accessibility: Strategically plan the placement of doors and access points to facilitate easy cleaning, feeding, and monitoring of the quails. Accessibility is key to ensuring the maintenance of the cage is convenient.
By carefully considering these aspects during the planning phase, you can tailor the quail cage to suit the specific needs of your quails and streamline the construction process.
Building the Frame
The first step in constructing your DIY quail cage is to build the frame, which serves as the foundation for the entire structure. Follow these steps to create a sturdy and reliable frame for your quail habitat:
-
Cutting the Wood: Begin by measuring and cutting the wood to the desired dimensions for the frame. Use a saw to ensure precise cuts, and remember to account for the height, width, and depth of the cage.
-
Assembling the Sides: Once the wood pieces are cut, assemble them to form the sides of the frame. Use screws and nails to securely join the pieces together, ensuring that the corners are square and the structure is stable.
-
Adding Support Beams: To reinforce the frame, add support beams across the top and bottom sections. These beams will provide additional stability and prevent the frame from warping over time.
-
Creating the Base: If your quail cage will be placed directly on the ground, construct a solid base for the frame using treated lumber or a suitable foundation material. This will help protect the cage from moisture and provide a level surface for the quails.
-
Elevated Cage Option: If you prefer an elevated cage, build a sturdy stand or legs to support the frame. Ensure the legs are securely attached and can bear the weight of the entire cage.
By carefully constructing the frame, you establish a solid structure for the quail cage, setting the stage for the addition of wire mesh, roofing, and other essential components. Pay close attention to the details during this phase to ensure the overall stability and durability of the cage.
Adding the Wire Mesh
Once the frame of the quail cage is in place, the next crucial step is to add the wire mesh to enclose the structure and provide a secure environment for the quails. Follow these steps to effectively incorporate the wire mesh into your DIY quail cage:
-
Measuring and Cutting: Begin by measuring the dimensions of each side of the frame where the wire mesh will be installed. Use wire cutters to cut the mesh to the appropriate sizes, ensuring a precise fit for each section of the cage.
-
Securing the Mesh: With the cut mesh pieces ready, carefully attach them to the frame using a staple gun or suitable fasteners. Start at one corner of the frame and work your way around, pulling the mesh taut as you secure it in place. Ensure that the mesh is securely fastened to prevent any gaps or loose sections that could compromise the safety of the quails.
-
Reinforcing Weak Points: Pay close attention to areas where multiple pieces of mesh meet or overlap. Use additional fasteners to reinforce these weak points and prevent any potential hazards such as sharp edges or protruding wires.
-
Door and Access Openings: If your quail cage includes doors or access points, carefully cut and secure the wire mesh around these areas. Ensure that the doors can open and close smoothly without compromising the integrity of the mesh.
-
Inspecting for Safety: Once the wire mesh is in place, thoroughly inspect the entire cage to ensure there are no sharp edges, loose wires, or gaps that could pose a danger to the quails. Address any potential safety concerns before proceeding to the next phase of construction.
By meticulously adding the wire mesh to the frame, you create a secure and predator-resistant enclosure for your quails, allowing them to thrive in a safe environment. The proper installation of the wire mesh is essential for the overall functionality and safety of the quail cage.
Installing the Roof
With the frame and wire mesh in place, the next critical step in constructing your DIY quail cage is installing the roof. The roof serves as protection against the elements and provides a sheltered environment for the quails. Follow these steps to effectively install the roof on your quail cage:
-
Selecting the Roofing Material: Choose a suitable roofing material based on your specific needs and the prevailing weather conditions in your area. Options include corrugated metal, plywood, or a durable plastic material. Ensure the chosen material is lightweight yet sturdy enough to withstand outdoor conditions.
-
Measuring and Cutting: Measure the dimensions of the cage frame to determine the size of the roof panels needed. Use a saw or appropriate cutting tools to cut the roofing material to the required dimensions, ensuring precise and clean cuts.
-
Securing the Roof Panels: Once the roofing material is cut to size, carefully position the panels on top of the cage frame. Secure the panels in place using screws or nails, ensuring they are evenly spaced and firmly attached to the frame. Pay attention to overlapping sections to prevent water leakage.
-
Weatherproofing: To enhance the durability and weather resistance of the roof, consider applying a weatherproof sealant or coating to the surface of the panels. This additional layer of protection can help prevent water damage and prolong the lifespan of the roof.
-
Gutter Installation (Optional): If you anticipate significant rainfall in your area, consider installing gutters along the edges of the roof to channel water away from the cage. Proper drainage can help prevent water accumulation and maintain a dry environment for the quails.
-
Inspecting for Stability: Once the roof panels are installed, carefully inspect the entire structure to ensure the roof is stable and securely attached. Check for any potential gaps or weak points that may compromise the integrity of the roof.
By effectively installing the roof on your quail cage, you provide essential protection for the quails and create a sheltered space for them to thrive. The roof serves as a crucial component of the cage, offering insulation and shielding the quails from adverse weather conditions. Pay close attention to the installation process to ensure the roof is secure and weather-resistant, contributing to the overall functionality and comfort of the quail habitat.
Adding Doors and Access Points
Creating suitable doors and access points within the quail cage is essential for facilitating easy maintenance and providing the quails with a secure environment. Follow these steps to effectively add doors and access points to your DIY quail cage:
-
Strategic Placement: Determine the locations where doors and access points will be incorporated into the cage. Consider factors such as ease of access, cleaning convenience, and the quails' natural movement patterns within the enclosure.
-
Door Design: Decide on the design and size of the doors based on the specific needs of your quails and the dimensions of the cage. Ensure the doors are large enough to allow for easy entry and exit, as well as convenient cleaning and feeding.
-
Cutting Openings: Using precise measurements, carefully cut openings in the wire mesh to accommodate the installation of doors and access points. Take care to avoid sharp edges and ensure the openings are smooth and free from any protruding wires.
-
Installing Hinges and Latches: Attach hinges to one side of the door frame and the corresponding section of the cage to create a functional door. Ensure the hinges are securely fastened to provide smooth opening and closing movements. Additionally, install latches or locks to secure the doors and prevent unauthorized access.
-
Access Point Considerations: If your quail cage requires additional access points for feeding, watering, or egg collection, carefully cut and secure openings in the appropriate locations. Consider incorporating hinged covers or flaps to protect these access points from the elements and prevent the quails from escaping.
-
Door Material: Construct the doors using the same wire mesh used for the rest of the cage to maintain consistency and ensure adequate ventilation. Alternatively, consider using a lightweight and durable material that provides visibility into the cage while offering security and protection.
-
Smooth Operation: Test the functionality of the doors and access points to ensure they open and close smoothly without any obstructions. Verify that the latches or locks are secure and functioning correctly to prevent any potential escapes or intrusions.
By thoughtfully adding doors and access points to the quail cage, you create a user-friendly environment for maintaining and interacting with the quails. The strategic placement and design of these openings contribute to the overall functionality and accessibility of the cage, ensuring that caring for the quails is a convenient and enjoyable experience.
Adding Perches and Nesting Boxes
Creating a comfortable and functional living space for your quails involves incorporating perches and nesting boxes into the cage. These features provide essential elements for the quails' well-being and natural behaviors. Follow these steps to effectively add perches and nesting boxes to your DIY quail cage:
-
Perch Placement: Determine the optimal locations within the cage to install perches. Quails enjoy perching off the ground, so consider placing the perches at varying heights to accommodate the birds' preferences. Ensure that the perches are securely attached to the frame to prevent instability.
-
Perch Material: Select suitable materials for the perches, such as untreated wooden dowels or branches. Avoid using materials with toxic coatings or rough surfaces that could harm the quails' feet. Cut the perches to the desired lengths and smooth the edges to create comfortable resting spots for the quails.
-
Securing the Perches: Attach the perches to the interior of the cage, ensuring they are firmly anchored and capable of supporting the weight of the quails. Consider using screws or brackets to secure the perches in place, allowing for easy removal and cleaning when necessary.
-
Nesting Box Design: Determine the size and design of the nesting boxes based on the number of quails and the available space within the cage. The nesting boxes should provide a secluded and comfortable area for the quails to lay eggs and brood.
-
Nesting Material: Line the nesting boxes with suitable nesting material, such as straw or wood shavings, to create a cozy environment for the quails to lay and incubate their eggs. Ensure the nesting material is clean, dry, and regularly replaced to maintain optimal hygiene.
-
Installing the Nesting Boxes: Position the nesting boxes in a quiet and secluded area of the cage to provide the quails with privacy and security. Secure the nesting boxes to the frame or structure of the cage, ensuring they are stable and resistant to movement.
-
Accessibility and Maintenance: Consider incorporating hinged or removable panels on the nesting boxes to allow for easy access when collecting eggs or cleaning the boxes. Accessibility is essential for maintaining the nesting boxes and ensuring the quails' reproductive needs are met.
By thoughtfully adding perches and nesting boxes to the quail cage, you create a habitat that supports the natural behaviors and reproductive activities of the quails. These features contribute to the overall well-being and contentment of the quails, providing them with essential elements for a fulfilling and comfortable living environment.
Final Touches and Considerations
As you near the completion of your DIY quail cage, it's essential to address final touches and consider additional factors that contribute to the functionality and overall success of the project. Paying attention to these details can enhance the comfort, safety, and longevity of the quail habitat. Here are some final touches and considerations to keep in mind:
-
Smooth Edges and Surfaces: Before introducing the quails to their new home, thoroughly inspect the entire cage for any sharp edges, protruding nails, or rough surfaces that could potentially harm the birds. Use a file or sandpaper to smooth out any rough areas and ensure the interior of the cage is safe and comfortable for the quails.
-
Weather Protection: If your quail cage will be exposed to outdoor elements, consider adding additional weather protection measures. This may include applying a non-toxic sealant to the wooden components to prevent moisture damage, or providing shade to shield the cage from direct sunlight during hot periods.
-
Predator Prevention: Evaluate the cage's security against potential predators such as raccoons, snakes, or birds of prey. Ensure that the wire mesh is securely fastened and that there are no gaps or weak points that could compromise the quails' safety. Additionally, consider reinforcing the base of the cage to prevent burrowing intruders.
-
Hygiene and Cleaning: Plan for regular cleaning and maintenance of the quail cage. Design the layout and features of the cage to facilitate easy cleaning, such as removable trays or access points for removing waste. Establish a cleaning routine to ensure the cage remains sanitary and conducive to the quails' health.
-
Environmental Enrichment: Consider incorporating elements that provide environmental enrichment for the quails, such as hanging toys or natural perches. These additions can promote mental stimulation and physical activity, contributing to the overall well-being of the quails.
-
Monitoring and Observation: Set up the quail cage in a location that allows for easy monitoring and observation of the birds. Consider installing a small camera or positioning the cage near a window to facilitate regular checks on the quails' behavior and well-being.
-
Compliance with Local Regulations: Before finalizing the construction of the quail cage, familiarize yourself with any local regulations or ordinances pertaining to the keeping of quails. Ensure that your DIY project aligns with any relevant guidelines to avoid potential issues in the future.
By addressing these final touches and considerations, you can ensure that your DIY quail cage provides a safe, comfortable, and enriching environment for the quails. Taking the time to attend to these details contributes to the success of the project and the well-being of the quails in their new habitat.
Conclusion
In conclusion, constructing your own DIY quail cage can be a fulfilling and rewarding endeavor, allowing you to create a tailored habitat for your quails while honing your DIY skills. By following the step-by-step guide outlined in this article, you have gained the knowledge and confidence to build a secure, comfortable, and functional home for your quails. From gathering the necessary materials to adding the final touches, each stage of the construction process contributes to the overall success of the project.
As you complete the construction of the quail cage, it's important to prioritize the safety, well-being, and environmental enrichment of the quails. By carefully planning the layout, incorporating essential features such as perches and nesting boxes, and addressing factors such as weather protection and predator prevention, you have created a habitat that meets the specific needs of your quails.
Moving forward, regular monitoring, maintenance, and adherence to local regulations will contribute to the long-term success of your quail habitat. By providing a clean, safe, and stimulating environment for the quails, you can ensure their health and contentment as they thrive in their new home.
Ultimately, the DIY quail cage you have constructed reflects your dedication to providing the best possible care for your quails. Whether you are a seasoned DIY enthusiast or a beginner looking for a new project, the process of building a quail cage offers a sense of accomplishment and the satisfaction of creating a functional and personalized space for your feathered friends.