
Home>Create & Decorate>DIY & Crafts>DIY Hammock Stand: How To Build Your Own
DIY & Crafts
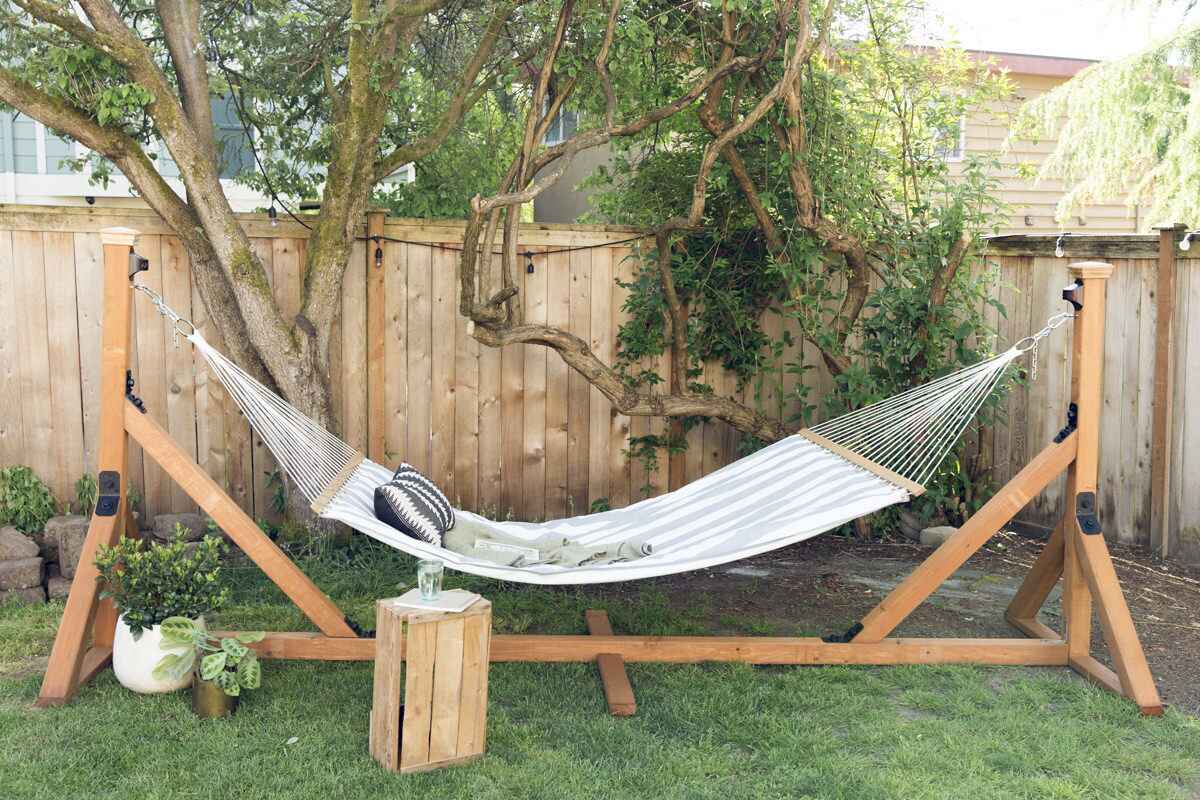
DIY Hammock Stand: How To Build Your Own
Published: June 13, 2024

Senior Editor in Create & Decorate, Kathryn combines traditional craftsmanship with contemporary trends. Her background in textile design and commitment to sustainable crafts inspire both content and community.
Learn how to build your own DIY hammock stand with our step-by-step guide. Perfect for DIY & Crafts enthusiasts looking for a fun and practical project. Start creating your own today!
(Many of the links in this article redirect to a specific reviewed product. Your purchase of these products through affiliate links helps to generate commission for Twigandthistle.com, at no extra cost. Learn more)
Introduction
Are you dreaming of lazy afternoons spent lounging in a hammock, but don't have the right trees to hang it from? Building your own DIY hammock stand might just be the perfect solution. Not only does it give you the freedom to set up your hammock wherever you like, but it also allows you to customize the stand to fit your specific needs and style. In this guide, we'll walk you through the steps to build your very own hammock stand, so you can start enjoying those relaxing moments in no time.
Materials Needed
To build your own DIY hammock stand, you'll need the following materials:
- Two 8-foot long 4×4 wooden posts: These will serve as the uprights of your hammock stand.
- Two 6-foot long 2×4 wooden boards: These will be used to create the base of the stand.
- Two 3-foot long 2×4 wooden boards: These will act as the crossbars to support the hammock.
- Galvanized screws: Make sure to have a variety of sizes to accommodate different parts of the stand.
- Drill and drill bits: You'll need these to create pilot holes and drive the screws into the wood.
- Measuring tape and pencil: Essential for marking and measuring the wood for accurate cuts.
- Level: This will help ensure that your stand is stable and balanced.
- Hammock: Don't forget the actual hammock that you plan to use with your stand!
- Stain or paint (optional): If you want to add a personal touch to your stand, you can choose to stain or paint the wood to match your outdoor decor.
Gathering these materials before you start will make the building process much smoother and more efficient.
Step 1: Choosing the Right Location
The first step in building your DIY hammock stand is to choose the perfect location for it. Here are some key factors to consider when selecting the right spot:
-
Space: Ensure that the area you choose has enough space to accommodate the full length of your hammock, including extra room for swaying. Measure the dimensions of your hammock and add a few extra feet on each end to allow for movement.
-
Level Ground: Look for a flat and level area to set up your hammock stand. Uneven ground can make the stand unstable and compromise safety. If the ground is not level, you may need to make adjustments or use shims to ensure stability.
-
Sun and Shade: Consider the amount of sun and shade in the area. While some people enjoy basking in the sun while lounging in a hammock, others prefer a shaded spot for relaxation. Choose a location that aligns with your preference for sun exposure.
-
Accessibility: Think about how easily accessible the location is from your home or main gathering area. You'll want a spot that is convenient to reach and enjoy, especially if you plan to spend a lot of time in your hammock.
-
Aesthetics: Lastly, consider the overall aesthetics of the location. You may want to position your hammock stand in a place that offers a pleasant view or complements your outdoor decor.
Once you've considered these factors, you'll be ready to move on to the next step of building your DIY hammock stand.
Step 2: Assembling the Base
Now that you've chosen the perfect location, it's time to move on to assembling the base of your DIY hammock stand. Follow these steps to create a sturdy foundation for your relaxing oasis:
-
Position the 6-foot long 2×4 boards: Lay the two 6-foot long 2×4 boards parallel to each other, ensuring that they are spaced apart to match the length of your hammock. These will serve as the base of your stand.
-
Secure the boards together: Using galvanized screws, attach the 3-foot long 2×4 boards perpendicular to the 6-foot boards at each end. This will create a rectangular base for the stand, providing stability and support.
-
Pre-drill pilot holes: Before driving in the screws, it's important to pre-drill pilot holes to prevent the wood from splitting. Use a drill bit that is slightly smaller than the diameter of the screws for this step.
-
Check for level: Use a level to ensure that the base is flat and even. Making adjustments at this stage will prevent any wobbling or instability once the stand is fully assembled.
-
Tighten the screws: Once the base is level, securely tighten the screws to hold the base together. Be sure to use enough screws to provide strong reinforcement for the stand.
By following these steps, you'll have a solid base for your hammock stand, setting the stage for the next phase of the construction process.
Step 3: Attaching the Uprights
With the base of your DIY hammock stand in place, it's time to move on to attaching the uprights. Follow these detailed steps to ensure a secure connection:
-
Position the 4×4 wooden posts: Stand the two 8-foot long 4×4 wooden posts upright at each end of the base. These will serve as the vertical supports for your hammock stand.
-
Align the posts: Ensure that the posts are positioned evenly and perpendicular to the base. This alignment is crucial for the stability and balance of the stand.
-
Secure the posts to the base: Using galvanized screws, attach the 4×4 posts to the base by driving screws through the bottom of the base into the ends of the posts. Make sure to use multiple screws for each post to create a strong connection.
-
Pre-drill pilot holes: As with previous steps, pre-drill pilot holes before driving in the screws to prevent the wood from splitting and to ensure a secure attachment.
-
Check for stability: Once the posts are attached, check the stability of the stand by gently rocking it back and forth. If there is any wobbling or instability, reinforce the connection points with additional screws.
-
Ensure vertical alignment: Use a level to confirm that the posts are perfectly vertical. Adjust the posts as needed to achieve a straight and plumb orientation.
By following these steps, you'll successfully attach the uprights to the base, creating a strong and stable foundation for your DIY hammock stand.
Step 4: Adding the Crossbar
Adding the crossbar is a crucial step in completing the construction of your DIY hammock stand. Follow these detailed steps to ensure a secure and supportive attachment:
-
Position the 3-foot long 2×4 boards: Lay the two 3-foot long 2×4 boards horizontally across the top of the upright posts, ensuring that they are evenly spaced and parallel to each other. These crossbars will provide the support for hanging your hammock.
-
Attach the crossbars to the uprights: Using galvanized screws, secure the crossbars to the upright posts by driving screws through the sides of the posts into the ends of the crossbars. Be sure to use multiple screws for each connection point to ensure a strong and stable attachment.
-
Pre-drill pilot holes: As with previous steps, pre-drill pilot holes before driving in the screws to prevent the wood from splitting and to ensure a secure connection.
-
Check for level and alignment: Use a level to confirm that the crossbars are horizontal and parallel to the base of the stand. Adjust the positioning of the crossbars as needed to achieve a level and balanced orientation.
-
Reinforce the connection: Once the crossbars are attached, check the stability of the stand by applying gentle pressure to the crossbars. If there is any movement or wobbling, reinforce the connection points with additional screws.
-
Test the weight-bearing capacity: Before hanging your hammock, test the weight-bearing capacity of the stand by applying downward pressure on the crossbars. This will ensure that the stand can safely support the weight of the hammock and the person using it.
By following these steps, you'll successfully add the crossbar to your DIY hammock stand, creating a secure and reliable support system for your hammock.
Step 5: Hanging the Hammock
Now that your DIY hammock stand is fully constructed, it's time to hang your hammock and enjoy the fruits of your labor. Follow these steps to securely attach your hammock to the stand:
-
Choose the Right Height: Decide on the height at which you want to hang your hammock. A good rule of thumb is to position the hammock so that the bottom is approximately 18 inches off the ground when it's empty. This allows for a comfortable sitting height and prevents the hammock from sagging too much when in use.
-
Attach the Hammock to the Crossbars: Depending on the type of hammock you have, you may need to use S-hooks, carabiners, or heavy-duty rope to attach the hammock to the crossbars. Ensure that the hammock is evenly positioned and securely fastened to prevent any accidents.
-
Test for Stability: Once the hammock is hung, carefully test it for stability by gently sitting or lying in the hammock. Check for any signs of strain or instability in the stand. If everything feels secure, you're ready to relax and enjoy your new DIY hammock stand.
-
Make Adjustments: If the hammock feels too loose or too tight, make the necessary adjustments to achieve the desired level of tautness. This may involve repositioning the attachment points or adjusting the tension of the hammock ropes or straps.
-
Add Personal Touches: Consider adding decorative elements or accessories to enhance the comfort and aesthetics of your hammock setup. This could include pillows, blankets, or even a canopy to provide shade on sunny days.
By following these steps, you'll be able to hang your hammock securely and enjoy the ultimate relaxation spot in your outdoor space. Now, all that's left to do is kick back, unwind, and savor the tranquility of your DIY hammock stand.
Conclusion
Congratulations! You've successfully built your very own DIY hammock stand. By following the steps outlined in this guide and putting in a bit of effort, you've created a versatile and convenient way to enjoy the comfort of a hammock without the need for trees. Whether you're looking to relax in your backyard, set up a cozy spot at the beach, or create a peaceful retreat at a campsite, your custom-built hammock stand provides the freedom to do so.
Now that your hammock stand is complete, it's time to kick back, unwind, and bask in the tranquility of your outdoor oasis. Whether you're enjoying a good book, soaking up the sunshine, or simply taking a well-deserved nap, your DIY hammock stand is sure to become a beloved feature of your outdoor living space. So, grab your favorite beverage, settle into your hammock, and let the gentle sway lull you into a state of pure relaxation. Cheers to your DIY success and many blissful moments in your hammock!